background image

18

19

V

iewing

 V

iewing from SD Card

Viewing from SD Card

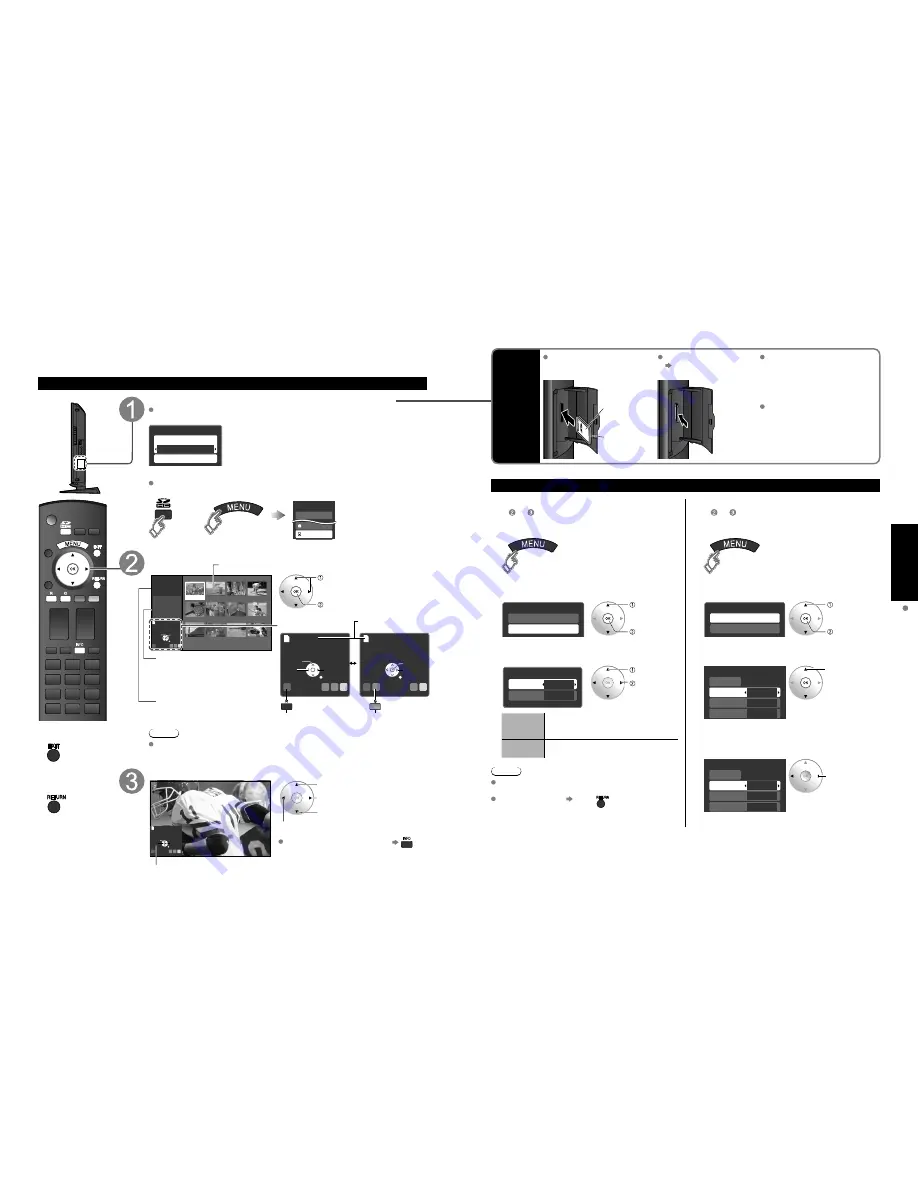
You can view photos taken with a digital camera or digital video camera and saved on an SD card.
(Media other than SD Cards may not be reproduced properly.)

Photo viewer


Press to exit from 
a menu screen


Press to return 
to the previous 
screen

Insert the SD card and select “Play SD card now”

 “SD card setting” will be displayed automatically each time a SD card is inserted 

for the first time.

SD card setting

Play SD card automatically

Play SD card now

On

Play SD card automatically:


  Set it to playback the data when SD card is inserted. 

On:


  When SD card is inserted the data plays automatically from 

next time. 

Off:


   The data can be played manually.

Press the SD key or select “SD card” on the Menu.

 You can skip this step when “Play SD card now” is selected or “On” is set in “Play 

SD card automatically” setting.

Menu

VIERA Link

Lock

SD card

or


Select the data to be viewed

Note

 Depending on the JPEG format, “Information” contents may not be displayed 

correctly. Refer to p. 41 (Data format for SD card browsing) for details.

View

Slide show

R

Y

G B

Next

Rotate

Prev.

RETURN

Displays one at a time

Navigation area

Rotate 90 degrees (counter-clockwise)

To next photo

Rotate 90 degrees (clockwise)

To previous photo

 To display/hide Navigation area   


Slide show

R

Y

G B

OK

Select

Accessing

RETURN

No.

Pana0365

Date

 01/01/2008

Pixel

1600x1200

Photo viewer

Total
Information

12

Pana0365

Pana0366

Pana0367

Pana0368

Pana0369

Pana0370

Pana0371

Pana0372

Pana0373

Pana0374

Pana0375

Pana0376

Accessing

Slide show

R

Y

G B

Next

Prev.

Rotate

RETURN

Accessing

Single

R

Y

G

B

Pause

Next

Prev.

RETURN

 select

 view

Thumbnail view

Selected picture information is displayed.

No.

:    Image number or file name is  

displayed.

Date

:  Date of recording is displayed.

Pixel

:  Display resolution is displayed.

Total number of images

Navigation area

(to Slide show) 

Present status

(While reading the data)

(to Single photo display)

To change the view (slide show mode, adjusting images, etc.)

To setup slide show mode

 In  or 

1

Display “Photo menu”

2

Select “Setup slide show”

Photo menu

Picture

Setup slide show

 select

 “Setup 

slide 

show”

 ok

3

Select the item and adjust

Setup slide show

Disp. time

Repeat

5

On

 Select

 Adjust

Disp. time

You can set how many seconds each 

image is displayed in Slide show 

mode. (1-10/15/20/30/45/60/120 sec)

Repeat

Turn the slide show Repeat function 

On or Off.

Note

 For large image sizes, the display time will be longer 

than the number of seconds set.

 To stop in mid-cycle   Press 

To adjust picture

 In  or 

1

Display “Photo menu”

2

Select “Picture”

Photo menu

Picture

Setup slide show

 select

 “Picture”

 ok

3

Select the item

Picture menu (p. 22)

Picture

1/2

Picture mode

Picture

Reset

Vivid

0

Back light +20

select

4

Adjust or select

Picture

1/2

Picture mode

Picture

Reset

Vivid

0

Back light +20

Adjust
or
Select

SD

Card

 Insert the card

 Remove the card


  Press in lightly on SD 

Card, then release.

 Compliant card type 

(maximum capacity): SDHC 

Card (16 GB), SD Card (2 

GB), miniSD Card (1 GB) 

(requiring miniSD Card 

adapter)

 For cautions and details on SD 

Cards (p. 41)

Label surface

Push until a 

click is heard

Summary of Contents for Viera TC-37LZ85

Page 1: ...le ofrece la garant a Modelo N mero de serie Panasonic Consumer Electronics Company Division of Panasonic Corporation of North America One Panasonic Way Secaucus New Jersey 07094 U S A Panasonic Puert...

Page 2: ...se Menu Functions picture sound quality etc 22 VIERA LinkTM HDAVI ControlTM 26 Lock 30 Editing and Setting Channels 32 Closed Caption 34 Input Labels 35 Using Timer 36 Recommended AV Connections 37 Ra...

Page 3: ...tning flash with arrowhead within a triangle is intended to tell the user that parts inside the product are a risk of electric shock to persons The exclamation point within a triangle is intended to t...

Page 4: ...Preparation for Wall hanging Before mounting the TV on the wall you must remove the TV Stand from the TV Follow the steps below Accessories WARNING Failure to use a Panasonic bracket or choosing to mo...

Page 5: ...clude digital high definition television HDTV standard definition television SDTV data broadcasting multi channel surround sound audio and interactive television If no Cable Box Cable Box Cable You ne...

Page 6: ...of HDMI or Component Video cable Note For details of external equipment connections please refer to the operating manuals for the equipment Satellite Receiver DVD Recorder or VCR with TV tuner VHF UHF...

Page 7: ...language First time setup Language Auto program Clock next Language English Language English Espa ol Fran ais select Go back to previous screen Adjust the clock First time setup Auto program Language...

Page 8: ...not pressed after selecting Apply the channels will not be saved The channel will be saved when no operation is performed for 60 seconds and the Manual program menu will also exit automatically If yo...

Page 9: ...ress of SAP will change the audio mode Stereo SAP Mono Display the SUB MENU Press SUB MENU to show sub menu screen p 24 This menu consists of shortcuts to convenient functions SUB MENU Setup SUB MENU...

Page 10: ...Pana0369 Pana0370 Pana0371 Pana0372 Pana0373 Pana0374 Pana0375 Pana0376 Accessing Slide show R Y G B Next Prev Rotate RETURN Accessing Single R Y G B Pause Next Prev RETURN select view Thumbnail view...

Page 11: ...ipment connected to the TV you can watch videos and DVDs on the TV s screen Input Select You can select the external equipment to access To return to TV With the connected equipment turned On Display...

Page 12: ...k level Light HD size Selects between 95 Size 1 or 100 Size 2 for the scanning area with High definition signal Size 1 Size 2 Select Size 1 if noise is generated on the edges of the screen Size 1 Sele...

Page 13: ...e Not in use when setting Auto power on On Off Timer Lock or Digital channel No signal shut off was activated will be displayed for about 10 seconds when the TV is turned on for the first time after t...

Page 14: ...matic Input Switching At the start of the DIGA Player theater or RAM theater playback the TV s input automatically switches to the input based on the playback equipment For the RAM theater the speaker...

Page 15: ...ntrol Recorder select change VIERA Link Control only with the TV s remote control for HDAVI Control 2 or HDAVI Control 3 In the VIERA Link menu you can select HDMI connected equipment and access it qu...

Page 16: ...to Custom Select channel to lock Channel lock Mode Channel 1 Channel 2 Channel 3 Custom 3 4 Channel 4 select set To lock unlock all channels Select Mode and set to All or Off All Locks all channels O...

Page 17: ...elect Yes add or No skip Move cursor to channel number Edit Caption Favorite Add Apply Cancel Manual program 2 Yes 3 Yes Cannnel select Press OK to tune to the channel Select Apply Caption Favorite Ad...

Page 18: ...t size Font Text font Style Text style Raised Depressed etc Foreground Color of text Fore opacity Opacity of text Background Color of text box Back opacity Opacity of text box Outline Outline color of...

Page 19: ...cted amount of time Sleep Sleep 60 set 0 30 60 90 minutes To set Timer 1 5 On Off Timer Select the item and set Timer 1 Channel Day On time Off time Set EVR FRI 10 00 AM 11 00 AM On 310 1 select set o...

Page 20: ...te for children under 13 R RESTRICTED Under 17 requires accompanying parent or adult guardian NC 17 NO ONE 17 AND UNDER ADMITTED X ADULTS ONLY U S TV PROGRAMS RATINGS U S TV Age based Group Age based...

Page 21: ...4 4 4 2 2 or 4 2 0 Max number of files 9 999 Image resolution 160 x 120 to 10 000 000 DCF Design rule for camera file system A Japan Electronics and Information Technology Industries Association s st...

Page 22: ...al viewing on your display Picture mode Vivid Provides enhanced picture contrast and sharpness for viewing in a well lit room Standard Recommended for normal viewing conditions with subdued room light...

Page 23: ...ls read the manual of the recorder If there is a problem with your TV please refer to the table below to determine the symptoms then carry out the suggested check If this does not solve the problem pl...

Page 24: ...LTING FROM THE USE OF THIS PRODUCT OR ARISING OUT OF ANY BREACH OF THIS WARRANTY As examples this excludes damages for lost time cost of having someone remove or re install an installed unit if applic...

Page 25: ...oduct which has been improperly installed subjected to usage for which the product was not designed misused or abused damaged during shipping or which has been altered or repaired in any way that affe...

Reviews: