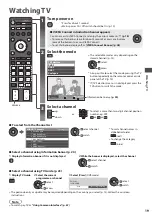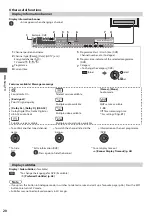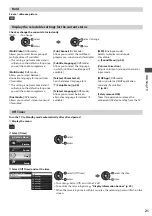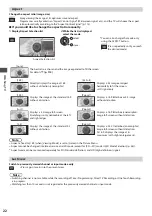
V
ie
wing 3D images
33
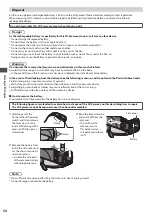
Attaching Ferrite Core
B
e
s
ur
e
to
atta
c
h
the
p
r
o
v
i
d
e
d f
e
rr
ite
c
o
r
e
to
the
c
ha
rg
in
g c
ab
l
e
to
r
e
duc
e
inte
rf
e
r
en
c
e
o
r
e
l
e
c
t
r
i
c
a
l
noise.
1
Attach the ferrite core as close to USB connector of
the charging cable as shown.
M
ini
U
S
B c
onne
c
to
r
U
S
B c
onne
c
to
r
2
Close the ferrite core until it clicks.
U
S
B c
onne
c
to
r
Charging the 3D Eyewear
Preparations
•
Set
[U
S
B C
ha
rg
e
in
Stan
d
b
y]
in
the
Set
u
p
m
en
u
to
[O
n
]
.
•
S
w
it
c
h
o
ff
the
3D Ey
e
w
ea
r
.
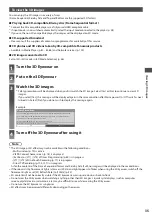
1
Turn the TV to Standby mode with the remote control.
2
Connect as shown in the diagram.
•
T
he
in
d
i
c
ato
r l
a
m
p
l
i
g
hts
r
e
d,
an
d c
ha
rg
in
g
sta
r
ts.
•
When
the
in
d
i
c
ato
r l
a
m
p
t
ur
ns
o
ff, c
ha
rg
in
g
is
c
o
m
p
l
ete
d
.
(A
pp
r
o
x
i
m
ate
ly 2
ho
ur
s
r
e
qu
i
r
e
d)
3
After charging is completed, remove the charging cable.
M
ini
U
S
B c
onne
c
to
r
U
S
B c
onne
c
to
r
Note
•
D
o
not
t
ur
n
the
TV Off w
ith
M
ains
po
w
e
r O
n
/
Off
s
w
it
c
h
dur
in
g c
ha
rg
in
g
.
•
F
o
r
the
spe
c
i
f
i
c
ation
o
f
the
r
e
c
ha
rg
eab
l
e
batte
ry
in
the
3D Ey
e
w
ea
r
(p. 127)
Storing and cleaning the 3D Eyewear
•
U
se
the
s
u
pp
l
ie
d 3D Ey
e
w
ea
r c
ase
to
sto
r
e
the
3D Ey
e
w
ea
r
.
•
Av
oi
d
sto
r
in
g
the
3D Ey
e
w
ea
r
in
hot
o
r
hi
g
h
ly
h
um
i
d l
o
c
ations.
•
U
se
a
cl
ean
,
so
f
t
an
d dry cl
oth
to
w
ipe
the
3D Ey
e
w
ea
r
.
O
the
rw
ise
, d
i
r
t
o
r du
st
m
a
y
s
cr
at
c
h
the
e
y
e
w
ea
r
.
•
D
o
not
u
se
ben
z
ene
,
thinne
r,
o
r w
a
x
on
the
3D Ey
e
w
ea
r,
as
d
oin
g
so
m
a
y c
a
u
se
the
paint
to
pee
l
o
ff
.
•
D
o
not
s
u
b
m
e
rg
e
the
3D Ey
e
w
ea
r
in
l
i
qu
i
d
s
uc
h
as
w
ate
r w
hen
cl
eanin
g
.
•
Dur
in
g
the
l
on
g
pe
r
io
d
o
f d
is
u
se
, full c
ha
rg
e
the
3D Ey
e
w
ea
r
on
c
e
e
v
e
ry 6 m
onths
to
k
eep
the
batte
ry
pe
rf
o
rm
an
c
e.
•
A
s
the
l
i
qu
i
d cry
sta
l
sh
u
tte
r
s
(l
ens
)
a
r
e
fr
a
g
i
l
e
an
d
easi
ly
b
r
o
k
en
,
be
v
e
ry c
a
r
e
ful w
hen
cl
eanin
g
the
m
.

