Panasonic TX-L50B6E Operating Instructions Manual Download Page 11

11

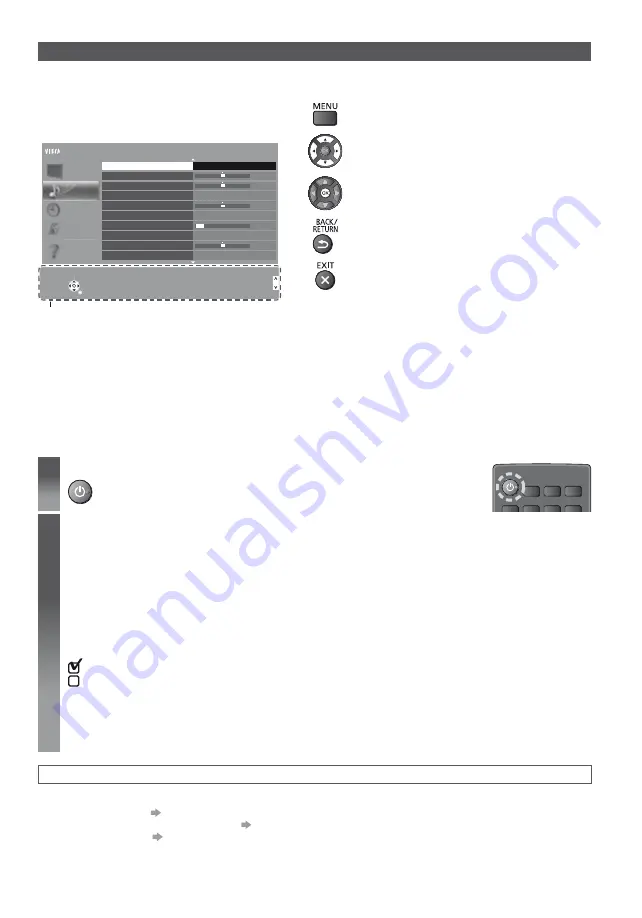
Using the On Screen Displays 

- Operation guide

Many features available on this TV can be accessed via the On Screen Display menu.


Operation guide

Operation guide will help your operation by using the 
remote control.
Example: [Sound Menu]

1/2

0
0

0

11

0

Mode

Standard

Bass
Treble
Equaliser

Headphone Volume

Surround

Auto Gain Control
Volume Correction
Speaker Distance to Wall

Off

Off

Over 30cm

 Main Menu

Picture

Sound

Timer

Setup

Help

Select

Selects your favourite sound 
mode.

Page up

Change

RETURN

Page down

Operation guide

Select

Selects your favourite sound 
mode.

Page up

Change

RETURN

Page down

Balance


How to use remote control

Open the main menu

Move the cursor / select from a range of options / 
select the menu item (up and down only) / adjust 
levels (left and right only)

Access the menu / store settings after adjustments 
have been made or options have been set

Return to the previous menu

Exit the menu system and return to the normal 
viewing screen

First time Auto Setup

Automatically sets up the TV and searches for available TV channels when the TV is turned on for the first time.

These steps are not necessary if the setup has been completed by your local dealer.

Please complete connections (p. 6 - 8) and settings (if necessary) of the connected equipment before starting Auto 
Setup. For details of settings for the connected equipment, read the manual of the equipment.

1

Plug the TV into mains socket and turn power on

Takes a few seconds to be displayed.

2

Select the following items

Set up each item by following the on-screen instructions.

Select the language
Select [Home]

Select [Home] viewing environment to use in your home environment.

[Shop] is for shop display.

To change viewing environment later on, you will need to initialise all settings by accessing Shipping Condition.

Select your country

Depending on the country you select, select your Region or store the Child Lock-PIN number (“0000” cannot 
be stored).

Tick the TV signal mode to tune, and then select [Start Auto Setup]

:  tune (search for the available channels)
:  skip tuning

Auto Setup screen varies depending on the country and the signal mode you select.

[DVB-C Network Settings]
Normally set [Frequency] and [Network ID] to [Auto].
If [Auto] is not displayed or if necessary, enter [Frequency] and [Network ID] specified by your cable provider 
with numeric buttons.

Auto Setup is now complete and your TV is ready for viewing.

If tuning has failed, check the connection of the RF cable, and then follow the on-screen instructions.

To retune all channels 


[Auto Setup] (p. 19)

To add the available TV signal mode later 


[Add TV Signal] (p. 20)

To initialise all settings 


[Shipping Condition] (p. 21)

Summary of Contents for TX-L50B6E

Page 1: ...sistance Model No TX L32B6E TX L42B6E TX L32B6ES TX L42B6ES TX L39B6E TX L50B6E TX L39B6ES English Contents Be Sure to Read Important Notice 2 Safety Precautions 3 Quick Start Guide Accessories 4 Conn...

Page 2: ...nted or shall be implied for any other use Additional information may be obtained from MPEG LA LLC See http www mpegla com ROVI CORPORATION AND OR ITS RELATED AFFILIATES ARE NOT IN ANY WAY LIABLE FOR...

Page 3: ...pact during installation of the pedestal Ensure that children do not climb onto the pedestal Install or remove the TV from the pedestal with at least two people Install or remove the TV by the specifi...

Page 4: ...the TV is not in use for a prolonged period of time Excessive volume Caution Do not expose your ears to excessive volume from the headphones Irreversible damage can be caused If you hear a drumming n...

Page 5: ...he base as shown to prevent the TV from falling over Commercially available screw not supplied Diameter 3 mm Length 25 30 mm The place where the base is secured should be thick enough and made of hard...

Page 6: ...HDMI cable Keep the TV away from electronic equipment video equipment etc or equipment with an infrared sensor Otherwise distortion of image sound may occur or operation of other equipment may be inte...

Page 7: ...Recorder VCR and Set top box TV Set top box HDMI cable SCART cable SCART cable DVD Recorder VCR Terrestrial aerial RF cable RF Cable Cable Other connections DVD player COMPONENT equipment TV DVD Play...

Page 8: ...t the view card into the card reader Insert the module in the correct direction Features that appear on the screen are dependent on the contents of the selected CI module Normally encrypted channels w...

Page 9: ...of the screen for 3 seconds to highlight the pressed button 1 Input mode selection Press repeatedly until you reach the desired mode Main Menu Press and hold for about 3 seconds to display main menu O...

Page 10: ...Volume Up Down 10 Numeric buttons Changes channel and teletext pages Sets characters When in Standby mode switches TV on 11 Still Freezes unfreezes the picture 12 Input mode selection p 12 15 TV swit...

Page 11: ...ttings if necessary of the connected equipment before starting Auto Setup For details of settings for the connected equipment read the manual of the equipment 1 Plug the TV into mains socket and turn...

Page 12: ...dio Cymru 1 BBC ONE Wales 2 BBC THREE 3 BBCi 4 CBBC Channel All DVB T Channels Z X Note Z_ Aspect Change the aspect ratio image size Auto X_ 16 9 Z 14 9 Z Just X J 4 3 X Zoom Z X 4 3 Full X Sidecut Ju...

Page 13: ...tch the channel listed in the banner Information on the next programme To hide Extra information To set display timeout Banner Display Timeout p 20 Viewing Teletext What is FLOF FASTEXT mode What is T...

Page 14: ...page stored FULL TOP BOTTOM Store frequently viewed pages Store frequently viewed pages in the colour bar To change stored pages Z X View sub page View sub page Only when Teletext is more than one pa...

Page 15: ...Coronation Street The Bill BBC FOUR 10 O clock News BBC Pepsi Char Good bye BBC 2W Panorama Spring watch Coast BBCi I m A Celebrity Pop Idol News Cinema Drama Shop BBC Radi 1 2 3 4 5 6 7 D D D D D D D...

Page 16: ...en Enter characters by free input menu A B C D E F G H I J K L M N O P Q R S T U V W X Y Z 0 1 2 3 4 5 6 7 8 9 a b c d e f g h i j k l m n o p q r s t u v w x y z _ User input Picture Viewing Mode Dyn...

Page 17: ...ement J J J J J J J J J Gamma Reset to Defaults Option Settings Film Cadence Mode 1080p Pixel Direct 39 inch model 42 inch model 50 inch model Z_ _ HDMI Content Type Auto HDMI RGB Range AV Colour Syst...

Page 18: ...sic Speech User Bass Treble Equaliser Balance Surround Headphone Volume Auto Gain Control Volume Correction Speaker Distance to Wall X_ X_ X_ X_ MPX Stereo Mono M1 M2 Audio Preference Auto J J Multich...

Page 19: ...PDIF Delay HDMI Input HDMI1 2 X_ Digital Analogue J Reset to Defaults Timer Off Timer Time Zone Auto Standby J X No signal Power off Z_ X Setup Eco Navigation J J Child Lock X Tuning Menu Favourites E...

Page 20: ...udio 1 2 Preferred Subtitles 1 2 Preferred Teletext Display Settings Preferred Subtitle Type Z Teletext ZX Teletext Character Set West East1 East2 Default Guide TV Guide p 15 Channel List Input Labels...

Page 21: ...4 CBBC Channel 70 72 Cartoon Nwk 105 719 720 BBCi BBC Radio Wales BBC Radio Cymru DVB C Favourites Editor J Z Z X 2 Add it to the Favourites list J 1 BBC One Wales 7 BBC THREE 14 E4 CBBC Channel 70 72...

Page 22: ...l all Category Tune Rename Note Auto Setup Manual Tuning see below Manual Tuning DVB C 1 Enter the frequency 74 00 MHz 4 100 100 DVB C Manual Tuning 2 Select Start scan DVB T 1 Adjust frequency for ea...

Page 23: ...e Lock all Unlock all Next input To change the PIN number To set Parental Rating Note Z Updating the TV Software To update automatically System Update If System Update is performed the software will b...

Page 24: ...d select the content Photo Video Music VIERA LINK VIDEO MUSIC ECO NAVIGATION Photo Select the appropriate device and content for playing back each file To change the device While the thumbnail is disp...

Page 25: ...If no music has been registered or the device which has the registered music is removed no sound will be produced Auto Music data stored in the root folder of the current device will be played back ra...

Page 26: ...layer theatre Amplifier etc with an HDMI cable allow you to interface them automatically p 27 These features are limited to models incorporating HDAVI Control and VIERA Link This TV supports HDAVI Con...

Page 27: ...ent Features Player theatre Blu ray Disc theatre Amplifier Easy playback 3 3 Power on Link Power off Link Standby Power Save 2 Intelligent Auto Standby 2 4 2 4 2 VIERA Link Control 1 1 Speaker Selecti...

Page 28: ...nk Set Power on Link to On in the Setup Menu to use this function p 20 When the connected equipment starts playback or direct navigator function menu for the equipment are activated the TV is automati...

Page 29: ...nt For example two recorders to HDMI1 and HDMI2 the recorder connected to HDMI1 is displayed as Recorder1 and the recorder connected to HDMI2 is displayed as Recorder2 VIERA Link Menu VIERA Link Contr...

Page 30: ...ayer a set top box or game equipment can be connected to the HDMI terminal using an HDMI compliant fully wired cable Applicable HDMI features Input audio signal 2ch Linear PCM sampling frequencies 48...

Page 31: ...ilable WMA Pro and WMA Lossless are not supported ASF asf wmv Video codec MPEG4 SP ASP VC 1 Windows Media Video Ver 9 Audio codec AAC Dolby Digital Dolby Digital Plus HE AAC LPCM MP3 WMA Copy protecte...

Page 32: ...d with this TV You cannot connect any devices by using USB card reader You cannot use two or more same kind of USB devices simultaneously except USB Flash Memory Additional information for the devices...

Page 33: ...nput setting p 19 If digital sound connection has a problem select analogue sound connection The TV does not switch on Check the mains lead is plugged into the TV and the socket outlet The TV goes int...

Page 34: ...Model No TX L32B6E TX L32B6ES TX L39B6E TX L39B6ES TX L42B6E TX L42B6ES TX L50B6E Sound Speaker 90 mm 25 mm 2 8 100 mm 30 mm 2 8 Audio output 10 W 5 W 5 W 20 W 10 W 10 W Headphones M3 3 5 mm stereo mi...

Page 35: ...ct When using the wall hanging bracket Please contact your local Panasonic dealer to purchase the recommended wall hanging bracket 32 inch model a 200 mm b 100 mm 39 inch model 42 inch model a 200 mm...

Page 36: ...ay be applicable for incorrect disposal of this waste in accordance with national legislation For business users in the European Union If you wish to discard electrical and electronic equipment please...

Reviews: