background image

38

Customer Information

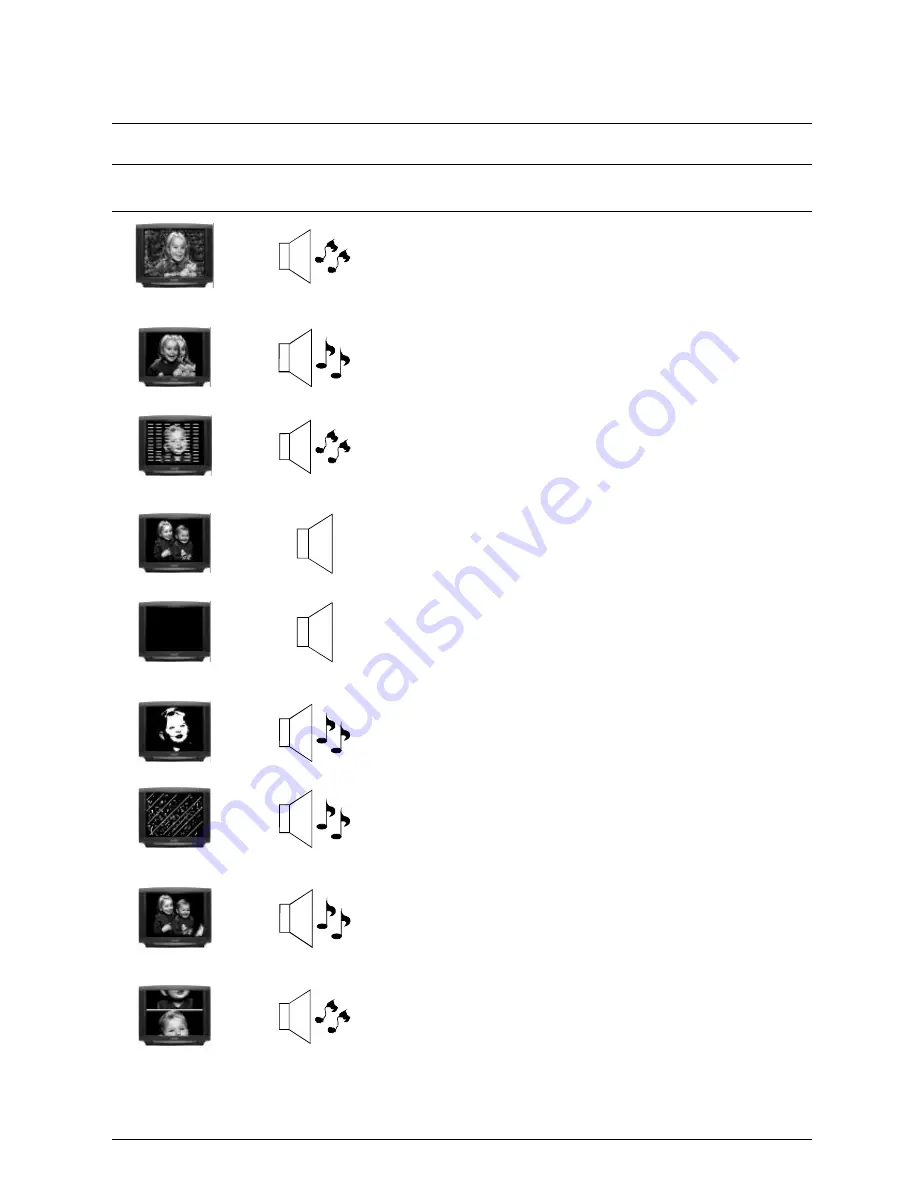
Troubleshooting

Picture

Sound

Check

Aerial Location, Direction or Connections.
If you are watching a tape playback check the state of the
Video heads – they may need to be cleaned or replaced.
The tape may be old. Check the tracking.

Snowy Picture

Noisy Sound

Aerial Location, Direction or Connections.

Multiple Image

Normal Sound

Electrical Appliances, Motorcycles, Cars or Fluorescent
Lamps.

Interference

Noisy Sound

Volume (Check the Mute function)
Check the Colour System Mode. Refer to page 27.

Normal Picture

No Sound

Not plugged in, switched OFF or Set to Stand By. Check
volume, brightness, and contrast levels.
Various internal safety devices may have been triggered.
Switch the TV off for a few minutes and try again.

No Picture

No Sound

Colour Control.
Colour System Mode. Refer to page 27.
If the picture is from a tape playback, try adjusting the
tracking.

No Colour

Normal Sound

Retune the Television. Refer to page 26.

Scrambled

Normal or Weak Sound

Magnetic Interference from unshielded equipment or the
television may have been moved while it was switched ON.
(Switch the television OFF with the main power switch and
leave it OFF for about 30 minutes. Refer to page 31.

 Colour Patches

Normal Sound

Colour System Mode. Refer to page 27.

Rolling Picture

Noisy Sound

Summary of Contents for TX-68PS12A

Page 1: ...ith Teletext TX 68PS12A TX 68PS13A Operating Instructions Please read these operating instructions completely before operating this set and retain the booklet for future reference TQB4A0150 T T tau FLA DIGI AL turn your life on ...

Page 2: ... television station can be tuned into any Programme Location Number Picture Quality All televisions are affected by Magnetic Interference Magnetic interference may come from such things as unshielded motors moving the TV while it is switched ON turning off a vacuum cleaner too close to the TV lightning strikes nearby or many other things The interference shows up as coloured patches which appear w...

Page 3: ...rnal aerial should be installed by a reputable qualified installer and should comply with Australian Standard AS1417 1 Connect the Power Plug This television is designed for the Australian Standard Mains Voltage of 240V 50Hz NOTE If the television is not going to be used for an extended period remove the power plug from the wall outlet Turn on the Television Push the Power Switch to turn the telev...

Page 4: ... STEREO MONO 10 FAVORITE 10 SOUND MUTE 11 TV AV 11 PROGRAMME NUMBER UP DOWN 11 VOLUME UP DOWN 11 NORMALISATION 11 SOUND MENU 11 WAKE UP 12 SURROUND 12 OFF TIMER 12 Main Menu 13 Picture Menu Operation 14 Sound Menu Operation 15 Features Menu Operation 16 Language Menu Operation 17 Preset Menu Operation 18 Remote Control VCR LD DVD Operation 19 Remote Control VCR LD DVD Buttons 20 REWIND REVIEW 20 P...

Page 5: ...ng 28 Skip Operation 29 How to Cancel the Skip Operation 29 Favorite CH 29 POS CHANGE 30 GEOMAGNETIC 31 Favorite CH Operation 32 Connecting Equipment to the TV 33 34 Front Panel Connections 33 Rear Panel Connections 33 Connecting a Standard VCR to the AV Input 34 Connecting S Video DVD Equipment to the AV Input 34 Monitor Out 34 Customer Information 35 Warnings 35 Cautions 35 Cleaning the Televisi...

Page 6: ...dphone socket the speakers are turned off The headphone volume is adjusted by the volume control Control Panel Open the control panel door to gain access to the Television controls Push the door at the point marked to open Push again to close Control Panel Buttons BUTTON WHAT IT DOES POWER This button is used to turn the television on and off S VIDEO VIDEO L MONO R AUDIO AV 2 IN PRE TV AV ...

Page 7: ...OFF Page 29 Page 30 POS CHANGE 1 GEOMAGNETIC 0 Page 31 TV AV This button is used to select the normal broadcast television stations or one of the three AV Audio Video inputs VOLUME DOWN and UP These buttons are used to reduce or increase the volume output level from the television The volume level is indicated on the screen as a green bar and as a number 0 63 10 PROGRAMME NUMBER DOWN and UP Pressi...

Page 8: ...elevision Buttons For details of VCR LD and DVD remote control operation please refer to page 20 For details of Teletext remote control operation please refer to page 22 R TUNE STANDBY DIRECT ACCESS PROGRAMME NUMBERS 2 DIGIT PROGRAMME NUMBERS RECALL MAIN MENU POSITION BUTTONS PICTURE MENU FAVORITE STEREO MONO MUTE TV AV PROGRAMME NUMBER UP PROGRAMME NUMBER DOWN VOLUME UP VOLUME DOWN NORMALISATION ...

Page 9: ...o digits required For example to select Programme Number 12 Press the Button followed by the 1 and the 2 0 9 R TUNE Place your thumb on the battery cover triangle Apply a slight downward pressure with the thumb and slide the cover back This allows the cover to be removed Insert the batteries ensuring the correct polarity The polarity is identified by the symbol on the battery and the and symbols o...

Page 10: ... Standard Dynamic Soft DYNAMIC For viewing in brightly lit rooms This menu selects higher than normal levels of Brightness and Contrast STANDARD For viewing in normal evening lighting environments This menu selects the normal levels of Brightness and Contrast SOFT For viewing in a dark room This menu selects reduced levels of Brightness and Contrast STEREO MONO Pushing the button changes the mode ...

Page 11: ...assed when this button is used VOLUME UP DOWN This button is used to increase or decrease the volume output level from the television The volume level is indicated on the screen as a green bar and as a number 0 63 NORMALISATION The Normalisation Button is used to reset the television to factory set levels Colour Sharpness Contrast Brightness Treble Bass and Balance will be reset The button will on...

Page 12: ...t off again after 90 minutes unless it is cancelled Press any button to cancel the Off Timer 3 The Wake Up Timer can be cancelled by switching the main power off or setting the timer to OFF using the Left and Right Buttons or pressing the Normalise Button while the wake up timer On Screen display is showing SURROUND Surround sound is designed to recreate the spatial effect of a movie theatre or co...

Page 13: ... 32 NTSC TINT 32 BRIGHT 63 CONTRAST 32 SHARPNESS STD COLOUR TEMP DYNAMIC 32 COLOUR 32 NTSC TINT 32 BRIGHT 63 CONTRAST 32 SHARPNESS STD COLOUR TEMP DYNAMIC 32 COLOUR 32 NTSC TINT 32 BRIGHT 63 CONTRAST 32 SHARPNESS STD COLOUR TEMP DYNAMIC 32 COLOUR 32 NTSC TINT 32 BRIGHT 63 CONTRAST 32 SHARPNESS STD COLOUR TEMP DYNAMIC 32 COLOUR 32 NTSC TINT 32 BRIGHT 63 CONTRAST 32 SHARPNESS STD COLOUR TEMP DYNAMIC...

Page 14: ...ghtness and Contrast SOFT For viewing in a dark room This menu selects reduced levels of Brightness and Contrast Item Effect Indicator COLOUR Less More NTSC TINT Reddish Greenish BRIGHT Darker Brighter CONTRAST Less More SHARPNESS Softer Sharper Normalisation N Pressing the Normal Button on the remote control when the Picture Menu is displayed will return all picture settings to the factory preset...

Page 15: ...lk shows news etc MOVIE Used where music and speech are fairly evenly spread Note Sound menu levels can be set for TV AV1 AV2 and AV3 modes Item Effect Indicator Operation BASS Less More TREBLE Less More BALANCE Left Right BASS BOOST Used to increase the Bass level Cut Boost LOUDNESS Used to increase the Bass level at low volume settings Off On Limits the maximum volume level It eliminates variati...

Page 16: ...ching weak signals It may be necessary to turn the BLUEBACK off when watching a videotape when CUE or REVIEW have been selected CH COLOUR SET CH COLOUR SET STD Colour density varying between broadcast channels can be adjusted to three levels for each channel received Use the Left or Right Button to switch between STD HIGH and LOW CHILD LOCK CHILD LOCK OFF CHILD LOCK allows you to lock out a channe...

Page 17: ...t or Right Button When the Language symbol is highlighted the LANGUAGE Menu has been selected 3 Change the language between English Chinese Russian and Arabic by using the Up or Down Buttons 4 Push the MAIN MENU Button to return to normal viewing MAIN MENU LANGUAGE LANGUAGE ENGLISH ENGLISH ENGLISH ENGLISH ...

Page 18: ...e location numbers See page 26 COLOUR SYS COLOUR SYS AUTO Used to select the most appropriate colour system for the type of picture being watched See page 27 FINE TUNE FINE TUNE Used to fine tune a broadcast signal See page 28 SKIP SKIP ON Used to bypass programme locations which do not have a broadcast station allocated to them See page 29 POS CHANGE POS CHANGE 1 This function allows you to store...

Page 19: ... been designed to work with a variety of VCRs Laser Disks and DVDs Please refer to page 21 for details of manufacturers codes WARNING Unauthorised recording of material from Television Broadcasts or from other video and or audio sources may contravene copyright laws PLAY FAST FORWARD CUE STILL ADVANCE DISK SIDE A DISK SIDE B RECORD PROGRAMME NUMBER UP SKIP FORWARD PROGRAMME NUMBER DOWN SKIP BACK R...

Page 20: ...auses the tape during play Pauses the disc during play PLAY PLAY Used to start the VCR Used to start the LD DVD playing playing FAST FORWARD CUE FAST FORWARD CUE Used to wind the tape Used to watch the disc at forward quickly or to watch fast speed the tape at fast speed STILL ADVANCE DISC SIDE A SELECTION Used to advance the tape Used to select the A side One frame at a time Used of the disc With...

Page 21: ...eck the operation of the VCR LD or DVD If it does not operate correctly repeat steps 1 to 5 and use an alternate code if there is one VCR CODES Manufacturer Code Manufacturer Code Panasonic 10 11 12 13 NEC 40 41 42 43 National ORION 45 46 AIWA 15 16 Philips 50 FUJITSU 20 SANYO 55 56 57 58 HITACHI 25 26 27 SHARP 60 61 JVC 30 31 32 SONY 65 66 67 MITSUBISHI 35 36 TOSHIBA 70 71 LD CODES Manufacturer C...

Page 22: ...e is reached 4 The picture disappears while you type in 801 The picture stays black until a programme containing closed captions is broadcast Some broadcast stations will have a message on the screen to tell you that closed captions are not available for this programme Some broadcast stations give you no indication at all TOP Table Of Pages MODE In TOPTEXT mode the red button moves to the previous...

Page 23: ...ed channel is transmitting Teletext information TIME TEXT When a Page has more than one screen sub page of information you may have to wait for some time before the sub page you require becomes available With this function it is possible to enter the number of the desired sub page 1 Select Text Mode and choose a page 2 Press the TIME TEXT button 3 When the page has been received the sub pages can ...

Page 24: ...ond to different page numbers REVEAL Some Text pages contain concealed information e g the solution to a puzzle To reveal this information press the Reveal Button To hide the information press the Reveal Button again LIST F TEXT Push the List F Text Button to switch between the Top of Page and List modes LIST STORE In LIST mode the page numbers stored in the four coloured buttons can be changed fo...

Page 25: ...e channels have been tuned Programme Number Channel Number Tuning Indicator Only shown while tuning 4 Return the television to normal operation by pushing the PRE Button seven times Auto Tuning Using the Remote Control 1 Push the MAIN MENU Button 2 Select the PRESET Menu using the Left or Right Button When the Preset symbol is highlighted the Preset Menu has been selected Push the Down Button to a...

Page 26: ... Push the Down Button to access the MANUAL TUNE option 3 Use the front panel Programme Number Up or Down Buttons to select the Programme Location Number you want to tune 4 Push the Left or Right Button to start the Manual Tune 5 If you do not want to save this broadcast station in this programme location number repeat step 4 6 When you are satisfied with your selection you can Tune more stations b...

Page 27: ...n by pushing the PRE Button twice Colour SYS Setting Using the Remote Control 1 Push the MAIN MENU Button 2 Select the PRESET Menu using the Left or Right Button When the Preset symbol is highlighted the Preset Menu has been selected 3 Push the Down Button to access the Colour SYS option 4 Press the Left or Right Button to switch between AUTO PAL NTSC 4 43 and NTSC 3 58 5 Push the MAIN MENU Button...

Page 28: ...ng the PRE Button four times Fine Tuning Using the Remote Control 1 Push the MAIN MENU Button 2 Select the PRESET Menu using the Left or Right Button When the Preset symbol is highlighted the Preset Menu has been selected 3 Use the front panel Programme Number Up or Down Buttons to select the Programme Location Number you want to tune 4 Push the Down Button to access the FINE TUNE option 5 Press t...

Page 29: ...ps 3 and 4 Return the television to normal operation by pushing the PRE Button three times Using the Remote Control 1 Push the MAIN MENU Button 2 Select the PRESET Menu using the Left or Right Button When the Preset symbol is highlighted the Preset Menu has been selected 3 Push the Down Button to access the SKIP option 4 Select the Programme Location Number you want to skip using the Remote Contro...

Page 30: ...normal operation by pushing the PRE Button twice POS CHANGE Using the Remote Control 1 Push the MAIN MENU Button 2 Select the PRESET Menu using the Left or Right Button When the Preset symbol is highlighted the Preset Menu has been selected 3 Push the Down Button to access the POS CHANGE option 4 Select the new Programme Location Number Use the Remote Control Programme Number Up Down Buttons Direc...

Page 31: ...orrection Using the Remote Control 1 Push the MAIN MENU Button 2 Select the PRESET Menu using the Left or Right Button When the Preset symbol is highlighted the Preset Menu has been selected 3 Push the Down Button to access the GEOMAGNETIC option 4 Use the Remote Control Programme Left or Right Button to adjust the picture for best colour Pay special attention to the four corners of the picture Th...

Page 32: ... following order 1 Push the MAIN MENU Button 2 Push the Right Button to select the FEATURES Menu 3 Push the Down Button to access the Favorite CH option 4 Push the Right Button to choose 2 5 Push the MAIN MENU Button 6 Push the Right Button to select the PRESET Menu 7 Push the Down Button to access the Favorite CH 8 Use the Programme Number Up or Down Buttons to select Programme Location 3 9 Push ...

Page 33: ...nals see below and page 34 Note When connecting a mono VCR through the RF In please switch the TV to mono Connecting a Standard VCR to the AV Input Most standard Video Cassette Recorders use RCA type video and audio connectors If your VCR has different type connectors please refer to the VCR instruction book for details NOTE A mono VCR can be connected to this television Connect the VCR Audio out ...

Page 34: ...can be used to allow one video source videotape video disc etc to be connected to more than one television Connect the Monitor out from this television to the AV Input of the second television If a video recorder is connected to the Monitor Out and video sources VCR video disc camera etc are connected to one or more of the AV inputs the television becomes a visual display for tape editing or copyi...

Page 35: ...Remove the Power Plug from the wall socket when the Television is not going to be used for an extended period of time In the advent of unusual operation e g odd sounds smoke or aromas turn the television Off and remove the power cord from the wall socket Then call the Television Service Centre this may reduce the possibility of expensive repair costs Cautions Safety First Danger Always pull the pl...

Page 36: ...levision Caring for the Remote Control The lens of the Remote Control should be kept clean and free of dirt and grease Use a soft cloth moistened with water and a mild detergent to keep the lens clean Lens Remote Control This television contains many plastic parts For this reason Do Not use benzene thinners or any solutions containing petroleum or other chemicals Remove dirt and soiling by wiping ...

Page 37: ...ess the recall button on the remote control Any other channel number is one being broadcast by the television station There is no way to turn this off Question How do I tune my stations Answer The instructions for tuning the stations are on page 25 for automatic tuning and on page 26 for tuning individual stations Question I have done an auto tune because the book told me to If I am only to do man...

Page 38: ...t plugged in switched OFF or Set to Stand By Check volume brightness and contrast levels Various internal safety devices may have been triggered Switch the TV off for a few minutes and try again No Picture No Sound Colour Control Colour System Mode Refer to page 27 If the picture is from a tape playback try adjusting the tracking No Colour Normal Sound Retune the Television Refer to page 26 Scramb...

Page 39: ...to 99 Picture Tube 68cm Viewable Measured diagonally Audio Output 2 Speaker 7 5W 7 5W Headphone Socket 3 5mm Stereo Aerial Impedance 75 Unbalanced coaxial A V Terminals YUV DVD In Rear 1 AV In Front 1 Rear 2 S In Front 1 Rear 1 Monitor Out Rear 1 Video Audio In S Video Y 1 0Vp p 75 C 0 3Vp p 75 Video in 1 0Vp p 75 Audio in Approx 400mV 47k Monitor Out Video Out 1 0Vp p 75 Audio Out Approx 400mV Ac...

Page 40: ...ational Quality Standard AS NZS ISO9001 Customer s Record The serial number of this product can be found on its rear cover and on the carton It is recommended that you note the serial number and other details in the space provided and retain this booklet in a safe place as a permanent record of your purchase to aid in identification in the event of theft or loss Model No Serial No PA Purchase Date...

Page 41: ......

Reviews: