background image

English

14

C

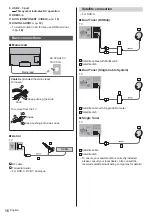
To remove from the TV:

C

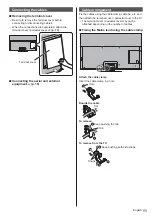
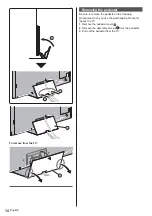
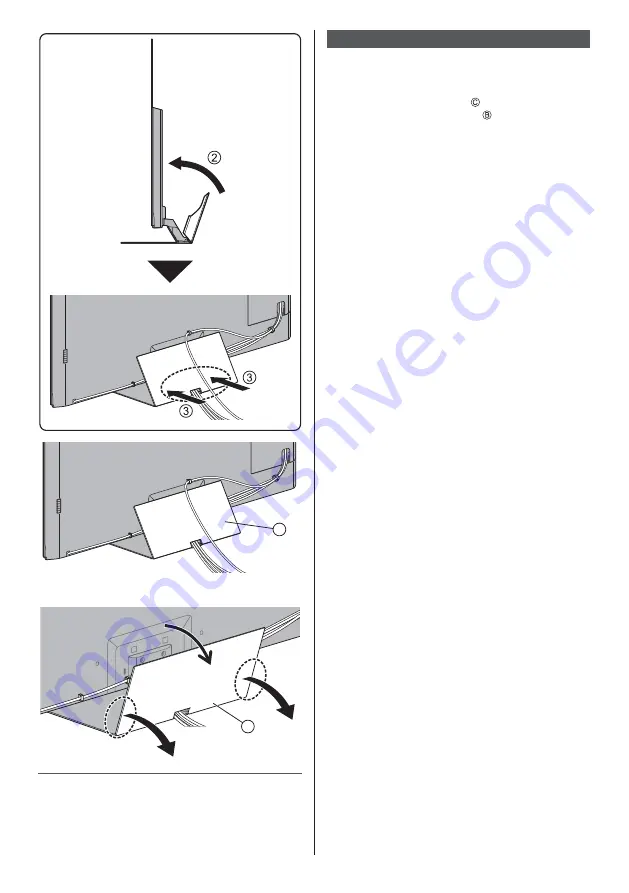
Removing the pedestal

Be sure to remove the pedestal in the following 
procedures when you use the wall-hanging bracket or 
repack the TV.

1

Remove the pedestal cover  .

2

Remove the assembly screws   from the pedestal.

3

Pull out the pedestal from the TV.

Summary of Contents for TX-55GZW1004

Page 1: ...fore use The images shown in this manual are for illustrative purposes only Please refer to Pan European Guarantee Card if you need to contact your local Panasonic dealer for assistance English Model No TX 55GZW1004 TX 55GZC1004 TX 65GZW1004 TX 65GZC1004 Operating Instructions OLED TV For more detailed instructions please refer to eHELP Built in Operating Instructions How to use eHELP p 24 image T...

Page 2: ... Auto Setup 23 Watching TV 24 How to Use eHELP 24 How to Use Menu Functions 26 Changing Picture and Sound settings 27 Retuning from Setup Menu 28 Tuning and Editing Channels 29 Multi Window 32 Child Lock 32 Watching External Inputs 33 Viewing Teletext 34 Using TV Guide 35 USB HDD Recording 36 Timer Programming 38 Using Media Player 39 Using Home Network 40 FAQs 42 Maintenance 43 Specifications 43 ...

Page 3: ... a long period In such cases the still part of the image remains dimly on the screen image retention This is not considered a malfunction and is not covered by the warranty Typical still image parts Still images shown continuously on the same area ex channel number channel logo other logos or title image etc Still or moving pictures viewed in 4 3 or 14 9 aspect ratio etc Video games To avoid image...

Page 4: ... full text of our privacy policy displayed at eHELP Search by Purpose Network Network settings Terms of Service and Settings When using Internet connecting function of this TV after agreeing in the jurisdictions where customer s consent is required to collect personal information under applicable privacy laws to or reviewing Panasonic s terms of service privacy policy hereinafter referred to as te...

Page 5: ...risk of electrical shock fire damage or injury please follow the warnings and cautions below Mains plug and lead Warning If you detect anything unusual immediately remove the mains plug Mains plug types vary between countries This TV is designed to operate on AC 220 240 V 50 60 Hz Insert the mains plug fully into the mains socket To turn Off the apparatus completely you must pull the mains plug ou...

Page 6: ...ay panel Ensure that children do not climb on the TV Do not place the TV on sloping or unstable surfaces and ensure that the TV does not hang over the edge of the base Warning Never place a TV in an unstable location A TV may fall causing serious personal injury or death Many injuries particularly to children can be avoided by taking simple precautions such as Using cabinets or stands recommended ...

Page 7: ...hem may be regarded as illegal access SSID is a name for identifying a particular wireless network for transmission Do not subject the built in wireless LAN to high temperatures direct sunlight or moisture Data transmitted and received over radio waves may be intercepted and monitored The built in wireless LAN uses 2 4 GHz and 5 GHz frequency bands To avoid malfunctions or slow response caused by ...

Page 8: ...nd manganese batteries Do not use rechargeable batteries Ni Cd etc Do not burn or break up batteries Do not expose batteries to excessive heat such as sunshine fire or the like Make sure you dispose of batteries correctly Remove the battery from the unit when not using for a prolonged period of time to prevent battery leakage corrosion and explosion OLED TV Declaration of Conformity DoC Hereby Pan...

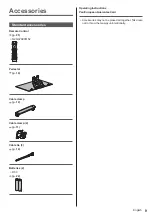
Page 9: ...ntrol p 21 N2QAYA000152 Pedestal p 10 Cable clamp p 12 Cable clamp 2 p 11 Cable tie 3 p 12 Batteries 2 R03 p 22 Operating Instructions Pan European Guarantee Card Accessories may not be placed all together Take care not to throw them away unintentionally ...

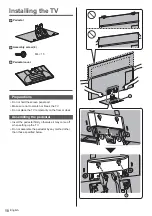
Page 10: ...old the screen panel part Make sure not to scratch or break the TV Do not place the TV temporarily on the floor or desk Assembling the pedestal Insert the pedestal firmly otherwise it may come off when setting up the TV Do not assemble the pedestal by any method other than those specified below A B ...

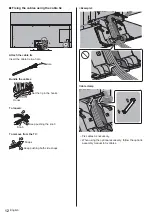
Page 11: ...d external equipment p 15 Cable arrangement Fix the cables using the cable clamp cable tie etc and then attach the terminal cover pedestal cover to the TV The terminal cover pedestal cover may not be attached depending on the number of cables Fixing the Mains lead using the cable clamp Attach the cable clamp Insert the cable clamp in a hole Hole Bundle the cable Set To release Keep pushing the tab...

Page 12: ...tie in a hole Hole Bundle the cables Hooks Set the tip in the hooks To loosen Knob Keep pushing the knob To remove from the TV Keep pushing both side snaps Snaps Example Cable clamp Fix cables as necessary When using the optional accessory follow the option s assembly manual to fix cables ...

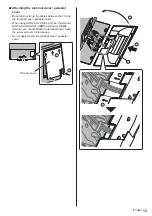
Page 13: ...een the TV and the terminal cover pedestal cover When using USB 2 port USB 3 port AV IN terminal DIGITAL AUDIO OUT HDMI3 terminal or HDMI4 terminal you cannot attach the terminal cover Keep the removed cover for future use Do not apply load to the terminal cover pedestal cover Terminal cover C ...

Page 14: ...ving the pedestal Be sure to remove the pedestal in the following procedures when you use the wall hanging bracket or repack the TV 1 Remove the pedestal cover 2 Remove the assembly screws from the pedestal 3 Pull out the pedestal from the TV ...

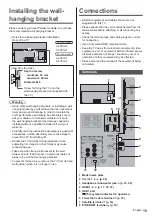
Page 15: ... carefully during installation since subjecting it to impact or other forces may cause product damage Take care when fixing wall brackets to the wall Always ensure that there are no electrical cables or pipes in the wall before hanging bracket To prevent fall and injury remove the TV from its fixed wall position when it is no longer in use Connections External equipment and cables shown are not su...

Page 16: ...move from the TV Keep pushing both side snaps Snaps Aerial TV Cable RF cable Terrestrial aerial For DVB C DVB T Analogue Satellite connection For DVB S Dual Tuner DiSEqC TV Satellite cables with Multiswitch Satellite dish Dual Tuner Single Cable System TV Satellite cable with Single Cable router Satellite dish Single Tuner TV Satellite cable Satellite dish To ensure your satellite dish is correctl...

Page 17: ... DVB via IP client function and can connect to DVB via IP server or SAT IP compatible servers to receive broadcast streaming It is recommended to connect to DVB via IP server with a LAN cable Wired connection TV Cable LAN cable Shielded Use Shielded Twist Pair STP LAN cable DVB via IP server RF cable Terrestrial aerial Satellite dish Wireless connection Cable Built in wireless LAN Rear of the TV A...

Page 18: ...nt Connect the 4K compatible equipment to HDMI terminal using a 4K compatible cable and you can watch content in 4K format Supporting HDR does not increase the peak brightness capabilities of the TV panel HDMI Auto Setting Setup Menu Reproduces the image more precisely with the expanded colour gamut when connecting the 4K compatible equipment Select the mode depending on the equipment Mode1 For be...

Page 19: ...ipment to the amplifier For information about the connections read the manuals of the equipment and amplifier TV HDMI cable Amplifier with speaker system External equipment DVD Player etc Use HDMI2 to connect the TV to an amplifier which has ARC Audio Return Channel function If connecting to an amplifier without ARC function use DIGITAL AUDIO TV Optical cable DIGITAL AUDIO IN e g Amplifier with sp...

Page 20: ...able channels and their features depend on the CI module If encrypted channels do not appear Common Interface in the Setup Menu There might be some CI modules in the market with older firmware versions that do not work fully interoperable with this new CI v1 4 TV In this case please contact your content provider For details refer to eHELP Search by Purpose Functions Common Interface read the manua...

Page 21: ...text button 11 Volume Up Down 12 Numeric buttons Changes channel and teletext pages Sets characters When in Standby mode switches TV on 13 eHELP Displays eHELP Built in Operating Instructions 14 My App Assigns a favourite application After setting starts the application easily by pressing this button For details refer to eHELP Search by Purpose Home Apps 15 Light Lights the buttons for about 5 sec...

Page 22: ...reach the desired mode Main Menu Press and hold for about 3 seconds to display main menu OK when in the menu system 5 Channel Up Down Cursor Up Down when in the menu system 6 Volume Up Down Cursor Left Right when in the menu system 7 Mains power On Off switch Use to switch the mains power To turn Off the apparatus completely you must pull the mains plug out of the mains socket Standby On Panel mai...

Page 23: ...up the network connection Depending on the country you select select your Region or store the Child Lock PIN number 0000 cannot be stored Tick the TV signal mode to tune and then select Start Auto Setup Auto Setup screen varies depending on the country and the signal mode you select DVB S Antenna Setup Ensure the satellite connections are completed p 16 and select the tuner mode Dual Tuner Single ...

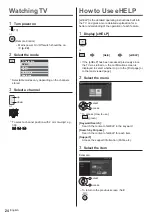
Page 24: ...gives a more detailed explanation for a better understanding of the operation of each feature 1 Display eHELP or Help eHELP If the eHELP has been accessed previously since the TV was turned on the confirmation screen is displayed to select whether to go to the First page or to the Last viewed page 2 Select the menu select access To access How to use green Keyword Search Search the content of eHELP...

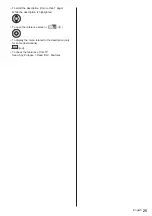
Page 25: ...n if more than 1 page While the description is highlighted To open the reference screen To display the menu related to the description only for some descriptions red To check the features of this TV Search by Purpose Read first Features ...

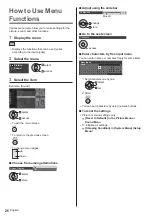
Page 26: ...creen Display On Off select store Adjust using the slide bar Sharpness Moved change store Go to the next screen Child Lock access Enter characters by free input menu You can enter names or numbers freely for some items A B C D E F G H I J K L M N O P Q R S T U V W X Y Z 0 1 2 3 4 5 6 7 8 9 a b c d e f g h i j k l m n o p q r s t u v w x y z _ User input Name 1 Set characters one by one select set ...

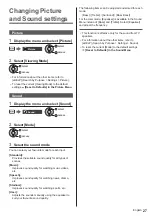
Page 27: ...y for all types of scenes Music Improves sound quality for watching music videos etc Speech Improves sound quality for watching news drama etc Stadium Improves sound quality for watching sports etc User Adjusts the sounds manually using the equaliser to suit your favourite sound quality The following items can be adjusted and stored for each mode Bass Treble Surround Bass Boost For the User mode E...

Page 28: ...ual Tuner Mode and set to On to use dual tuner function 3 Set LNB and Satellite Select IN 1 IN 2 in Signal Input to set for each tuner 4 Store 5 Select Auto Setup select access 6 Set Search Mode Scan Mode After settings select Start scan 7 A confirmation screen is displayed and press the OK button to start Auto Setup Settings are made automatically When the operation is completed the channel at th...

Page 29: ...tion to tune DVB channels When the operation is completed the channel at the lowest position will be displayed Tuning and Editing Channels You can retune channels create your favourite channel lists skip unwanted channels etc For details refer to eHELP Search by Purpose Watching Tuning and editing channels 1 Select the mode 2 Display the menu and select Setup Setup select access 3 Select DVB S Tun...

Page 30: ...mes in alphabetical order red To add all channels if available yellow green depending on the broadcaster To add consecutive channels to the list at once if available yellow make the channel block add To change the category of Channels Found blue 2 Store To exchange channel list DVB S Exchange Channel List in Other Settings Setup Menu Follow the on screen instructions During the operation remove US...

Page 31: ...list You can edit the favourites list while the cursor is on the channel in the favourites list To move the channel green Select the new position Store green To delete the channel blue To delete all channels yellow To name the favourites red Enter characters maximum 10 characters User input Name select set Store Update Channel List By updating the DVB channel list you can add new channels delete r...

Page 32: ...isplay the menu and select Setup Setup select access 2 Select Child Lock select access 1 Enter the PIN number 4 digits Enter the PIN number twice at first setting Make a note of the PIN number in case you forget it 0000 may be stored as the default PIN number depending on the country you select 2 Select Child Lock List and set the channel input to be locked Child Lock List TV and AV Sorting 123 Na...

Page 33: ...pment with TV s remote control You can operate the content in Media Player media server recording functions or the connected equipment with the following buttons of this TV s remote control How to change the code Each Panasonic product has its own remote control code Change the code according to the product for operation Press and hold Standby On Off switch during the following operations Enter th...

Page 34: ...casting In FLOF mode four differently coloured subjects are situated on the bottom of the screen To access more information about one of these subjects press the appropriate coloured button This facility enables fast access to information on the subjects shown List mode In List mode four differently coloured page numbers are situated on the bottom of the screen Each of these numbers can be changed...

Page 35: ...y of this function depends on the country you select Example Landscape 11 00 xxxxx xx xx xx xx xxxxxxxxxxx xxx xx xx xxxx xxxxxxxxxxx 11 30 12 00 12 30 xxxx xxxx xxxx xxxx xxxx xxxx 1 7 14 70 72 85 1 00 Das Erste Hot Wars Emmerdal 10 O clock News Panorama Shopping DIY SOS Coronation Street Spring watch Topics The Bill Holiday Program Pepsi Char Cinema The Bill Coast Red Cap Good bye Drama Live Spo...

Page 36: ...tting for USB HDD Format and set up the USB HDD with this TV in order to use it for recording Please note that USB HDD will be formatted and all data in it will be erased after this setup Before setting connect the USB HDD and be sure to turn on the USB HDD 1 Display the menu and select Setup Setup select access 2 Select USB Device Setup select access 3 Select the USB HDD for recording and start s...

Page 37: ... are available for operation Search backward Playback Pause Search forward Return to the current programme To stop REW LIVE TV 1 2 REW LIVE TV Recording Setup Auto Off select Off store If you stop REW LIVE TV the recorded content for REW LIVE TV will be deleted REW LIVE TV is stopped and the recorded content is deleted automatically in the following conditions Even if REW LIVE TV stops for the fol...

Page 38: ...rt time end time and can also be entered with numeric buttons 1 ZDF xxx xxx Overlapped timer events Function USB HDD Rec TV mode DVB S DVB C DVB T DVB via IP You cannot change the mode within the menu Channel position channel name etc Signal Supported Recording if available This function is Timer Programming which is controlled by information from the TV Guide if programme start and end times are ...

Page 39: ...en inserting or removing Connect the USB Flash Memory to the USB 1 2 or 3 port To remove the USB Flash Memory safely from the TV Safely remove USB in USB Device Setup Setup Menu Check the terminal type and devices are correct for connection For the USB HDD Connection p 36 1 Insert the USB Flash Memory to the TV To play back content in the USB HDD ensure the connection and settings are completed 2 ...

Page 40: ...ess LAN Rear of the TV Access point Smartphone etc Hub Router Media server PC etc Wired connection For home network and internet service Be sure to remove the terminal cover pedestal cover before connecting or disconnecting cables Internet environment LAN cable Shielded Use Shielded Twist Pair STP LAN cable Hub Router Media server PC etc Network settings Ensure the connections are completed before...

Page 41: ...fore selecting the file To display hide information of the highlighted file Note Non playable files are also listed but cannot be selected You can use the following buttons during playback Confirm the remote control code is 73 p 33 Playback of sharing content on this TV with the DMC Digital Media Controller network equipment You can enjoy content stored in the media server by controlling with the ...

Page 42: ...p Menu The image or sound from external equipment are unusual when the equipment is connected via HDMI Set HDMI Auto Setting Setup Menu to Mode1 p 18 Parts of the TV become hot Parts of the TV may become hot These temperature rises do not pose any problems in terms of performance or quality When pushed with a finger the display panel moves slightly and makes a noise There is a little gap around th...

Page 43: ...nel is specially treated and may be easily damaged Take care not to tap or scratch the surface with your fingernail or other hard objects Do not allow the cabinet and pedestal to make contact with a rubber or PVC substance for a long time This may degrade surface quality Mains plug Wipe the mains plug with a dry cloth at regular intervals Moisture and dust may cause fire or electrical shock Specif...

Page 44: ... VHF E2 E12 VHF A H ITALY CATV S01 S05 CATV S11 S20 U1 U10 VHF H1 H2 ITALY UHF E21 E69 CATV S1 S10 M1 M10 CATV S21 S41 Hyperband PAL D K SECAM D K VHF R1 R2 VHF R3 R5 VHF R6 R12 UHF E21 E69 PAL 525 60 Playback of NTSC tape from some PAL Video recorders VCR M NTSC Playback from M NTSC Video recorders VCR NTSC AV input only Playback from NTSC Video recorders VCR Satellite dish input Female F type 75...

Page 45: ...ithout notice Mass and Dimensions shown are approximate For information about the power consumption display resolution etc refer to Product Information Sheet For information about the open source software refer to eHELP Search by Purpose Read first Before use Licence ...

Page 46: ...uthority Penalties may be applicable for incorrect disposal of this waste in accordance with national legislation Note for the battery symbol bottom symbol This symbol might be used in combination with a chemical symbol In this case it complies with the requirement set by the Directive for the chemical involved Customer s Record The model number and serial number of this product may be found on th...

Page 47: ... TX 55GZW1004 TX 55GZC1004 TX 65GZW1004 TX 65GZC1004 ...

Page 48: ... J 3 9 ª 23 27 28 29 32 32 33 µ 38 39 ...

Page 49: ... 3 º º À Á  º Ã Ä º º ÅÂÁ à à º Æ ÀÇÈ ÀÇÈ É ÀÇÈ Å Á ÀÇÈ Å Â ÀÇÈ Ç Ã Ã ÀÇÈ Ç Ã Ã ª Ê ÀÇÈ Ç Ã Ã À À µº º Ë ÃÌ Ã É É É Ã Í Î Ï Ë À ÃÐ µ ÑËÐ µÅ Ò Ó Ó Ó Ä _ J J J J Ô Õ Ö Ø Ó Ó Ó Ö Ò Ó Ó Ò Ò J ...

Page 50: ... 4 Ù É Ú ÅÉË ÉË É Ë ÅÉË ÉË É µ ÅÉË ÉË É Ú É µ É Ë É Ú É Ë É µ ˺ ˺ Ò Ëº º Ö Ó Ó Ó Ú Ó Ó Ó Ó Û Ó ...

Page 51: ... 5 Ò Ö ÅÉË ÅÉË ÅÉË Ú ÅÉË Ú ÅÉË Ò Å Ë Ì ÚÚÜÜÜ ÁÌ À Á Ö Ö ºº J J Ö Ý Ú ...

Page 52: ... 6 J J Ö Ú J Þ Ö J J ß ...

Page 53: ... 7 J J J _ J µµº µµº Ý Ò J Ò ºµ À À _ J ...

Page 54: ... 8 J Ö J Ö J Ö J à ËÂ Ë ÃÌ Ã Ò Ú Ú Ë Ì ÚÚÜÜÜ Ì Ì ÚÂ Ë Ã Ãá Ã Ì ÁÇ Ç Ã Ã ÁÇ Ã Ò Ý ª Ò Ö Û Ä Ä Ä Ä Û Æ Æ ß Ò Ö â â â À Ù Ø ...

Page 55: ... 9 J J à ãÅäÅ J å ...

Page 56: ... 10 æ A B ...

Page 57: ... 11 Þ Þ Ú Þ Þ Ú Þ Ú ç ...

Page 58: ... J J ...

Page 59: ... 13 Þ Ú µ µ Þ ÅÉ ºà º º Å Å º Þ º º Þ Þ Ú Þ C ...

Page 60: ... 14 C C 1 3 ...

Page 61: ... 15 Ç Õ Ç Õ Ç J Ò ª Ò Þ º Ú 2 3 4 5 6 7 1 8 9 10 11 12 ª ...

Page 62: ... 16 J J 10 11 µ ª µ µ Ò è Þ º Ý Ú Æ Ò É Ë É Ò É µ ºª ...

Page 63: ... 17 Ö É º É º µÅ Óº µ Ú É º Ö Û É º Ò Ó Û Ó É º Ö É º É º µÅ Óº É º µ É º É º Ö Ò É º Ò Ó Û Ó É º µ º É Ú À Ã È ...

Page 64: ... 18 º Ò µ J º è Ú å è Þ º è è å è Ò º Ò è Ò º ª º Ò Ó Ó è Ó ª º ...

Page 65: ... 19 Ë à à ª É Éº ª Ú Ò ÀÇÈ À Ò º É Þ º ÅåË ÅåË Þ º º Å Å º é Û ê ª Ò ß Ò Ò Ò Þ Ó Ó ...

Page 66: ... Ò Ò Þ Ó Ó ª ë ˺ Ú Ëº ˺ ˺ ˺ ˺ ˺ ˺ì Ï Ò Ó Û Ó Ëº ˺ ª µ µ Ò Ó µ º Ý Éº åÅ á Ò Ó Û Ó Éº åÅ á Åɺ Ë Ã ÀÐ ...

Page 67: ... _ J J ª J À Á à í º Ò Ò _ 10 J 11 13 14 J Ò Ó Ó 15 16 _ J É Ý É µ Ú É Ë Ú É Ú É º Ú ÅÉ Ý ÅÉ 17 _ 18 19 _ Ú Ò Ó Ó Û ...

Page 68: ... _ µ ì 1 2 3 5 6 7 4 J Ò ç J ª _ J Ú Ú Ú J Ù Ö Ó Ó Ò Ó ...

Page 69: ... Ò Ý ª Ò 1 _ Ò _ _ _ Ò Ú _ _ _ Ò ºà Ô Õ J Ö É µ Ò Ú É Ë º ª ª º ª Ò _ Ò ...

Page 70: ... 1 _ Ú _ J _ _ ª Ò 3 _ Ò ØØ ë Þ 1 _ J 3 _ ...

Page 71: ... Ú Ò Ò Ó Ó Û ...

Page 72: ... 1 _ 3 _ Ò Ò Ò _ Ò _ ª ß _ a é Æ Ò î ï Þ ð ñ ò ɗ ɷ ê ó ç Ä 0 1 2 O 3 4 5 6 7 8 Û 9 1 J Ò ...

Page 73: ... J 1 _ J Ò Ó Ó Ò J 1 _ J 3 _ J Ò Ò Ú Ú Ú Ö Ö Ò Ò Ó Ó Ò ...

Page 74: ... ª Ò Ò ºà Ò Ó Ó Ó ª 1 _ 3 _ 4 1 2 µ ÑË à 1 à Ò 3 à ºà Ú ºà 4 5 _ 6 J J 7 J J J J ª 1 _ ª 3 _ ª 4 _ 5 ª É Ë ...

Page 75: ... 6 J J J J 1 _ 3 _ 4 _ 5 J J J 6 _ 7 _ 8 _ 9 J É º É J Ò Ó Ó 1 _ J 3 _ ª 4 _ ...

Page 76: ...rte HD 1 Das Erste HD 2 ZDF HD 3 RTL Television SAT 1 4 5 VOX HD 6 7 8 ProSieben HD RTL2 HD arte HD 1 Das Erste HD Tagesschau É µ É µ Ò Ú Ò Ò ð Ò Ò É Ò Ò ð Ò ð Ò É µ µ µ ÉËå Ô Õ 1 É µ 1 Das Erste HD 2 ZDF HD 3 RTL Television SAT 1 4 5 VOX HD 6 7 8 ProSieben HD RTL2 HD arte HD 1 BBC One Wales DIY SOS É µ É µ Ò Ò Ò ...

Page 77: ... 31 Ò É µ 1 Das Erste HD 1 BBC One Wales DIY SOS 1 Das Erste HD 2 ZDF HD 3 RTL Television SAT 1 4 5 VOX HD 6 7 8 ProSieben HD RTL2 HD arte HD É µ É µ 1 Das Erste HD Ò ð Ò ð 3 Ò Ò Ò ð Ò É ...

Page 78: ... J ÅÉ Ú Ë à à Ú º Ò Ó Û Ó J Ò Ú Þ ÅÉ Ú Ò ºà Ò Ó Û Ó 1 _ 1 ºà ºà ºà ºà Ô Õ Ú É ÅÉ É Ë É É ª ª ª ª ª ª Ú Ú Ò Ò ð Ò Ò Ú ...

Page 79: ... 33 ÉËå É Ò Ó Ó 1 _ ÅÉ Ë à à ɺ ÅÉ Ú J J J J É É À Ã È â Ò Ò À Ã È â ÉËå 72 µ ɺ åÅ á 73 ...

Page 80: ... 34 Û Ò Ó Ó J J Ò Ò Ú Ú Ò Ò ð J   µ à í í íŵ í í Þ Þ Ö Þ J J 1 01 02 03 04 05 06 07 TELETEXT INFORMATION Ú é _ é Ú J ...

Page 81: ... 12 00 12 30 xxxx xxxx xxxx xxxx xxxx xxxx 1 7 14 70 72 85 1 00 Das Erste Hot Wars Emmerdal 10 O clock News Panorama Shopping DIY SOS Coronation Street Spring watch Topics The Bill Holiday Program Pepsi Char Cinema The Bill Coast Red Cap Good bye Drama Live Sports Live junction NEWS Ö Ò Ú Ú 1 Ò _ Ò Ú Ú J ...

Page 82: ... 36 µ Ò Ó µ µ µ Þ µ µ Ò µ Þ Ë µ µ Ò µ µ µ µ 1 _ 3 _ µ 1 _ µ Ôâ Õ _ 1 2 Ù Ú ...

Page 83: ... 37 Ä µ Ôâ Õ J Ä 1 2 å ºÉ É ª Ú å ºÉ É ª Ä Ø Ú Ú Ä 1 2 å ºÉ É ª å ºÉ É å ºÉ É å ºÉ É Ò å ºÉ É ª ...

Page 84: ... 38 Ö µ Ò Ó Ó 1 _ ª 3 _ 4 µ Ò Ëº ð 5 _ 1 ZDF xxx xxx Û µ É µ É Ë É É º Ö ô Ò Ú Ú 6 Ò ...

Page 85: ... 39 µ µ Ò Ó µ µ µ Þ µ µ Ò µ Þ Ò µ 1 _ Ò µ 3 _ µ Ú µ 4 _ 5 J J Ò Ú Ôâ Õ ...

Page 86: ... 40 Ò Ò Ó J Ú Þ Ú J µ Ú 1 _ ...

Page 87: ... 41 _ 1 _ 3 _ Ò Ú Û Ôâ Õ _ ª Ë Ò Ó Ò Ó ...

Page 88: ... Ò Ó J Ö J J Û õ õ â J ÅÉ Ë à à Ú Éº ç é õ J J Ò Ú J ª º J Ö J Ú Ò J J J J J è Ú Ò J _ J J Ö ...

Page 89: ... 43 ª ß J Ö ß Ö Å Õ Ë Õ Ë Æ _ Æ Õ Ù æ âÙ æ Ù æ â æ Õ Ø æ Ø â æ Ø æ Ù â æ Õ Ù Õ Ù Ý Ú _ æ ì æ æ _ µ ª Æ Ì Ì â µ Æ Y Ì Ì ª ª ö Ì Ì ...

Page 90: ... µ _ µ µ Ë Ú ÀÇÈ Å Â é ÅÉË ÉË Ò ë Ø µ ÑË ë ª é ÅÉË ÉË é ÅÉË ÉË µ ªµ ªµ Ç É í Ý É í Å Ý ªÄ ç ËÅ É µ Ý µ ËÅ É µ Ý µ Ý É í Ý ªÄ ç í Ý Ø ËÅ É µ Ý µ Ý ËÅ É µ Ý µ µ ªµ É í å Ý å É í å Ý å É í å Ý å í Ý Ø µ à µË Å ÉËå ª à µË ÉËå ª µ à µË ÉËå _ í â æ _ Ú øËÝ øË _ J ùÝÙ ù _ º Ù Ú Ú Ù Ý Ý Ù Ý â º Ù ÇÚ Ú Ý â Å µè èº ÚÅ µ Å µè èº ÚÅ µ Ú Ù 2 À Ý Ù ...

Page 91: ... 45 À Ò Ò Ó Ó Ó Ä ...

Page 92: ... Ö Ú Ò Ò J Ö Ò Þ Web Site http www panasonic com Panasonic Corporation 2019 ã Ùâ Ø ...

Reviews: