background image

20

DVB Tuning Menu – DVB Auto Setup 

(DVB mode)

DVB Auto Setup automatically retunes your TV. This feature is useful if, e.g., you move house and wish to retune 
your TV to receive the local stations.

Press the 

MENU

 button.

Move to choose 

Setup menu

.

Access 

Setup menu

.

Move to choose 

DVB Setup Menu

.

Access 

DVB Setup Menu

.

Move to choose 

Tuning Menu

.

Access 

Tuning Menu

.

Move to choose 

Auto Setup

.

Access 

Auto Setup

.

Notes:

• 

If you proceed with the next step DVB tuning data will be erased


(all DVB stations and their programme positions stored in your TV’s 
memory will be wiped out so the new settings can be stored).

• If you exit the procedure after this point and before 

Auto Setup

 is 

complete, no station information will be stored. Restart and complete 
the Auto Setup procedure so that the TV is retuned.
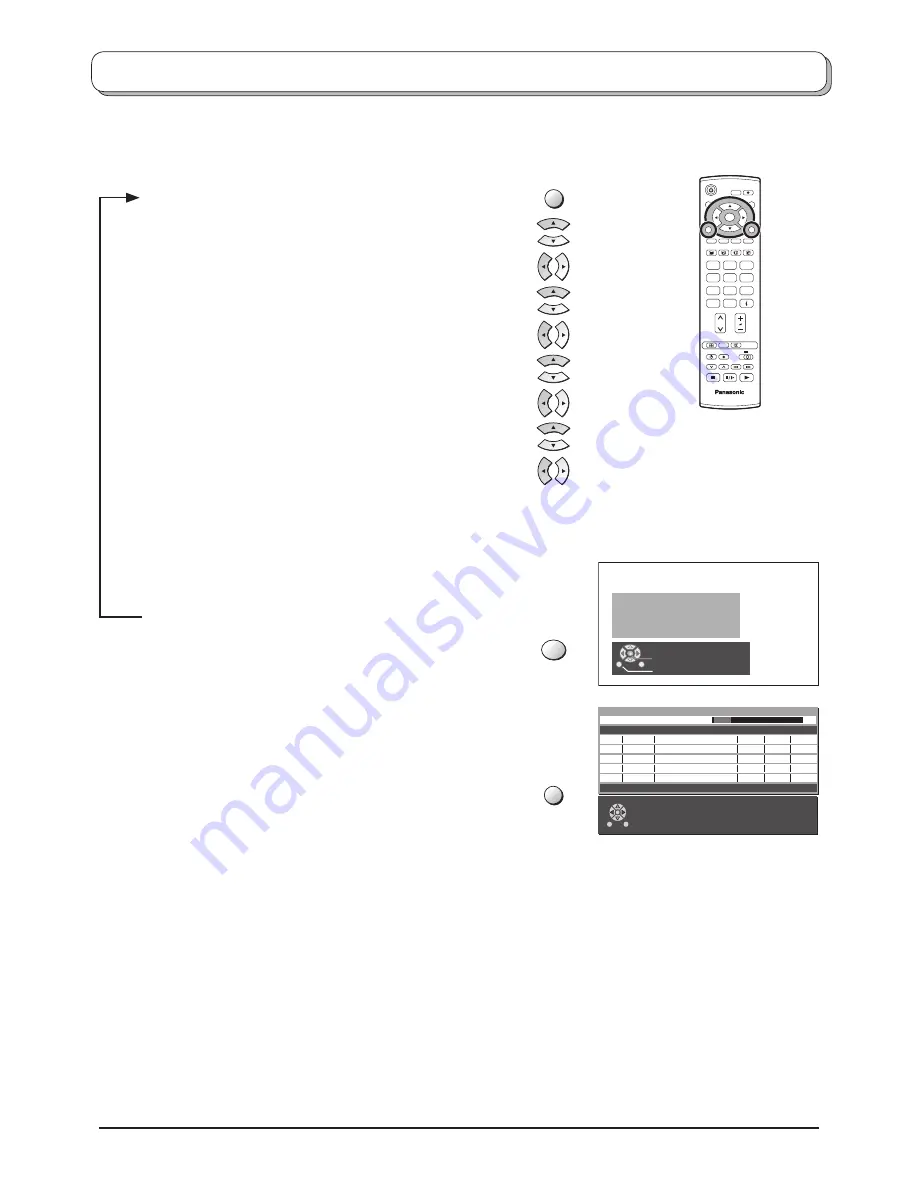
Press to start 

Auto Setup

.

The TV will search for, locate, store and then sort into 
order your local stations.

Once this operation is completed the TV will display the 
programme now stored on programme position 1.

Press the 

EXIT

 button at any time to go back to watching 

TV (please read the 

Notes

 in the above procedure).

EXIT

All  digital  tuning
data  will  be  erased

WARNING

Exit
Return

Start Digital Scan

Please Wait !

DVB Auto Setup

Prog.   Channel            Service Name             NetID.    TS ID.   Quality

This will take about 3 mins.

Exit

4

5

6

7

34

54

54

54

54 

12302

12302

12302

12302

12302

4158

4158

4158

4158

4158

9

9

9

9

9

VOX

N24

ProSieben

KABEL1

SAT.1


69 

5

MENU

OK

In 

DVB mode

1

2

3

4

5

6

7

8

9

0

IDTV

N

MODE

OK

C

Summary of Contents for TX-32LXD55F

Page 1: ...ur set and retain them for future reference TQB0E0227U 1 2 3 4 5 6 7 8 9 0 OK C IDTV N MODE PULL The image shown is for illustration only English TX 32LXD55F Model No Operating Instructions Digital Progressive LCD TV This set is only for use in Germany ...

Page 2: ... Interface Module 22 DVB System Update 23 Information banner 25 Q Link 26 Aspect Controls 27 VCR DVD operation 29 Teletext operation 30 Still 32 Connections 33 How to connect the Headphones AV3 terminals 33 How to connect the Audio Output terminals 34 How to connect the AV1 2 4 Scart terminals 34 How to connect the Component Input terminals 34 How to connect the HDMI Input terminal 35 Troubleshoot...

Page 3: ... mains plug from the wall socket before connecting or disconnecting any leads or if the TV set is not used for a prolonged period of time Note If the set is not switched off when the TV station stops transmitting it will automatically go to Standby mode after 30 minutes This function will not operate when the TV is in AV mode Cabinet and LCD panel care Remove the mains plug from the wall socket Th...

Page 4: ... the front cover Note To avoid interference appearing on the screen do not bundle the RF cable and mains lead together Removal Fitting 1 Push down hooks and pull the cover slightly towards yourself to disengage the claws at 3 points 2 Slowly pull out in the downward direction 1 Insert the claws at 3 points at the bottom end 2 Push until it clicks PULL PULL Raise the lower part of the door marked P...

Page 5: ...dby mode press the button on the remote control The TV set can be switched on by pressing the button again if it was in Standby mode Note This TV will still consume some power as long as the mains plug is still inserted into the wall socket Power Indicator Standby Red On No Light C A T S sensor LCD C A T S Contrast Automatic Tracking System automatically senses the ambient light conditions and adj...

Page 6: ... use Stations are sorted into the following order DVB Stations Are sorted into channel order but can be made favourites list by Profile Edit See page 18 Analogue Stations Are sorted into channel order but can be changed to your preference See page 13 Press the MODE button to select the mode you want to view Press the GUIDE button Analogue mode Analogue Programme Guide Use the cursor buttons to mov...

Page 7: ...rm selections and choices Menu button Press to access the Picture Sound and Setup menus see page 8 11 Coloured buttons used for the selection navigation and operation of various functions Teletext button see page 30 32 Text F P button see page 31 Direct channel access Available in Analogue mode During normal TV viewing or when in the Tuning Programme edit or Manual tuning menus press and then ente...

Page 8: ...eft and right cursor buttons are used to access menus adjust levels or to select from a range of options The OK button is used with a number of features to store settings after adjustments have been made or options have been set The EXIT button is used to exit the menu system and return to the normal viewing screen An On Screen Help box is displayed whenever a menu is displayed on the TV This Help...

Page 9: ...ate settings for each signal source RF AV1 AV2 AV3 AV4 Component and HDMI Changes will be stored automatically By analysing and processing the incoming picture all four modes feature automatic enhancement Contrast Brightness Colour Sharpness Increase or decrease the levels of these options according to your personal preference Tint With an NTSC signal source connected to the TV the picture hue can...

Page 10: ...n also be selected if a mono signal is being transmitted Mode Sound quality can be improved when watching music scene or drama by selecting the appropriate Music or Speech mode Ambience Ambience provides a dynamic enhancer to simulate improved spatial effects HDMI input Displayed during HDMI input mode Allows you to choose from Auto Digital and Analogue Select to fit the input signal Auto Set in n...

Page 11: ...tures including Programme edit and Auto setup See page 12 16 DVB Setup Menu Provides access to setup the DVB operations See page 17 System language When you first install the TV the On Screen Display language is set to German System language lets you change the language used for On Screen Displays Colour system During AV mode Colour system is displayed Lets you select the correct transmission stan...

Page 12: ...ize your programme settings e g adding or deleting a programme position See page 13 14 Auto setup Allows you to automatically retune the TV Useful if you move house and wish to retune your TV to the local stations See page 15 Manual tuning Allows individual programme positions to be tuned manually See page 16 Fine tuning Use to make small adjustments to the tuning of an individual station useful f...

Page 13: ...amme position or the Red button to delete one Press the same button again to confirm your decision Adding deleting a programme channel Confirm Cancel Programme edit Prog Chan Name Lock 1 2 3 4 5 CH44 CH51 CH41 CH47 CH37 ABC XYZ FTP 123 456 Off Off Off Off Off Move the cursor to the programme to be moved Press the Yellow button Choose the new position for the programme channel Press the Yellow butt...

Page 14: ...Choose between Lock On or Lock Off Press the OK button to store the new setting You can copy programme information to a compatible recording device connected to AV2 AV4 See page 34 for connection information Press the Blue button Programme data will now be sent to the recording device s This might take a few seconds depending on the number of stations stored If the message Feature not available ap...

Page 15: ...e Auto setup is complete no station information will be stored Restart and complete the Auto setup procedure so that the TV is retuned Press to start Auto setup The TV will search for locate store and then sort into order your local stations If compatible recording device is connected via theAV2 AV4 terminal programme data will be sent to the device via Q Link See page 26 Once this operation is co...

Page 16: ...ing mode Press the TV AV button to move between Change programme Search and Change TV system Press the or button to change programme position or start search When the desired station is found press the STR button to store The programme position will flash Repeat above procedure to tune additional programme positions Press the F button at any time to go back to watching TV Note If your VCR is conne...

Page 17: ...ositions to watch Multi Audio Allows you to select from several sound tracks The number of options available depends on each broadcast Teletext Allows you to select the language in teletext mode The number of options available depends on each broadcast System Setup Provides access to various specialized DVB options See page 21 System Update Allows you to download new software to the television See...

Page 18: ...D MHP Data All Services Profile 1 Return MENU EXIT OK MENU Green Yellow Blue Add a programme to the Profile list Edit the Profile list Move to the profile list When the profile list is highlighted Press the Red button to edit the profile name Press the Green button to move the programme 1 Move the programme to another position with the up or down cursor button 2 Press the Green button to confirm 3...

Page 19: ...rovide the best picture When viewing analogue pictures interference such as signal reflection from nearby buildings or mountains causes ghosting but still provides a viewable picture For the DVB system interference such as this can disrupt the flow of data causing the picture to appear to be made up of large blocks or to freeze intermittently If the picture disappears completely this could mean th...

Page 20: ...oint and before Auto Setup is complete no station information will be stored Restart and complete the Auto Setup procedure so that the TV is retuned Press to start Auto Setup The TV will search for locate store and then sort into order your local stations Once this operation is completed the TV will display the programme now stored on programme position 1 Press the EXIT button at any time to go ba...

Page 21: ...nguage Setting Profile Edit Tuner Lock DVB Setup Menu System Setup System Update Access Teletext Multi Audio Tuning Menu Off ger ger Common Interface Module The Common Interface Module menu provides access to functions contained on a Common Interface Module inserted into the CI slot located at the rear of the TV See page 22 Preferred Language Setting This option allows you to select the initial la...

Page 22: ...rt the viewing card into the reader If no module is inserted the message No module inserted will be displayed If you have inserted a module check that it is fully inserted The features that now appear on screen are dependent on the contents of the selected Common Interface Module Refer to the instructions supplied with the card or contact the vendor In all cases it is possible to navigate the page...

Page 23: ...on if new software is being broadcast The message might be the notification beforehand In this case the schedule information the date that the new version can be used will appear Press the OK button to download the new version The TV will begin download of the new software version This can take up to about 20 minutes Press the EXIT button to exit without download To ensure that your TV automatical...

Page 24: ...her a newer version is available or not This search process may take a few minutes If a newer software version is found an on screen message will inform the user that it is available The user is given the chance to download this version The message might be the notification beforehand In this case the schedule information the date that the new version can be used will appear Press the OK button to...

Page 25: ...title being shown Now and the next programme title to be shown Next Press the up or down cursor button to step through the banner information for all programmes Press the OK button to view a programme While the banner appears Press the button or the GUIDE button to display an extended banner showing any information available on the current selected programme If the information is out of the screen...

Page 26: ... Additionally when using a Q Link device the main features possible are the following The following features are only available from the device connected to the Scart terminal selected using Q Link See page 11 TV Recording device Auto Power On If you insert pre recorded media into the recording device and press the Play button whilst the TV is in Standby mode the TV will automatically switch on an...

Page 27: ...ilms and programmes can vary If these are wider than a standard 16 9 aspect picture then a black band may be visible at the top and bottom of the screen WIDE will appear in the top left corner of the screen and picture aspect changes accordingly in any aspect modes if a widescreen identification signal WSS is detected or a control signal is found through a Scart terminal Automatic aspect ratio adj...

Page 28: ... the left and right sides of the picture The 4 3 picture will be stretched horizontally so that the image fills the screen this is done in such a way that the stretching is only obvious at the left and right edges of the screen Just Zoom1 will display 16 9 letterbox or 4 3 pictures with no aspect distortions Zoom1 Zoom1 Zoom1 Zoom2 Zoom2 Zoom2 Zoom2 will display 16 9 anamorphic letterbox pictures ...

Page 29: ...ip Fast Forward Cue VCR Press to fast forward the tape In Play mode press to view the picture rapidly forward Cue DVD Press to skip to the next track or title Press and hold to search forward Skip Rewind Review VCR Press to rewind the tape In Play mode press to view the picture rapidly in reverse Review DVD Press to skip to the previous track or title Press and hold to search backward Pause Still ...

Page 30: ...age number Press and hold the OK button the page numbers will change to white indicating that the page is stored HOLD HOLD To hold the Teletext page when viewing multi page information Press again to return to automatic page update Teletext features may vary depending on the Broadcasting Companies and is only available if the channel selected is transmitting Teletext Pressing the MENU button three...

Page 31: ...ub pages to reach the sub page you require As each sub page is found its number is displayed at the top of the page so that you may select it as more sub pages are picked up the display at the top of the page changes so that you are always offered the most recently transmitted selection of sub pages In Teletext operation use the following procedure to access sub pages If the sub page you want to l...

Page 32: ... pages are found pressing the Yellow button will take you to the sub page which you requested Press the TEXT button to return to normal TV operation INDEX INDEX When in TOP FLOF operation Press the INDEX button to return to the main index page Depending on the way information is transmitted this may have to be pressed more than once to return to the main index page MENU Picture and text Press the ...

Page 33: ...isappear after a few seconds If you want to select an input when the keys are not shown press any one of the coloured buttons and the keys will reappear Notes The volume level of the headphones can be adjusted by selecting Headphone volume from the Sound menu Additional equipment and cables shown are not supplied with this TV set Notes You can also select an AV source using the TV AV button on the...

Page 34: ...to connect the Component Input terminals How to connect the Audio Output terminals How to connect the AV1 2 4 Scart terminals AV4 VCR S VIDEO VCR Q Link COMPATIBLE VCR SET TOP BOX DVD PLAYER DVD RECORDER Q Link COMPATIBLE DVD RECORDER CAMCORDER S VIDEO CAMCORDER GAME CONSOLE COMPUTER RGB AV1 VCR SET TOP BOX DVD PLAYER DVD RECORDER CAMCORDER GAME CONSOLE COMPUTER RGB AV2 VCR S VIDEO VCR Q Link COMP...

Page 35: ...has aspect adjustment set it to 16 9 for correct output display on this TV For applicable HDMI signals information see page 38 How to connect the HDMI Input terminal Compatible sampling frequency of AUDIO signal through HDMI L PCM 48 kHz 44 1 kHz 32 kHz Notes This HDMI connecter is Type A If you connect equipment without a digital output terminal connect to the COMPONENT S VIDEO or VIDEO input ter...

Page 36: ... TV through a mixer In this case connect either Aerial or CATV signal directly to the TV Normal Picture Weak or Distorted Sound Sound reception may have deteriorated Switch MPX setting Sound menu inAnalogue mode to Off until reception improves There may be red spots blue spots and green spots on the screen Normal Sound This is a characteristic of liquid crystal panels and is not a problem The liqu...

Page 37: ... picture disappears completely this could mean that signal quality is very poor If this happens often you may need to improve your aerial system to provide a better signal This TV contains a complex microprocessor which enables you to view enhanced digital services Occasionally this device may need to be reset This can be done by pressing the standby button on your remote control Symptoms Checks N...

Page 38: ...io in L Audio earth Audio in R AV1 Scart terminal RGB VIDEO Suitable inputs for AV1 include RGB Red Green Blue AV2 Scart terminal VIDEO S VIDEO Q Link AV2 Pins 15 and 20 are dependent on AV2 S VHS VIDEO switching Chrominance in Luminance in Chrominance earth Luminance earth AV3 S VIDEO 4 pin terminal Socket Earth CVBS out video CVBS earth S C in Earth Earth Earth Audio out L Audio out R CVBS in vi...

Page 39: ... signals may not be received in some areas This set is only for use in Germany Aerial Rear UHF VHF Operating Conditions Temperature 5 C 35 C Humidity 5 90 RH non condensing Connection Terminals AV1 Scart connecter 21 Pin terminal Audio Video in Audio Video out RGB in AV2 Scart connecter 21 Pin terminal Audio Video in Audio Video out S Video in Q Link AV3 Input VIDEO RCA PIN Type 1 S VIDEO Mini DIN...

Page 40: ...a free of charge basis Alternatively in some countries you may be able to return your products to your local retailer upon the purchase of an equivalent new product Disposing of this product correctly will help to save valuable resources and prevent any potential negative effects on human health and the environment which could otherwise arise from inappropriate waste handling Please contact your l...

Reviews: