background image

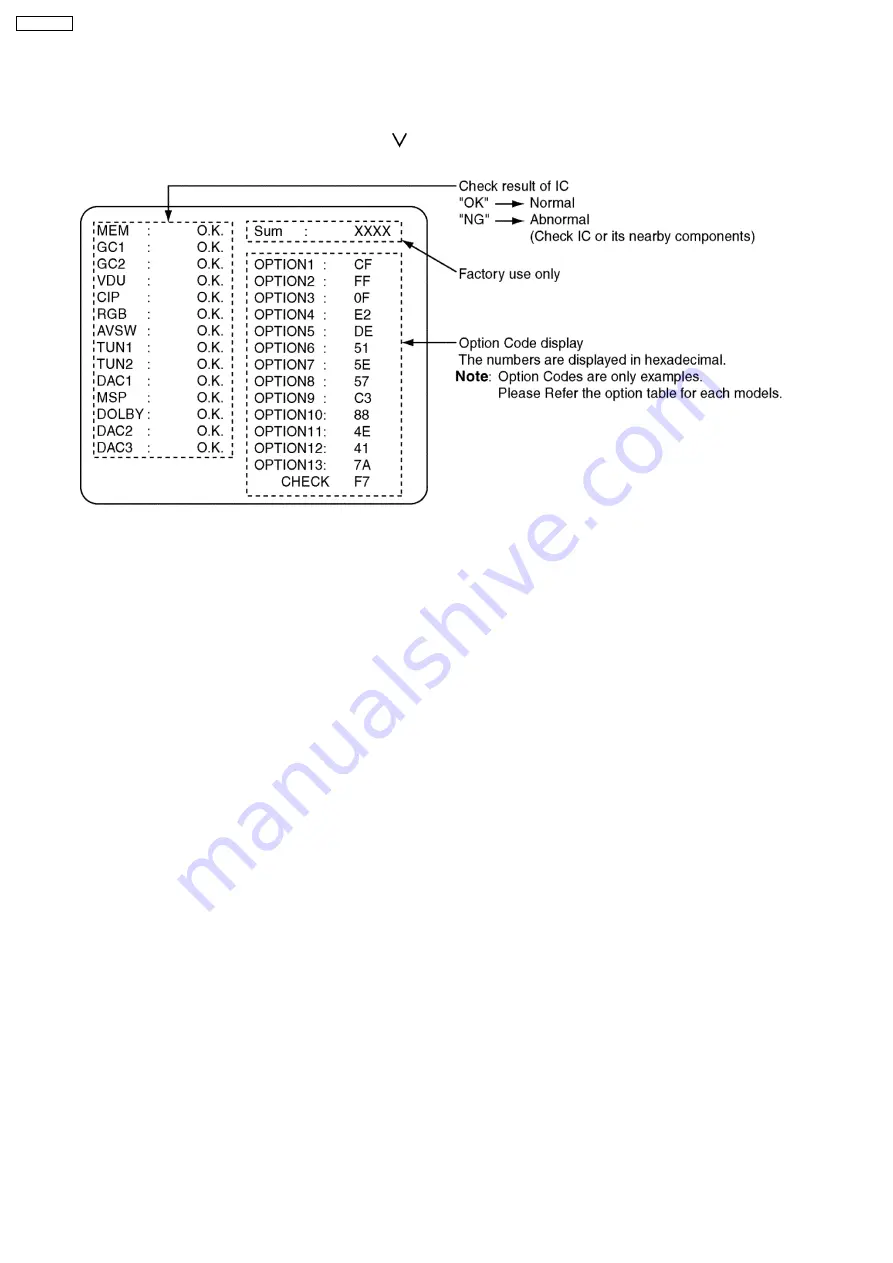
3 SELF CHECK

 1. Self-Check is used to automatically check the bus lines and hexadecimal code of the TV set.

 2. To get into the Self-Check mode, press the down n [-/

] button on the customer controls at the front of the set, at the same

time pressing the HELP button on the remote control and the screen will show:

6

TX-29P180X

Summary of Contents for TX-29P180B

Page 1: ...eceiving Channels Regular TV 2003 Matsushita Electric Industrial Co Ltd All rights reserved Unauthorized copying and distribution is a violation of law TX 29P180B MD3N Chassis VHF BAND 2 12 PAL SECAM B K1 0 12 PAL B AUST 1 9 PAL B N Z 1 12 PAL SECAM D 1 12 NTSC M Japan 2 13 NTSC M U S A UHF BAND 21 69 PAL G H I SECAM G K K1 28 69 PAL B AUST 13 57 PAL D K 13 62 NTSC M Japan 14 69 NTSC M U S A CATV ...

Page 2: ...t S Video Video Audio L R RGB Terminals AV3 IN Rear Video Audio L R terminals AV4 IN Rear Video or Y PB PR Audio L R terminals RGB Input High DENSITY D sub 15 pin 31 5 kHz 60 Hz 640 x 480 dot and 31 5 kHz 70 Hz 640 x 400 dot Remote Control Transmitter R6 AA Battery x 2 75 Ω coaxial aerial plug Dimensions W x D x H 699 mm x 509 mm x 584 mm Weight Mass 53 kg Net Note Design and Specifications are su...

Page 3: ... being exposed to shock hazards 1 2 Leakage Current Cold Check 1 Unplug the AC cord and connect a jumper between the two prongs on the plug 2 Turn on the receiver s power switch 3 Measure the resistance value with an ohmmeter between the jumper AC plug and each exposed metallic cabinet part on the receiver such as screw heads aerials connectors control shafts etc When the exposed metallic part has...

Page 4: ...on Note It is important to use an accurate periodically calibrated high voltage meter 1 Set the brightness to minimum 2 Measure the High Voltage The meter reading should indicate 31 0 1 kV If the meter indication is out of tolerance immediate service and correction is required to prevent the possibility of premature component failure 3 To prevent the possibility of X Radiation it is essential to u...

Page 5: ...this Mode prevents the customer from changing the TV preset data such as Channel preset data Note This Mode is useful for Hotels You should not get into Hotel mode with Normal use Operation 1 To get into Hotel Mode press the remote control Recall button and Channel up key on the TV set simultaneously after setting the Off Timer mode 2 In this mode the Channel up and down Function will be enabled a...

Page 6: ... the bus lines and hexadecimal code of the TV set 2 To get into the Self Check mode press the down n button on the customer controls at the front of the set at the same time pressing the HELP button on the remote control and the screen will show 6 TX 29P180X ...

Page 7: ...control in Service Mode 4 1 HOW TO ENTER SERVICE 1 1 In sound menu set BASS to MAX and set TREBLE to MINIMUM 2 Simultaneously press INDEX button on remote control and VOLUME DOWN button on the TV set 4 2 HOW TO ENTER SERVICE 2 1 Set the channel to CH99 2 Press HOLD button on remote control Note To exit Service mode press N or Power button on remote control 7 TX 29P180X ...

Page 8: ...ption3 00 0E2 b0 1 A2 enable 4 5 1 b1 1 5 5 1 b2 1 6 0 1 b3 1 NICAM enable 6 5 1 b4 0 4 5 1 b5 0 5 5 1 b6 0 6 0 1 b7 0 6 5 1 option4 00 0E3 b0 0 A2 select 6 5MHz 5 742MHz 0 6 742MHz 1 b1 1 NICAM priority ASIA M E 1 b2 0 HK UK 1 b3 0 CHINA 1 b4 0 NZ INDONESIA 1 b5 1 AUSTRALIA 1 b6 1 E EUROPE 1 b7 1 SPECIAL 1 option5 00 0E4 b0 0 Virtual Dolby Surround enable 1 b1 1 NICAM C4 bit enable 1 b2 1 Noise m...

Page 9: ...urope 1 1 b5 0 E Europe 2 1 b6 1 Arabic 1 b7 0 option8 00 0E7 b0 1 VGA enable 1 b1 1 Reserved 1080i Enable 1 b2 0 Reserved ID 1 Enable 1 b3 0 Australia enable 1 b4 1 OSD language ARABIC 1 b5 0 RUSSIAN 1 b6 1 CHINESE 1 b7 0 free option9 00 0E8 b0 1 Panasonic LOGO Display 1 b1 1 MPX status Display 1 b2 0 Scan mode AUTO for P NTSC Progressive2 0 Progressive 1 b3 0 free b4 0 free b5 0 free b6 1 X ray ...

Page 10: ...i enable 1 option12 41 0EB b0 1 Asia Asia 1 Europe 0 b1 0 b2 0 Ireland not use b3 0 UK not use b4 0 b5 0 Reserved for 29 inch etc b6 1 Large size 52 1 42 0 for PTV 36 1 32 0 for wide 34 1 29 0 for 4 3 b7 0 PTV PTV 1 option13 7A Temporary 0EC b0 0 VDU Version A21 0 A12 1 b1 1 GC Version ES5 0 ES6 1 b2 0 UV Swap Swap 1 b3 1 TEXT Enable 1 b4 1 Main GC ES7 ES7 1 ES5 6 0 b5 1 Sub GC ES7v ES7 1 ES5 6 0 ...

Page 11: ...input contrast and brightness minimum 1 Check the EHT voltage is 32 0 1 0 kV 2 Switch from AV mode to TV 3 With the Brightness and the contrast controls MAX check that the high voltage does not drop more than 3 0 kV from the above measurement with R F signal 5 3 SUB CONTRAST Item Preparation Adjustment Procedure 1 Receive PAL colour bar pattern 2 Connect oscilloscope to A51 pin 48 3 Set controls B...

Page 12: ...level of waveform is similar to Fig 3 Fig 3 2 Receive the Rainbow pattern 3 58 MHz NTSC on both of Main and Sub pictures 3 Adjust Sub NTSC Tint 2 so that the peak of level of waveform is similar to Fig 4 Fig 4 5 5 SUB COLOUR Item Preparation Adjustment Procedure 1 Receive a 3 58 MHz NTSC rainbow pattern 2 Connect oscilloscope to A51 pin 48 3 Set controls BRT CENTER COLOUR CENTER CONTRAST MAX AI OF...

Page 13: ...re vertical position VRS Mg Set VRS Mg that 2 magnets are side position c Set geomagnetic correction DAC 0 2 ADJUSTMENT a Receive the white balance pattern b Adjust V CENTER c Set R B CUT OFF to minimum 0 and set G CUT OFF to center 511 d Receive the aging pattern e Set 2 magnets of vertical position to up and down equally so that center part of CRT Fig 3 Fig 1 Fig 2 Fig 3 13 TX 29P180X ...

Page 14: ...NAMIC Normal and adjust BRIGHT DAC until gray portion of cross hatch d Set DY to CRT not to tilt up and down and left and right 3 ADJUSTMENT a Static convergence Adjustment a Make sure that magnets are positioned shown in Fig 1 b Adjust 4 pole magnets Fig 1 to align center dots of R and B and adjust 6 pole magnets to align center dots to G c After adjustment secure magnets with magnet lock of whit...

Page 15: ... point for the screen control Note that do not adjust the G CUTOFF setting in the following procedure 4 Adjust the remained R and B CUTOFF controls so as to get a white horizontal line on the screen 5 Return to full field SCAN by pushing the position 5 key on the remote control 6 Adjust the R Drive and B Drive controls as to obtain uniform white on the white bar of the greyscale pattern 7 Confirm ...

Page 16: ...ure 1 Receive a cross hatch pattern signal 1 Adjust the Focus to thin all the Lines by Focus 1 Control Prefer to thin the Vertical Lines than Horizontal Line 2 Adjust the Focus to thin the Horizontal Lines by Focus 2 Control 5 12 GEOMAGNETIC Item Preparation Adjustment Procedure 1 Demagnetize the GM Board around its perimeter with the Demagnetizer 2 Set to control Geomagnetic Auto 1 Connect a DC v...

Page 17: ...equal 6 1 1 4 60p V POS ADJUSTMENT 1 Receive NTSC monoscope pattern 2 Set scan mode to progressive by remote control key 3 Adjust V POS 60p 4 3 so that the scale of the top and bottom side is equal Fig 1 6 1 2 V HEIGHT ADJUSTMENT 4 3 MODE 6 1 2 1 100i V AMP ADJUSTMENT 1 Receive PAL monoscope pattern 2 Set scan mode to 100 Hz by remote control key 3 Adjust V AMP 100i 4 3 so that B D Fig 2 is 2 1 0 ...

Page 18: ...ote control key 3 Adjust H POS 120i 4 3 so that the horizontal position is center of CRT 6 2 2 H WIDTH ADJUSTMENT 4 3 MODE 6 2 2 1 100i H AMP ADJUSTMENT 1 Receive PAL monoscope pattern 2 Set scan mode to 100 Hz by remote control key 3 Adjust H AMP 100i 4 3 so that both of the edges are within A B 2 5 0 2 6 2 2 2 120i H AMP ADJUSTMENT 1 Receive NTSC monoscope pattern 2 Set scan mode to 100 Hz by re...

Page 19: ...at there is no trapezoid parallel distortion 6 Confirmation EW of the corner side If need adjust Top Corner 120i 4 3 and Bottom Corner 120i 4 3 7 Confirm bow level of the both side If it is not symmetrical adjust C Correct 120i 4 3 Fig 4 6 3 3 50p EW ADJUSTMENT 4 3 MODE 1 Receive PAL cross hatch pattern 2 Set scan mode to progressive by remote control key 3 Adjust the vertical line to straight by ...

Page 20: ... key 3 Confirm V linear 100i 4 3 as to the balance of circle If needed adjust V linear 100i 4 3 6 4 2 120i V Linear ADJUSTMENT 1 Receive NTSC monoscope pattern 2 Set scan mode to 100 Hz by remote control key 3 Confirm V linear 120i 4 3 as to the balance of circle If needed adjust V linear 120i 4 3 6 4 3 50p V Linear ADJUSTMENT 1 Receive PAL monoscope pattern 2 Set scan mode to progressive by remot...

Page 21: ...t and copy the data of 120i 4 3 to 60p 16 9 about H AMP and C Correct 6 5 2 V AMP 16 9 ADJUSTMENT 1 Receive PAL monoscope pattern 2 Set the aspect to 16 9 3 Set scan mode to 100 Hz 4 Confirm that A B in Fig 7 is 5 0 cm 1 cm If not adjust V AMP 100i 16 9 5 Set scan mode to progressive 6 Confirm that A B in Fig 7 is 5 0 cm 1 cm If not adjust V AMP 50p 16 9 7 Receive NTSC monoscope pattern 8 Set scan...

Page 22: ...ADJUSTMENT 1 Adjust V AMP VGA so that A B in Fig 8 6 8 3 H CENTER ADJUSTMENT 1 Adjust H POS VGA so that horizontal position is center of CRT 6 8 4 H WIDTH ADJUSTMENT 1 Adjust H AMP VGA so that C D in Fig 8 6 8 5 EW ADJUSTMENT 1 Adjust the vertical line to straight line by Parabola VGA 2 Adjust the vertical line to straight line of both side vertical line in Fig 9 by Trapezoid VGA 3 Confirm there i...

Page 23: ...t H SIZE in the user control to NORMAL No need if SELF CHECK is done before shipping 6 10 TABLE 1 mode 100i PAL 4 3 100i PAL 16 9 120i NTSC 4 3 120i NTSC 16 9 50p PAL 4 3 50p PAL 16 9 60p NTSC 4 3 60p NTSC 16 9 525p YUV 4 3 525p YUV 16 9 625p YUV 4 3 625p YUV 16 9 VGA 480 60H z VGA 400 7 0Hz H POS ADJ D00 ADJ D02 COPY D01 ADJ D03 V POS ADJ D10 COPY D10 D14 ADJ D11 COPY D11 D15 ADJ D12 COPY D12 D16...

Page 24: ...DA1 ADJ DA3 ADJ DA2 ADJ DA4 Top Corner ADJ DB1 ADJ DB5 ADJ DB2 ADJ DB6 ADJ DB3 ADJ DB7 ADJ DB4 ADJ DB8 ADJ DBA ADJ DB9 ADJ DD2 Bottom Corner ADJ DC8 ADJ DCC ADJ DC9 ADJ DCD ADJ DCA ADJ DCE ADJ DCB ADJ DCF ADJ DD1 ADJ DD0 ADJ DD2 V S Correct FIX 2B DDF FIX 19 DE3 FIX 22 DE0 FIX 20 DE4 FIX 2C DE1 FIX 1E DE5 FIX 31 DE2 FIX 20 DE6 FIX 2E DE8 FIX 2D DE7 FIX 20 DE9 EEPOM ADDRESS 24 TX 29P180X ...

Page 25: ...7 CONDUCTOR VIEWS 7 1 A Board TNP4G167AA 25 TX 29P180X ...

Page 26: ...8 SCHEMATIC DIAGRAMS 8 1 SCHEMATIC DIAGRAM NOTES 26 TX 29P180X ...

Page 27: ...27 TX 29P180X ...

Page 28: ... STEREO Circuit TNP4G169AA 8 1 3 Front AV Geomagnetic Circuit TNP4G171AB 8 1 4 CRT Circuit TNP4G177AA 8 1 5 Pincushion Circuit TNP4G181AA 8 1 6 Digicomb Board TNP4G189AA Digicomb Board 1 2 Digicomb Board 2 2 8 1 7 Digicomb2 Board TNP4G203AA 8 1 8 Geomagnetic Circuit TNP4G118AT 28 TX 29P180X ...

Page 29: ...9 PARTS LOCATION TX 29P180X 29 ...

Page 30: ...TX 29P180X 30 ...

Page 31: ...10 Replacement Parts List 10 1 Replacement Parts List Notes 31 TX 29P180X ...

Page 32: ...10 2 Replacement Part List 32 TX 29P180X ...

Reviews: