background image

15

5. 5MHz

1

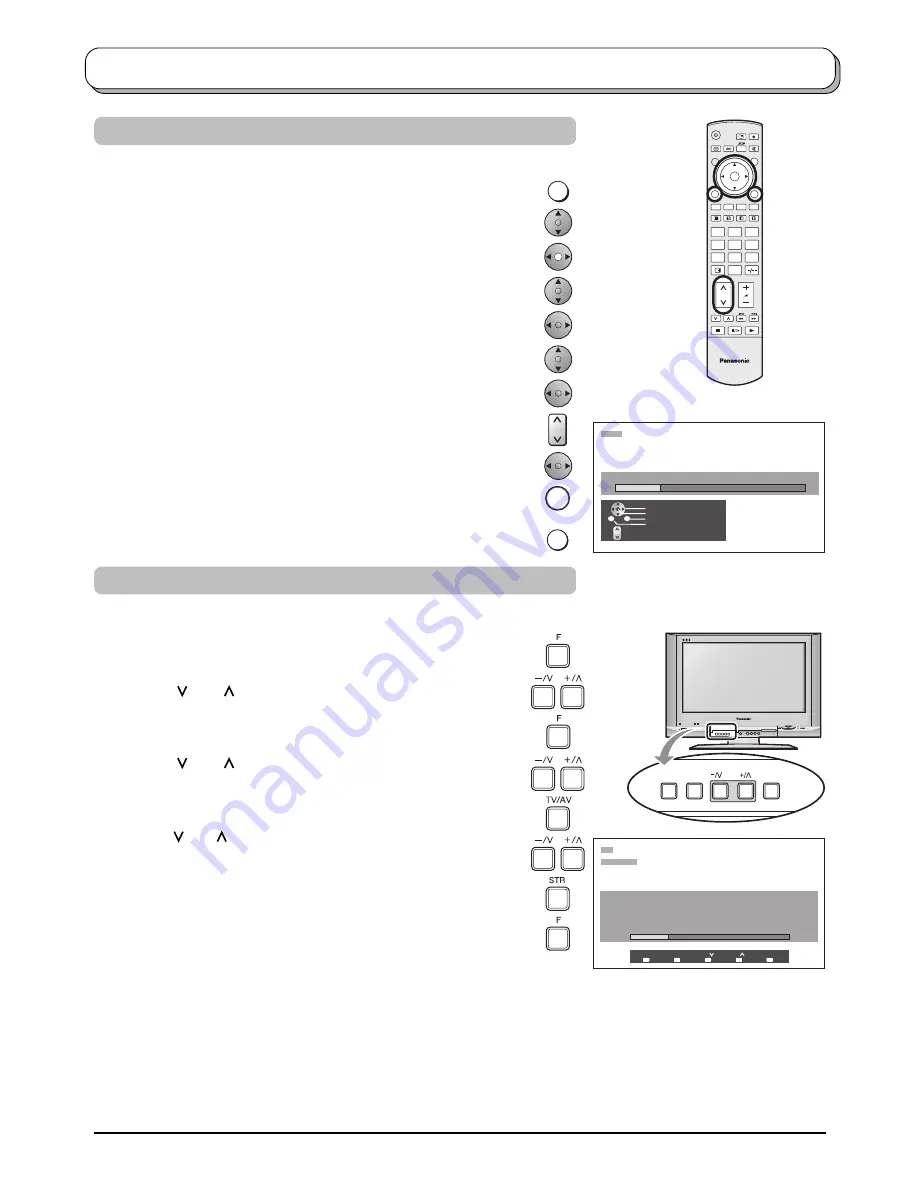
Manual  tuning

-, + 

:  Search

TV / AV  :  Move  cursor
STR 

:  To  store

:  To  exit

STR

F

- / 

+ / 

TV / AV

Tuning

Press the 

MENU

 button.

Move to choose 

Setup menu

.

Access 

Setup menu

.

Move to choose 

Tuning menu

.

Access 

Tuning menu

.

Move to choose 

Manual tuning

.

Access 

Manual tuning

.

Select the programme position to be tuned.

Press repeatedly until required station is found.

When the desired station is found, press the 

OK

 button to store.

The programme position will flash.

Press the 

EXIT

 button at any time to go back to watching TV.

It is possible to retune individual programme positions:

It is also possible to use the control panel buttons on the front of the TV to tune individual programme positions:

STR

F

TV/AV

1

Manual  tuning

Search down/up
Store

Programme down/up

Return

Exit

MENU

OK

OK

TV

1

2

3

4

5

6

7

8

9

0

OK

Press 

F

 until 

Tuning mode

 is reached.

Press 

–/

 or 

+/

 to access 

Tuning mode

.

Press 

F

 until 

Manual tuning 

is reached.

Press 

–/

 or 

+/

 to access 

Manual tuning

.

Press 

TV/AV

 to move between Change Programme, Search

and Change sound system.

Press 

–/

 or 

+/

 to change programme position or start search.

When the desired station is found, press 

STR

 to store.

The programme position will flash.
Repeat above procedure to tune additional programme positions.

Press 

F

 at any time to exit the Tuning menu.

EXIT

Manual tuning  (via front panel)

Notes:

• If a clear picture cannot be obtained even when a Broadcast or AV signal is received, refer to the Colour system

selection on page 13.

• After the Manual tuning is finished, press the Programme Number up button to confirm the tuning condition for each

Programme Numbers. If some Programme Numbers are unused, it is possible to skip such Programme Numbers.
Please refer to the Skip function on page 13.

• When using a VCR without video and audio input / output terminals, it is convenient to connect the aerial cable as

indicated in the instruction manual of VCR and to set the designated channel to Programme No.“0”. In that case,
perform Manual tuning after setting the Colour system and Sound system in advance. Further, in multi-system
VCR, it is more convenient to set the designated channel to several Programme Numbers.

Manual tuning

Summary of Contents for TX-26LX500A

Page 1: ...nstructions before operating your set and retain them for future reference English TQBC2050 The illustration shown is an image TX 26LX500A TX 32LX500A Operating Instructions Wide LCD TV Model No TV 1 2 3 4 5 6 7 8 9 0 OK ...

Page 2: ...anasonic Customer Welcome to the Panasonic family of customers We hope that you will have many years of enjoyment from your new LCD TV To obtain maximum benefit from your set please read these Instructions before making any adjustments and retain them for future reference Retain your purchase receipt also and note down the model number and serial number of your set in the space provided on the bac...

Page 3: ...d odd sounds smoke or unusual odours coming from the unit Unplug the power cord if foreign matter or water falls into the unit or if the unit is dropped or the cabinet is damaged TAKE CARE NOT to damage the power cord DO NOT touch the aerial cable and this unit when there is lightning DO NOT use if the power cord or power plug is damaged or if the plug does not fit tightly into the socket DO NOT u...

Page 4: ...pment motors fans other speakers etc nearby Optional External Equipment The Audio Video connection between components can be made with shielded video and audio cables For best performance we recommend 75 Ω coaxial aerial cable is used Cables are available from your dealer or electronic supply store Before you purchase any cables be sure you know what type of output and input connectors your variou...

Page 5: ...al No DO NOT REMOVE COVER NO USER SERVICE ABLE PARTS INSIDE REFER SERVICIN G TO QUALIFIE D SERVICE PERSON NEL ONLY Though surface of the unit may feel warm during operation this condition is normal Note To avoid interference appearing on the screen do not bundle the RF cable and mains lead together 1 Push down hooks and pull the cover slightly towards yourself to disengage the claws at 3 points 2 ...

Page 6: ... Dealer may be able to assist you in obtaining the correct Aerial system for your particular area and the accessories required Any matters regarding Aerial installation upgrading of existing systems or accessories required and the costs incurred are the responsibility of you the Customer For proper reception of VHF UHF channels an external antenna is required For best reception an outdoor antenna ...

Page 7: ...he keys will reappear Notes You can also select an AV source using the TV AV button on the front panel of the TV Press the TV AV button repeatedly until you reach the AV source you wish to view When a Monaural VCR is used connect the Monaural Audio cable to the AUDIO L terminal without HDMI PC Additional equipment and cables shown are not supplied with this TV set TV AV 1 2 3 4 5 6 7 8 9 0 OK AV1 ...

Page 8: ...in terminal Luminance earth Luminance in Chrominance in Chrominance earth To receive monaural output connect to AUDIO L MONO terminal Audio Video connections Y PB CB PR CR MONO AV4 IN AUDIO OUT VIDEO OUT L R Y PB PR OUT PR PB Y COMPONENT VIDEO OUT S VIDEO COMPONENT MONITOR OUT AV1 IN AV2 IN AV4 IN VIDEO L AUDIO R PB CB Y PR CR MONO MONO MONO DVD PLAYER Example of input signal source Digital TV SET...

Page 9: ...gital output terminal connect to the COMPONENT S VIDEO or VIDEO input terminal on the TV so you can receive an analogue signal The HDMI IN terminal can only be used with 480i 480p 576i 576p 720p or 1080i picture signals Set the Digital Set Top Box DIGITAL OUT terminal output setting to 480i 480p 576i 576p 720p or 1080i For detailed information refer to the Digital Set Top Box instruction manual If...

Page 10: ...T MONITOR OUT AV1 IN AV2 IN AV4 IN VIDEO L AUDIO R PB CB Y PR CR MONO MONO MONO U S patent No 4 907 093 L R PC IN AUDIO IN COMPUTER RGB AUDIO D sub 15p Stereo plug Conversion adapter if necessary 1 6 7 8 3 9 4 5 10 15 14 13 12 11 2 Pin No Signal Name Pin No Signal Name Pin No Signal Name 1 R 6 GND Ground 11 NC not connected 2 G 7 GND Ground 12 NC not connected 3 B 8 GND Ground 13 HD SYNC 4 NC not ...

Page 11: ...ee page 20 N Normalize button Resets all settings to their default levels Press to confirm selections and choices MENU button Press to access the Picture Sound and Setup menus see page 17 19 Coloured buttons used for the selection navigation and operation of various functions Teletext button see page 32 34 Text F P button see page 33 Recall button Press to display the current system status for exa...

Page 12: ...d select menus The left and right cursor buttons are used to access menus adjust levels or to select from a range of options The OK button is used with a number of features to store settings after adjustments have been made or options have been set The EXIT button is used to exit the menu system and return to the normal viewing screen An On Screen Help box is displayed whenever a menu is displayed...

Page 13: ...er conditions are affecting reception quality of a program To cancel the Fine tuning tune again by Manual tuning It is possible to skip Program Number on which no TV stations are tuned appearing on the screen The function is only effective when pressing the Program Number up or down button either on the TV set or on the remote control Under the normal viewing select the Program Number you would li...

Page 14: ...to go back to watching TV please read the Note in the above procedure MENU OK TV 1 2 3 4 5 6 7 8 9 0 OK AUTO SETUP IN PROGRESS SEARCHING PLEASE WAIT 12 Return Exit Press F until Tuning mode is reached Press or to access Tuning mode Press F until Auto tuning is reached Press or to start search Press TV AV at any time to exit the Tuning menu It is also possible to use the control panel buttons on th...

Page 15: ...en Change Programme Search and Change sound system Press or to change programme position or start search When the desired station is found press STR to store The programme position will flash Repeat above procedure to tune additional programme positions Press F at any time to exit the Tuning menu EXIT Manual tuning via front panel Notes If a clear picture cannot be obtained even when a Broadcast o...

Page 16: ...3 62 C13 S 1 S 2 S 3 S 1 S 2 S 3 S 1 S 2 S 3 S 1 S 1 S 2 S 3 21 22 23 24 28 57 58 59 62 63 69 90 91 92 93 94 95 96 97 98 99 70 73 74 75 76 77 78 79 80 81 89 100 107 117 118 120 125 100 125 Z10 Z11 Z12 Z13 Z14 Z15 Z16 Z17 Z18 Z19 S11 S12 S13 S14 S15 S16 S17 S18 S19 S20 S11 S12 S13 S14 S15 S16 S17 S18 S19 S20 S11 S12 S13 S14 S15 S16 S17 S18 S19 S20 S11 S12 S13 S14 S15 S16 S17 S18 S19 S20 S14 S15 S16...

Page 17: ... of the picture Choose from Cool Standard and Warm Enables vivid colour adjustment automatically Reduces noise in a channel with many noises Remains Off when receiving a strong signal Off Recommended mode when receiving a strong signal Strong Applies strong noise reductions regardless of input signals Weak Applies weak noise reductions regardless of input signals Auto Automatically reduces unwante...

Page 18: ...vel comfortable for them To enjoy a concert hall effect turn Surround to On Switching is also possible by pressing the SURROUND button The benefits of Surround sound are enormous You can be completely enveloped in sound just as if you were at a concert hall or cinema The Surround effect can be obtained without the use of external Surround speakers Displayed during HDMI input mode Allows you to cho...

Page 19: ...SECAM and NTSC 3 58 are different colour signal broadcast transmission systems applicable to differing countries NTSC 4 43 is a trick playback mode used in special VCR s to playback NTSC recorded video tapes through PAL television equipment Displayed during AV mode Displays 480p 576p input signals in a natural colour from digital equipment adapters connected to COMPONENT VIDEO INPUT Y PB PR termin...

Page 20: ...isplay a true 16 9 anamorphic picture with no aspect distortions Zoom1 will display 16 9 letterbox or 4 3 pictures with no aspect distortions Use Just when you wish to expand a 4 3 picture to fill the whole screen rather than watching a programme with black stripes down the left and right sides of the picture The 4 3 picture will be stretched horizontally so that the image fills the screen this is...

Page 21: ... Y PB PR Picture and picture mode Press the Blue button The two pictures have been swapped the picture in the smaller window has become the main window picture Picture in picture mode Changing the mode Main window Press the TV AV button to switch between the TV and AV mode During the AV mode press any coloured button Whilst the on screen selector keys are displayed press coloured button to select ...

Page 22: ... chosen menu Press the EXIT button at any time to exit Picture menu Menu Contrast Brightness Sharpness Colour temperature About settings see page 17 Advanced setting Access to adjust to the fine picture at a professional level R Gain Adjusts the white balance for red areas G Gain Adjusts the white balance for green areas B Gain Adjusts the white balance for blue areas Gamma 2 0 2 2 2 5 MENU OK R G...

Page 23: ... V pos Clock phase Sync VGA PC setup H V Clock If a periodic striped pattern noise occurs carry out adjustments to reduce the noise to the lowest level H pos Adjust the horizontal position V pos Adjust the vertical position Clock phase Eliminate the flickering and distortion Carry out this adjustment after adjusting Clock Adjust to reduce noise to the most inconspicuous level Sync H V To synchroni...

Page 24: ...ot compatible with card type hard disk Micro Drive Mobile type hard disk etc Memory cards are not supplied with this television When both SD card and PC card are inserted in the slot SD card has the priority You can change the priority See page 29 Note Suitable SD Memory Cards Please confirm the latest information on the following website http panasonic co jp pavc global cs This site is in English...

Page 25: ...format 2 0 2 1 2 2 or JFIF JPEG file interchange format in addition to the DCF design rule for Camera File system format MPEG4 view can only show moving pictures recorded by this unit Panasonic DVD recorder DIGA or mobile camera D snap When recording in MPEG4 format the SD card with this unit The card may not operate properly if formatted with different equipment Memory cards must be formatted wit...

Page 26: ... picture can be switched for the sub window If the signal system is changed during recording it cannot be recorded completely The signals without video only audio cannot be recorded completely SD recording is also possible on the Multi Media Card except EXTRA FINE and SUPER FINE MODE and MiniSD Card SD REC SD REC OK Remaining time is not enough Rec time is set to No setting Start recording Not eno...

Page 27: ...s MPEG4 view After for a while the thumbnail screen is displayed Select the file Press the OK button The moving picture starts Notes Picture menu Sound menu in playback only or Card setup menu in thumbnail only adjustment is possible by pressing the MENU button during MPEG4 view Date shows the date on which the recording was made by this unit DIGA or D snap Its format is 01 01 2000 when recordings...

Page 28: ...ect the file you want to delete in the thumbnail Press the Red button to delete the file Press again to confirm your decision Note If the file is locked it is not possible to delete Card setup menu Press the MENU button during MPEG4 view thumbnail Move to choose Card setup menu Access Card setup menu Move and adjust options Frame size Normal or Large Select the Frame size of the playback picture R...

Page 29: ...ring Photo view Move to choose Card setup menu Access Card setup menu Move and adjust options or access Slide show MENU OK OK OK Red Select Select SD Return Exit View PHOTO VIEW MODE Filename 800 0003 Date 06 12 2003 Pixel 2048x1536 00001 00028 SD card MPEG4 view Photo view Setup Memory left Inserted card displayed Slide show Interval Card setup menu Access 5sec Repeat Off Card SD Main menu Pictur...

Page 30: ...e recording Note If you set Rec time to No setting the recording does not stop until the card is fully recorded Card format The confirmation message will appear Press the OK button to format the card Notes If the card is formated all data is erased Only cards that are supported by the SD card slot can be formatted Do not remove the SD card while formatting That may cause the card to not be able to...

Page 31: ... or FAT 16 Still image must be with DCF and EXIF standard JPEG file Moving picture must be with MPEG4 standard ASF file This type of card is not supported Incompatible card is inserted Broken file Cannot display image The file is broken Memory full The card memory is full Not enough memory The card does not have enough memory to operate Cannot read file The file is not readable Unrecordable source...

Page 32: ...e If Teletext is in use the aspect ratio is set to 16 9 TV Teletext mode Press the TEXT button to switch between the current programme and teletext Page Selection Pages can be selected in two ways a Press the Up Down buttons to increase or decrease the page number by one b By entering the page number using 0 9 on the remote control Full Top Bottom Press the MENU button to display special functions...

Page 33: ...he page so that you may select it as more sub pages are picked up the display at the top of the page changes so that you are always offered the most recently transmitted selection of sub pages In Teletext operation use the following procedure to access sub pages If the sub page you want to look at is not yet available press the MENU button to display special functions followed by the Yellow button...

Page 34: ...ed more than once to return to the main index page Picture and text Press the TEXT button followed by the MULTI PIP button to move between viewing teletext and the Picture and text mode Picture and text mode lets you see the current programme and a page of teletext side by side Whilst using this feature the remote control affects the teletext page if you wish to make changes to the programme viewe...

Page 35: ... Selection When you receive the stereo bilingual sound system sound output modes can be selected by pressing the Stereo Bilingual Sound Selection button Notes If the stereo signal is poor or the receiving conditions are not optimum or if STEREO MONO automatic switching occurs it is recommended you switch from STEREO to MONO Even when the contents of the receiving signal undergo changes selection m...

Page 36: ...une Channel s Sound reception may have deteriorated Sound system Picture Sound Colour Controls set at minimum levels Colour system This is a characteristic of liquid crystal panels and is not a problem The liquid crystal panel is built with very high precision technology giving you fine picture details Occasionally a few non active pixels may appear on the screen as a fixed point of blue green or ...

Page 37: ...the cabinet is heavily soiled wipe with a well wrung soft cloth dipped in neutral cleanser diluted with water CAUTION If water or similar substances get inside the monitor via the liquid crystal panel surface a malfunction may result Maintenance Input signal that can be displayed Applicable input signal for Component Y PB PR HDMI and PC D sub 15P Mark Notes Signals other than above may not be disp...

Page 38: ... Vp p 75 Ω C 0 286 Vp p 75 Ω AUDIO L R RCA Pin Type 2 0 5 Vrms VIDEO RCA Pin Type 1 0 Vp p 75 Ω AUDIO L R RCA Pin Type 2 0 5 Vrms Y 1 0 Vp p including synchronization PB CB PR CR 0 35 Vp p TYPE A Connector HIGH DENSITY D SUB 15PIN RCA Pin Type 2 SD CARD slot 1 PC CARD slot 1 VIDEO RCA Pin Type 1 0 Vp p 75 Ω AUDIO L R RCA Pin Type 2 0 5 Vrms 724 mm 549 mm 300 mm 857 mm 624 mm 300 mm 724 mm 487 mm 1...

Page 39: ......

Page 40: ... home or pick up delivery service is available for Television Receivers screen size greater than 39 cm in the major metropolitan areas of Australia or the normal operating areas of the nearest Authorised Service Centres 5 The warranties hereby conferred do not extend to any costs associated with the delivery handling freighting or transportation of the product or any part thereof or replacement of...

Reviews: