Panasonic TX-26LE60PM Operating Instructions Manual Download Page 7

Increases or decreases the programme position by one. When a 
function is already displayed, press to increase or decrease the 
selected function. When in 

Standby

 mode, switches TV 

On

.

STR

 (Normalization store)

Used to store tuning and other function settings.

F

 (Function select)

Displays the On Screen Display functions, use 
repeatedly to select from the available functions - 

Volume

,

Backlight

,

Contrast

,

Brightness

,

Colour

,

Sharpness

,

Tint

 (in 

NTSC

 mode), 

Bass

,

Treble

,

Balance

 and 

Tuning mode

.

On

/

 Off

 switch

TV/AV

 button (see page 24)
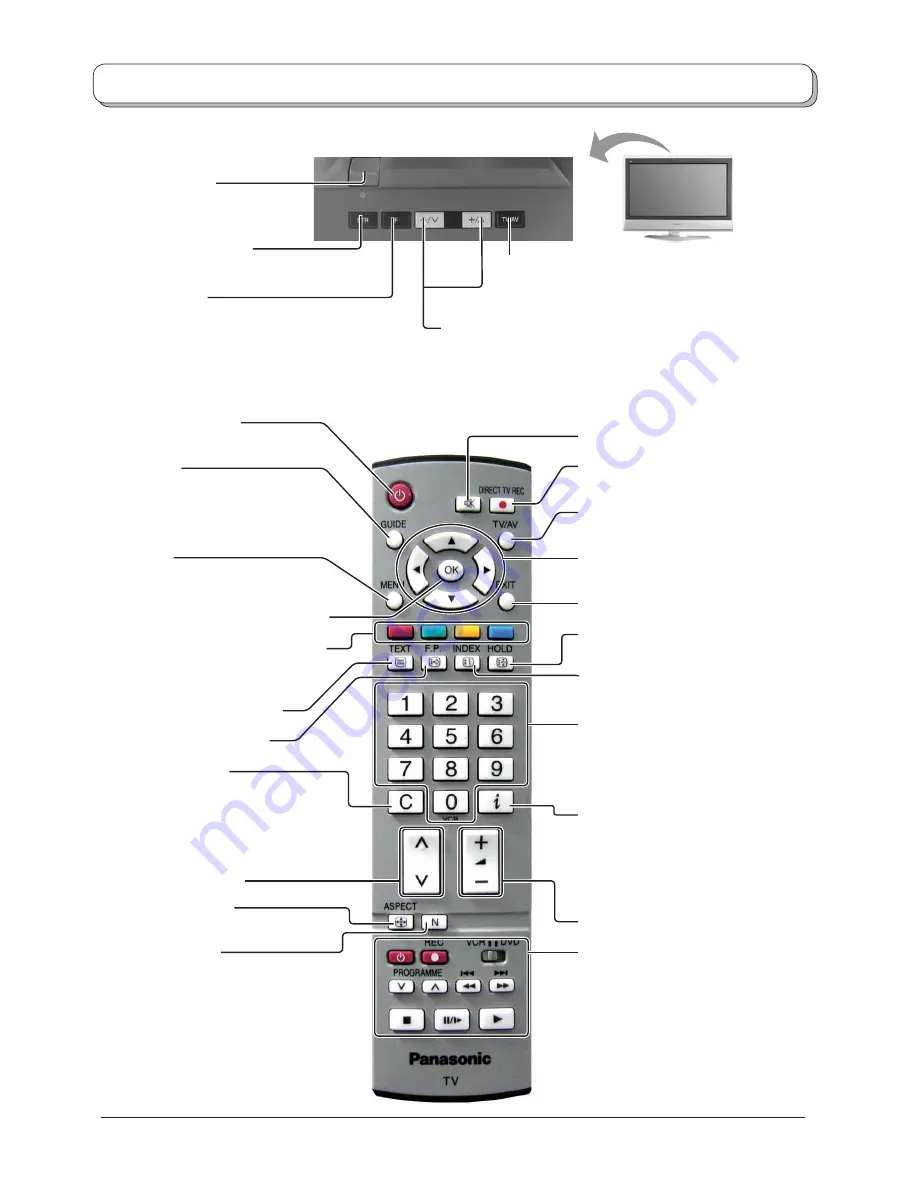
7

Basic controls: control panel and remote control

Standby On 

/

 Off

 button

Switches TV 

On

 or 

Off

 (Standby mode).

GUIDE

 button

Displays the Programme table.
Move the cursor to choose the position, 
then press the OK button to the viewing 
screen.

Menu button
Press to access the 

Picture

,

Sound

 and 

Setup

 menus. (see page 8-11)

Press to confi rm selections and choices.

Coloured buttons used for the selection, 
navigation and operation of various 
functions.

Teletext button (see page 21-23)

Text F.P. button (see page 22)

Direct channel access
During normal TV viewing or when 
in the 

Tuning

,

Programme edit

 or 

Manual tuning

 menus, press and then 

enter channel number using the numeric 
buttons.

Channel up / down button

ASPECT

 control button

(see page 18, 19)

N

 (Normalize) button

Resets all settings to their default levels.

Sound mute 

On

/

 Off

DIRECT TV Record

 button

(see page 17)

Switch between viewing TV or AV input. 
(see page 24)

Cursor buttons to make selections and 
adjustments.

Exit the mode.

Text Hold / Picture Still button
(see page  22, 23)

Text Index button (see page 23)

Programme / channel change buttons (0-
9) and Teletext page buttons.
(see page 21-23)
When in 

Standby

 mode, switches TV 

On

.

Status button
Press to display status information for the 
current Programme position,  Programme 
name, Channel number, MPX mode, 
Receiving system and ASPECT mode.
Press again to remove the information.

Volume up / down button

VCR

 / 

DVD

 buttons

(see page 20)

Summary of Contents for TX-26LE60PM

Page 1: ...Please read these instructions before operating your set and retain them for future reference English TX 26LE60PM TX 32LE60PM Model No Operating Instructions Wide LCD TV...

Page 2: ...c controls control panel and remote control 7 Using the On Screen Displays 8 Programme guide 8 Picture menu 9 Sound menu 10 Setup menu 11 Tuning menu overview 12 Tuning menu Programme edit 13 Adding d...

Page 3: ...This type of LCD panel damage is not an operating defect and as such is not covered by the Panasonic warranty Remove the mains plug from the wall when TV is not in use Remove the mains plug from the w...

Page 4: ...fore you purchase any cables be sure you know what type of output and input connectors your various components require Also determine the lenght of cable you ll need For optimum quality picture When t...

Page 5: ...et can be switched on by pressing the button again if it was in Standby mode Note This TV will still consume some power as long as the mains plug is still inserted into the wall socket TV N 1 2 3 4 5...

Page 6: ...Q Link is not operating correctly check the following The Scart cable is connected to the TV s Scart terminal AV1 or AV2 and correctly setup in the menu The Scart cable is connected to the recording d...

Page 7: ...nd choices Coloured buttons used for the selection navigation and operation of various functions Teletext button see page 21 23 Text F P button see page 22 Direct channel access During normal TV viewi...

Page 8: ...normal viewing screen An On Screen Help box is displayed whenever a menu is displayed on the TV This Help box indicates which buttons on the remote control are used to navigate the menu shown see abo...

Page 9: ...setting Backlight Contrast Brightness Colour Sharpness Tint in NTSC only Colour balance P NR can be adjusted and stored to suit your particular viewing requirement e g you may require different setti...

Page 10: ...minimise lower deeper sound output Treble Increase or decrease level to enhance or minimise sharper higher sound output Balance The levels of sound between the left and right speakers can be adjusted...

Page 11: ...uanian Ukrainian East2 Czech Hungarian Latvian Polish Rumanian Lithuanian Tuning menu Provides access to many other features including Programme edit and Auto setup See page 12 16 OSD language When yo...

Page 12: ...e Lock Sys 1 2 3 4 5 CH44 CH51 CH41 CH47 CH37 ABC XYZ FTP 123 456 Off Off Off Off Off SC3 SC3 SC3 SC3 SC3 Programme edit Auto setup Manual tuning Fine tuning Colour system Volume correc Tuning menu Au...

Page 13: ...me channel to the programme position or the Red button to delete one Press the same button again to con rm your decision Adding deleting a programme channel Confirm Cancel Programme edit Prog Chan Nam...

Page 14: ...tion information Press the Blue button Programme data will now be sent to the recording device s This might take a few seconds depending on the number of stations stored If the message Feature not ava...

Page 15: ...me now stored on programme position 1 Press the EXIT button at any time to go back to watching TV please read the Notes in the above procedure Notes If you proceed with the next step all tuning data w...

Page 16: ...n to access Tuning mode Press the TV AV button to move between Change programme Search and Change TV system Press the or button to change programme position or start search When the desired station is...

Page 17: ...ndby mode the recording device will also switch into Standby mode if there is no media inserted or if there is media inserted and the device is in Rewind or Stop mode If a VCR is rewinding a tape it w...

Page 18: ...n adjustment details The widescreen aspect ratios of different lms and programmes can vary If these are wider than a standard 16 9 aspect picture then a black band may be visible at the top and bottom...

Page 19: ...picture will be stretched horizontally so that the image lls the screen this is done in such a way that the stretching is only obvious at the left and right edges of the screen Just Zoom1 will display...

Page 20: ...to playback the tape or DVD Stop Press to stop the tape or DVD Skip Fast Forward Cue VCR Press to fast forward the tape In Play mode press to view the picture rapidly forward Cue DVD R Press to skip...

Page 21: ...K button the page numbers will change to white indicating that the page is stored HOLD HOLD To hold the Teletext page when viewing multi page information Press again to return to automatic page update...

Page 22: ...eeds one page it may take some time for the automatic changing of the sub pages to reach the sub page you require As each sub page is found its number is displayed at the top of the page so that you m...

Page 23: ...he Yellow button to view the page Regardless of how many pages are found pressing the Yellow button will take you to the sub page which you requested Press the TEXT button to return to normal TV opera...

Page 24: ...itional equipment and cables shown are not supplied with this TV set Notes You can also select an AV source using the TV AV button on the top panel of the TV Press the TV AV button repeatedly until yo...

Page 25: ...k COMPATIBLE VCR SET TOP BOX DVD PLAYER DVD RECORDER Q Link COMPATIBLE DVD RECORDER CAMCORDER GAME CONSOLE COMPUTER RGB AV2 VCR S VIDEO VCR Q Link COMPATIBLE VCR SET TOP BOX DVD PLAYER DVD RECORDER Q...

Page 26: ...a DVI to HDMI adapter cable 2 to connect to the HDMI terminal Connect the audio cables to the AUDIO IN terminals when using a DVI to HDMI adapter cable Audio settings can be made on the HDMI input me...

Page 27: ...Link Suitable inputs for AV1 include RGB Red Green Blue AV2 Scart terminal RGB VIDEO S VIDEO Q Link Suitable inputs for AV2 include RGB Red Green Blue AV2 Pins 15 and 20 are dependent on AV2 S VHS VI...

Page 28: ...annel s Normal Picture Weak or Distorted Sound Sound reception may have deteriorated Switch MPX setting Sound menu to Off until reception improves There may be red spots blue spots and green spots on...

Page 29: ...from M NTSC Video recorders VCR NTSC AV input only Playback from NTSC Video recorders VCR Aerial Rear UHF VHF Operating Conditions Temperature 5 C 35 C Humidity 5 90 RH non condensing Teletext Pages...

Page 30: ......

Page 31: ......

Page 32: ...lternatively in some countries you may be able to return your products to your local retailer upon the purchase of an equivalent new product Disposing of this product correctly will help to save valua...

Reviews: