Panasonic TU-HDT104A Operating Instructions Book Manual Download Page 8

Operating Instruction Book 

TU-HDT104A


8

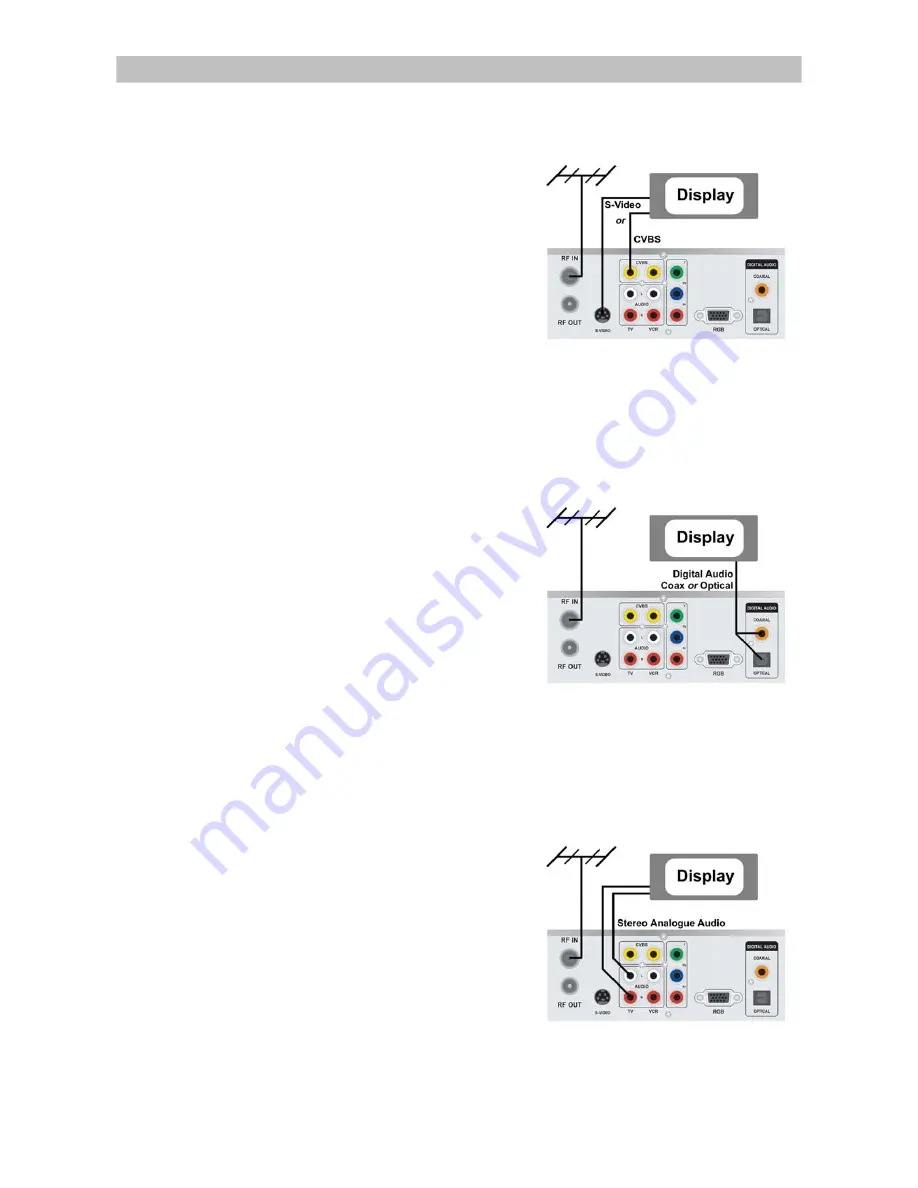
Mode C (SD, TV/CVBS) 

Connect the CVBS composite video 
output socket on your digital receiver to 
your TV’s CVBS video input socket. 

Connect the S-Video (Y/C) component 
video output socket on your receiver to 
your TV’s S-Video input socket.  (Refer 
to D) 

Note: Cable is not supplied. 

Note: When unit is in Mode C, there is 
no output from the YPbPr sockets. 


Audio Connections 

If your display device is equipped with 
Dolby Digital and/or MPEG audio decoding


capability, you may connect the Digital 
Audio output of your digital receiver to the 
display device’s Digital Audio input using 
either the Optical or Coaxial RCA socket.  
(Refer to E)  You may also connect the 
digital audio output to your A/V receiver if it 
is capable of decoding a Dolby Digital / 
MPEG digital audio stream. 

Note: Cable is not supplied. 


If your display device and/or A/V receiver 
does not support Dolby Digital / MPEG 
decoding, you will need to connect the L/R 
Audio output RCA sockets on your digital 
receiver to the stereo L/R Audio inputs of 
your display device and/or A/V receiver.  
(Refer to F).  If your A/V receiver supports 
Dolby Pro Logic decoder, you can switch 
ON the “Downmix-Surround” function 
(Page 21). 


(D) CVBS / S-Video Connection

(E) Digital Audio Connection 

(F) Analogue Audio Connection

Summary of Contents for TU-HDT104A

Page 1: ...ital Video Broadcasting Project 1991 to 1996 Declaration of Conformity No 3090 21st April 2004 5 6 Trademark Acknowledgment and license notice Manufactured under license from Dolby Laboratories Dolby Pro Logic and the double D symbol are Trademarks of Dolby Laboratories ...

Page 2: ...ver to dripping or splashing water and objects filled with liquid such as vases must not be placed on top of or above the unit Adequate ventilation is essential to prevent failure of electrical components we recommend that a gap of at least 5cm is left all around this Digital Receiver even when it is placed inside a cabinet or between shelves Ensure that the ventilation holes beneath the unit are ...

Page 3: ...ver 7 4 2 Output Mode Selection 9 4 3 Audio Display setting 11 4 4 Select Region 11 4 5 Select Aspect Ratio 12 4 6 Autotune 12 5 Operating Instructions Knowing your basic controls 12 5 1 Switching On Your Digital Receiver 12 5 2 Information Plate 13 5 3 Changing or Selecting Channels 13 5 4 Audio Selection 14 6 Using the Main Menu 15 6 1 Program Guide 16 6 2 TV Radio Channels 18 6 3 Preferences 18...

Page 4: ...ct various system settings according to your personal preference and 6 4 Advanced Settings to set your region for correct current time and to conduct channel search 2 The Digital Receiver 2 1 Front Panel Power Button Turns the Digital Receiver On Off Standby mode EXIT Button To return to the previous menu from the sub menus Display Shows channel number when the box is activated or current time in ...

Page 5: ...by coaxial Optical Digital Audio output by optical Serial Port RS232 For system maintenance A B C Switch Switches for video output mode selection Selection options are listed in the table 2 3 Box Contents The box that carries your Digital Receiver should also contain the following items Remote Controller Two batteries AAA Size RCA video cables one white red the other red green blue User s Manual 3...

Page 6: ...ined function key Blue Application defined function key Aspect ratio to change to 16 9 4 3 letterbox or 4 3 centre cut mode To turn on channel list To turn on off sound only for Analogue Audio Output To select the desired audio sound track VOL S T For Volume adjustment only for analogue audio output CH S T For changing channels To turn closed captions on off teletext TV To toggle between TV and Ra...

Page 7: ...lso connect the cable between your TV Antenna IN and RF Out connector on the rear of the Digital Receiver This connection allows your TV set to receive normal analogue programs Refer to A Video Connections Adjust switch on the rear panel according to the format supported by your display device and it contains three modes A B and C Mode A SD HD YPbPr Connect the YPbPr component video output socket ...

Page 8: ...your digital receiver to the display device s Digital Audio input using either the Optical or Coaxial RCA socket Refer to E You may also connect the digital audio output to your A V receiver if it is capable of decoding a Dolby Digital MPEG digital audio stream Note Cable is not supplied If your display device and or A V receiver does not support Dolby Digital MPEG decoding you will need to connec...

Page 9: ...est these video formats on the display device and confirm if the picture is displayed correctly If the display device is not capable of displaying a particular video format the digital receiver will return to the last correctly displayed format after about 8 seconds Note In some cases a display device will fail to return to a previously tested mode after failing to display the next mode i e the di...

Page 10: ...cket The digital receiver display will show Sdtv Press OK to confirm the selection or switch to another mode Proceed to INSTALLATION Installation The on screen display will ask which type of display device is being used You will have a choice of either Plasma LCD Flat panel displays or CRT eg Standard television Select from the choices using the remote control keypad The following screen will ask ...

Page 11: ...ve to restart the procedure again 4 3 Audio Display setting During the format set up if you select Plasma LCD as the display type your digital receiver will ask you to set up Lip Sync Compensation Generally speaking Plasma Display Panels introduce a slight time delay in the picture which may cause a problem with lip sync Use S T on the remote control to select the delay and confirm by pressing OK ...

Page 12: ...u should learn how to use the control buttons on the Front Panel and the Remote Control The following segment is an introduction to features that you will most commonly use 5 1 Switching On Your Digital Receiver Before you switch on your receiver please ensure the power lead is plugged into a 240V AC socket Remember that as long as the digital receiver remains plugged into a 240V supply the receiv...

Page 13: ...on 6 1 of your User Manual will instruct you to use the Program Guide efficiently 5 3 Changing or Selecting Channels There are several methods to change or select a channel You can either use the front panel or the remote control buttons The following methods are available for you to choose from z Press Channel S T on the remote control channel changes according to favourite channel settings z Dir...

Page 14: ...anguages or different types Dolby D MPEG 1 or MPEG 2 You may press the audio button to select your desired soundtrack When you first press the button the Audio OSD is shown on screen listing all available soundtracks The currently played track is highlighted This OSD will disappear in a few seconds Press the Audio key again to select another track before this OSD disappears ...

Page 15: ... Categorisation Type iii Booked Programs 2 TV Radio Channels allows you to program i Program Favourite channels ii Channel locking iii Channel deletion 3 Preferences allows you to access i VCR out ii Audio delay time iii MPEG Audio Level iv Audio Language Priority v Audio preference vi Digital Audio vii Downmix Surround viii Audio Balance ix Select output format 4 Advanced Settings allows you to p...

Page 16: ...adcaster has not transmitted detailed description for the program the text No description available will appear If you wish to see what programs are being broadcast on other channels use the CH S T button to access the list of all programs shown for the current and next days subject to availability If you wish to book a future program highlight any program beyond the current time frame by using th...

Page 17: ...ighted You have to de select that item before selecting specific program type s As you select some categories and go back to program guide menu only programs of the selected categories will be visible Booked Programs To review what programs are currently booked press blue to call up the Booked Programs OSD To cancel or re engage the booking press OK If the symbol the alarm clock disappears then th...

Page 18: ... wish to watch the locked channel you will be asked to enter the password If you wish to delete any channel press the button yellow and an X sign will be shown on that channel You may un delete that channel by pressing the same key again If one or more channels are deleted you will be asked to confirm the removal of those channels upon leaving the TV Radio channels menu Once you confirm their remo...

Page 19: ...e in 4 3 black areas will appear at the left and right of the screen in order to present the picture in a correct aspect ratio Note that this selection only applies to CVBS output Audio delay time Different displays may have different delay in displaying pictures which may cause a slight problem with lip sync This feature allows you to use W X to select your choice according to your actual video d...

Page 20: ...alian broadcasters Audio Preference The Audio mode allows you to adjust the audio setting You may choose Dolby Digital Dolby D MPEG1 and MPEG2 Use W X to select your choice Like the Audio Language Priority setting this audio mode setting determines your initial choice of soundtrack based on the audio mode and you may select any soundtrack channel by channel regardless of the audio mode setting mad...

Page 21: ...ut but can not decode Dolby Digital Off select this if you want the digital audio output to mute when a Dolby Digital program is being received Downmix Surround You can toggle Downmix Surround on or off by pressing W X and OK On Surround information will be included in stereo output Lt Rt Off Pure stereo audio output L R Audio Balance You can adjust the value from L 7 to R 7 The selection 0 means ...

Page 22: ...lock MA Block AV Block RA and Block All Your digital receiver will automatically block programs that are unsuitable to children under the age limit you have set For example if you choose Block PG and a received program has rating equal to or above PG the digital receiver will ask the viewer to enter the password before viewing that program However not all transmissions carry ratings information to...

Page 23: ...ort an auto scan during the scan process some channels may not be available to you z Manual Channel Search In the Manual channel search window you can set the specific channel to search Press the left or right button then OK to select the physical channel you wish to search Restore shipping condition If you wish to reset all previous settings you can use this feature to do so Once you decide to re...

Page 24: ...top box detects new software a pop up menu will appear on the display We suggest you to select YES to initiate the software download After selecting YES the system will ask you not to press any button and not to switch the power off during the download process The download process requires around 10 minutes After completion of the software upgrade the digital receiver will reboot itself with the n...

Page 25: ...ncluding access to locked channels Also known as the PIN Number Program Guide The instantaneously and continuously updated electronic program guide for quick and easy reference or program selection Reminder Message displayed on the screen informing viewers that a booked program is about to start Service Also called a channel to which a TV or receiver is tuned A service provider offers one or more ...

Page 26: ... Check the cable connections and other equipment connected to your receiver Try another output configuration Battery exhausted Change the batteries Fluorescent light interfering with the remote control Switch off the light The remote control is not working Remote control is incorrectly aimed Aim the remote control at the receiver What to do if you can t solve the problem If you have tried all of t...

Page 27: ...D mode 576i Output format changed by specific hot key software switchable Decoding and display for supporting closed captions Teletext Activated by specific hot key Standard ISO IEC 11172 3 MPEG 1 layer I and layer II ISO IEC 13818 3 MPEG 2 Layer II Dolby Digital Sampling rate 32 44 1 48 and 96 kHz Audio Decoder Digital Audio SPDIF Output format IEC 60958 for PCM data IEC 61937 for encoded Audio D...

Page 28: ...ontroller Battery AAA 1 5V x 2 User s manual A V Cable 1 8m R G B for component video 1 8m R W for stereo audio Accessory RF Cable 1 8m 3C2V IEC Male Female EMC Safety Standard AS NZS CISPR 13 2003 Class B AS NZS 60065 2000 Copyright 2001 Quanta Network Systems Inc All Rights Reserved Customer s Record The serial number of this product can be found on its rear cover and on the carton It is recomme...

Page 29: ...bnormally corrosive conditions or any foreign object or matter having entered the product 4 If warranty service is required you should Telephone Panasonic s Customer Care Centre on 132600 for the name address of the nearest Authorised Service Centre Provide a copy of your purchase receipt as proof of date of purchase Send or bring the product to a Panasonic Authorised Service Centre Please note th...

Page 30: ......

Reviews: