background image

20

Getting Started

Useful Information

Troubleshooting

Appendix

Reinstalling Software

CAUTION

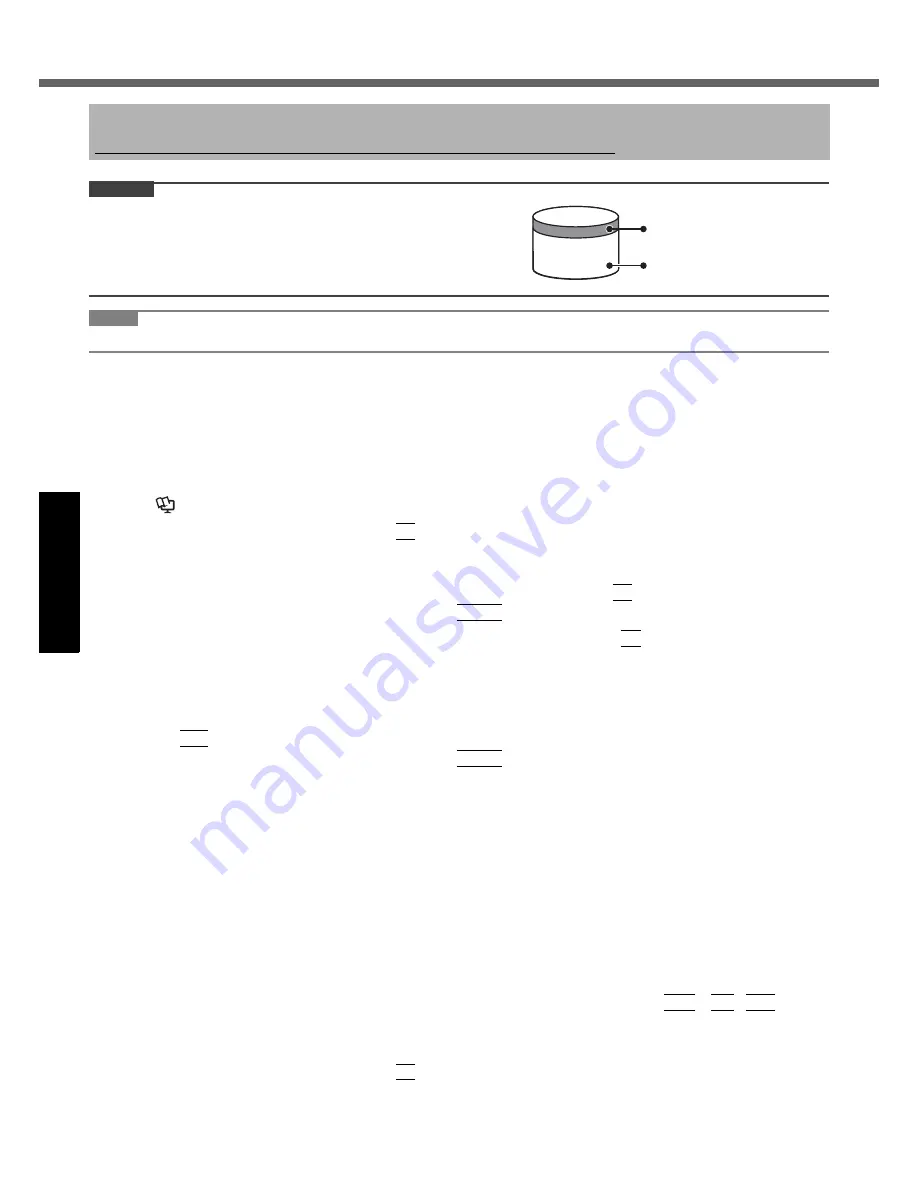
Do not delete the partition with recovery tools on the hard disk.
The disk space in the partition is not available to store data.

NOTE

z

Even if reinstallation is performed, the number of times of DVD’s region code setting will not be reset.

Preparation

z

Prepare the following items:
• The Product Recovery DVD-ROM (included)
• Panasonic CD/DVD drive (included)

z

Remove all peripherals (except for the CD/DVD drive).

z

Connect the AC adaptor and do not remove it until reinstallation is complete.

1

Turn off the computer and insert the CD/DVD drive into the multimedia pocket 

(

Î


Reference Manual

 “Multimedia Pocket”).

2

Turn on the computer, and press 

F2

 while [Panasonic] boot screen is displayed.

The Setup Utility starts up.

z

If the password is requested, enter the Supervisor Password.

3

Write down all of the contents of the Setup Utility and press 

F9

.

At the confirmation message, select [Yes] and press 

Enter

.

4

Select the [Boot] menu, then select [Optical Drive] and press 

F6

 until [Optical Drive] is 

at the top of [Boot priority order].

5

Select the [Security] menu and set [DVD Operation] to [Enable].

6

Set the Product Recovery DVD-ROM into the CD/DVD drive.

7

Press 

F10

.

At the confirmation message, select [Yes] and press 

Enter

.

The computer will restart.

8

Click [Reinstall Windows] and click [Next].

The License Agreement screen appears.

9

Click [Yes, I agree to the provisions above and wish to continue!] and click [Next].

10

Select the settings and click [Next].

z

[Reinstall Windows to the whole Hard Disk to factory default.]
You will have a single partition.

z

[Reinstall Windows to the operating system partition.]
You can keep the partition structure.

11

At the confirmation message, click [YES].

Reinstallation starts automatically. (It will take approximately 30 minutes.)

z

Do not interrupt reinstallation, for example by turning off the computer or pressing  

Ctrl

+  

Alt

Del

. Other-

wise reinstallation may become unavailable as Windows may not start up or the data may be corrupted.

12

Remove the Product Recovery DVD-ROM, and then click [OK] to turn off the computer.

13

Turn on the computer, and press 

F2

 while [Panasonic] boot screen is displayed.

The Setup Utility starts up.

z

If the password is requested, enter the Supervisor Password.

Reinstalling software will return the computer to the default condition. When you reinstall the software, the hard disk 
data will be erased.
Back up important data to other media or an external hard disk before reinstallation.

Area usable by Windows

Hard disk

Partition with recovery tools
(approximately 2 GB)

Summary of Contents for Toughbook CF-74JDMDD2M

Page 1: ...roduction 2 Read Me First 3 Description of Parts 9 First time Operation 11 On screen Manual 15 Handling and Maintenance 16 Hard Disk Backup Restore Function 18 Hard Disk Data Erase Utility 19 Reinstalling Software 20 Error Code Message 22 Troubleshooting Basic 23 Hardware Diagnostics 26 LIMITED USE LICENSE AGREEMENT 29 Specifications 31 LIMITED WARRANTY 34 For further information about the com put...

Page 2: ...th respect to the use of the information contained herein 2007 Matsushita Electric Industrial Co Ltd All Rights Reserved Disclaimer Computer specifications and manuals are subject to change without notice Matsushita Electric Industrial Co Ltd assumes no liability for damage incurred directly or indirectly from errors omissions or discrepancies between the com puter and the manuals Trademarks Micro...

Page 3: ...High power radars are allocated as primary users of the 5 25 to 5 35 GHz and 5 65 to 5 85 GHz bands These radar sta tions can cause interference with and or damage this product 25 M W 1 This device complies with Part 15 of the FCC Rules Operation is subject to the following two conditions 1 This device may not cause harmful interference and 2 This device must accept any interference received inclu...

Page 4: ...r to this equipment or equipment malfunctions may give the telecommunications company cause to request the user to disconnect the equipment Users should ensure for their own protection that the electrical ground connections of the power utility telephone lines and internal metallic water pipe system if present are connected together This precaution may be particularly important in rural areas Caut...

Page 5: ...ing 15 22525 Hamburg F R Germany Network connection The terminal equipment is intended for connection to the following public network In all the countries of European Economical Area Public Switched Telephony Networks Technical Features The terminal equipment includes the following features DTMF dialing Maximum bitrate receiving mode 56 kbit s Maximum bitrate sending mode 33 6 kbit s This product ...

Page 6: ... damage or violation of government regulations that may arise from failing to comply with these guidelines 26 M 1 Lithium Battery This computer contains a lithium battery to enable the date time and other data to be stored The battery should only be exchanged by authorized service personnel Warning A risk of explosion from incorrect installation or misapplication may possibly occur 15 E 1 Pile au ...

Page 7: ...all Chil dren Accidental swallowing will result in bodily injury In the event of accidental swallowing see a doctor immediately Do Not Place This Product on Unstable Surfaces If balance is lost this product may fall over or drop result ing in an injury Avoid Stacking If balance is lost this product may fall over or drop result ing in an injury Do Not Keep This Product Wherever There is a Lot of Wa...

Page 8: ...lied by Panasonic may present a safety hazard generation of heat ignition or rupture z Do not touch the terminals on the battery pack The battery pack may no longer function properly if the contacts are dirty or damaged z Do not expose the battery pack to water or allow it to become wet z If the battery pack will not be used for a long period of time a month or more charge or discharge use the bat...

Page 9: ... Î Reference Manual Key Combinations L Bluetooth antenna Only for model with Bluetooth Î Reference Manual Bluetooth M Keyboard N Touch pad O Microphone jack A condenser microphone can be used If other types of microphones are used audio input may not be pos sible or malfunctions may occur as a result When recording in stereo using a stereo microphone Click Start Control Panel Hardware and Sound So...

Page 10: ...xpansion bus connector Î Reference Manual Mini Port Replicator G SD Memory Card indicator Blinking During access or a password is requested Î Reference Manual SD Memory Card H Ventilation hole I Stylus holder J DC IN jack K LAN port Î Reference Manual LAN L Modem port Î Reference Manual Modem M Serial port N External display port Î Reference Manual External Display O Security lock A Kensington cab...

Page 11: ... battery pack may fall when you carry the computer z Do not touch the terminals of the battery pack and the computer Doing so can make the terminals dirty or damaged and may cause malfunction of the battery pack and the computer The battery charging starts automatically CAUTION z Do not disconnect the AC adaptor and do not switch the wireless switch to on until the first time operation procedure i...

Page 12: ...or the first time appears and then a small circle circu lates on the screen This will take a few minutes z During setup of Windows use the touch pad to move the cursor and to click items z Setup of Windows will take approximately 20 minutes Go to the next step confirming each message on the display CAUTION z You cannot choose the following words for user name and password CON PRN AUX CLOCK NUL COM...

Page 13: ...onsumes electricity even when the computer power is off If the battery pack is fully charged the battery will fully discharge in the following period of time When power is off Approx 8 weeks In sleep Approx 3 days In hibernation Approx 4 days At the time of purchase Wake Up from LAN is enabled If Wake Up from LAN is disabled the period of time in sleep will become slightly longer and the period of...

Page 14: ...may be interrupted or produce a time lag during playback If this happens click or on the notification area and click High performance This may remedy the problem Depending on the processing status on Windows sound may be interrupted at Windows startup You can mute the sound at startup A Right click the desktop and click Personalize Sounds B Remove the check mark from Play Windows Startup sound and...

Page 15: ... the bat tery pack in the optimum condition to obtain longer operation time To access the Important Tips A Double click on the desktop z Alternatively click Start All Programs Panasonic On Line Manuals Important Tips NOTE z When Adobe Reader update notice is displayed we recommend you follow the on screen procedure and update See http www adobe com for the latest version of Adobe Reader Contents z...

Page 16: ...ls z The touch pad is designed to be used with a finger tip Do not place any object on its surface and do not press down strongly with sharp pointed or hard objects that may leave marks e g nails pencils and ball point pens z Avoid any harmful substances such as oil from getting into the touch pad The cursor may not work correctly z This computer contains a magnet and magnetic products at the loca...

Page 17: ... requested enter the Supervisor Password 2 Select the Security menu then select Computrace R Sub Menu and press Enter 3 Select Computrace R BIOS Module and set to Enable 4 At the confirmation message select Execute and press Enter 5 At the reconfirmation message select Execute and press Enter 6 Press F10 At the confirmation message select Yes and press Enter The computer restarts To clean the LCD ...

Page 18: ...il restoration is complete 1 Turn on the computer and when Panasonic boot screen disappears press and hold F8 z If Enter Password is displayed during the following procedure input the Supervisor Password or the User Password 2 Release your finger when Advanced Boot Options is displayed 3 Press Ï Ð to select Repair Your Computer and press Enter System Recovery Options appears 4 Select the keyboard ...

Page 19: ...nd press F2 while Panasonic boot screen is displayed The Setup Utility starts up z If the password is requested enter the Supervisor Password 3 Press F9 At the confirmation message select Yes and press Enter 4 Select the Boot menu then select Optical Drive and press F6 until Optical Drive is at the top of Boot priority order 5 Set the Product Recovery DVD ROM into the CD DVD drive 6 Press F10 At t...

Page 20: ...ery DVD ROM into the CD DVD drive 7 Press F10 At the confirmation message select Yes and press Enter The computer will restart 8 Click Reinstall Windows and click Next The License Agreement screen appears 9 Click Yes I agree to the provisions above and wish to continue and click Next 10 Select the settings and click Next z Reinstall Windows to the whole Hard Disk to factory default You will have a...

Page 21: ...ter of hard disk or CD DVD drive NOTE z Drive letters of hard disk can be changed only when two or more partitions have been created on the hard disk drive z The name of the C drive cannot be changed z Change the drive letters before installing applications A Click Start Control Panel System and Maintenance Administrative Tools and double click Compu ter Management A standard user needs to enter a...

Page 22: ...ity settings have been returned to the default values to startup the computer z Start the Setup Utility and return the settings to the default values and then change the settings as necessary Press F2 to Setup z Write down the error details and press F2 to start the Setup Utility Change the settings if necessary Operating System not found The operating system is not installed in the floppy disk or...

Page 23: ...tall Î page 20 and set up Windows and then set a new password Remove disks or other media Press any key to restart or a similar mes sage appears z A floppy disk is in the drive and it does not contain system startup information Remove the floppy disk and press any key z If a device is connected to the USB port disconnect the device or set USB Port or Legacy USB Support to Disable in the Advanced m...

Page 24: ...ed z The computer may be in ten key mode If the NumLk indicator lights press NumLk to disable the ten key mode and then input Even after entering the password Type your pass word is displayed again z The computer may be in ten key mode If the NumLk indicator lights press NumLk to disable the ten key mode and then input z The computer may be in Caps Lock mode If the Caps Lock indicator lights press...

Page 25: ...ing instructions Cannot input using the touchscreen z Set Touchscreen Mode to Auto or Touchscreen Mode in the Main menu of the Setup Utility z When mouse drivers are installed i e IntelliMouse the touchscreen does not work Reinstall the touchscreen driver Cannot point the correct posi tion using the included stylus z Perform the touchscreen calibration Î page 12 Reference Manual The Reference Manu...

Page 26: ...io diagnostic check is running sounds may be generated from the speaker These are not malfunctions NOTE z For the hard disk and memory only you can select standard diagnostic check or extended diagnostic check When the PC Diagnostic Utility starts up it will run the standard diagnostic check z We recommend that you use the touch pad for operations When not using the touch pad you can operate using...

Page 27: ... you can execute the following operations Start the diagnostic check from the beginning Stop the diagnostic check You cannot restart the check partway through by clicking Display help click the screen or press Space to return to the original diagnostic check screen z You can check the status of the diagnostic check by the display color on the left side of the hardware icon A Aqua Not running diagn...

Page 28: ...sage Check Result TEST PASSED is displayed the computer s hardware is operating normally Continue using the computer as is If the computer still does not operate properly reinstall the software Î page 20 NOTE z If you run a memory diagnostic check after installing a new RAM module sold separately and the message Check Result TEST FAILED is displayed Remove the additional RAM module and run the dia...

Page 29: ...r transfer of the single Product which was accompanied by the Programs to such other party At the time of such a transfer you must also transfer all copies whether in printed or machine readable form of every Program and the related documentation to the same party or destroy any such copies not so transferred F You may not remove any copyright trademark or other notice or product identification fr...

Page 30: ... pouvez ni modifier ni tenter de modifier les Logiciels E Vous ne pouvez céder les Logiciels et en octroyer la licence à une autre partie qu en rapport avec votre cession du Produit unique qui est accompagné par les Logiciels à cette autre partie Au moment de cette cession vous devez céder également toutes les copies que ce soit sous forme imprimée ou lisible par la machine de tous les Logiciels a...

Page 31: ... 4X 10X Ultra Speed CD RW 10X 10 24X CD R 8X 8 12X 8 16X 8 24X CD RW 4X High Speed CD RW 4X 8X 10X Ultra Speed CD RW 8X 10X DVD R 1X 2X 2 4X 2 6X 2 8X DVD RW 1X 2X 2 4X DVD RAM 2X 3X 3 5X R 2 4X 2 4 4X 2 4 6X 2 4 8X R DL 2 4X RW 2 4X 2 4 4X Supported Discs Format 4 Reading DVD ROM 4 7 GB 8 5 GB 9 4 GB 17 GB DVD Video DVD R 1 4 GB 3 95 GB 4 7 GB DVD R DL 8 5 GB DVD RW 8 1 4 GB 2 8 GB 4 7 GB 9 4 GB ...

Page 32: ...m battery 3 0 V Power Consumption 23 Approx 50 W 24 Approx 100 W Maximum when recharging in the ON state Physical Dimensions W H D including the carrying handle 303 5 mm 43 6 60 1 mm 293 3 mm 12 0 1 7 2 4 11 6 Weight including the carrying handle Approx 2 7 kg Approx 6 0 lb Operation Environment Temperature 5 C to 35 C 41 F to 95 F Humidity 30 to 80 RH No condensation Storage Environment Temperatu...

Page 33: ...ment is not guaranteed This computer is not compatible with MultiMediaCards Do not insert this kind of cards 17 Theoretical value and not the actual speed The transfer rate does not become higher even if you use a card that supports the higher transfer rate 18 Only for model with Smart Card slot 19 Only for North America The AC adaptor is compatible with power sources up to 240 V AC adaptor The co...

Page 34: ... Station 3 Years Port Replicator I O Box Device Cradle like CF 08 3 Years Antenna Pass through Cable 3 Years Backlit or Full sized keyboard 3 Years or assumes warranty of the unit in which it is installed Integrated Panasonic supplied options and kits including but not limited to Wireless WAN Media Bay Drives Floppy CD DVD GPS Bluetooth Smartcard Reader and Fingerprint readers 3 Years or assumes w...

Page 35: ...s failures due to defects in materials or workmanship which occur during normal use THIS PRODUCT IS NOT INTENDED FOR USE AS OR AS PART OF NUCLEAR EQUIPMENT SYSTEMS AIR TRAFFIC CON TROL EQUIPMENT SYSTEMS OR AIRCRAFT COCKPIT EQUIPMENT SYSTEMS 1 PANASONIC WILL NOT BE RESPONSIBLE FOR ANY LIABILITY RESULTING FROM THE USE OF THIS PRODUCT ARISING OUT OF THE FOREGOING USES 1 AIRCRAFT COCKPIT EQUIPMENT SYS...

Page 36: ...anasonic Canada Inc Computer Products Marketing 5770 Ambler Drive Missis sauga Ontario L4W 2T3 within the warranty period together with a copy of your purchase receipt and an explanation of the sus pected defect PCI will replace in Canada the defective disk s or other media Remedy PCI s entire liability and your only remedy for any breach of this software media warranty is limited to replacement o...

Page 37: ...yé à son service de Marketing produits informatiques 5770 Ambler Drive Mississauga Ontario L4W 2T3 dans les soixante 60 jours suivant la date d achat original Joignez à votre envoi une pièce justificative de votre achat et une description du problème Recours La responsabilité de PCI et votre seul recours dans le cas de toute défaillance couverte par la garantie sur ce support de logiciel est limit...

Page 38: ...38 Getting Started Useful Information Troubleshooting Appendix MEMO ...

Page 39: ...39 ...

Page 40: ...e international ENERGY STAR Office Equipment Program is an international program that promotes energy saving through the use of computers and other office equipment The program backs the development and dissem ination of products with functions that effectively reduce energy consumption It is an open system in which busi ness proprietors can participate voluntarily The targeted products are office...

Reviews: