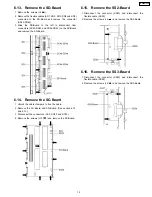
6.13. Remove the SD-Board
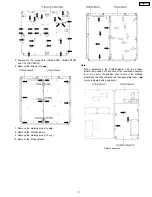
1. Remove the screws (×4
).
2. Remove the flexible cables (SD1, SD2, SD3, SD4 and SD5)
connected to the SD-Board and remove the connector
(SC46-SD46).
3. Slide the SD-Board to the left to disconnect from
connectors (SC43-SD43 and SC44-SD44) on the SC-Board
and remove the SD-Board.
6.14. Remove the SC-Board
1. Unlock the cable clampers to free the cable.
2. Remove the SU-Board and SD-Board. (See section 6.12.
and 6.13.)
3. Disconnect the connectors (SC2, SC20 and SC23).
4. Remove the screws (×10
) and remove the SC-Board.
6.15. Remove the SS2-Board
1. Disconnect the connector (SS23) and disconnect the
flexible cable (SS55).
2. Remove the screws (×2
) and remove the SS2-Board.
6.16. Remove the SS3-Board
1. Disconnect the connector (SS22) and disconnect the
flexible cable (SS56).
2. Remove the screws (×2
) and remove the SS3-Board.
15
TH-58PZ750U
Summary of Contents for TH58PZ750U - 58" PLASMA TV
Page 5: ...1 Applicable signals 5 TH 58PZ750U ...
Page 22: ...8 Location of Lead Wiring 8 1 Lead of Wiring 1 22 TH 58PZ750U ...
Page 23: ...8 2 Lead of Wiring 2 23 TH 58PZ750U ...
Page 24: ...8 3 Lead of Wiring 3 24 TH 58PZ750U ...
Page 25: ...8 4 Lead of Wiring 4 25 TH 58PZ750U ...
Page 26: ...8 5 Lead of Wiring 5 26 TH 58PZ750U ...
Page 30: ...9 4 No Picture 30 TH 58PZ750U ...
Page 37: ...11 4 Adjustment Volume Location 11 5 Test Point Location 37 TH 58PZ750U ...
Page 39: ...39 TH 58PZ750U ...
Page 75: ...15 Schematic and Block Diagram 15 1 Schematic Diagram Note TH 58PZ750U 75 ...
Page 153: ...16 Exploded Views Replacement Parts List 16 1 Exploded Views 153 TH 58PZ750U ...
Page 154: ...16 2 Packing Exploded Views Accessories 154 TH 58PZ750U ...
Page 155: ...16 3 Packing Exploded Views Stand 155 TH 58PZ750U ...
Page 156: ...16 4 Replacement Parts List Notes 156 TH 58PZ750U ...


