background image

16

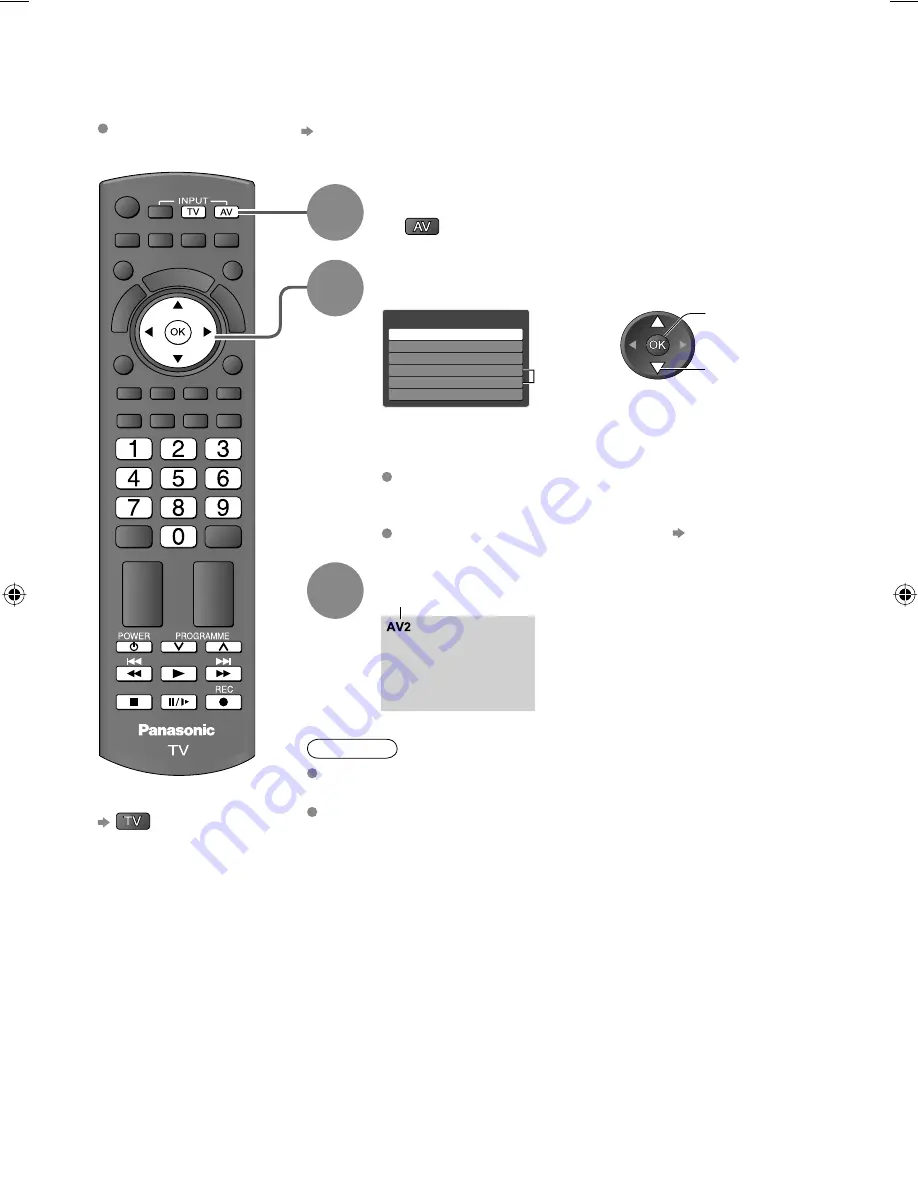
Watching Videos and DVDs

Connect the external equipment (VCRs, DVD equipment, etc.) and you can watch the input.

 To connect the equipment   p. 9

You can operate some functions of selected Panasonic external equipment with this remote control.

Select the input mode of the connected 

equipment

 If the external equipment has an aspect adjustment function, set to 

“16:9”.

 For details, see the manual of the equipment or ask your local dealer.

To return to TV


Display the Input Selection menu

Displays the selected mode

*2)  For TH-L32C12K only:

“HDMI1” will be displayed as “HDMI” and “HDMI2” is not 

displayed.

 You can also select the input using the AV button on the side 

panel of the TV.

  Press the button repeatedly until the desired input is selected.

 You can label or skip each input mode   “Input Labels” (p. 22)

View

1

 select

2

 change

1
2

3

Note

Input Selection

PC

AV2

AV1

HDMI1
HDMI2
TV

*2

TH-L32C10&12&11KMRSX_EN.indb   16

TH-L32C10&12&11KMRSX_EN.indb   16

6/24/09   8:50:20 AM

6/24/09   8:50:20 AM

Summary of Contents for TH-L32C10

Page 1: ...ore operating your set and retain them for future reference The images shown in this manual are for illustrative purposes only English Model No TH L32C10K TH L32C10M TH L32C10R TH L32C10S TH L32C10X TH L32C12K TH L32C11KG Operating Instructions LCD TV ...

Page 2: ...rn your own living room into a movie theatre Experience an amazing level of multi Sharp pictures with HDMI terminal Create home theatre and DVD recorder link ups with VIERA Link without complicated settings ...

Page 3: ...dience 23 Editing Channels 24 Tuning Channels 26 Restore Settings 28 Displaying PC Screen on TV 29 Viewing from SD Card VIERA IMAGE VIEWER 30 VIERA Link HDAVI Control 32 VIERA Tools 39 External Equipment 40 Technical Features Technical Information 42 FAQs 47 Licence 49 Specifications 50 Quick Start Guide Accessories Options 6 Identifying Controls 7 Basic Connection 9 Auto Tuning 10 Language Settin...

Page 4: ... the mains plug is loose it could generate heat and cause fire Ensure that the mains plug is easily accessible Do not touch the mains plug with a wet hand This may cause electrical shock Do not damage the mains lead A damaged lead may cause fire or electrical shock Do not move the TV with the lead plugged in the socket outlet Do not place a heavy object on the lead or place the lead near a high te...

Page 5: ...re Take care not to subject surfaces to insect repellent solvent thinner or other volatile substances This may deteriorate the surface by peeling the paint Do not allow the cabinet and pedestal to make contact with a rubber or PVC substance for a long time This appliance is intended for use in tropical climates When cleaning the TV remove the mains plug Cleaning an energized TV may cause electrica...

Page 6: ... wall hanging bracket installation manual Cleaning cloth Not applicable for TH L32C11KG 2 Caution Pedestal Assembly screw for Pedestal 4 M4 This product contains possibly dangerous parts such as plastic bags that can be breathed in or swallowed by young children accidentally Keep these parts out of reach of young children Optional accessories WARNING Failure to use a Panasonic bracket or choosing ...

Page 7: ... received a command Fix securely with assembly screws A Total 4 screws Tighten screws firmly WARNING Always be sure to ask a qualified technician to carry out set up Incorrect fitting may cause equipment to fall resulting in injury and product damage Do not disassemble or modify the pedestal Otherwise the TV may fall over and become damaged and personal injury may result Caution Do not use any oth...

Page 8: ...omatically after a fixed period of time Return Returns to the previous menu Hold Freeze unfreeze picture p 12 Holds the current teletext page teletext mode p 15 Standby On Off switch Switches TV On or Off standby Channel Up Down Selects channel in sequence Index p 15 Returns to the teletext index page teletext mode OK Confirms selections and choices Press after selecting channel positions to quick...

Page 9: ...ead to avoid noise Do not place the RF cable under the TV To obtain optimum quality picture and sound an Aerial the correct cable 75 Ω coaxial and the correct terminating plug are required If a communal Aerial system is used you may require the correct connection cable and plug between the wall Aerial socket and the TV Your local Television Service Centre or dealer may be able to assist you in obt...

Page 10: ...al p 20 Shop Viewing Mode is set as Dynamic p 20 Select the viewing environment Select your area CATV Other Press displays sub menu 3 4 5 select OSD Language Please select your viewing environment Home Shop Auto Tuning Scan 1 120 CH2 1 EXIT RETURN 2 If you select Shop by mistake Return to the Home or Shop Selection menu Automatic Demo Off On Select Home Auto Tuning is complete Once you press the O...

Page 11: ...ETURN 4 0 Stereo ON SCREEN HELP Instructions box example Sound Menu On screen operation guide How to use remote control Open the main menu Move the cursor select the menu Move the cursor adjust levels select from a range of options Access the menu store settings after adjustments have been made or options have been set Return to the previous menu Exit the menu system and return to the normal viewi...

Page 12: ... Display information banner 2 When the TV is switched to standby there will be a clicking sound after a short delay This is normal Note Also appears when changing channels To set display timeout Banner Display Timeout p 21 TV 1 ABC CH07 5 5MHz PAL 16 9 Colour system will not be displayed if it is set to Auto Input mode Channel position Channel number Sound system Colour system Channel name Aspect ...

Page 13: ...to fit the screen HD signal only Displays a 16 9 letterbox or 4 3 image without distortion Zoom2 Zoom3 Displays a 16 9 letterbox anamorphic image full screen without distortion Displays a 2 35 1 letterbox anamorphic image full screen without distortion At 16 9 displays the image at its maximum with slight enlargement Check or change the current programme status instantly Channel Colour Set Sets co...

Page 14: ...moves to the next subject block What is List mode In List mode four differently coloured page numbers are situated at the bottom of the screen Each of these numbers can be altered and stored in the TV s memory Store frequently viewed pages p 15 To return to TV or Corresponds to the colour bar Displays Index content varies depending on the broadcasters To adjust contrast Press three times As the bl...

Page 15: ...han one page Appears when updating is completed You cannot change the programme Teletext automatically updates itself when new information becomes available The news page provides a function that indicates arrival of latest news News Flash Changes to TV screen temporarily View the updated page View the TV picture while searching for a teletext page Watch TV and Teletext in two windows at once Oper...

Page 16: ...ustment function set to 16 9 For details see the manual of the equipment or ask your local dealer To return to TV Display the Input Selection menu Displays the selected mode 2 For TH L32C12K only HDMI1 will be displayed as HDMI and HDMI2 is not displayed You can also select the input using the AV button on the side panel of the TV Press the button repeatedly until the desired input is selected You...

Page 17: ... slow speed Programme Up Down Select programme Record Start recording Note Confirm if the remote control works correctly after changing the code The codes will be reset to default values if batteries are replaced Some operations may not be possible on some equipment models Watching Videos and DVDs How to change the code for each equipment Each type of Panasonic equipment has its own remote control...

Page 18: ...Normal Contrast Brightness Colour Sharpness Viewing Mode Tint 90 0 50 50 Channel Colour Set Colour Management Colour Balance On Normal 0 0 Moved Sharpness 50 Displays the next screen Tuning Menu Access Changed Number and positions of alternatives Colour Balance Normal example example User input A B C D E F G H I J K L M N U V W X Y Z 0 1 2 3 4 5 6 a b c d e f g h i j k l m n u v w x y z _ O P Q R ...

Page 19: ...m Menu Other Settings VIERA Link Settings Access Access Access Access Access Access Access Picture Menu 1 2 Normal Contrast Brightness Colour Sharpness Viewing Mode Tint 90 0 50 50 2 2 Off Eco Mode P NR 3D COMB Reset to Defaults Off On Reset Picture Menu Channel Colour Set Colour Management Colour Balance On Normal 0 0 Tuning Menu Access Auto Tuning Manual Tuning Channel List Edit Access Access Ho...

Page 20: ...ewing still or slow moving pictures colour patterning may be seen Set to On to display sharper and more accurate colours Off On For PAL or NTSC signal reception only Not valid on Component PC HDMI and SD Card Reset to Defaults Press the OK button to reset the present Picture Menu to the default settings Sound Mode Basic sound mode Music Speech Set for each input signal Bass Increases or decreases ...

Page 21: ...ption Off On p 34 Intelligent Auto Standby Makes unwatched or unused connected equipment go into Standby mode to reduce the power consumption Off On With reminder On No reminder p 34 System Menu Shipping Condition Resets all settings for example when moving house p 28 Software Licence Displays the software licence information System Information Displays the system information of this TV Other Sett...

Page 22: ...ss Main Menu Picture Setup Sound 1 select 2 access Setup Menu Off Child Lock Tuning Menu OSD Language Display Settings Off Timer System Menu Other Settings VIERA Link Settings Access Select Input Labels 4 Display Settings FASTEXT Teletext Character Set Input Labels Banner Display Timeout Teletext 3 seconds English Access Playing Time Display On Input Labels AV1 AV2 AV1 AV2 PC HDMI1 HDMI2 HDMI2 HDM...

Page 23: ... input is locked 1 Enter the PIN number 4 digits 2 Select Child Lock List To cancel Select the locked channel input To lock all To cancel all locks To jump to the next block of channels 3 Select the channel input to be locked Setting Shipping Condition p 28 erases the PIN number and all settings Enter the PIN number twice at first setting Make a note of the PIN number in case you forget it 1 selec...

Page 24: ...V 3 4 Set 5 Select Channel List Edit Setup Menu Off Child Lock Tuning Menu OSD Language Display Settings Off Timer System Menu Other Settings VIERA Link Settings Access Tuning Menu Access Auto Tuning Manual Tuning Channel List Edit 1 select 2 access 1 select 1 select 2 access 2 access 1 2 Main Menu Picture Setup Sound ...

Page 25: ...nted channels Select a channel and add delete 2 add delete 1 select To retune each channel Manual Tuning p 27 select 2 Edit To change the displayed name when selecting channels Select Rename Set characters 2 set 1 select maximum five characters Store To move channel position Select new position Store add delete skip Channel List Editor 2 1 3 4 5 6 7 BBC1 Edit channel name Name Page up Page down se...

Page 26: ...lect a function Set 1 2 3 4 5 1 select 2 access 1 select 2 access 1 select 2 access To return to TV Main Menu Picture Setup Sound Setup Menu Off Child Lock Tuning Menu OSD Language Display Settings Off Timer System Menu Other Settings VIERA Link Settings Access Tuning Menu Auto Tuning Manual Tuning Channel List Edit Access ...

Page 27: ...tely Manual Tuning For Auto Tuning using the buttons on the side panel of the TV p 7 1 Press repeatedly until Auto Tuning appears 2 Access Auto Tuning 3 Start Auto Tuning Automatically retune all channels received in the area Start Auto Tuning EXIT RETURN Auto Tuning All tuning data will be erased Auto Tuning EXIT 1 Scan 1 120 CH2 1 BBC1 CH33 Manual Tuning Sound System Manual Tuning 1 120 Fine Tun...

Page 28: ... channels tuned in All settings channels picture sound quality etc are reset 3 5 Set 1 Check the message and reset To return to TV Setup Menu Off Child Lock Tuning Menu OSD Language Display Settings Off Timer System Menu Other Settings VIERA Link Settings Access 4 1 select 2 access 1 select 2 access Select Shipping Condition 1 select 2 access Confirm EXIT RETURN Shipping Condition All tuning data ...

Page 29: ...eset to the default Picture settings Setup PC Setup Input Resolution Switches to a wide view VGA 640 x 480 WVGA 852 x 480 pixels XGA 1 024 x 768 WXGA 1 280 x 768 1 366 x 768 pixels Options change depending on signals If H freq or V freq is shown in red the signals may not be supported Clock Set to the minimum level if noise occurs H pos Adjusts horizontal position V pos Adjusts vertical position C...

Page 30: ...to Selected photo information is displayed Enter SD mode Photo View Mode All photos in SD Card are displayed by thumbnail 2 4 To return to the previous screen To return to TV or To previous photo Rotate 90 anti clockwise To next photo Rotate 90 clockwise Prev Rotate Rotate Select Slideshow Single view EXIT List Operation guide 2 view 1 select Press the centre of the card Photo View 1 Single view D...

Page 31: ...2008 10 25 8 pictures 2008 10 23 5 pictures 2008 12 02 2 pictures 2008 11 25 1 picture 2008 11 20 10 pictures 2008 11 10 1 picture Photo View Mode 100_PANA Sort by Date Select EXIT Select RETURN All pictures View Sort by Date 2 thumbnail of the selected group 1 select 2 thumbnail of the selected group 1 select File name Date Pixel p1010001 1 38 2008 10 23 1600 x 1200 p1010004 p1010003 p1010002 p10...

Page 32: ...teed Please refer to individual manuals for the equipment About applicable Panasonic equipment consult your local Panasonic dealer VIERA Link features and connections VIERA Link Connected equipment with VIERA Link function Features DIGA Recorder 1 DVD Player Blu ray Disc Player 1 HD Video Camera LUMIX Camera 1 Player theatre 2 Blu ray Disc theatre 2 Amplifier 2 Channel download 4 Easy playback 7 7...

Page 33: ...mera LUMIX Camera with VIERA Link function HDMI cable This function may not work properly depending on the connected equipment For DIGA Recorder DVD Player Blu ray Disc Player HD Video Camera LUMIX Camera with VIERA function connect to HDMI1 or HDMI2 terminal for TH L32C12K only HDMI1 terminal is available via an HDMI cable For Player theatre Blu ray Disc theatre Amplifier connect to HDMI1 termina...

Page 34: ...his function Easy playback Channel setting can be downloaded to the recorder 34 Automatic input switching When the connected equipment is operated input mode is switched automatically Set Power on Link On in Setup Menu to use this function Power on Link p 18 19 21 When the connected equipment starts playback or direct navigator function menu for the equipment are activated the TV is automatically ...

Page 35: ...e check the settings and the equipment VIERA Link features and connections p 32 33 2 Select Direct TV Rec and start recording To stop recording Select Stop in Direct TV Rec and access 1 Display VIERA Link Menu 1 select 2 stop 2 start 1 select Direct TV Rec Speaker Selection VIERA Link Menu Home Cinema Start VIERA Link Control Speaker Selection Home Cinema Recorder Pause Live TV Start Direct TV Rec...

Page 36: ...ction is available with DIGA Recorder which has HDD If you connect two recorders including other manufacturers recorder at the same time please connect DIGA Recorder which has HDD to the TV s lower HDMI terminal number If you cannot operate check the settings and the equipment VIERA Link features and connections p 32 33 1 select 2 pause Access and pause the live TV programme TV picture will be pau...

Page 37: ...e remote control code for TV p 17 2 Follow the operation guide To display the operation guide Move the cursor select the menu Move the cursor access adjust Store set access Return to the previous menu Exit the menu When the key words are displayed on colour bar If two recorders or players are connected You can connect up to two recorders or players at the same time Direct TV Rec Speaker Selection ...

Page 38: ... Player theatre Blu ray Disc theatre or Amplifier Read the manual of the equipment HDAVI Control 4 is the newest standard current as of December 2008 for HDAVI Control compatible equipment This standard is compatible with conventional HDAVI equipment To confirm this TV s version of HDAVI Control System Information p 21 Note If you wish to enjoy the multi channel sound e g Dolby Digital 5 1ch via a...

Page 39: ...ol p 37 The connected device can be operated with the VIERA remote control When multiple devices are connected an indicator appears below the icon so that one device can be selected Pause Live TV Pause Live TV p 36 A live TV programme can be paused and resumed later Direct TV Rec Direct TV Rec p 35 What is on TV can be recorded immediately Speaker Selection Speaker Control p 38 Theatre speaker can...

Page 40: ...ding Playback equipment AV1 IN AV2 IN MONITOR OUT To record playback videocassettes DVDs VCR DVD recorder To watch DVDs DVD player To watch camcorder images Video camera To watch satellite broadcasts Set top box To play games Game equipment To use amplifier with speaker system VIERA Link Recommended Connection Types of connectable equipment to each terminal Amplifier with speaker system Viewing Li...

Page 41: ... SCL 15 CEC 13 TMDS Clock Shield 11 TMDS Data0 9 TMDS Data0 7 TMDS Data1 Shield 5 TMDS Data2 3 TMDS Data2 1 18 5V Power 16 SDA 14 Reserved in cable but N C on device 12 TMDS Clock 10 TMDS Clock 8 TMDS Data0 Shield 6 TMDS Data1 4 TMDS Data1 2 TMDS Data2 Shield HDMI terminal Connect the COMPONENT or VIDEO terminal when using AV2 IN terminals 4 For TH L32C12K only HDMI1 terminal is available HDMI equ...

Page 42: ... 62 63 69 62 63 69 62 63 62 C13 70 73 74 75 76 77 78 79 S 1 S 2 S 3 S 1 S 2 S 3 S 1 S 2 S 3 S 1 32 41 S 1 S 1 S 2 S 3 80 81 89 Z1 Z9 S1 S2 S10 S1 S2 S10 S1 S2 S10 S1 S2 S10 42 51 S1 S2 S10 S1 S2 S10 90 91 92 93 94 95 96 97 98 99 Z10 Z11 Z12 Z13 Z14 Z15 Z16 Z17 Z18 Z19 S11 S12 S13 S14 S15 S16 S17 S18 S19 S20 S11 S12 S13 S14 S15 S16 S17 S18 S19 S20 S11 S12 S13 S14 S15 S16 S17 S18 S19 S20 S11 S12 S13...

Page 43: ...nditions are not optimum or if STEREO MONO automatic switching occurs it is recommended you switch from STEREO to MONO Even when the contents of the receiving signal undergo changes selection mode is kept intact When the receiving conditions deteriorate listening will be easier if the mode is set to the MONO position using the stereo bilingual sound selection button DUAL also known as DUAL MONO or...

Page 44: ...anasonic co jp pavc global cs DCF Design rule for camera file system Unified standard established by Japan Electronics and Information Technology Industries Association JEITA Note Format the card with the recording equipment The picture may not appear correctly on this TV depending on the recording equipment used Display may take some time when there are many files and folders This function cannot...

Page 45: ...Bandwidth Digital Content Protection copyright protection An equipment having no digital output terminal may be connected to the input terminal of either COMPONENT or VIDEO to receive analogue signals The HDMI input terminal can be used with only the following image signals 480i 480p 576i 576p 720p 1080i and 1080p Match the output setting of the digital equipment For details of the applicable HDMI...

Page 46: ...1 080 50p 1 125 1 080 24p Signal name Horizontal frequency kHz Vertical frequency Hz 640 x 400 70 Hz 31 47 70 07 640 x 480 60 Hz 31 47 59 94 640 x 480 75 Hz 37 50 75 00 800 x 600 60 Hz 37 88 60 32 800 x 600 75 Hz 46 88 75 00 800 x 600 85 Hz 53 67 85 06 852 x 480 60 Hz 31 44 59 89 1 024 x 768 60 Hz 48 36 60 00 1 024 x 768 70 Hz 56 48 70 07 1 024 x 768 75 Hz 60 02 75 03 1 024 x 768 85 Hz 68 68 85 00...

Page 47: ... when it is pushed with a finger Clattered sound might be heard There are some looseness around the panel to prevent the damage to the panel The panel might move slightly when it is pushed with a finger and clattered sound might be heard This is not a malfunction White spots or shadow images noise Check the position direction and connection of the aerial The main unit is hot The main unit radiates...

Page 48: ... EIA CEA 861 861B Sound is unusual Set the sound setting of the connected equipment to 2ch L PCM Check the HDMI1 Input or HDMI Input for TH L32C12K setting in the Sound Menu p 20 If digital sound connection has a problem select analogue sound connection p 43 Sound level is low or sound is distorted Sound signal reception may be deteriorated Check Sound system p 27 Set MPX p 20 in the Sound Menu to...

Page 49: ...nics Standard Association HDMI the HDMI Logo and High Definition Multimedia Interface are trademarks or registered trademarks of HDMI Licensing LLC HDAVI Control is a trademark of Panasonic Corporation SDHC Logo is a trademark Even if no special notation has been made of company or product trademarks these trademarks have been fully respected Licence Frequently Asked Question Licence ...

Page 50: ...F BAND 2 12 PAL SECAM B K1 0 12 PAL B AUST 1 9 PAL B N Z 1 12 PAL SECAM D 1 12 NTSC M Japan 2 13 NTSC M USA UHF BAND 21 69 PAL G H I SECAM G K K1 28 69 PAL B AUST 13 57 PAL D K 13 62 NTSC M Japan 14 69 NTSC M USA CATV S1 S20 OSCAR 1 125 USA CATV C13 C49 JAPAN S21 S41 HYPER Z1 Z37 CHINA 5A 9A AUST Aerial Rear VHF UHF Operating Conditions Temperature 0 C 40 C Humidity 20 80 RH non condensing Connect...

Page 51: ...51 Technical Specifications Memo ...

Page 52: ...l number of this product may be found on its rear panel You should note this serial number in the space provided below and retain this book plus your purchase receipt as a permanent record of your purchase to aid in identification in the event of theft or loss and for Warranty Service purposes Model Number Serial Number ...

Reviews: