background image


Australia


1. The product is warranted for 12 months from the date of purchase. Subject to the conditions of this warranty Panasonic or its 

Authorised Service Centre will perform necessary service on the product without charge for parts or labour, if in the opinion of 

Panasonic, the product is found to be faulty within the warranty period.

2. This warranty only applies to Panasonic products purchased in Australia and sold by Panasonic Australia or its Authorised Distributors or 

Dealers and only where the products are used and serviced within Australia or it's territories. Warranty cover only applies to service carried 

out by a Panasonic Authorised Service Centre and only if valid proof of purchase is presented when warranty service is requested.

3. This warranty only applies if the product has been installed and used in accordance with the manufacturer’s recommendations (as noted 

in the operating instructions) under normal use and reasonable care (in the opinion of Panasonic). The warranty covers normal domestic 

use only and does not cover damage, malfunction or failure resulting from use of incorrect voltages, incorrect installation, accident, 

misuse, neglect, build-up of dirt or dust, abuse, maladjustment of customer controls, mains supply problems, thunderstorm activity, 

infestation by insects or vermin, tampering or repair by unauthorised persons (including unauthorised alterations), introduction of sand, 

humidity or liquids, commercial use such as hotel, office, restaurant, or other business or rental use of the product, exposure to abnormally 

corrosive conditions or any foreign object or matter having entered the product.

4. This warranty does not cover the following items unless the fault or defect existed at the time of purchase:

  (a) Cabinet Part(s) 

(e) DVD, Blu-ray, or Recordable Discs

  (b) Video or Audio Tapes 

(f) Video / Audio Heads from wear and tear in normal use

  (c) SD cards or USB devices 

(g) Information stored on Hard Disk Drive, USB stick or SD card

  (d) User replaceable Batteries 

(h) DTV reception issues caused by TV Aerial / Cabling / Wall socket(s) 

 etc

5. Some products may be supplied with Ethernet connection hardware. The warranty is limited on such products and will not cover

  (a) Internet and or DLNA connection / setup related problems

  (b) Access fees and or charges incurred for internet connection

  (c) The use of incompatible software or software not specifically stipulated in the product operations manual; and

 (d) Any indirect or consequential costs associated with the incorrect use or misuse of the hardware, its connection to the internet or 

any other device.

6. To claim warranty service, when required, you should:

  • Telephone Panasonic’s Customer Care Centre on 132600 or visit our website referred to below and use the Service Centre Locator 

for the name/address of the nearest Authorised Service Centre. 

  • Send or take the product to a Panasonic Authorised Service Centre together with your proof of purchase receipt as a proof of purchase 

date. Please note that freight and insurance to and / or from your nearest Authorised Service Centre must be arranged by you. 

  • Note that home or pick-up/delivery service is available for the following products in the major metropolitan areas of Australia or the 

normal operating areas of the nearest Authorised Service Centres:

    - Plasma/LCD televisions / displays (screen size greater than 103 cm)

7. The warranties hereby conferred do not extend to, and exclude, any costs associated with the installation, de-installation or 

re-installation of a product, including costs related to the mounting, de-mounting or remounting of any screen, (and any other ancillary 

activities), delivery, handling, freighting, transportation or insurance of the product or any part thereof or replacement of and do not 

extend to, and exclude, any damage or loss occurring by reason of, during, associated with, or related to such installation, 

de-installation, re-installation or transit. 

Panasonic Authorised Service Centres are located in major metropolitan areas and most regional centres of Australia, however, coverage 

will vary dependant on product. For advice on exact Authorised Service Centre locations for your product, please telephone our Customer 

Care Centre on 132600 or visit our website and use the Service Centre Locator.

In addition to your rights under this warranty, Panasonic products come with consumer guarantees that cannot be excluded under the 

Australian Consumer Law. If there is a major failure with the product, you can reject the product and elect to have a refund or to have the 

product replaced or if you wish you may elect to keep the goods and be compensated for the drop in value of the goods. You are also entitled 

to have the product repaired or replaced if the product fails to be of acceptable quality and the failure does not amount to a major failure.

If there is a major failure in regard to the product which cannot be remedied then you must notify us within a reasonable period by contacting 

the Panasonic Customer Care Centre. If the failure in the product is not a major failure then Panasonic may choose to repair or replace the 

product and will do so in a reasonable period of time from receiving notice from you.

Panasonic

THIS WARRANTY CARD AND THE PURCHASE DOCKET (OR SIMILAR PROOF OF PURCHASE)

SHOULD BE RETAINED BY THE CUSTOMER AT ALL TIMES

If you require assistance regarding warranty conditions or any other enquiries, please visit the 

Panasonic Australia

 website 

www.panasonic.com.au

 or contact by phone on 

132 600


If phoning in, please ensure you have your operating instructions available.

Panasonic Australia Pty. Limited

ACN 001 592 187   ABN 83 001 592 187

1 Innovation Road, Macquarie Park  NSW  2113

PRO-031-F11 Issue: 4.0   

 01-01-2011

 Warranty

Summary of Contents for TH-55AS800A

Page 1: ...em for future reference The images shown in this manual are for illustrative purposes only For more detailed instructions refer to eHELP Built in Operating Instructions How to use eHELP p 18 M0414 0 English English Model No Australia New Zealand TH 55AS800A TH 55AS800Z TH 60AS800A TH 60AS800Z TQB4GC1142 Operating Instructions LED TV ...

Page 2: ...Contents Be Sure to Read Important Notice 3 Safety Precautions 4 Quick Start Guide Accessories 7 Connections 9 Identifying Controls 13 First time Auto Tuning 16 Using your VIERA Operations 17 How to Use eHELP 18 Viewing 3D images 18 Others FAQs 19 Maintenance 19 Specifications 20 ...

Page 3: ... does not grant you that permission and explicitly disclaims any right ability or intention to obtain such permission on your behalf It is your responsibility to ensure that your use of this or any other device complies with applicable copyright legislation in your country Please refer to that legislation for more information on the relevant laws and regulations involved or contact the owner of th...

Page 4: ...her sources of heat To prevent the spread of fire keep candles or other open flames away from this product at all times Safety Precautions To help avoid risk of electrical shock fire damage or injury please follow the warnings and cautions below Mains plug and lead Warning If you detect anything unusual immediately remove the mains plug This TV is designed to operate on AC 220 240 V 50 60 Hz Inser...

Page 5: ...r falling Dangerous part Small object Warning This product contains possibly dangerous parts such as plastic bags that can be breathed in or swallowed by young children accidentally Keep these parts out of reach of young children Do not allow children to handle any small objects such as SD Card and R03 batteries The small object could be swallowed by young children Remove SD Card immediately after...

Page 6: ...ower even in the Off mode as long as the mains plug is still connected to a live socket outlet Remove the mains plug from the wall socket when the TV is not in use for a prolonged period of time Battery for the Remote Control Touch Pad Controller Caution Incorrect installation may cause battery leakage corrosion and explosion Replace only with the same or equivalent type Do not mix old and new bat...

Page 7: ...ront Pedestal has already been assembled to the TV Rear Pedestal Assembly screw A M4 14 4 Assembling the Rear Pedestal 1 Hooks Cover Accessories Remote Control p 13 N2QAYB000936 Touch Pad Controller p 14 N2QBYA000005 Rear Pedestal p 7 The Rear Pedestal cannot be held by one hand because of its weight Handle with both hands Corner cap 2 Assembly screw D 2 M4 5 Attach the corner caps to the TV when ...

Page 8: ...sure to remove the Rear Pedestal in the following way when using the wall hanging bracket or repacking the TV 1 Pull out the cover from the Rear Pedestal 2 Remove the assembly screws A from the TV 3 Lift up the TV at a slight angle from the Rear Pedestal as shown View from the side 4 Attach the cover to the Rear Pedestal When using the wall hanging bracket remove the Front Pedestal as well p 21 2 ...

Page 9: ...cket and the TV Your local Television Service Centre or dealer may be able to assist you in obtaining the correct aerial system for your particular area and the accessories required Connections External equipment and cables shown are not supplied with this TV Please ensure that the unit is disconnected from the mains socket before attaching or disconnecting any cables Check the terminal type and c...

Page 10: ...sories required and the costs incurred are the responsibility of you the customer AV devices DVD Recorder VCR TV RF cable HDMI cable DVD Recorder VCR Aerial Set top box TV HDMI cable Set top box Network To use internet service you need a broadband network environment If you do not have any broadband network services please consult your retailer for assistance Prepare the internet environment for w...

Page 11: ...speakers Use HDMI2 for connecting an amplifier This connection is applicable when using an amplifier that has ARC Audio Return Channel function As for an amplifier without ARC function use DIGITAL AUDIO OUT To enjoy multi channel sound from external equipment e g Dolby Digital 5 1ch connect the equipment to the amplifier For the connections read the manuals of the equipment and amplifier TV HDMI c...

Page 12: ...2 Cable tie Attach the cable tie Insert the cable tie in a hole Hole Bundle the cables Hooks Set the tip in the hooks To loosen Knob Keep pushing the knob To remove from the TV Keep pushing both side snaps Snaps ...

Page 13: ...ds Press again to turn off the button lights 15 Input mode selection TV switches to Digital TV Analogue TV AV switches to AV input mode from Input Selection list 16 Exit Returns to Home Screen 17 HOME Displays Home Screen 18 TV Guide Australia Freeview Guide New Zealand 19 Cursor buttons Makes selections and adjustments 20 Return Returns to the previous menu page 21 Aspect Changes aspect ratio 22 ...

Page 14: ...ll open Hook Note the correct polarity or Close Touch Pad Controller Touch Pad Controller is designed for the convenient operations especially on Home Screen or internet contents You can operate the TV intuitively with this controller Touch Pad Controller can be used by registering to this TV with Bluetooth wireless technology The registration starts automatically when you press any buttons except...

Page 15: ... Up Down Cursor Up Down when in the menu system 10 Volume Up Down Cursor Left Right when in the menu system 11 Mains power On Off switch Use to switch the mains power Installing Removing batteries Slide open Note the correct polarity or Close Note It is recommended to hold Touch Pad Controller with your hand when using The battery power will be used whenever you use Touch Pad Controller including ...

Page 16: ...nu Setup Menu To add the available TV signal mode later Add TV Signal in Tuning Menu Setup Menu To initialise all settings Shipping Condition in System Menu Setup Menu First time Auto Tuning Automatically sets up the TV and searches for available TV channels when the TV is turned on for the first time These steps are not necessary if the setup has been completed by your local dealer Please complet...

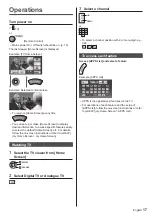
Page 17: ... Operations Turn power on TV or Remote Control Mains power On Off switch should be on p 15 The last viewed Home Screen is displayed Example TV Home Screen Example Selected content screen To return to Home Screen at any time You can set up or make Home Screen to display desired information to access specific features easily to select the default Home Screen etc For details follow the on screen inst...

Page 18: ... 2D images converted to 3D Press the 3D button and set to 2D 3D mode in 3D Mode Selection 1 Put the 3D Eyewear on 2 View the 3D images Safety precautions will be displayed when you first watch the 3D image Select Yes or No to continue to view 3D images Note Do not exert pressure on or scratch the lens of the 3D Eyewear 3D content will not be correctly visible if the 3D Eyewear is worn upside down ...

Page 19: ...t FAQs The TV does not switch on Check the mains lead is plugged into the TV and the socket outlet The TV goes into Standby mode Auto power standby function is activated The remote control does not work or is intermittent Are the batteries installed correctly p 14 Has the TV been switched on The batteries may be running low Replace them with new ones Point the remote control directly at the TV s r...

Page 20: ...ir TV broadcast reception PAL B G Reception of Off air broadcast PAL 60 Hz Playback of NTSC tape from some PAL Video recorders VCR M NTSC Playback from M NTSC Video recorders VCR Specifications TV Model No 55 inch model TH 55AS800A TH 55AS800Z 60 inch model TH 60AS800A TH 60AS800Z Dimensions W H 1 D 55 inch model 1 242 mm 752 mm 247 mm With Pedestal 1 242 mm 727 mm 53 mm TV only 60 inch model 1 35...

Page 21: ...remove the Rear Pedestal before laying down the TV on the table Foam mat or thick soft cloth The Front Pedestal is slightly tilted forward Keep the TV in a horizontal position by using the edge of the table as shown NTSC Playback from NTSC Video recorders VCR Aerial input Standard Belling Lee connector VHF UHF Operating conditions Temperature 0 C 35 C Humidity 20 80 RH non condensing Built in Came...

Page 22: ...nimum 8 mm maximum 11 mm Type of screw M6 Screw for fixing the TV onto the wall hanging bracket not supplied with the TV 1 2 1 2 B C B C Front Pedestal Use the assembly screws D supplied with the corner caps to attach the corner caps D D 3 3 Corner caps Assembly screws B M3 5 4 C M4 10 6 D M4 5 2 supplied with corner cap ...

Page 23: ... for the name address of the nearest Authorised Service Centre Send or take the product to a Panasonic Authorised Service Centre together with your proof of purchase receipt as a proof of purchase date Please note that freight and insurance to and or from your nearest Authorised Service Centre must be arranged by you Note that home or pick up delivery service is available for the following product...

Page 24: ...c net Panasonic Corporation 2014 English Printed in Malaysia New Zealand WARRANTY New Zealand only Distributed in New Zealand by Panasonic New Zealand Limited 350 Te Irirangi Drive East Tamaki Private Bag 14911 Panmure Auckland Tel 09 272 0100 Customer Care Center Email Customerservice nz panasonic com www panasonic co nz NEW ZEALAND Warranty Information on Disposal in other Countries outside the ...

Reviews: