background image

48

49

F

AQs, etc.

 T

echnical 

Information

Technical Information 

(Continued)

VIERA Link “HDAVI Control

TM

”  

HDMI connections to some Panasonic equipment allow you to interface automatically. (p. 28)

 This function may not work normally depending on the equipment condition.
 The equipment can be operated by other remote controls with this function on even if TV is in Standby mode.
 Image or sound may not be available for the first few seconds when the playback starts.
 Image or sound may not be available for the first few seconds when Input mode is switched.
 Volume function will be displayed when adjusting the volume of the equipment.
 If you connect the same kind of equipment at once (for example: one DIGA to HDMI 1 / another DIGA to HDMI 2), VIERA Link is 

available for the terminal with the smaller number.

 If you connect equipment that has “HDAVI Control 2” (or more) function to the TV with HDMI cable, the sound from DIGITAL 

AUDIO OUT terminal can be output as multi channel surround.

 “HDAVI Control 3” is the newest standard (current as of December, 2007) for the HDAVI Control compatible equipment.

  This standard is compatible with the conventional HDAVI equipment.

HDMI connection

HDMI (high-definition multimedia interface) allows you to enjoy high-definition digital images and high-quality sound by connecting 
the TV unit and the devices.
HDMI-compatible equipment (*1) with an HDMI or DVI output terminal, such as a DVD player, can be connected to the HDMI 
connector using an HDMI compliant (fully wired) cable.

 HDMI is the world’s first complete digital consumer AV interface complying with a non-compression standard.
 If the external equipment has only a DVI output, connect to the HDMI terminal via a DVI to HDMI adapter cable (*2).
 When the DVI to HDMI adapter cable is used, connect the audio cable to the audio input terminal.
 Audio settings can be made on the “HDMI 1 in”, “HDMI 2 in” or “HDMI 3 in” menu screen. (p. 24)

Applicable audio signal sampling frequencies (L.PCM):  48 kHz, 44.1 kHz, 32 kHz


(*1):  The HDMI logo is displayed on an HDMI-compliant device. 


(*2):  Enquire at your local digital equipment retailer shop.

Caution

 Use with a PC is not assumed.
 All signals are reformatted before being displayed on the screen.
 If the connected device has an aspect adjustment function, set the aspect ratio to “16:9”.
 These HDMI connectors are “type A”.
 These HDMI connectors are compatible with HDCP (High-Bandwidth Digital Content Protection) copyright protection.
 A device having no digital output terminal may be connected to the input terminal of either “COMPONENT”, “S VIDEO”, or 

“VIDEO” to receive analog signals.

 The HDMI input terminal can be used with only the following image signals:  480i, 480p, 720p, 1080i and 1080p.

Match the output setting of the digital device.

 For details of the applicable HDMI signals, see below.

Input signals that can be displayed

* Mark:  Applicable input signal for Component (Y, P

B

, P

R

) and HDMI

horizontal

frequency (kHz)

vertical

frequency (Hz)

COMPONENT

HDMI

525 (480) / 60i

15.73

59.94

*

*

525 (480) /60p

31.47

59.94

*

*

750 (720) /60p

45.00

59.94

*

*

1,125 (1,080) /60i

33.75

59.94

*

*

1,125 (1,080)/60p

67.43

59.94

*

1,125 (1,080)/60p

67.50

60.00

*

1,125(1,080)/24p

26.97

23.98

*

1,125(1,080)/24p

27.00

24.00

*

Note

 Signals other than those shown above may not be displayed properly.
 The above signals are reformatted for optimal viewing on your display.

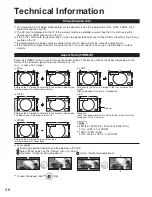
Picture mode

 Vivid:            Provides enhanced picture contrast and sharpness for viewing in a well-lit room.
 Standard:        Recommended for normal viewing conditions with subdued room lighting.
 Cinema:         For watching movies in a darkened room. It provides a soft, film-like picture.
 

Game:     For playing video game. This mode will be set automatically if “GAME” is selected from Input label setting (p. 37)

 Custom  (Photo):   Customizes each item according to your taste.

Photo is displayed in JPEG menu.

Note

 Picture mode will be automatically set to “Standard” if you change the Input label from “GAME” to other labels.
 Picture mode will be automatically set to “Game” if you change from an Input label other than “GAME” to “GAME” label.

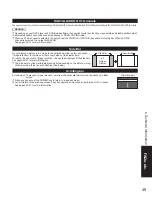
Side Bar

Do not display a picture in 4:3 mode for an extended period, as this can cause 
“Image retention” to remain on either or both sides of the display field.
To reduce the risk of such “Image retention”, change the brightness of the side bars.
See pages 26-27 for more information.

 The side bar may flash (alternate black/white) depending on the picture. Using   

Cinema mode will reduce such flashing (See below).

Side Bar

4:3

Screen

Display

Image retention

Scrolling bar

Scrolling bar:   To prevent “Image retention”, scrolls white horizontal bar from top to bottom on a black 

screen.

 Press any key except the POWER key to return to previous screen.
 You will return to the previous screen if any key operation has not been performed for 15 minutes.

See pages 26-27 for more information.

[Scrolling bar]

DIGITAL AUDIO OUT terminals

You can enjoy your home theater by connecting a Dolby Digital (5.1 channel) decoder and “Multi Channel” amplifier to the DIGITAL AUDIO OUT terminals. 

Caution

 Depending on your DVD player and DVD-Audio software the copyright protection function may operate and disable optical output.
 External speakers cannot be connected directly to PROG OUT terminals.
 When an ATSC channel is selected, the output from the DIGITAL AUDIO OUT jack will be Dolby Digital. When an NTSC 

channel is selected, the output will be PCM.
See pages 40-41 for more information.

Summary of Contents for TH-50PZ80Q

Page 1: ...50PZ80Q English Please read these instructions before operating your set and retain them for future reference The images shown in this manual are for illustrative purposes only Quick Start Guide See...

Page 2: ...ice contains a digital television tuner so it should receive digital over the air TV programming with a suitable antenna after the end of full power analog TV broadcasting in the United States as requ...

Page 3: ...Closed Caption 36 Input Labels Monitor Out 37 Using Timer 38 Programming the Remote to Operate Peripheral Equipment 39 Recommended AV Connections 40 Remote control operation codelist 42 Ratings List f...

Page 4: ...the AC cord power plug is securely connected FCC STATEMENT This equipment has been tested and found to comply with the limits for an Other Class B digital device pursuant to Part 15 of the FCC Rules T...

Page 5: ...odor is detected from the Plasma TV unplug the power cord immediately Continued use of the TV under these conditions might cause fire or permanent damage to the unit Have the TV evaluated at an Author...

Page 6: ...o not mix different battery types such as alkaline and manganese batteries Do not use rechargeable Ni Cd batteries Do not burn or break batteries Make a note of the remote control codes before changin...

Page 7: ...m view Warning Do not disassemble or modify the pedestal Otherwise the TV may fall over and become damaged and personal injury may result Caution Do not use any other TV and displays Otherwise the TV...

Page 8: ...and pull the clamper Snaps Set hooks knob Keep pushing the knob Cable clamper Do not bundle the RF cable and AC cord together could cause distorted image Fasten the cables with the Cable clamper as n...

Page 9: ...C National Television System Committee Conventional broadcasting ATSC Advanced Television Systems Committee Digital TV Standards include digital high definition television HDTV standard definition tel...

Page 10: ...progressive signal connection can be done with the use of Component Video or HDMI cable p 12 VCR Connection can be done with the use of an RF cable and Composite Video S Video cable p 12 VHF UHF Anten...

Page 11: ...e Receiver TV VHF UHF Antenna You can enjoy high definition programming by subscribing to high definition satellite service Connection can be done with the use of HDMI or Component Video cable p 12 No...

Page 12: ...and high quality sound For VIERA LinkTM connections please refer to p 41 B To use COMPONENT terminals L R Y PB PR COMPONENT VIDEO OUT AUDIO OUT white red green blue red white red green blue red white...

Page 13: ...Colored buttons used for various functions for example p 20 30 Channel up down Changes aspect ratio p 19 Operates the Favorite channel list function p 19 Switches to previously viewed channel or inpu...

Page 14: ...software must be downloaded from the cable company The download time will vary based on the speed and size of the download If you experience a front panel control or remote control function hang up wh...

Page 15: ...ontrol buttons Display Main menu Display VOD Video On Demand screen Display TV Guide PAGE Page up down Available when the function of the keys is displayed on screen Note These Operating Instructions...

Page 16: ...are selecting the mode for store demonstration select ok Select No and return to previous screen If you select Yes Screen enters store demonstration mode Displays Please select your viewing environmen...

Page 17: ...canning the channels Available channels analog digital are automatically set All channels Scans digital and analog channels Analog only Scans Analog channels only Digital only Scans Digital channels o...

Page 18: ...Digital mode Press SAP to select the next audio track if available when receiving a digital channel Audio track 1 of 2 English Analog mode Press SAP to select the desired audio mode Each press of SAP...

Page 19: ...tenna in ANT in of Program channel to switch the signal reception between cable TV and antenna p 17 35 The channel number and volume level remain the same even after the TV is turned off Favorite Feat...

Page 20: ...Lock SD card or Select the data to be viewed Note Depending on the JPEG format Information contents may not be displayed correctly Refer to p 47 Data format for SD card browsing for details View Slide...

Page 21: ...tup slide show ok 3 Select the item and adjust Setup slide show Disp time Repeat 5 On Select Adjust Disp time You can set how many seconds each image is displayed in Slide show mode 1 10 15 20 30 45 6...

Page 22: ...ayed To label each of the inputs please refer to p 37 Note The input label will be displayed on Input select screen if Input label is set on p 37 For front input terminals HDMI 3 Video 2 GAME input la...

Page 23: ...ct Setup Menu VIERA Link Lock Setup SD card CC select next Select VIERA Link setting Setup 2 2 VIERA Link setting Advanced Setup About select next Select VIERA Link VIERA Link setting VIERA Link Power...

Page 24: ...Menu Functions Various menus allow you to make settings for the picture sound and other functions so that you can enjoy watching TV best suited for you TV MENU Press to exit from a menu screen Press...

Page 25: ...Standard Definition HD High Definition Only 480p signal accepted regular TV NTSC is not available Color matrix SD Reduces noise of specific digital signals of DVD etc On Off MPEG NR Off Selects Dark...

Page 26: ...menu list Various menus allow you to make settings for the picture sound and other functions so that you can enjoy watching TV best suited for you TV MENU Press to exit from a menu screen Press to re...

Page 27: ...when a connected device is turned On No Set The Sleep timer On Off timer and First time setup will not function if Auto power on is set p 38 Auto power on No To conserve energy the TV automatically tu...

Page 28: ...such its operation with other manufacturers equipment that supports HDMI CEC cannot be guaranteed Please refer to the individual manuals for other manufacturers equipment supporting the VIERA Link fu...

Page 29: ...is performed automatically Home Theater power switches On and playback begins TV power switches On and the playback screen is displayed Audio is muted on the TV and switches to the theater system The...

Page 30: ...eturn to the previous screen Display VIERA Link menu Menu Audio Lock SD card Timer Picture VIERA Link or Select the item Record now Stop recording Speaker output TV VIERA Link control Recorder select...

Page 31: ...RA Link Control Select the equipment you want to access Recorder Home theater Player Camcorder Available TV s remote control buttons Move the cursor Select Set Access Return to the previous menu Displ...

Page 32: ...e you display the Lock menu Input your 4 digit password A 4 digit code must be entered to view a blocked program or change rating settings Create password Enter password 0 9 If it is your first time e...

Page 33: ...U S TV U S TV program ratings C E L R Canadian English ratings C F L R Canadian French ratings Select the rating to be locked select Example of MPAA U S movie ratings NR No rating G General Audience...

Page 34: ...Program channel Setup 1 2 All Surf mode Language Clock Program channel External devices Anti image retention Reset next select Select the function Program channel Cable ANT in Auto Manual Signal meter...

Page 35: ...K to tune to the channel Select Apply Caption Favorite Add Apply Cancel program Yes select Apply ok Select Edit Edit Cannnel Caption Favorite Add Apply Cancel Manual program 2 Yes 3 Yes 4 Yes 5 Yes se...

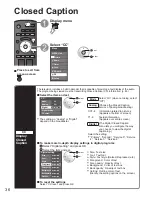
Page 36: ...e setting Primary Second Service 3 Service 4 Service 5 Service 6 The settings in Analog or Digital depend on the broadcaster To make more in depth display settings in digital programs Select Digital s...

Page 37: ...picture and audio To prevent howling and image oscillation stops output of the pictures and audio specified in this menu p 27 Select the terminal and set Off Monitor out Component 1 Component 2 HDMI 1...

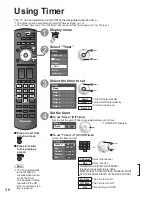
Page 38: ...if a key is pressed Display menu Select Timer Menu Audio Lock SD card Timer Picture VIERA Link next select Select the timer to set Timer Sleep Timer 1 Timer 2 Timer 3 Timer 4 Timer 5 select next Set t...

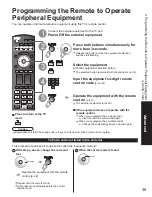
Page 39: ...control p 42 The external equipment turns On If the equipment does not operate with the remote control When your equipment has a single code Input the remote control code again When your equipment has...

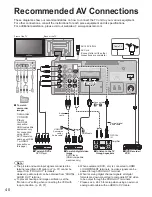
Page 40: ...ignals can be passed through PROG OUT terminal When receiving digital channel signals all digital formats are down converted to composite NTSC video to be output through the PROG OUT terminals Please...

Page 41: ...en to the TV program through the theater system Connecting this unit to a DVD recorder DIGA AV amp When using an VIERA Link audio video amplifier and a compatible DVD recorder DIGA use a daisy chain c...

Page 42: ...l Music PROG Sub Channel Page Down Up Page Down Up Skip Reverse Forward TV VCR Switch TV DBS Switch TV CBL Switch Rewind Fast Forward Rewind Fast Forward Rewind Fast Forward Reverse Forward VCR Record...

Page 43: ...ntom 0072 Shogun 0240 Singer 0072 Sonic Blue 0614 0616 1137 Sony 0000 0032 0033 0034 0035 0636 1032 1972 Stack 9 1972 STS 0042 Sylvania 0000 0035 0043 0081 0110 0593 1593 1781 Symphonic 0000 0593 1593...

Page 44: ...ch 1402 Norcent 0872 1003 1107 1265 Nova 1517 Onkyo 0503 0627 0792 1769 Oppo 0575 1224 1525 OptoMedia Electronics 0896 Oritron 0651 Panasonic 0458 0490 0632 0703 1010 1011 1362 1462 1464 1490 1641 176...

Page 45: ...gue with sexual content CANADIAN ENGLISH RATINGS C E L R E Exempt Exempt programming includes news sports documentaries and other information programming talk shows music videos and variety programmin...

Page 46: ...se the aspect depending on the format of the received signal and your preference p 19 e g in case of 4 3 image FULL JUST FULL JUST Enlarges the 4 3 image horizontally to the screen s side edges Recomm...

Page 47: ...PG P1000003 JPG P1000004 JPG 100_PANA Created automatically 3 digit folder number 5 digit arbitrary characters 4 digit arbitrary characters 4 digit file number Usable characters 1 byte a to z A to Z 0...

Page 48: ...io signal sampling frequencies L PCM 48 kHz 44 1 kHz 32 kHz 1 The HDMI logo is displayed on an HDMI compliant device 2 Enquire at your local digital equipment retailer shop Caution Use with a PC is no...

Page 49: ...ack screen Press any key except the POWER key to return to previous screen You will return to the previous screen if any key operation has not been performed for 15 minutes See pages 26 27 for more in...

Page 50: ...ap solution and then wring the cloth dry Use this cloth to wipe the cabinet and then wipe it dry with a dry cloth Do not allow any mild liquid dish soap to come into direct contact with the surface of...

Page 51: ...ENT INPUT 1 2 Y 1 0 V p p including synchronization PB PR 0 35 V p p AUDIO L R RCA PIN Type 2 0 5 V rms HDMI 1 3 TYPE A Connector 3 This TV supports HDAVI Control 3 function IEEE1394 IEEE 1394 Standar...

Page 52: ...ce or frozen digital channels intermittent sound Change the direction of antenna for digital channels Check Signal meter p 35 If the signal is weak check the antenna and consult your local dealer The...

Page 53: ...s However sometimes a few pixels may be bright or dark These pixels do not indicate a defective panel and will have no impact on the performance of the TV Check nearby electrical products car motorcyc...

Page 54: ...SO DOES NOT COVER damages which occurred in shipment or failures which are caused by products not supplied by the warrantor or failures which result from accidents misuse abuse neglect bug infestation...

Page 55: ...ntact us directly at 1 877 95 VIERA 958 4372 Monday Friday 9 am 9 pm Saturday Sunday 10 am 7 pm EST For hearing or speech impaired TTY users TTY 1 877 833 8855 Accessory Purchases United Stated and Pu...

Page 56: ...purchase receipt as a permanent record of your purchase to aid in identification in the event of theft or loss and for Warranty Service purposes Model Number Serial Number Panasonic Consumer Electron...

Reviews: