background image

11

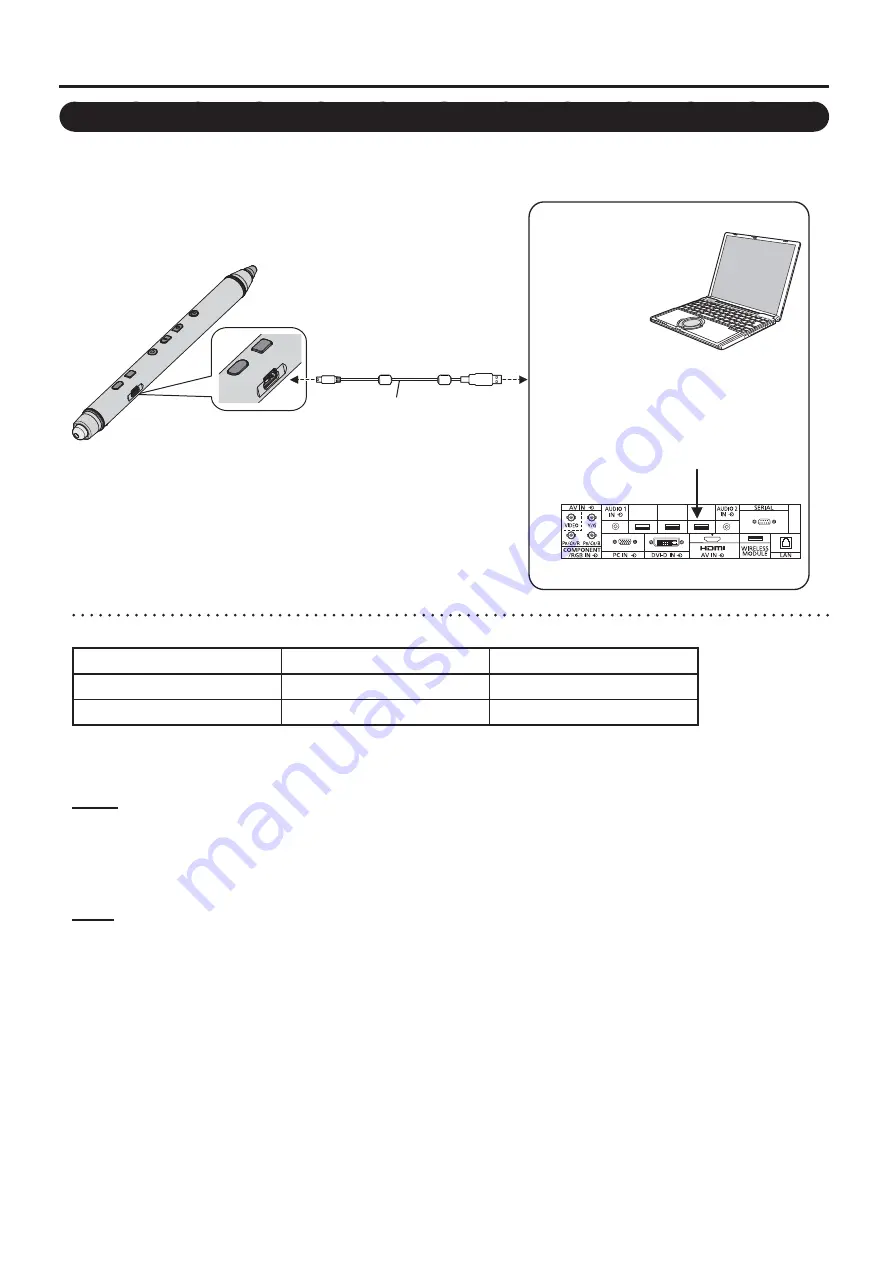
Charging with Charger cable

Connect the charging port of the electronic pen to the CHARGE or MEMORY/(CHARGE) port of the display or the 
USB port of the computer with the included charger cable

The power button lights red and charging starts.

• 

PEN

ADAPTER

MEMORY

/(CHARGE)

CHARGE

  Connect to the 

charging port of the 
electronic pen

External input ports on the rear of the display

Computer

  Connect to the USB 

port of the computer

  Connect to the CHARGE or 

MEMORY/(CHARGE) port of the 
display

Or

Charger cable


 Guide of charging time and duration time

Charging time

Operation time

Charging with charger

Approximately 4 h*

1

Approximately 5 h*

2

Charging with charger cable

Approximately 4 h*

1

Approximately 5 h*

2

*

1

 The time to fully charge the empty battery.

*

2

 The duration time may become shorter depending on the condition of use.

Notice

Do not connect the charger cable to the WIRELESS MODULE port or PEN ADAPTER port of the display.

• 

When you store the electronic pen for a long period of time, avoid full charge*

• 

3

 and turn the power off.

*

3

  The electronic pen is not fully charged if the power button lights red when the electronic pen is set in the 

charger or connected to the charger cable.

Notes

It is possible to use the electronic pen even during charging with the charger cable.

• 

If you charge the electronic pen by connecting it to the display, turn the power of the display on or set the 

• 

display to standby.
If you charge while the display is in standby, set the “Standby pen charging mode” of the “Touch-Pen 

• 

Settings” to “On[4hrs]”. (See Display Operations of the operating instructions.)
The battery life is approximately 4 years when it is charged approximately 5 times in a day (note that the 

• 

warranty period is one year).
If the operation time became substantially short even when charged correctly, it is considered as due to the 
end of the battery life. (The battery life greatly differs depending on its use and storage conditions.)

Summary of Contents for TH-50PB2E

Page 1: ...teractive Plasma Display Before connecting operating or adjusting this product please read these instructions completely Please keep this manual for future reference English Electronic Pen Model No DK...

Page 2: ...s Computer IBM PC AT compatible CPU Intel Core 2 processor or later Operating System Windows XP Service Pack 3 except for Media Center and Tablet PC versions Windows Vista Service Pack 2 except for St...

Page 3: ...ies Supplied 7 Names and Uses of the Parts 8 How to Charge 10 About Electronic Pen 12 Using Electronic pen with Easy WhiteBoard 14 Using Electronic Pen with Panasonic WhiteBoard Software 18 Registerin...

Page 4: ...smoke detectors and other automatically controlled equipment Electromagnetic waves generated by this device can affect equipment and can cause equipment to malfunction Use at least 22 cm away from pac...

Page 5: ...ufacturer of any personal medical devices such as pacemakers to determine if they are adequately shielded from external RF radio frequency energy The unit operates in the frequency range of 2 405 GHz...

Page 6: ...scratch the screen Be careful not to hit or scratch with the pen tip of electronic pen because it is protruding Also note that the electronic pen will not function correctly if the pen tip cannot rece...

Page 7: ...ectronic pen adapter 1 Pen tip 1 Model No DKB DP13 Parts No N2FZ00000025 Model No SSR RFNANO Parts No N5EDZ0000010 TKKL55591 Eraser tip 1 Optical attachment 1 Charger 1 TO DISPLAY TKKL55601 TGAD003 N0...

Page 8: ...he power off press and hold the button one second or more The Power Button lights as below according to the status of the electronic pen Off Power off Lighting green Power on Blinking green Low batter...

Page 9: ...e Check that the power button is green when using the electronic pen Using the electronic pen with the wireless module ET WM200E connected may result in malfunction of the electronic pen due to radio...

Page 10: ...MEMORY CHARGE CHARGE Connect to the CHARGE port on the rear of the charger Charger cable Connect to the CHARGE port of the display External input ports on the rear of the display 2 Turn the pen tip do...

Page 11: ...le to the WIRELESS MODULE port or PEN ADAPTER port of the display When you store the electronic pen for a long period of time avoid full charge 3 and turn the power off 3 The electronic pen is not ful...

Page 12: ...imported from a le using the electronic pen Desktop operation You can operate the desktop functions shown on the screen or other software using the electronic pen Not available with the Easy WhiteBoa...

Page 13: ...ing with its pen tip even when the optical attachment is attached When you use the eraser detach the optical attachment If Display and the remote pointer are not far enough apart from each other the o...

Page 14: ...r PEN CHARGER Electronic pen adapter Recording medium compatible with USB2 0 Note Connect a recording medium when saving the drawn characters and other objects See 17 page 3 Register the electronic pe...

Page 15: ...ick the tab Switch the mode The software has two modes that are switched to each other by clicking when the main menu is started from other inputs than WHITEBOARD The characters drawn in each mode are...

Page 16: ...bject drawn on the screen Some parts may be left in the surrounding area on the screen Use the eraser again to ease them or erase the entire screen Erase selected area If you click and then move the e...

Page 17: ...ave Overwrites and saves the current page Save as a new page The current page is left as before drawing is made and the image with drawn objects is saved as a new page Delete this page The page curren...

Page 18: ...stall the Panasonic WhiteBoard Software since the software can be run directly on your computer as an executable le 1 Copy WhiteBoardSoft folder contained in the supplied CD ROM to your computer deskt...

Page 19: ...leted the power button lights green If a registration error has occurred the power button lights red for approximately one second 5 When registration of the electronic pen is completed the pairing com...

Page 20: ...the pen tip eraser tip 1 Remove the pen tip cover eraser tip cover Pen tip Eraser tip Raising the pen makes replacement easier 2 Remove the used pen tip eraser tip and attach the new pen tip eraser t...

Page 21: ...ws TO DISPLAY TO DISPLAY The illustration shows the case that the charger is attached to the left side of display when seen from the front To attach it to the right side reverse the mounting plate TO...

Page 22: ...removed TO DISPLAY If necessary use the included clamper to clamp the cables TO DISPLAY Mounting hole Close after bundling the cables Insert the projection into the mounting hole Mounting hole Attach...

Page 23: ...e rechargeable battery in the electronic pen is low Charge the electronic pen 10 11 The electronic pen is used with the wireless module ETWM200E connected Using the electronic pen with the wireless mo...

Page 24: ...or store the battery with a necklace hair pin or the like Do not charge use or leave the battery in a hot location such as near a re or under the hot sun Doing so may cause the battery to generate he...

Page 25: ...ff light off and perform the procedure again Leave the electronic pen untouched while the power button repeats blinking When the battery is exhausted the power button stops blinking and you can disass...

Page 26: ...battery one by one with scissors Insulate the cord part of the removed rechargeable battery with vinyl tape to prevent the metal parts inside the cord from contacting each other Rechargeable battery B...

Page 27: ...be mixed with general household waste For proper treatment recovery and recycling of old products and used batteries please take them to applicable collection points in accordance with your national l...

Page 28: ...999 5 EC Directive 2004 108 EC Directive 2006 95 EC Directive 2011 65 EU and Council recommendation 1999 519 EC If you want to get a copy of the original DoC of this display please visit the following...

Reviews: