background image

12

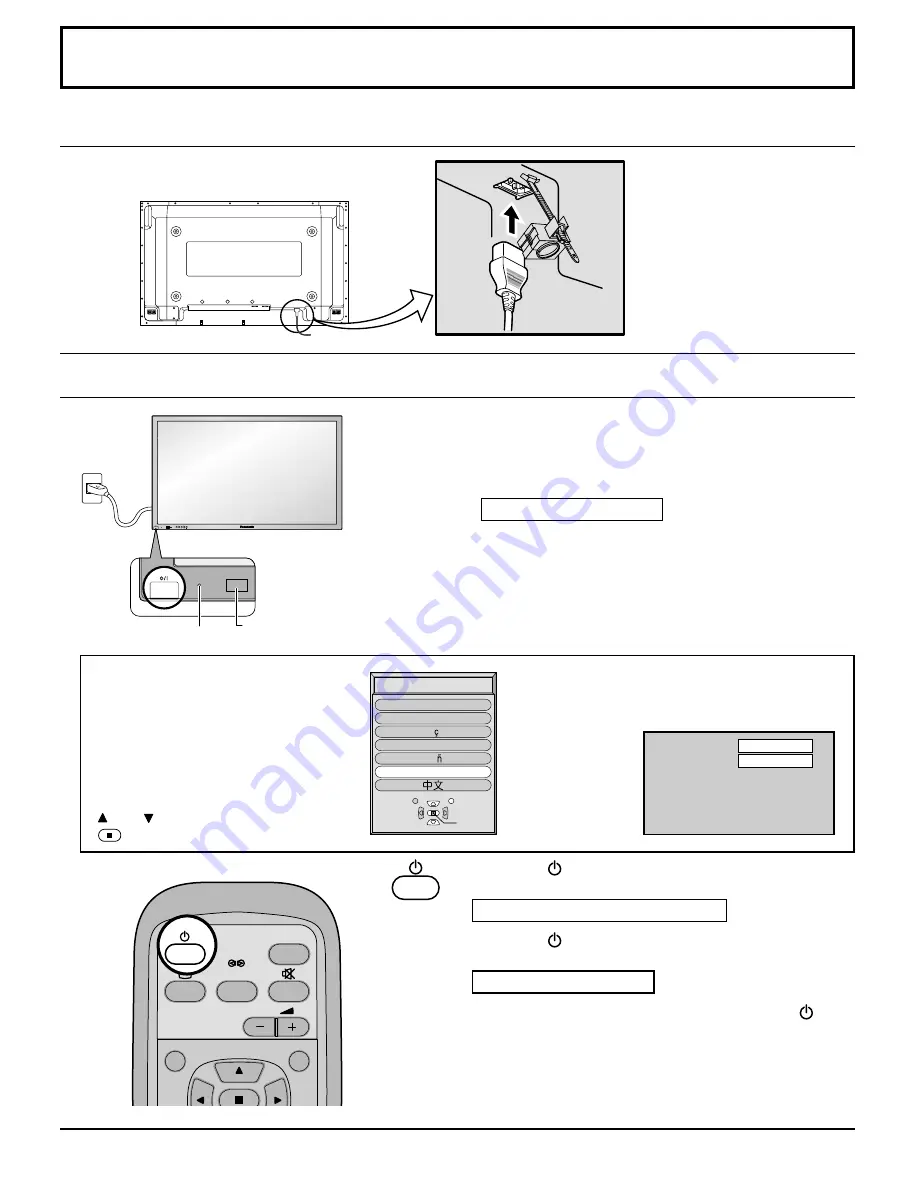
Power ON/OFF

Press the 

  button on the remote control to turn the

Plasma Display off.

Power Indicator: Red (STAND-BY)

Press the 

  button on the remote control to turn the

Plasma Display on.

Power Indicator: Green

To turn the power for the Plasma Display off, press the   switch
on the Plasma Display, when the Plasma Display is on or in
standby mode.

Power ON/OFF

When the POWER is turned on for the
first time, the LANGUAGE selection
screen is displayed.

From the second time on, language
selection can be done from the setup
menu. (see page 13)

Select the desired language using the

 and   keys and press the ACTION

 button.

Remote Control Sensor

Power Indicator

Connecting the plug to the Wall Outlet

Press the POWER switch on the Plasma Display to turn
the set on : POWER-ON.

Power Indicator : Green

Example: The screen below is displayed for a while after

the Plasma Display is turned on. (setting
condition is an example.)

AC cord connection

Connecting the AC cord plug to the Plasma Display.

From the second time on, the screen shown
below is displayed for a while (setting
condition is an example).

Note: During operation of the power management function, the power

indicator turns orange in the power off state.

Fix the AC cord plug
securely to the Plasma
Display with the clamper.

INPUT

SURROUND

VOL

N

R

SELECT

OSD  LANGUAGE

SET

En

g

lish (UK)

Deutsch

Fran  ais

Italiano

Es

p

a  ol

ENGLISH (US)

R - STANDBY

G   POWER ON

R - STANDBY
G   POWER ON

TH-42PWD6

INPUT

MENU

ENTER

+

VOL

P C

N O R M A L

Summary of Contents for TH-42PWD6

Page 1: ... TH 37PWD6UX TH 42PWD6UX Model No Before connecting operating or adjusting this product please read these instructions completely Please keep this manual for future reference English TQBC0650 PLASMA DISPLAY R STANDB Y G POWER ON INPUT MENU ENTER VOL POWE R ...

Page 2: ...hock do not remove cover No user serviceable parts inside Refer servicing to qualified service personnel 2 Do not remove the grounding pin on the power plug This apparatus is equipped with a three pin grounding type power plug This plug will only fit a grounding type power outlet This is a safety feature If you are unable to insert the plug into the outlet contact an electrician Do not defeat the ...

Page 3: ...ns have been adhered to 9 Do not defeat the safety purpose of the polarized or grounding type plug A polarized plug has two blades with one wider than the other A grounding type plug has two blades and a third grounding prong The wide blade or the third prong are provided for your safety If the provided plug does not fit into your outlet consult an electrician for replacement of the obsolete outle...

Page 4: ...ower ON OFF 12 Input Signal Selection 13 Select the Input Signal 13 Selecting the ON Screen Menu Language 13 Basic Controls 14 On Screen Menu Displays 16 ASPECT Controls 18 Adjusting PICTURE POSITION SIZE 19 SOUND Adjustment 20 MUTE 20 PICTURE Adjustments 21 ADVANCED SETTINGS 22 PRESENT TIME SETUP SET UP TIMER 23 PRESENT TIME SETUP 23 SET UP TIMER 24 SCREENSAVER For preventing after images 25 Setu...

Page 5: ...n FCC Caution To assure continued compliance and possible undesirable interference the provided ferrite cores must be used when connecting this plasma display to video equipment and maintain at least 40 cm spacing to other peripheral devices Any changes or modifications not expressly approved by Matsushita Electric Corporation of America could cause harmful interference and would void the user s a...

Page 6: ...eat may be generated which could cause fire If the plug is damaged or the wall socket plate is loose they should not be used Do not handle the power cord plug with wet hands Doing so may cause electric shocks Do not do anything that might damage the power cable When disconnecting the power cable hold the plug not the cable Do not make any modifications place heavy objects on place near hot objects...

Page 7: ...rd from the wall outlet and clean it with a dry cloth This Plasma Display radiates infrared rays therefore it may affect other infrared communication equipment Install your infrared sensor in a place away from direct or reflected light from your Plasma Display Cleaning and maintenance The front of the display panel has been specially treated Wipe the panel surface gently using only a cleaning clot...

Page 8: ...bserve the following precautions 1 Batteries should always be replaced as a pair Always use new batteries when replacing the old set 2 Do not combine a used battery with a new one 3 Do not mix battery types example Zinc Carbon with Alkaline 4 Do not attempt to charge short circuit disassemble heat or burn used batteries 5 Battery replacement is necessary when the remote control acts sporadically o...

Page 9: ...pointed end through the locking block as shown in the figure While ensuring there is sufficient slack in cables to minimize stress especially in the power cord firmly bind all cables with the supplied fixing band AC cord connection see page 12 To tighten To loosen Pull Pull Push the catch 3 Slide up the clamper and fix the AC cord plug securely 2 Insert the AC cord and close the clamper securely 1...

Page 10: ...the aspect mode is set to 16 9 If the display resolution exceeds these maximums it may not be possible to show fine detail with sufficient clarity 3 The PC input terminals are DDC1 2B compatible If the computer being connected is not DDC1 2B compatible you will need to make setting changes to the computer at the time of connection 4 Some PC models cannot be connected to the set 5 There is no need ...

Page 11: ...Volume 00 63 Audio MUTE OFF Audio MUTE ON Input select toggle Slot1 input Slot2 input Slot3 input PC input Screen mode select toggle NORMAL 4 3 ZOOM FULL JUST Panasonic AUTO Parameter None None 0 1 None SL1 SL2 SL3 PC1 None NORM ZOOM FULL JUST SELF Command Basic format for control data The transmission of control data from the computer starts with a STX signal followed by the command the parameter...

Page 12: ...ol Sensor Power Indicator Connecting the plug to the Wall Outlet Press the POWER switch on the Plasma Display to turn the set on POWER ON Power Indicator Green Example The screen below is displayed for a while after the Plasma Display is turned on setting condition is an example AC cord connection Connecting the AC cord plug to the Plasma Display From the second time on the screen shown below is d...

Page 13: ...same input mode cannot be selected for the main picture and sub picture Input Signal Selection Press the INPUT button to select the input signal to be played back from the equipment which has been connected to the Plasma Display Select the input signals to be connected by installing the optional Terminal Boards Input signals will change as follows R STANDBY G POWER ON INPUT MENU ENTER VOL MENU ENT...

Page 14: ...screen is displayed press to move the cursor up press to move the cursor down see page 16 Input modes switching is possible Press the SELECT button Under main Picture and sub picture display select the picture which you would like to change input modes Press the MOVE button Each time the location of the sub picture will be moved Notes 1 This button is effective only in the picture in picture 2 The...

Page 15: ...ASPECT button Press to adjust the aspect see page 18 SOUND button see page 20 Press to adjust the SOUND SET UP button see page 16 POSITION buttons R button see page 19 20 Press the R button to return to previous menu screen Stand by ON OFF button The Plasma Display must first be plugged into the wall outlet and turned on at the power switch see page 12 Press this button to turn the Plasma Display ...

Page 16: ...the unit SET UP 1 2 SIGNAL SCREENSAVER INPUT LABEL COMPONENT RGB IN SELECT RGB RGB1 OSD LANGUAGE ENGLISH US POWER SAVE OFF STANDBY SAVE ON POWER MANAGEMENT OFF PICTURE NORMALIZE PICTURE MENU BRIGHTNESS COLOR STANDARD 0 0 TINT COLOR TEMP NORMAL ADVANCED SETTINGS ON PICTURE 25 0 0 SHARPNESS NORMAL NORMAL ADVANCED SETTINGS NORMALIZE BLACK EXTENSION W B HIGH R W B HIGH B 0 0 0 0 INPUT LEVEL 0 0 W B LO...

Page 17: ...IME OF DAY 3D Y C FILTER NTSC COLOR SYSTEM Panasonic AUTO 4 3 ON AUTO NORMAL 3 2 PULLDOWN OFF SIGNAL VIDEO SIGNAL COMPONENT 3 2 PULLDOWN OFF SIGNAL RGB SYNC H FREQ kHz V FREQ Hz H V 31 5 60 0 R PRESENT TIME SETUP PRESENT TIME OF DAY 10 00 SET 10 00 PRESENT TIME OF DAY MULTI DISPLAY SETUP MULTI DISPLAY SETUP ARRANGEMENT ON 2 2 LOCATION A1 SCREENSAVER FUNCTION MODE WHITE BAR SCROLL TIME OF DAY START...

Page 18: ...9 and 4 3 program material Certain 4 3 program material such as stock market data screens may occasionally cause the image size to change unexpectedly When viewing such programs it is recommended that the ASPECT be set to NORMAL Changes in accordance with the Panasonic AUTO mode setting see page 34 ASPECT Controls The Plasma Display will allow you to enjoy viewing the picture at its maximum size i...

Page 19: ...ress to select H POS H SIZE V POS V SIZE CLOCK PHASE During VIDEO S VIDEO and COMPONENT input signal During RGB and DVI input signal 1 3 2 Notes 1 Adjustment details are memorized separately for different input signal formats Adjustments for component signals are memorized for 525 480 60i 60p 625 575 50i 50p 1125 1080 60i 50i 24p 24sF 1250 1080 50i 750 720 60p 50p each and RGB DVI signals are memo...

Page 20: ...er the N button on the remote control is pressed at any time or the ACTION button is pressed during NORMALIZE then all adjustment values are returned to the factory settings Helpful Hint NORMALIZE Normalization N To end adjustments Note Press the SURROUND button to directly turn the surround effect ON and OFF see page 15 BASS TREBLE and SURROUND settings are memorized separately for each SOUND mod...

Page 21: ...gher than normal levels of BRIGHTNESS and PICTURE CINEMA Ideal for movies Press the left or right button to switch between modes While the PICTURE menu is displayed if either the N button on the remote control is pressed at any time or the ACTION button is pressed during NORMALIZE then all adjustment values are returned to the factory settings Note If you would like to change the picture and color...

Page 22: ...VANCED SETTINGS menu is displayed if either the N button is pressed at any time or the ACTION button is pressed during NORMALIZE then all adjustment values are returned to the factory settings Notes 1 Carry out W B adjustment as follows A Adjust the white balance of the bright sections using the W B HIGH R and W B HIGH B settings B Adjust the white balance of the dark sections using the W B LOW R ...

Page 23: ...SENT TIME SETUP Press to set up PRESENT TIME OF DAY button Forward button Back Note Set cannot be selected unless PRESENT TIME OF DAY is set Press to exit from PRESENT TIME SETUP Notes Pressing or button once changes PRESENT TIME OF DAY 1minute Pressing or button continuously changes PRESENT TIME OF DAY by 15 minutes INPUT SURROUND VOL N PICTURE SOUND R MULTI SET UP ZOOM SET UP 2 2 AUTO POWER OFF ...

Page 24: ... PRESENT TIME OF DAY is set Notes Pressing or button once changes POWER ON TIME POWER OFF TIME 1minute Pressing or button continuously changes POWER ON TIME POWER OFF TIME by 15 minutes Display the SET UP TIMER SCREEN button Forward button Back R SET UP TIMER POWER ON FUNCTION OFF 0 00 POWER ON TIME POWER OFF FUNCTION POWER OFF TIME 0 00 OFF 2 30 PRESENT TIME OF DAY SET UP TIMER POWER ON FUNCTION ...

Page 25: ...ive OFF WHITE BAR SCROLL NEGATIVE ON Operates when START is selected and the ACTION is pressed START setting 5 When the Mode is set to ON press to select START Press to start SCREENSAVER The menu screen will disappear and the SCREENSAVER will be activated To stop the SCREENSAVER under ON press the R button SET UP 1 2 SIGNAL SCREENSAVER INPUT LABEL COMPONENT RGB IN SELECT RGB RGB1 OSD LANGUAGE ENGL...

Page 26: ... SCREENSAVER FUNCTION MODE WHITE BAR SCROLL INTERVAL SHOW DURATION 0 00 0 00 SIDE BAR ADJUST BRIGHT SAVER DURATION START PRESENT TIME OF DAY 10 00 SCREENSAVER FUNCTION MODE WHITE BAR SCROLL INTERVAL SHOW DURATION 0 00 0 00 SIDE BAR ADJUST BRIGHT SAVER DURATION START 10 00 PRESENT TIME OF DAY SCREENSAVER FUNCTION MODE WHITE BAR SCROLL OFF 0 00 0 00 SIDE BAR ADJUST BRIGHT WOBBLING ON START PRESENT T...

Page 27: ...n guide steps 1 and 2 side bars 4 3 Screen Display Press to exit from SCREENSAVER 3 Notes Setting the side bar to bright mode for an extended period may result in occurence of after images The side bar may flash alternate black white depending on the picture being shown on the screen In such an occurrence use the Cinema mode Picture out Picture Picture and Picture Non picture area This function ma...

Page 28: ...tal Zoom is in operation Adjusting Picture Pos Size cannot be used 4 For RGB input signals normal multi display magnification is only available at the VGA SVGA and XGA resolution 5 The Digital Zoom capability is functional for the following component signals 525 480 60i 60p 625 575 50i 50p 1125 1080 60i 50i 24sF 750 720 60p 50p 1250 1080 50i 6 The Digital Zoom capability is functional for the foll...

Page 29: ...P Press to select INPUT LABEL Press to change the INPUT LABEL Customizing the Input labels This function can change the label of the Input signal to be displayed Notes While selecting a Input signal through Optional Terminal Board connected to Slot 1 to Slot 3 the Input label will depend on each Optional Terminal Board INPUT LABELS for Slot 1 to Slot 3 and miniD sub Slot1 Input INPUT1 VIDEO1 COMPO...

Page 30: ...ETUP menu Press to select the MULTI DISPLAY SETUP 1 2 3 Press to select the MULTIDISPLAYSETUP Press to select ON or OFF How to setup MULTI DISPLAY group of 4 2 2 group of 9 3 3 INPUT SURROUND VOL N PICTURE SOUND R MULTI SET UP ZOOM SET UP MULTI DISPLAY SETUP MULTI DISPLAY SETUP ARRANGEMENT ON 2 2 LOCATION A1 SET UP 1 2 SIGNAL SCREENSAVER INPUT LABEL COMPONENT RGB IN SELECT RGB RGB1 OSD LANGUAGE EN...

Page 31: ...For RGB input signals normal multi display magnification is only available at the VGA SVGA and XGA resolution 2 The multi display capability is functional for the following component signals 525 480 60i 60p 625 575 50i 50p 1125 1080 60i 50i 24sF 750 720 60p 50p 1250 1080 50i 3 The multi display capability is functional for the following composite signals NTSC PAL SECAM A1 A2 B1 B2 A1 A2 A3 B1 B2 B...

Page 32: ...t signal mode SIGNAL VIDEO menu is displayed Press to select the 3D Y C FILTER NTSC Press to set ON OFF Press to exit from adjust mode Press ACTION button Note When ON this setting only affects NTSC input signals Note Selection may not be possible depending on which optional board is installed INPUT SURROUND VOL N R PICTURE SOUND SET UP MULTI PIP SWAP SELECT MOVE ZOOM 3D Y C FILTER NTSC COLOR SYST...

Page 33: ...nal SIGNAL VIDEO or SIGNAL COMPONENT menu is displayed Press to select 3 2 PULLDOWN Press to set ON OFF Press to exit from adjust mode Note When ON this setting only affects the following signal input NTSC PAL signal input during VIDEO S VIDEO input signal 525i 480i signal input during COMPONENT input signal When ON the display attempts to reproduce a more natural interpretation of sources such as...

Page 34: ...te Sync input Displays the H Horizontal V Vertical frequencies This display is valid only for RGB input and DVI input signal Display range Horizontal 15 110 kHz Vertical 48 120 Hz H FREQ kHz V FREQ Hz SET UP for Input Signals Press to exit from adjust mode Press ACTION button Note Sync cannot be adjusted while a DVI signal is being applied SIGNAL RGB SYNC H FREQ kHz V FREQ Hz H V 31 5 60 0 SYNC H ...

Page 35: ...s not an operating defect and as such is not covered by the Warranty This product is not designed to display fixed images for extended periods of time Symptoms Checks Electrical Appliances Cars Motorcycles Fluorescent light Volume Check whether the mute function has been activated on the remote control Not plugged into AC outlet Not switched on PICTURE and BRIGHTNESS Volume setting Check by pressi...

Page 36: ...50 00 9 1 125 1 080 24p 27 00 24 00 10 1 125 1 080 24sF 27 00 48 00 11 1 250 1 080 50i 31 25 50 00 12 640 400 70 31 47 70 00 13 640 480 60 31 47 59 94 14 Macintosh13 640 480 35 00 66 67 15 640 480 75 37 50 75 00 16 852 480 60 31 50 60 00 17 800 600 60 37 88 60 32 18 800 600 75 46 88 75 00 19 800 600 85 53 67 85 06 20 Macintosh16 832 624 49 73 74 55 21 1 024 768 60 48 36 60 00 22 1 024 768 70 56 48...

Page 37: ...852 W 480 H 2 556 480 dots 32 F 104 F 0 C 40 C 20 80 NTSC PAL PAL60 SECAM Modified NTSC with TY 42TM6H 525 480 60i 60p 625 575 50i 50p 750 720 60p 50p 1125 1080 60i 50i 24p 24sF SMPTE274M 1250 1080 50i VGA display VGA SVGA XGA SXGA UXGA compressed Horizontal scanning frequency 15 110 kHz Vertical scanning frequency 48 120 Hz HIGH DENSITY D SUB 15PIN R G B 0 7 Vp p 75 ohm Component Y 1 0 Vp p 75 oh...

Page 38: ......

Page 39: ...non expanded standard 4 3 pictures or onscreen data in a stationary and fixed location The Limited Warranty ALSO DOES NOT COVER damages which occurred in shipment or failures which are caused by products not supplied by the warrantor or failures which result from accidents misuse abuse neglect mishandling misapplication alteration faulty installation set up adjustments misadjustment of consumer co...

Page 40: ...s back cover You should note this serial number in the space provided below and retain this book plus your purchase receipt as a permanent record of your purchase to aid in identification in the event of theft or loss and for Warranty Service purposes Model Number Serial Number Matsushita Electric Industrial Co Ltd ...

Reviews: