


English
15
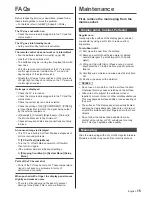
Maintenance
First, remove the mains plug from the
mains socket.
Display panel, Cabinet, Pedestal
Regular care:
Gently wipe the surface of the display panel, cabinet,
or pedestal by using a soft cloth to remove dirt or
fingerprints.
For stubborn dirt:
(1) First clean the dust from the surface.
(2) Dampen a soft cloth with clean water or diluted
neutral detergent (1 part detergent to 100 parts
water).
(3) Wring out the cloth firmly. (Please note, do not let
liquid enter the TV inside as it may lead to product
failure.)
(4) Carefully wipe moisten and wipe away the stubborn
dirt.
(5) Finally, wipe away all the moisture.
Caution
●
Do not use a hard cloth or rub the surface too hard,
otherwise this may cause scratches on the surface.
●
Take care not to subject the surfaces to insect
repellent, solvent, thinner or other volatile substances.
This may degrade surface quality or cause peeling of
the paint.
●
The surface of the display panel is specially treated
and may be easily damaged. Take care not to tap or
scratch the surface with your fingernail or other hard
objects.
●
Do not allow the cabinet and pedestal to make
contact with a rubber or PVC substance for a long
time. This may degrade surface quality.
Mains plug
Wipe the mains plug with a dry cloth at regular intervals.
Moisture and dust may cause fire or electrical shock.
FAQs
Before requesting service or assistance, please follow
these simple guides to solve the problem.
●
For details, refer to [eHELP] (Support > FAQs).
The TV does not switch on
●
Check the mains lead is plugged into the TV and the
mains socket.
The TV goes into Standby mode
●
Auto power standby function is activated.
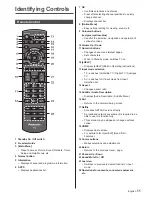
The remote control does not work or is intermittent
●
Are the batteries installed correctly?
(p. 12)
●
Has the TV been switched on?
●
The batteries may be running low. Replace them with
new ones.
●
Point the remote control directly at the TV’s remote
control signal receiver (within about 7 m and a 30
degree angle of the signal receiver).
●
Situate the TV away from sunshine or other sources
of bright light so they do not shine on the TV’s remote
control signal receiver.
No image is displayed
●
Check the TV is turned on.
●
Check the mains lead is plugged into the TV and the
mains socket.
●
Check the correct input mode is selected.
●
Check the setting of [AV] ([COMPONENT] / [VIDEO])
in [Input Selection] to match the signal being output
by the external equipment.
●
Is [Backlight], [Contrast], [Brightness] or [Colour] in
the Picture Menu set to the minimum?
●
Check all required cables and connections are firmly
in place.
An unusual image is displayed
●
This TV has a built-in Self Test. Makes a diagnosis of
picture or sound problems.
[TV Self Test] (Help Menu)
●
Turn the TV off with Mains power On / Off switch,
then turn it on again.
●
If the problem persists, initialise all settings.
[Shipping Condition] in [System Menu] (Setup
Menu)
Parts of the TV become hot
●
Parts of the TV may become hot. These temperature
rises do not pose any problems in terms of
performance or quality.
When pushed with a finger, the display panel moves
slightly and makes a noise
●
There is a little gap around the panel to prevent
damage to the panel. This is not a malfunction.


