background image

9

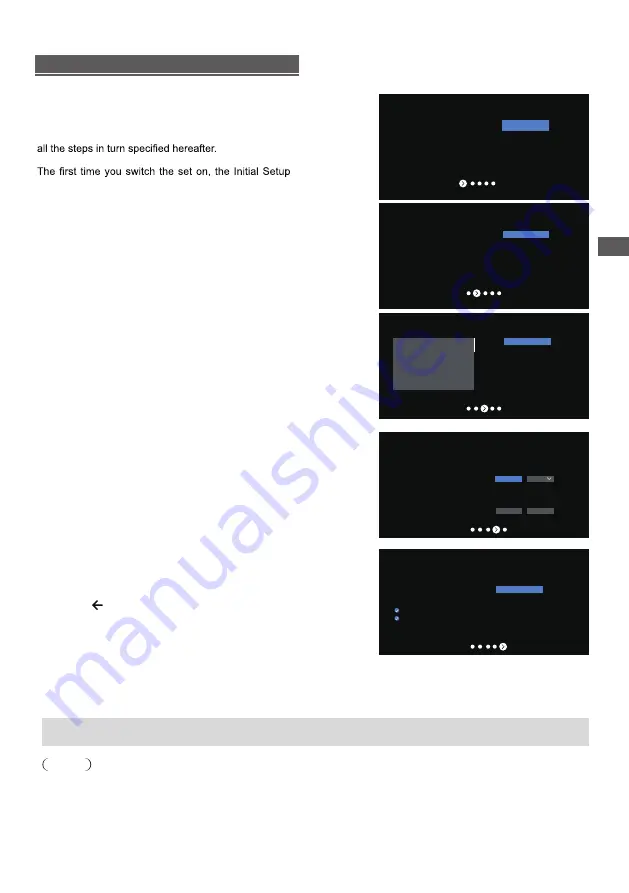
Initial Setup

Initial setup involves selecting all the settings required 

to be able to search for and store all the analogue

channels you can receive.

Make sure that the television is switched on and follow 

wizard opens, which guides you through the initial 

setup process. 

Step 2: Were are you?

Press ▲/▼ to select your 

Country/Region.Press       to

confirm and move to next step. 

OK 

Note: Picture mode setting will not be accessible

when you select Shop Mode. 

Home Mode: 

You Would be able to view the standard

settings for Picture and sound modes.

Shop Mode:

 You can enjoy enhanced setting for Picture

and Sound modes.

Step 1: Environment


Press ▲/▼ to select your 

environment.Then press       to 

enter next step. 

OK 


Step 3: Terms & Conditions

Use 

▲/▼

 to read Terms & Conditions,then press 

OK


to

confirm and move to next step.

Step 4: Channel installation

Use 

▲/▼

 to select Tuner mode: Antenna, Cable, Satellite.

Type: Digital, Analogue and All, then press 

OK


to confirm and

move to next step.

Step 5: Please check settings 

When all setup is done, the [Please check settings] interface

displays on the screen, and press OK to finish the initial setup.

You can also go back to former step and make any changes

by using     button. 

Country/Region

NEWZEALAND

Environment

Home

Step 1:

Step 2:

Step 3:

Step 4:

Step 5:

Home
Shop

1

2 3 4 5

Next

Environment

Please choose your Environment:

Home

Shop

Shop with demo

Where are you?

We will provide you with the local time,climate

and more information.

Country/Region

AUSTRALIA
NEWZEALAND

Next step is to represent you have read and agreed.

Terms & Conditions

Please read the terms & conditions and agree.

  Terms and Conditions

  Terms and Conditions 

  The contents and services 

(

collectively the


“Licensed Application”

made available to you

through this TV set (this “Device”) are licensed, not

sold,  to you for use only under these terms and

conditions. The providers of the Lisensed Application

(each an “Application Provider”) reserve all rights not

expressly granted to you.

  1.Scope of License

   The license granted to you for a Licensed

Application by the relevant Application Provider

is limited to a non-transferable license to use the 

Licensed Application on the Device that you own or

Next

Channel installation

Tuner mode

Antenna
Cable
Satellite

Type

Digital

Scan

Skip

Please verify settings in system settings

.

Please check settings

Start now

Initial Setting


Setup is now complete and your TV is ready for viewing.

Note

If tuning has failed, check the connection of the RF cable, then follow the on-screen instructions.

Summary of Contents for TH-32JS610Z

Page 1: ...ions shown may be different between models and countries The images shown in this manual are for illustrative purposes only Some illustrations are presented as conceptual images and may be different from the actual products The illustrations for 43 inch model is used in this manual unless otherwise mentioned Transport only in upright position Model No TH 32JS610Z TH 43JS610Z 32 inch model 43 inch ...

Page 2: ... Precautions 3 Setting Up the TV 4 Connecting the TV 6 Operating the TV 10 Watching External Inputs 11 Initial Setup 8 Using Homepage Apps 12 Using the Menu Functions 13 Additional Information 16 Troubleshooting 20 Maintenance 21 Specifications 22 Using Media Player 15 ...

Page 3: ...o help avoid risk of electrical shock fire damage or injury please follow the warnings and cautions below Mains plug and lead Warning If you detect anything unusual immediately remove the mains plug Mains plug types vary between countries This TV is designed to operate on AC 100 240 V 50 60 Hz Insert the mains plug fully into the socket outlet Ensure that the mains plug is easily accessible Discon...

Page 4: ... alkaline and manganese batteries Do not use rechargeable batteries Ni Cd etc Do not burn or break up batteries Do not expose batteries to excessive heat such as sunshine fire or the like Make sure you dispose of batteries correctly Setting Up the TV Supplied accessories Accessories may not be placed all together Take care not to throw them away unintentionally Setting Up the TV Safety Precautions...

Page 5: ...stic cabinet parts When installing wall brackets you must ensure the wall bracket is not electrically grounded to metal wall studs Always ensure that there are no electrical cables pipes etc in the wall before you begin the wall bracket installation To prevent fall and injury remove the TV from its fixed wall position when it is no longer in use Warning Setting Up the TV Depth of screw Screw for f...

Page 6: ...he RF cable under the TV An aerial correct cable 75 Ω coaxial and correct terminating plug are required to obtain optimum quality picture and sound If a communal aerial system is used you may require the correct connection cable and plug between the wall aerial socket and the TV Your local Television Service Centre or dealer may be able to assist you in obtaining the correct aerial system for your...

Page 7: ...aker system Optical cable Amplifier with speaker system TV read the manuals of the equipment and amplifier To enjoy the sound from the external equipment in multi channel sound e g Dolby Digital 5 1ch connect the equipment to the amplifier For the connections Blu Ray Player Blu Ray Player TV HDMI cable HDMI 1 2 3 AV Game equipment Using HDMI terminal TV HDMI cable Equipment HDMI 1 2 3 OPTICAL out ...

Page 8: ...V location Initial Setup When you turn on the TV for the first time there will show a wizard to guide you to finish the following initial settings Step 1 Select the menu language as you need Note English New Zealand is recommended Step 2 Only for some countries Select whether or not to use and Android device to setup the TV Google Initial Setup Note If you don t want to use your Android device to ...

Page 9: ... make any changes by using button Country Region NEWZEALAND Environment Home Step 1 Step 2 Step 3 Step 4 Step 5 Home Shop 1 2 3 4 5 Next Environment Please choose your Environment Home Shop Shop with demo Where are you We will provide you with the local time climate and more information Country Region AUSTRALIA NEWZEALAND Next step is to represent you have read and agreed Terms Conditions Please r...

Page 10: ...r it with the TV firstly The following steps are for your reference Remote Control Functions Most of your television s functions are available via the menus that appear on the screen The remote control supplied with your set can be used to navigate through the menus and to configure all the general settings POWER On Off button Turns the TV on or off up down left and right direction buttons Highlig...

Page 11: ...xternal equipment has an aspect adjustment function set it to 16 9 2 Display the Input menu then select the input of the connected equipment Press OK key only can access OK Select 2 Remote control signal receiver 3 Power LED Red Standby Green On 1 Power On Power Off Indicators on the TV 2 3 1 ATV CABLE SATELLITE ANTENNA HDMI 1 HDMI 2 HDMI 3 AV ...

Page 12: ...roduct appearance And for some models certain options are not available You can select all the features from homepage Press to display homepage Press to select icons from the screen list Press OK to enter each option CUSTOMISE CHANNELS Add and remove channels from your Home screen Using Homepage Apps Using Homepage Apps To exit the APP press or ...

Page 13: ... to edit the channel TV Using TV Settings The Settings menu allows you to the TV with your preferences TV Each menu is outlined and detailed to help you get the most from your TV To access the menu system 1 2 Press to select the desired item then press OK to open the corresponding submenu 3 In submenu use and OK buttons to make the adjustments or use to select an item use OK to enter and operate a...

Page 14: ...0E Transponder Optus D1 LNB Type Lnb Power 22KHz Unicable IF Freq SatPosition Toneburst DISEqC1 0 DiSEqC1 1 11300 Auto Auto Off 1 1210 SatA None None None Signal Level Singal Quality Delete Select Button 88 100 Edit Add Scan Satellite Message Freeview satellite transponder has heen selected Signal Level and Signal Quality bars need to be blue coloured Please press the button to select the blue sca...

Page 15: ...art TV Manual Show the guide to get smart TV manual by smartphone Smart Zone Enjoy Music Select this option to enter into Audio Only mode Fast Cast An app that quickly delivers mobile content to TV allowing users to quickly deliver multimedia content such as photos videos musics and more to TV terminals Fast Cast Step 1 Download Fast Cast mobile App 2 Mobile and TV are connected the Same Wi Fi 3 S...

Page 16: ...le and press OK to show 3 While showing picture press OK to display the play console For Previous and Next use remote left and Right key 4 Use OK key to see more option Left rotation Right rotation ZOOM ZOOM Manual play Auto play Information Play interval Play mode BGM on or off Video 1 Select Video icon then press OK button to view movie file 2 Press Up Down Left or Right direction button to sele...

Page 17: ...us operation may damage the data or device Panasonic is not liable for any deterioration or damage of data or device during operations with the TV It is recommended to connect the USB Flash Memory directly to the TV s USB port Some USB devices or USB HUB may not be used with this TV You cannot connect any devices by using USB card reader Additional information for USB devices may be on the followi...

Page 18: ...Do not disconnect USB devices while they are transferring files Limitations on use of photo video and music files When connecting an external hard drive use the USB HDD port We recommend that you use an external hard drive with its own power adapter Certain digital cameras and audio devices may not be compatible with the TV The TV supports the FAT file systems After sorting files in the Folder vie...

Page 19: ...oder 2 Audio 3 Video Audio Container 4 Image Decoder progressive static animation wav PCM ADPCM A law PCM u law PCM ADPCM IMA4 AMR AMR NB AMR WB AMR WB LPCM DVD LPCM RA cook COOK RealAudio6 WMA WMA v7 v8 v9 Pro Dolby AC3 DD Dolby Digital EX Dolby Digital Plus Dolby EAC3 DDCO Dolby Digital Plus Dolby TrueHD Dolby lossless Dolby MS11 No HEAAC FLAC FLAC VORBIS VORBIS MPEG 1 2 4 AAC PCM MPEG1 Layer1 2...

Page 20: ... match the output of the external equipment p 10 Unusual image is displayed Turn the TV off with Mains power On Off switch p 10 then turn it on again Pictures from equipment connected via HDMI are unusual Check the HDMI cable is connected properly Turn the TV and equipment off then turn them on again Check an input signal from the equipment p 18 Use equipment compliant with EIA CEA 861 861D Genera...

Page 21: ...way all the moisture Caution Do not use a hard cloth or rub the surface too hard as this could scratch the surface Do not subject the TV s surfaces to water or detergent Liquid inside the TV could lead to product failure Do not subject the surfaces to insect repellent solvent thinner or other volatile substances This may degrade surface quality or cause peeling of the paint The surface of the disp...

Page 22: ...power TH 32JS610Z 32 inch model TH 43JS610Z 43 inch model 32 inch model 32 inch model 32 inch model 55 W 0 5W 43 inch model 75 W 0 5W 32 inch model 80 cm 43 inch model 108 cm 32 inch model 1366 W 768 H 43 inch model 1920 W 1080 H Mass Connection terminals Speaker Output Audio output 10 W 5 W 5 W 43 inch model Audio output 16 W 8 W 8 W 32 inch model 3 9 kg With Pedestal 3 8 kg TV only 43 inch model...

Page 23: ...F UHF Operating conditions Temperature 0 C 40 C Humidity 20 80 RH non condensing Note Design and Specifications are subject to change without notice Mass and Dimensions shown are approximate 9 Systems Systems Function 1 PAL B G 2 PAL I 3 PAL D K PAL Reception of broadcast 6 Playback from Special VCR s or DVD 4 NTSC 4 43 5 NTSC 3 58 7 PAL 60 Hz 5 5 MHz 8 PAL 60 Hz 6 0 MHz 9 PAL 60 Hz 6 5 MHz Playba...

Page 24: ...l be useful but WITHOUT ANY WARRANTY without even the implied warranty of MERCHANTABILITY or FITNESS FOR A PARTICULAR PURPOSE Please refer to the detailed terms and conditions thereof Settings Device Preferences About Legal information At least three 3 years from delivery of this product Panasonic will give to any third party who contacts us at the contact information provided below for a charge n...

Page 25: ...ation on Disposal in other Countries outside the European Union This symbol is only valid in the European Union If you wish to discard this product please contact your local authorities or dealer and ask for the correct method of disposal Web Site http www panasonic com Panasonic Corporation 2021 WARRANTY New Zealand only Distributed in New Zealand by Panasonic New Zealand Limited 18 Sir Woolf Fis...

Reviews: