background image

Set up TIMER

POWER OFF Function
POWER OFF Time

POWER ON Time

POWER ON Function

Off

0:00

Off

0:00

PRESENT  TIME    99:99

Set up TIMER

POWER OFF Function
POWER OFF Time

POWER ON Time

POWER ON Function

Off

0:00

Off

0:00

PRESENT  TIME    99:99

29

PRESENT TIME Setup / Set up TIMER

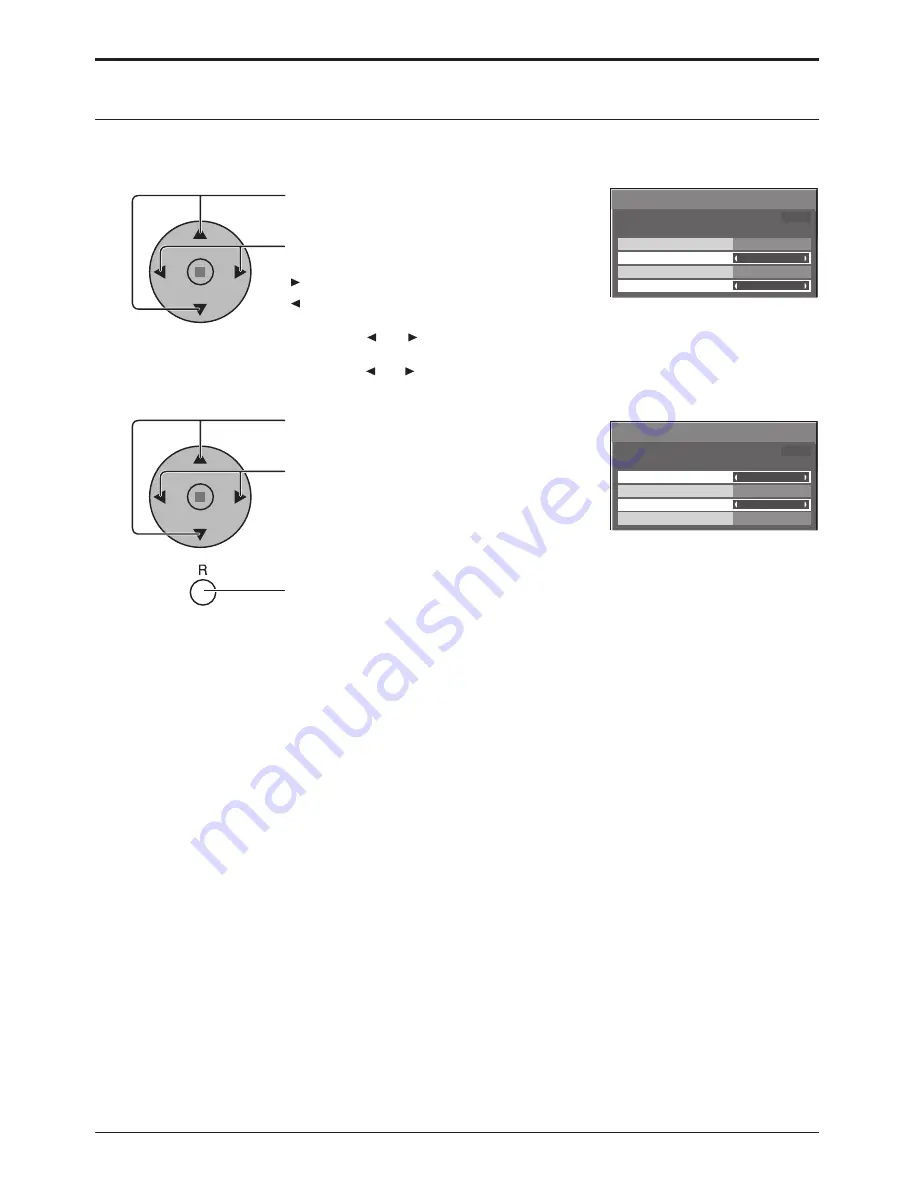
Set up TIMER

Press to select 
POWER ON Time / POWER OFF Time.

Press to setup 
POWER ON Time / POWER OFF Time.

  button: Forward
  button: Back

Notes:

• Pressing “  ” or “  ” button once changes POWER ON Time / POWER OFF Time 

1 minute.

• Pressing “  ” or “  ” button continuously changes POWER ON Time / POWER OFF 

Time by 15 minutes.

Press to select POWER ON Function/POWER 
OFF Function.

Press to select On.

Press twice to exit from Setup. 

1

2

3

Note:

Timer function will not work unless “PRESENT TIME” is set. 

Display the Set up TIMER screen.

Summary of Contents for TH-103PF10EK

Page 1: ...read these instructions before operating your set and retain them for future reference Model No Operating Instructions High Definition Plasma Display English The illustration shown is an image TH 103...

Page 2: ...Set up TIMER 29 Screensaver For preventing image retention 30 Setup of Screensaver Time 31 Reduces screen image retention 31 Side Panel Adjustment 32 Reduces power consumption 33 Customizing the Input...

Page 3: ...in this plug Shall the fuse need to be replaced please ensure that the replacement fuse has a rating of 13 amps and that it is approved by ASTA or BSI to BS1362 Check for the ASTA mark ASA or the BSI...

Page 4: ...lay please consult your local Panasonic dealer Transport only in upright position Transporting the unit with its display panel facing upright or downward may cause damage to the internal circuitry Ven...

Page 5: ...hocks Do not do anything that may damage the power cable When disconnecting the power cable pull on the plug body not the cable Do not damage the cable make any modifications to it place heavy objects...

Page 6: ...f the screen The display panel is made of glass Do not apply strong force or impact to it This may lead to injury Take steps to prevent toppling Earthquakes or children climbing up or onto the display...

Page 7: ...ine batteries for longer life Precaution on battery use Incorrect installation can cause battery leakage and corrosion that will damage the remote control transmitter Disposal of batteries should be i...

Page 8: ...ks 2 Pull off 1 Keep the knob pressed Stereophonic sound code audio equipment line in AC cord connection see page 12 AC cord fixing Unplug the AC cord Unplug the AC cord pressing the two knobs Close O...

Page 9: ...puter shown in the illustration is for example purposes only Additional equipment and cables shown are not supplied with this set Do not set the horizontal and vertical scanning frequencies for PC sig...

Page 10: ...s If multiple commands are transmitted be sure to wait for the response for the first command to come from this unit before sending the next command If an incorrect command is sent by mistake this uni...

Page 11: ...equipment cables and adapter plugs shown are not supplied with this set Refer to page 51 for applicable input signal Use the DVI D cable complying with the DVI standard Image deterioration may occur d...

Page 12: ...on on the remote control to turn the Plasma Display off Power Indicator Red standby Press the button on the remote control to turn the Plasma Display on Power Indicator Green Turn the power to the Pla...

Page 13: ...mage retention image lag may occur on the plasma display panel when a still picture is kept on the panel for an extended period The function that darkens the screen slightly is activated to prevent im...

Page 14: ...wall outlet Standby Red Power ON Green DPMS Orange With PC input signal and during operation of PC s screensaver Volume Adjustment Volume Up Down When the menu screen is displayed press to move the c...

Page 15: ...inutes remain OFF TIMER 3 will flash The off timer is cancelled if a power interruption occurs Status button Press the Status button to display the current system status 1 Input label 2 Aspect mode se...

Page 16: ...0 2 2 W B Low B W B High R W B Low R W B Low G W B High G W B High B INPUT MENU Right side surface MENU VOL ENTER 1 2 Sound Normal Normalise 0 0 0 Off Treble 0 Mid Balance Bass Surround Main Audio Out...

Page 17: ...SENT TIME 99 99 Screensaver Start Function Mode Side panel Wobbling Peak limit Operating Time Periodic Time White bar scroll Interval 6 15 12 30 High Off Off PRESENT TIME 99 99 Off Portrait Setup Seam...

Page 18: ...ic Auto Panasonic Auto 4 16 3 9 The display will automatically become enlarged depending on the picture source allowing you to view the picture at its maximum size Notes Panasonic Auto mode is designe...

Page 19: ...i 60p 625 575 50i 50p 1125 1080 60i 50i 60p 50p 24p 25p 30p 24sF 1250 1080 50i 750 720 60p 50p each and RGB PC Digital signals are memorized for each frequency If a Cue or Rew signal from a VCR or DVD...

Page 20: ...be adjusted automatically Select Normalise in Pos Size and press the ACTION button when appropriate adjustment cannot be made H Pos Adjust the horizontal position H Size Adjust the horizontal size V...

Page 21: ...in Picture Notes If INPUT lock in Options menu is set to other than Off MULTI PIP function isn t available Sound output is from the picture which is selected in Audio OUT PIP see page 25 In 2 screen d...

Page 22: ...re and sub picture The main picture and sub picture are processed by different circuits resulting in a slight difference in the clarity of the pictures There may also be a difference in the picture qu...

Page 23: ...ween modes While the Picture menu is displayed if either the N button on the remote control is pressed at any time or the ACTION button is pressed during Normalise then all adjustment values are retur...

Page 24: ...Item Effect Details Black extension Less More Adjusts the dark shades of the image in gradation Input level Less More Adjustment of parts which are extremely bright and hard to see This cannot be adj...

Page 25: ...n the remote control is pressed at any time or the ACTION button is pressed during Normalise then all adjustment values are returned to the factory settings Helpful Hint Normalise Normalisation Bass A...

Page 26: ...Disables audio output Level Meter Off 1 8ch 9 16ch Sets audio channels to show in the audio level meter 8 channels are displayed in the audio level meter 4 channels each on both right and left sides o...

Page 27: ...tal Zoom Press to exit from the Digital Zoom The cursor will move VOL button MUTE button SURROUND button OFF TIMER button Notes When power goes OFF including Off Timer operation Digital Zoom terminate...

Page 28: ...POWER ON Time POWER OFF Time Press to display the Setup menu Press to select Set up TIMER or PRESENT TIME Setup Press to display the Set up TIMER screen or PRESENT TIME Setup screen 1 2 PRESENT TIME...

Page 29: ...R Press to select POWER ON Time POWER OFF Time Press to setup POWER ON Time POWER OFF Time button Forward button Back Notes Pressing or button once changes POWER ON Time POWER OFF Time 1 minute Pressi...

Page 30: ...4 Press to display the Setup menu Press to select Screensaver Press to display Screensaver screen Press to select Function Press to select the desired function White bar scroll Image Reversal White ba...

Page 31: ...Time White bar scroll Off 6 15 12 30 High Off Off PRESENT TIME 99 99 31 Screensaver For preventing image retention Setup of Screensaver Time After selecting Time Designation or Interval the relevant T...

Page 32: ...emain on the side panels either side of the display field To reduce the risk of such an image retention illuminate the side panels Display the Screensaver screen Refer to the previous page operation g...

Page 33: ...is no signal When this is set to On the power supply of the unit goes Off 10 minutes after the input signals stop This function is effective for input signals except input from PC Mini D sub terminal...

Page 34: ...ress to select the MULTI DISPLAY Setup Press to select On or Off How to Setup MULTI DISPLAY 1 2 3 Setup for MULTI DISPLAY By lining up Plasma Displays in groups for example as illustrated below an enl...

Page 35: ...on 2 Horizontal Scale Off Off A1 Location Vertical Scale Seam hides video 2 MULTI DISPLAY Setup MULTI DISPLAY Setup 35 Setup for MULTI DISPLAY How to set the display location number for each Plasma Di...

Page 36: ...an use the remote control without identical ID number during option menu display see page 45 The ID remote control cannot be used when ID select is set to anything other than 0 and the remote control...

Page 37: ...s to select the Portrait Setup Press to select On or Off Note If you set Portrait Setup to On MULTI DISPLAY Setup will be unavailable Press to select Seam hides video Press to select Off On How to set...

Page 38: ...de of image division and the Location by setting of Viewing Area is as follows Location 1 Location 2 Location 3 Location 1 Location 2 Location 3 Viewing Area 4 3 Suitable to display 16 9 images 4 3 im...

Page 39: ...atch the signals from the source connected to the Component RGB input terminals Y PB PR signals Component R G B HD VD signals RGB 1 2 Press to display the Setup menu Press to select the Component RGB...

Page 40: ...reality Signal Off Component Block NR Mosquito NR Off P NR Off Off Sync Signal H Freq V Freq kHz Hz 33 8 60 0 RGB Cinema reality Block NR P NR Mosquito NR Auto Off Off Off Off 40 Setup for Input Sign...

Page 41: ...become unstable Should this occur set the system to match the format of the input signal Cinema reality Press to select Cinema reality Press to set On Off Press to exit from adjust mode Cinema reality...

Page 42: ...input is set to RGB input this setting is valid only for RGB input signal Auto The H and V sync or synchronized signal are automatically selected If both input it is selected the H and V sync on G Use...

Page 43: ...r after was pressed Off Hides all the items above from view Initial INPUT Off PC INPUT1 INPUT2 INPUT3 Adjusts the input signal when the unit is turned on Notes Only the adjusted signal is displayed se...

Page 44: ...ly the adjusted signal is displayed see page 13 Signal can be displayed when the Terminal board is installed Input switch can be used when this is set to Off In two screen display mode if anything oth...

Page 45: ...D Control Off Disables external control by the ID On Enables the external control by the ID Display size Off On Adjusts the image display size on screen Off Sets the normal image display size on scree...

Page 46: ...overs from failure or after plugging off and in again the power cord After you unplug and plug the power cord in while the unit is in standby mode and also the power is being supplied to a terminal bo...

Page 47: ...10 07 08 1 Program 47 Options Adjustments You can set 7 day timer programming by setting time and command Note Before setting Weekly Command Timer set PRESENT TIME Setup see page 28 Press to select F...

Page 48: ...lect Command No Press to select a command number 6 Press to select Time Command Press to set each item Time Set the time to execute a command program Pressing or button once changes Time 1 minute Pres...

Page 49: ...u Press to select OSD Language Press and hold till the SHIPPING menu is displayed Press to select YES Press to confirm from the unit 1 Press the MENU button till the Setup menu is displayed 2 Press th...

Page 50: ...occur between image and audio depending on the type of input signal However this is not a malfunction Plasma Display panel Symptoms Check The screen darkens slightly whenbrightpictureswithminimal move...

Page 51: ...Hz 53 67 85 06 56 25 27 852 480 60 Hz 31 47 59 94 33 54 5 34 24 28 1 024 768 50 Hz 39 55 50 00 51 89 29 1 024 768 60 Hz 48 36 60 00 65 0 65 0 30 1 024 768 70 Hz 56 48 70 07 75 0 31 1 024 768 75 Hz 60...

Page 52: ...36 DWA POP Dual Picture mode Picture out Picture 37 DWA SWP Swap main picture and sub picture when PIP mode 38 DWA TWN Dual Picture mode Picture and Picture 39 IMS PC1 Input select PC1 Main Picture w...

Page 53: ...3 x 1 0 5Vrms Compatible with HDCP 1 1 COMPONENT RGB IN Y G BNC PB B BNC PR R BNC AUDIO IN RCA PIN JACK 2 with sync 1 0 Vp p 75 0 7 Vp p 75 0 5 Vrms high impedance PC IN HIGH DENSITY MINI D SUB 15PIN...

Page 54: ...54 Memo...

Page 55: ...55 Memo...

Page 56: ...mation Customer Care Centre For customers within the UK 0844 844 3852 For customers within the Republic of Ireland 01 289 8333 Visit our website for product information www panasonic co uk E mail cust...

Reviews: