background image

11

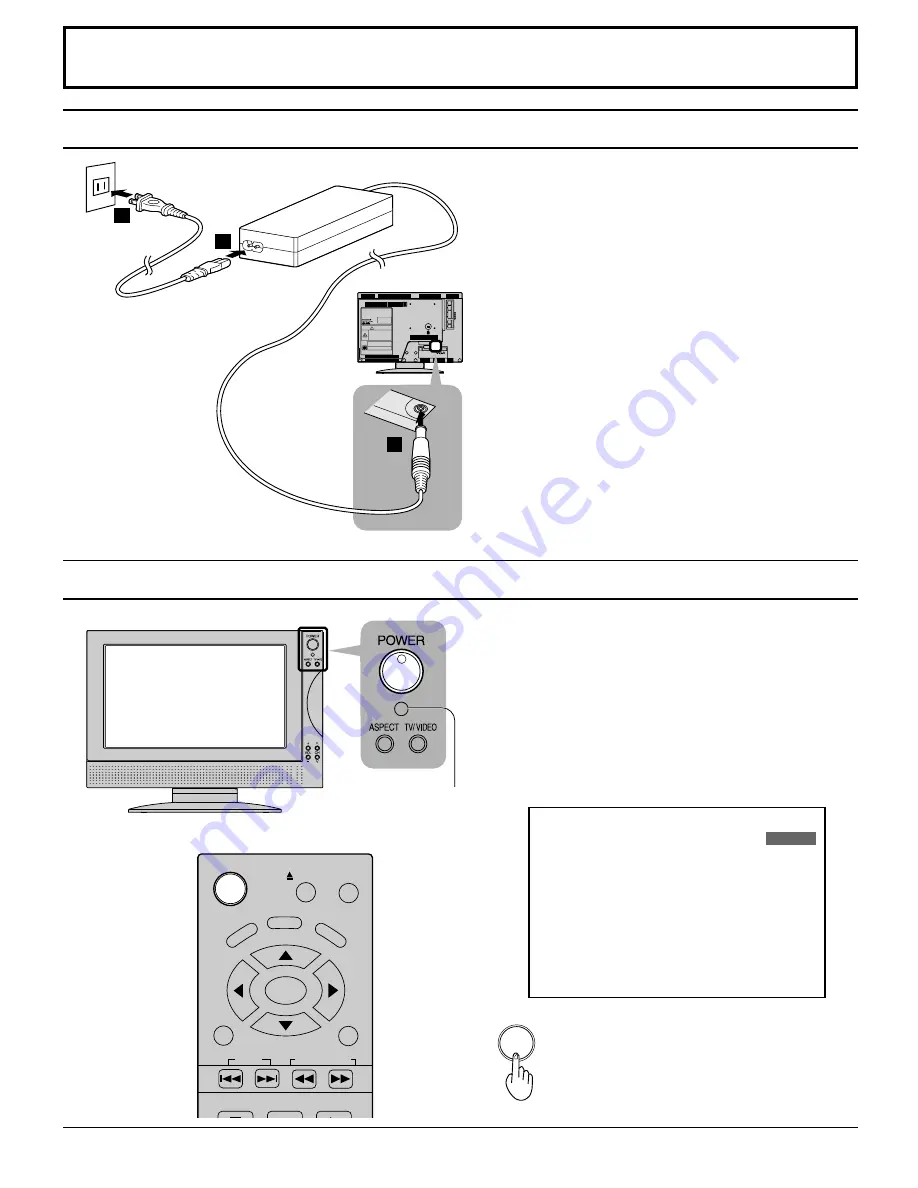
Press the POWER button on the remote
control to turn the TV off: Red (standby)

Press the POWER button on the remote
control to turn the TV on: Green

Power ON / OFF

Push the POWER switch on the TV to turn the set on.
POWER-ON: Green

How to Turn the Power On

Remote control
sensor

DISPLAY

TOP MENU

ANGLE

DVD

MENU

RETURN

SKIP

STOP

PAUSE

PLAY

TV      
MENU

ENTER

SLOW/SEARCH

EJECT

POWER

POWER

CH 6

STEREO

SAP

MONO

NORMAL

2

2

3

1

Connecting the Plug to the Wall Outlet

Note:
The TV and AC adaptor will still consume some power
as long as the power cord is still inserted into the wall
outlet.

Turn the power of the TV set off by pressing the
POWER switch on the TV when the TV is on or in
standby mode.

Example: The screen below is displayed for a while

after the TV is turned on. (setting condition
is an example.)

Summary of Contents for TC11LV1 - 11" LCD TV

Page 1: ...Guide Install and TV Adjusts Details on installation of the unit and adjustments to achieve optimum quality of the TV DVD Operation Guide Details on operating instructions for playing discs such as DVDs and CDs For assistance please call 1 800 211 PANA 7262 or send e mail to consumerproducts panasonic com or visit us at www panasonic com U S A For assistance please call 787 750 4300 or visit us at...

Page 2: ...during lightning storms or when it will be left unused for long periods of time This will prevent damage to the receiver due to lightning and power line surges 13 Refer all servicing to qualified service personnel Servicing is required when the apparatus has been damaged in any way such as when the power supply cord or plug is damaged liquid has been spilled or objects have fallen into the apparat...

Page 3: ...hock or other hazards 21 WARNING TO REDUCE THE RISK OF FIRE OR ELECTRIC SHOCK DO NOT EXPOSE THIS APPARATUS TO RAIN OR MOISTURE 22 CAUTION TO PREVENT ELECTRIC SHOCK DO NOT USE THIS PLUG WITH A RECEPTACLE OR OTHER OUTLET UNLESS THE BLADES CAN BE FULLY INSERTED TO PREVENT BLADE EXPOSURE 23 CAUTION USE WITH OTHER STAND MAY RESULT IN INSTABILITY CAUSING POSSIBLE INJURY 24 CAUTION DANGER OF EXPLOSION IF...

Page 4: ...cate the TV antenna Increase the separation between TV and other equipment Connect TV into separate outlet from other equipment Consult the dealer or an experienced radio TV technician for help FCC Caution Any changes or modifications not expressly approved by the party responsible for compliance could void the user s authority to operate this equipment CAUTION COMBINATION 11 DIAGONAL LCD TV DVD P...

Page 5: ... Automatically changing screen size for VIDEO INPUT modes ID 1 28 To eliminate noise at the top and bottom of the screen IMAGE ADJ 29 Features of DVD on this Product 32 Enjoying digital audio output from the digital audio output connector 33 Location of Controls for DVD Operation 34 Location of front operation panel 35 Basic play 36 To play 36 Stopping play 37 Skipping chapters or tracks 38 Still ...

Page 6: ... place in a location not exposed to outdoor light Handling precautions Hold the disc by the edges so the surface will not be soiled with fingerprints Fingerprints dirt and scratches can cause skipping and distortion Do not write on the label side Do not use record cleaning sprays benzine thinner static electricity prevention liquids or any other solvent Be careful not to drop or bend the disc Do n...

Page 7: ...ould always be replaced as a pair Always use new batteries when replacing the old set 2 Do not combine a used battery with a new one 3 Do not mix battery types example Zinc Carbon with Alkaline 4 Do not attempt to charge short circuit disassemble heat or burn used batteries 5 Battery replacement is necessary when the remote control acts sporadically or stops operating this unit Helpful Hint For fr...

Page 8: ...d channels A cable converter box is required for proper reception Check with your local Cable company for its compatibility requirements Connecting the Antenna Cable to the RF In Terminal S VIDEO S VIDEO DVD DIGITAL AUDIOOUT VIDEO INPUT OUTPUT AUDIO R L UHF Antenna RF in Terminal VHF Antenna Mixer 75 Ohm Coaxial Cable Coaxial Antenna Plug Antenna Connection For proper reception of VHF UHF channels...

Page 9: ...ck of the VCR to the Antennainputterminal on the left side of the TV Connect the cable from the Output terminal on the back of the Cable Box to the Antenna input terminal on the back of the VCR ANTENNA TERMINALS ON THE LEFT SIDE OF THE TV VCR CABLE BOX TERMINAL ON THE BACK OF THE CABLE BOX Incoming Cable from Antenna or Cable TV System OUTPUT INPUT OUTPUT INPUT TO VCR Connect the cable from the an...

Page 10: ... VIDEO S VIDEO AUDIO DIGITAL AUDIO PCM BTSTREAM OPTICAL VIDEO VIDEO IN DVD OUT AUDIO R L Audio INPUT S Video IN R L TV Notes When a monaural VCR is used connect the monaural audio cable to the AUDIO L Left terminal When connecting video cables priority is given to the S Video cable when the S Video input terminal and the video input terminal are connected at the same time How to connect the input ...

Page 11: ...E DVD MENU RETURN SKIP STOP PAUSE PLAY TV MENU ENTER SLOW SEARCH EJECT POWER POWER CH 6 STEREO SAP MONO NORMAL 2 2 3 1 Connecting the Plug to the Wall Outlet Note The TV and AC adaptor will still consume some power as long as the power cord is still inserted into the wall outlet Turn the power of the TV set off by pressing the POWER switch on the TV when the TV is on or in standby mode Example The...

Page 12: ...riod The setting changes to 30 minutes 60 minutes 90 minutes and 0 minutes off timer cancelled each time the button is pressed When three minutes remain 3 will flash The off timer is cancelled if the main power is turned off Starting three minutes before the power is automatically turned off the remaining time 3 2 1 will blink on the screen SLEEP CH VOL SURROUND Volume Up or Down Channel Up or Dow...

Page 13: ...reactivate sound Sound is also reactivated when power is turned off or volume level is changed TV VIDEO button This input mode changes each time this button is pressed See page 18 ASPECT button Changes screen size See page 21 NORMAL JUST FULL ZOOM Stand by ON OFF button TV must first be plugged into the wall outlet and turned on at the power switch See pages 12 34 35 Use with DVD operation Refer t...

Page 14: ... the TV MENU button is pressed the MENU screen will be displayed If the TV MENU button is pressed once more the MENU screen will be cleared Select desired MENU by pushing Right button or Left button 1 ENTER TV MENU 2 MENU ADJUST SET UP RETURN ENTER SELECT PAGE PICTURE AUDIO PICTURE ADJUST POSITION SIZE AUDIO ADJUST MENU ADJUST SET UP LANGUAGE PROGRAM CH DVD SET UP INPUT LABEL OTHER ADJUST RETURN E...

Page 15: ...RIGHTNESS COLOR TINT SHARPNESS AI PICTURE OFF ON STANDARD ENTER LANGUAGE RETURN LANGUAGE ENGLISH CHANGE ENTER PAGE PROGRAM CHANNELS RETURN CHANGE SELECT TV CABLE MODE AUTO MANUAL PROGRAM PROGRAM ENGLISH ENGLISH ENGLISH LEVEL 8 RETURN ENTER SETUP DISC AUDIO SUBTITLE MENUS RATINGS LANGUAGE menu See page 16 POSITION SIZE RETURN NORMALIZE NORMAL 1 SIZE PAGE AUDIO ADJUST RETURN ENTER SELECT 0 0 0 OFF N...

Page 16: ...M YES NO ENTER CHANGE 1 Turn the Power on and press the TV VIDEO button to display the TV channel CHANGE PAGE PROGRAM CHANNELS RETURN SELECT TV CABLE MODE AUTO MANUAL PROGRAM PROGRAM ENTER Selecting LANGUAGE It is possible to change the screen menu language to a different language English Français Español Press to select LANGUAGE Press to display the LANGUAGE screen Press to select LANGUAGE 1 Pres...

Page 17: ...enu ENTER ENTER ENTER PAGE MANUAL PROGRAM RETURN ENTER CHANNEL 121 ADD DELETE CH SELECT ENTER PAGE MANUAL PROGRAM RETURN ENTER CHANNEL 121 ADD DELETE CH SELECT Notes When buttons are pressed with AUTO PROGRAM running the TV set will return to normal viewing Channels searched up to this point are added After AUTO PROGRAM is finished the lowest channel number added will be received When there are no...

Page 18: ...Player DVD player When playing a VIDEO When playing a DVD or CD Turning the power on and switching input modes This equipment can also be connected to the rear terminals See Connections for details Note When the remote control is unavailable input modes can also be switched on the TV set using the TV VIDEO button CH6 VIDEO DVD CD Video camera DISPLAY TOP MENU ANGLE DVD MENU RETURN SKIP STOP PAUSE ...

Page 19: ...NU ENTER DISPLAY SLOW SEARCH POWER EJECT DISPLAY The GUI menu bar for DVD operation is displayed by pressing the DISPLAY button when the above screen is displayed OFF DISPLAY DISPLAY DISPLAY DISPLAY FULL DVD CD 01 12 01 05 00 00 00 1 2 0 OFF NORMAL 1 2 Press to GUI screen The GUI screen changes every time the DISPLAY button is pressed Refer to DVD Operation Guide Channel number Video or DVD CD Inp...

Page 20: ...een and select SET UP 2 ENTER Press to select OTHER ADJUST Press to display the OTHER ADJUST screen 3 Press to select CHILD LOCK Press to set ENTER To end adjustment TV MENU MENU ADJUST SET UP LANGUAGE PROGRAM CH DVD SET UP INPUT LABEL OTHER ADJUST RETURN ENTER SELECT PAGE PAGE OTHER ADJUST RETURN SELECT NATURL CLR ID 1 IMAGE ADJ CHILD LOCK OFF ON OFF ON 2 ON CHANGE 1 OFF When CHILD LOCK is ON the...

Page 21: ... size ZOOM mode magnifies the central section of the picture FULL will display the picture at its maximum size but with slight elongation JUST mode will display a 4 3 picture at maximum size but with aspect correction applied to the center of the screen so that elongation is only apparent at the left and right edges of the screen The size of the picture will depend on the original signal NORMAL 3 ...

Page 22: ...u to adjust Select the desired level by looking at the picture behind the menu ENTER ENTER See next page MENU ADJUST SET UP RETURN ENTER SELECT PAGE PICTURE AUDIO PICTURE ADJUST POSITION SIZE AUDIO ADJUST PAGE PICTURE ADJUST RETURN ENTER SELECT 0 0 0 0 0 0 NORMALIZE PIC MODE BACK LIGHT PICTURE BRIGHTNESS COLOR TINT SHARPNESS AI PICTURE OFF ON STANDARD Press the left or right button to switch betwe...

Page 23: ... a lighter color TINT Adjust for flesh tone color SHARPNESS Displays a sharp image AI PICTURE Displays black and white colors more clearly when turned ON Picture Adjustments ENTER To adjust each item Press the up and down buttons to select each item Select NORMALIZE with the up and down buttons Press ENTER button Press TV MENU button To return to normal viewing To reset to standard setting TV MENU...

Page 24: ...iginal image intended by the producer The adjusted setting will remain even when the TV is turned off The signals output from the output terminal on the left of the TV are not affected when the screen size and position are adjusted 1 2 ASPECT TV MENU Press to display the MENU screen Press to select ADJUST menu ENTER Press to narrow Press to widen P r e s s t o move image upwards P r e s s t o move...

Page 25: ...ress to select the menu to adjust each item Select the desired level by listening to the sound ENTER ENTER AUTO STANDARD DYNAMIC MUSIC BASS Adjusts low sounds TREBLE Adjusts high sounds BALANCE Adjust left and right volume SURROUND To enjoy a concert hall effect turn SURROUND to ON when stereo is playing See page 26 Selecting STEREO SAP MONO See page 26 TV MENU Press to end ENTER To reset to stand...

Page 26: ...eration Helpful Hints STEREO Two channel Audio reception SAP Second Audio Programming typically used for bilingual audio MONO Use when stereo signal is weak TV VIDEO MUTE SLEEP CH VOL ASPECT SURROUND SURROUND SURROUND Button The benefits of surround are astounding You can be completely enveloped in sound just as if you were at a concert hall or cinema The surround setting switches on and off each ...

Page 27: ... for each VIDEO INPUT can be changed to match with the connected device VCR DVD Player Example When changing VIDEO to LD 1 2 Press to select INPUT LABEL Press to display the VIDEO INPUT LABEL screen ENTER ENTER Press to change By pressing this button display changes as follows Press to end VIDEO VCR LD BLANK DTV DVD GAME This button rotates in reverse NTER ENTER TV MENU ENTER INPUT LABEL RETURN VI...

Page 28: ...ode changes to FULL 1 Press the MENU button to display the MENU screen and select SET UP Press to select OTHER ADJUST Press to display the OTHER ADJUST screen ENTER 2 Press to end TV MENU ON When screen size specification signals are detected ASPECT mode is automatically changed OFF ASPECT mode is not automatically changed Turn OFF if this function does not operate properly Press to select ID 1 Im...

Page 29: ...J Press to select 2 Press to select 1 ENTER Press to select OTHER ADJUST Press to display the OTHER ADJUST screen ENTER 2 To eliminate noise at the top and bottom of the screen IMAGE ADJ MENU ADJUST SET UP LANGUAGE PROGRAM CH DVD SET UP INPUT LABEL OTHER ADJUST RETURN ENTER SELECT PAGE PAGE OTHER ADJUST RETURN SELECT NATURL CLR ID 1 IMAGE ADJ CHILD LOCK OFF ON OFF ON 2 ON CHANGE 1 OFF Example Exam...

Page 30: ......

Page 31: ...31 DVD CD Operation Guide ...

Page 32: ...eatures Multi audio function See pages 42 45 49 The audio soundtrack can be heard in up to 8 languages The number of languages depends on the software Multi subtitle function See pages 43 45 49 Subtitles may be displayed in one of 32 languages The number of languages depends on the software Multi angle function See pages 43 45 This function allows you to choose the camera angle of scenes shot from...

Page 33: ...ipment Caution for the optional digital audio output connector Do not connect to the digital audio input of an amplifier that does not have Dolby Digital dts MPEG audio decoder If such an amplifier should be connected to the player with Bitstream selected at the 2 Dolby digital any attempt to play DVDs or CDs recorded in dts may cause such a high level of noise that it may be harmful to your ears ...

Page 34: ...sed to eject DVD or CD Displays disc information and settings when pressed during play See pages 40 to 47 Displays the menu for DVDs with several menus See page 37 39 Used to make selections SELECT Key adjustments and settings See page 13 For fast forwarding and re winding or slow play See page 38 Plays the disc See page 36 Used to select menus songs set time and input passwords Selects still pict...

Page 35: ...itch Turns power ON and OFF The remote control can be operated when this is ON Remote control sensor Stand by Red Power ON Green See page 11 Rewinds DVD CD discs and skips backwards scenes during play See page 38 Skip forwards DVD CD discs and skips scenes during play See page 38 Stops operation of disc See page 37 Pauses or stops play of DVD CD discs EJECT button Plays DVD CD discs See page 36 SL...

Page 36: ...TOP POWER 4 Press PLAY to display the following 1 2 3 Press POWER to switch on the power See page 34 35 To play Insert DVD to play When a menu screen appears on the TV In the case of many movie DVDs an interactive DVD or a Video CD with playback control a title screen appears on the TV Perform step 5 to start play Place the disc in the disc slot with the label side to be played facing frontwards I...

Page 37: ...by mode Note The disc continues to rotate while the menu is displayed even after the player has finished playing a particular item When no further selections are to be played be sure to press STOP to clear the menu display For your reference When appears on the screen when a button is pressed the operation is prohibited by the player or disc Press STOP during play RESUME function The player record...

Page 38: ...ain a chapter track is skipped each time the button is pressed When SKIP is pressed during menu play of Video CDs with playback control a menu screen may sometimes be recalled SKIP Reverse Forward Reverse Forward Example For your reference When SLOW SEARCH is used during menu play of Video CDs with playback control a menu screen may sometimes be recalled For DVDs and Video CDs audio will be heard ...

Page 39: ...CT is pressed When the SELECT is kept pressed consecutive frame advance reverse works Normal play is resumed when PLAY is pressed Some movie discs may have two or more titles If the disc has a title menu recorded on it pressing TOP MENU shows the title menu screen The details of operation depend on the disc used Press TOP MENU during play A list of the titles on the disc is now displayed 1 Using a...

Page 40: ...RCH POWER EJECT OFF ON 08 14 10 14 14 14 OFF NORMAL 1 2 01 14 00 00 00 OFF OFF NORMAL Example Basic play Two way setting method for Sound field Using GUI screen Selecting sound field Press DISPLAY button and display sound field screen Press SELECT to select sound field Press SELECT button 1 2 Using SURROUND button During playback of disc each time the SURROUND button is pressed the sound field cha...

Page 41: ...r during menu play of a Video CD with playback control To return to normal play Press REPEAT MODE until OFF is displayed A 2 Press A B REPEAT at the point where repeat play is to be concluded B AB Repeat play of the section between points A and B starts To return to normal play Press A B REPEAT until is displayed Notes A B repeat play does not work with an interactive DVD Some subtitles recorded a...

Page 42: ...r your reference When the preferred language is not selected even after pressing the SELECT button several times it means that language is not available on the disc When the power is turned on or the disc is removed the language heard is the one selected at the initial settings If this language is not recorded on the disc only the available language on the disc will be heard Press DISPLAYto clear ...

Page 43: ...s that language is not available on the disc When the power is turned on or the disc is removed the language heard is the one selected at the initial settings If this language is not recorded on the disc only the available language on the disc will be heard 3Press SELECT to select the language Pressing the numeric buttons also changes the subtitle language I love you 01 12 01 05 00 00 00 1 1 ENG O...

Page 44: ...leared Some functions cannot be accessed from the stop mode Press the SELECT button to select the setting For some functions the setting will be registered immediately for others ENTER or PLAY must be pressed When numbers are displayed e g title No the numeric buttons are also effective for setting instead of the SELECT button When numbers are entered with numeric buttons press ENTER to register t...

Page 45: ...the two locations starts Press ENTER again to return to normal play A B repeat play See page 41 The GUI screen display indicates the number of channels recorded on the disc Select the mode during play with the SELECT button Repeat play See page 41 OFF C T Normal play Chapter repeat play Title repeat play DVD Notes Repeat play does not work with an interactive DVD or during menu play of a Video CD ...

Page 46: ... the following discs CDs Video CDs with playback control when menu play is cancelled Press STOP while the menu screen is displayed Video CDs which do not support playback control Ver 1 1 Elapsed playing time minute second 1 Select the random play setting menu 2 Press the SELECT button to selection and press ENTER button Random play See page 40 Press ENTER during to store location A and press ENTER...

Page 47: ... Repeat playback between A and B Repeat playback Playback is repeated between the designated 2 points Each time Set is pressed during playback the setting cycles are as indicated below This is only possible in the same chapter same title if there are no chapter divisions DVD or the same track video CD music CD If the chapter title track ends before the end point B is designated the start point A i...

Page 48: ...tton to select DVD SET UP and press ENTER Press SELECT button to select the menu setup Each screen for setting the value is displayed MENU ADJUST SET UP LANGUAGE PROGRAM CH DVD SET UP INPUT LABEL OTHER ADJUST RETURN ENTER SELECT PAGE RETURN ENTER SELECT PAGE MENU ADJUST SET UP LANGUAGE PROGRAM CH DVD SET UP INPUT LABEL OTHER ADJUST ENGLISH ENGLISH ENGLISH LEVEL 8 RETURN ENTER SETUP DISC AUDIO SUBT...

Page 49: ...BTITLE AUTOMATIC ENGLISH FRENCH SPANISH OTHER 0 AUTOMATIC Subtitle language will automatically be selected in accordance with the audio soundtrack language Factory preset If the language selected for the AUDIO is actually used during playback the subtitles will not appear If another language is used during playback the subtitles will appear in the language selected at the setup AUDIO ENGLISH FRENC...

Page 50: ...settings operation playback of the disc will be prohibited Input a 4 digit password with the numeric buttons and press ENTER button RETURN ENTER SETUP RATINGS ENTER A 4 DIGIT THEN PRESS ENTER PASSWORD Do not forget your password Factory setting 1111 Press the SELECT button to select the level and press ENTER button Setting is finished and the initial settings screen is displayed The rating is lock...

Page 51: ...NTER SETUP RATINGS 3 3 3 3 REMEMBER THE CANNOT CHANGE THE RATING LEVEL PASSWORD OR YOU 16 9 RETURN ENTER SETUP VIDEO TV ASPECT VIDEO MENU RETURN ENTER SETUP TV ASPECT 16 9 4 3 LETTERBOX 4 3 PAN SCAN 1 2 3 1 2 16 9 Select when a wide screen TV set is connected Factory preset Select this if the disc video type is 16 9 For wide screen TV s set the screen mode to Full 4 3 LETTERBOX Select when a conve...

Page 52: ... of functions like PLAY and STOP on or off ON Functions like PLAY and STOP are displayed on the television screen OFF Functions like PLAY and STOP are not displayed on the television screen Digital audio output setting This is for selecting the type of digital audio signal output from the optical digital audio output terminal of this device according to the connection method with other equipment O...

Page 53: ...namic range difference between high and low volume This setting works only with DVD discs recorded in Dolby digital STANDARD Set this to listen with a range equivalent to a normal television MAX RANGE Set this to listen with the range recorded on the disc MIN RANGE Set this to listen with a smaller difference between the maximum and minimum volume When you want a powerful sound even at low volume ...

Page 54: ...an Armenian Interlingua Indonesian lcelandic Italian Hebrew Japanese Yiddish Javanese Georgian Latin Kirghiz Korean Kurdish Kashmiri Kannada Cambodian Greenlandic Kazakh Code 7678 7679 7684 7686 7771 7773 7775 7776 7778 7779 7782 7783 7784 7789 7865 7876 7869 7879 7982 8065 8076 8083 8084 8185 8277 8279 8285 8365 8368 8372 8373 Language Lingala Laotian Lithuanian Latvian Lettish Malagasy Maori Mac...

Page 55: ...e either at both sides or one side of the screen is automatically eliminated so that the picture fills the whole screen Type of software Type of TV set ASPECT mode 4 3 16 9 FULL mode 16 9 ZOOM mode 16 9 AUTO mode Wide screen pan and scan format Software 4 3 Software 4 3 Letterbox Letterbox with black bands at top and bottom Screen horizontally enlarged with black bands at top and bottom Full scree...

Page 56: ...rate with another remote control Is there deterioration breakage or disconnection of the antenna or antenna wire Is the antenna wire connected correctly Is the system affected by radio wave interference or induced electromagnetic waves by external sources automobiles or trains high voltage wires neon motors magnetized steel frame or iron rain shutters etc Turn off the power supply and try changing...

Page 57: ...stops quickly No sound or sound is strange Buttons cannot be operated Screen messages do not appear GUI screen display is cut off The picture is disturbed during fast forward or rewind Playback does not start even when a title is selected The disc is hot when it is removed Subtitles do not appear The audio or subtitle language cannot be selected The angle cannot be changed Cause and remedy Is ther...

Page 58: ...at the disc conforms to the DVD standard Discs which do not comply with the standard cannot be played They cannot be used with this equipment Dolby digital audio signals have a wide dynamic range i e the range between high and low volume so in general volume seems to sound low If the region number contains ALL or 1 and the format is NTSC it can be played back They can be played back if they are in...

Page 59: ...single layer 12 cm disc 12 cm single sided dual layer 8 cm disc 12 cm double sided single layer 8 cm single sided single layer 8 cm single sided dual layer 8 cm double sided single layer Accessories Supplied Operating Conditions Temperature 42 F 95 F 5 35 C Humidity 20 80 non condensing Connection Terminals Dimensions W H D 12 8 325 mm 9 89 251 mm 6 70 170 mm 12 8 325 mm 8 55 217 mm 2 72 69 mm Wei...

Page 60: ...sonic Sales Company Division of Matsushita Electric of Puerto Rico Inc PSC Ave 65 de Infanteria Km 9 5 San Gabriel Industrial Park Carolina Puerto Rico 00985 Printed in Japan MBS101A0 This product incorporates copyright protection technology that is protected by method claims of certain U S patents and other intellectual property rights owned by Macrovision Corporation and other rights owners Use ...

Reviews: