background image

29

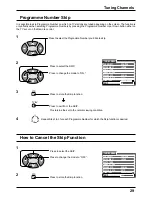
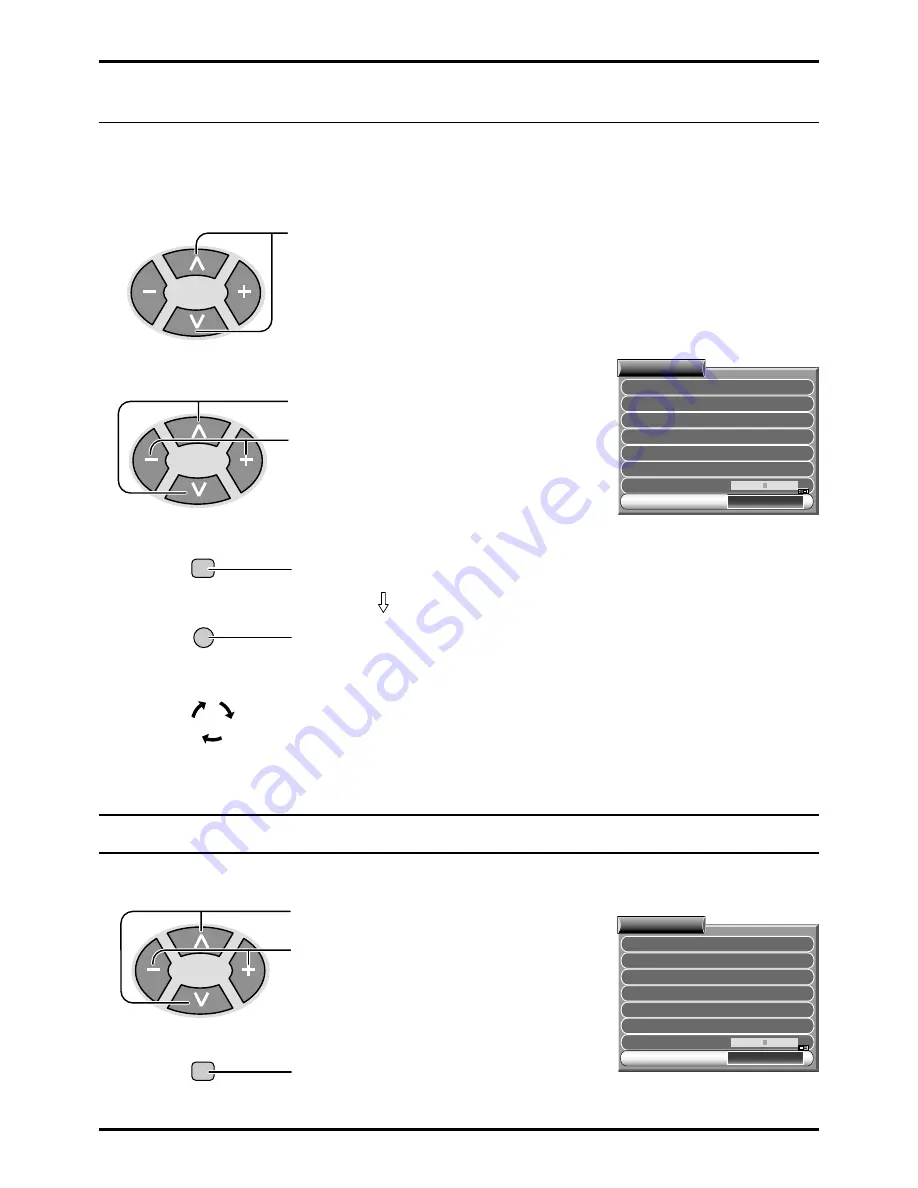
Programme Number Skip

It is possible to skip Programme Number on which no TV stations are tuned appearing on the screen. The function is
only effective when selecting Programme Numbers by pressing the Programme Number Up or Down button either on
the TV set or on the Remote control.

SYS SELECT

CH  SELECT

AUTO  TUNE
MANUAL  TUNE

FINE  TUNE

SKIP

SOUND  SYS

6. 0MHz

COLOUR  SYS

AUTO

ON

JAPAN

POSITION

TUNING  MENU

1

Press to select the Programme Number you’d like to skip.

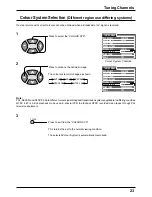
Press to change the mode to “ON.”.

2

Press to select the SKIP.

4

Press to exit from  the SKIP.

TV/AV

3

STR

Press to store the Skip function.

This returns the set to the normal viewing condition.

Repeat Step1 to 3 for each Programme Number for which the Skip function is desired.

How to Cancel the Skip Function

SYS SELECT

CH  SELECT

AUTO  TUNE
MANUAL  TUNE

FINE  TUNE

SKIP

SOUND  SYS

6. 0MHz

COLOUR  SYS

AUTO

OFF

JAPAN

POSITION

TUNING  MENU

Press to change the mode to “OFF.”.

Press to select the SKIP.

2

STR

Press to store the Skip function.

1

Tuning Channels

2

1

3

Summary of Contents for TC-43P250H

Page 1: ...anual for all the above series of models Please read these instructions before operating your set and retain them for future reference Operating Instructions Projection Television TC 43P250H TX 43P250H TX 43P250X TC 51P250H TX 51P250H TX 51P250X Model No ...

Page 2: ... long time max 2 hours use of TV game on the set is not recommended since the signal from TV game may be the cause of damage on picture projection tubes on the set 2 Do not allow a still picture to be displayed for an extended period as this can cause a permanent after image to remain on the Projection TV screen Examples of still pictures include logos video games computer images teletext and imag...

Page 3: ...r RED BLUE and GREEN 19 Convergence2 Adjustment for RED and BLUE 20 Tuning Channels 21 Sound System Selection Different region use differing systems 22 Colour System Selection Different region use differing systems 23 Channel Selection 24 Channel Allocation 25 Automatic Tune Channel Select and Regional System must already be set Refer to pages 21 26 Manual Tune Channel Select and Regional System m...

Page 4: ...t tightly into the socket DO NOT insert foreign objects metal or easily flammable objects DO NOT use at a voltage other than indicated TAKE CARE NOT to damage the power cord DO NOT remove the rear cover as live parts and High Voltage components are accessible w h e n t h e r e a r c o ve r i s removed DO NOT touch the aerial cable and this unit when there is lightning DO NOT touch the power plug i...

Page 5: ...power plug from the socket if you are not going to use the unit for an extended period Ask your sales outlet to install the aerial Cleaning The unit contains many plastic parts For this reason DO NOT use benzine thinner or other chemicals to clean the unit DO NOT bring into contact with insecticide or other volatile substances DO NOT allow the unit to come into contact for extended periods with ru...

Page 6: ... 43P250H X TX 51P250H X TC 43P250H TC 51P250H Note Mainly the remote control for TX 43P250H X and TX 51P250H X is used as an example in the Operating Instructions TEXT Favourite Page Selection TV TEXT Selection TEXT Index Channel Search TEXT hold Still Picture AI Picture Noise Reduction Channel Search Still 1 2 3 4 5 6 7 8 9 0 INDEX HOLD STILL CH SEARCH TV AV PICTURE SOUND SET UP 100Hz PROGRE SURR...

Page 7: ...t your TV is equipped with before you begin using these Operating Instruc tions Instructions are given for all functions please disregard these which do not apply to your TV T C 5 1 P 2 5 0 H T X 5 1 P 2 5 0 H T X 5 1 P 2 5 0 X T C 4 3 P 2 5 0 H T X 4 3 P 2 5 0 H T X 4 3 P 2 5 0 X Securing the casters To prevent the set from tipping forward turn the two casters on the front of the TV so they face ...

Page 8: ...en the wall Aerial socket and your set Your local Television Service Centre or Dealer may be able to assist you in obtaining the correct Aerial system for your particular area and accessories required Any matters regarding Aerial installation upgrading of existing systems or accessories required and the costs incurred are the responsibility of you the Customer Please take safety precautions to pre...

Page 9: ...to turn the TV set on by pressing any of the Direct Programme Number Selection buttons 0 9 or Programme Number Up or Down buttons on the TV set or on the Remote Control If the Wall Outlet is switched OFF or the Main Plug is unplugged when the TV set is again turned ON by either connecting the Main Plug to the Wall Outlet or switching the Wall Outlet ON it will have returned to the original state P...

Page 10: ...ls and Terminals on the TV Item No Function Refer to Page Item No Function Refer to Page Main Headphones Jack 13 Sub Headphones Jack 13 AV3 Input Terminals 11 STR 14 Function 14 Volume Down 14 Volume Up 14 TV AV Selection 14 Aerial Terminal RF In Terminal 8 Monitor Output Terminals 12 AV1 Input Terminals 11 AV2 Input Terminals 11 AV4 Input Terminals 11 DVD Y PB PR Input 12 Programme Number Down Pr...

Page 11: ...he unit The AV2 and AV4 audio input terminals serve as the audio input terminal for both the Video input and the DVD input How to connect the AV1 2 3 or 4 Input Terminals Connections VHS VCR VIDEO AUDIO Audio OUT Video OUT R L MONO AV1 IN S VIDEO VIDEO MONO MONO R L AUDIO VIDEO MONO R L AUDIO PB PR Y DVD Y PB PR PB PR Y DVD Y PB PR AV1 IN AV2 IN AV4 IN MONITOR OUT Super VHS VCR S Video input S VID...

Page 12: ...ts the main picture normal video and audio signals Teletext display on screen will not be output at the MONITOR OUT terminals Even if the television is in picture in picture condition MONITOR OUT terminals output the same signals as main picture on the screen and sound from speakers Sub picture including strobe still channel search etc will not be output at the MONITOR OUT terminals The DVD signal...

Page 13: ...n Headphones will function Use Volume Up or Down button to control volume level Sub Headphones plug For the sub Headphones volume control refer to page 32 3 5mm Plug Optional not supplied S VIDEO Sub Main VIDEO L MONO AUDIO R AV3 IN Screen condition Single picture Teletext Picture in Picture Picture in Picture CHANGE B A A B A Speaker Sound A Stereo A Stereo A Stereo A Stereo B Stereo B Stereo B M...

Page 14: ... system status for example Programme number Channel number Stereo mode Picture menu Sound menu Scan mode Sound system and colour system Store see page 28 29 39 Stores some settings in TUNING menus and TELE TEXT Function selection Displays the on screen display functions use repeatedly to select from the available functions The following adjustments can be accessed directly Notes NTSC TINT Displaye...

Page 15: ...TV set OFF to Standby mode Sound Mute Press to mute the sound completely the Mute symbol will appear Press again to restore the previous sound level and cancel the mute Programme Number Selection Press to select the next higher or lower Programme number Press to increase or decrease the sound volume level VOLUME 18 Press to select TV AV1 AV2 AV3 and AV4 input signal modes sequentially AV1 AV2 AV3 ...

Page 16: ...AN MODE AUTO ON PICTURE P NR AUTO MENU VOLUME BASS TREBLE BALANCE SURROUND SUB HEADPHONE HEADPHONE VOL OFF DYNAMIC SOUND To PICTURE adjust menu see page 30 To HELP MENU EXT CONNECTION MENU DEMO ACCESS HELP MENU HOW TO USE THE MENUS MOVE BETWEEN MENU OPTIONS OPEN OR CLOSE THE MENUS GO BACK TO WATCHING ADJUST OR ACCESS CHOSEN OPTION MENU To SOUND adjust menu see page 32 The HELP button runs a demons...

Page 17: ... MENU To SETUP MENU see page 34 Press to access to TUNING MENU On Screen menu Display from Remote Control TELETEXT OFF TIMER FLICKER REDUC STROBE CH COLOUR SET TEXT SELECT ENGLISH VCR GAME OFF OFF DYNAMIC FASTEXT SETUP MENU TUNING MENU PICTURE SHIFT CHILD LOCK CONVERGENCE LANGUAGE OFF OFF ACCESS SETUP MENU ENGLISH Press to access to CONVERGENCE CONVERGENCE 2 CONVERGENCE 1 ACCESS SELECT ACCESS RETU...

Page 18: ...AL signal and again with the NTSC signal Convergence Adjustment Vertical centre marker Horizontal centre marker 1 Press to display the Setup Menu 2 Press to select the CONVERGENCE Press to access to the CONVERGENCE menu SET UP TUNING MENU PICTURE SHIFT CHILD LOCK CONVERGENCE LANGUAGE OFF OFF ACCESS SETUP MENU ENGLISH 3 Press to select the CONVERGENCE1 or the CONVERGENCE2 Press to access to the fun...

Page 19: ... line Press N button to adjust the blue mode Stores RED RED Press to align the horizontal blue line with the horizontal yellow line Becomes a white line Press to align the vertical blue line with the vertical yellow line Becomes a white line BLUE Press N button to adjust the green mode Stores BLUE Press to align the horizontal green line with the vertical centre maker Press to align the vertical g...

Page 20: ...ition 1 is selectd 1 2 3 4 5 6 7 8 9 0 F P INDEX HOLD STILL CH SEARCH TV TEXT 100Hz PROGRE SURROUND MULTI PIP Press to align the horizontal red line with the horizontal blue line Becomes a white line Press to align the vertical red line with the vertical blue line Becomes a white line Press N button to adjust the blue mode Stores RED RED Press to align the horizontal blue line with the horizontal ...

Page 21: ...ECT mode as detailed below Press to select the SYS SELECT Press to select the appropriate system SYS SELECT CH SELECT AUTO TUNE MANUAL TUNE FINE TUNE SKIP SOUND SYS 6 0MHz COLOUR SYS AUTO OFF POSITION E EUROPE TUNING MENU The system select indicator will change as follows CHINA HK UK M EAST NZ INDONES AUSTRALIA JAPAN CATV AMERICA SPECL VER E EUROPE 2 Regional System Selection 2 SYSTEM SELECT Regio...

Page 22: ...NE SKIP SOUND SYS 6 0MHz COLOUR SYS AUTO OFF JAPAN POSITION TUNING MENU Sound System Condition SYS SELECT CH SELECT AUTO TUNE MANUAL TUNE FINE TUNE SKIP SOUND SYS 6 0MHz COLOUR SYS AUTO OFF JAPAN POSITION TUNING MENU Note These are different sound broadcast transmission systems applicable to differing countries The sound system will change as shown This returns the set to the normal viewing condit...

Page 23: ...ries NTSC 4 43 is a trick playback mode used in special VCR to playback NTSC recorded video tapes through PAL television equipment The colour system will change as shown This returns the set to the normal viewing condition The selected Colour System is automatically memorised 3 Press to exit from the COLOUR SYS TV AV SYS SELECT CH SELECT AUTO TUNE MANUAL TUNE FINE TUNE SKIP SOUND SYS 6 0MHz COLOUR...

Page 24: ...s the channels tuned in order from programme No 1 Press the button 1 to view channel 2 Press the button 2 to view channel 4 Press the button 3 to view channel 6 During position mode various reception channels can be viewed DIRECT SELECT When the Channel Selection is on DIRECT and Auto Tune is performed the unit memories the programme number which is the same as the channel tuned This method allows...

Page 25: ... 11 12 13 2 13 14 1 2 1 2 12 13 57 21 62 63 69 21 62 63 69 21 62 63 69 21 62 63 69 21 62 63 69 62 63 69 62 63 62 C13 S 1 S 2 S 3 S 1 S 2 S 3 S 1 S 2 S 3 S 1 S 1 S 2 S 3 21 22 23 24 28 57 58 59 62 63 69 90 91 92 93 94 95 96 97 98 99 70 73 74 75 76 77 78 79 80 81 89 100 117 118 120 125 100 125 Z10 Z11 Z12 Z13 Z14 Z15 Z16 Z17 Z18 Z19 S11 S12 S13 S14 S15 S16 S17 S18 S19 S20 S11 S12 S13 S14 S15 S16 S17...

Page 26: ...AV TO EXIT AUTO SETUP IN PROGRESS SEARCHING PLESEWAIT STORED CH29 Search Start Note When sound volume is too small to confirm tune it up by using the sound volume button on the remote control 1 2 3 Press to check each station sequentially 1 2 If necessary repeat steps 1 to 2 for each Programme Number 4 Press to exit from the Tuning Menu This returns the set to the normal viewing condition Helpful ...

Page 27: ...ure with correct colours cannot be obtained when a Broadcast or AV signal is received refer to the Colour System Selection operation on page 23 2 3 When using a VCR without video and audio input output terminals it is convenient to connect the aerial cable as indicated in the instruction manual of VCR and to set the designated channel to programme No 0 In that case perform manual tune after settin...

Page 28: ...ng Cancelling previously adjusted manually fine tuning means re activating the AFT Automatic Fine Tuning Re activating the Automatic Fine Tuning means albaming the set to automatically tune to the optimum tuning position for that programme Number Press briefly to tune the best position Press to access to MANUAL TUNE 3 Press to select the MANUAL TUNE SYS SELECT CH SELECT AUTO TUNE MANUAL TUNE FINE ...

Page 29: ...NU 1 Press to select the Programme Number you d like to skip Press to change the mode to ON 2 Press to select the SKIP 4 Press to exit from the SKIP TV AV 3 STR Press to store the Skip function This returns the set to the normal viewing condition Repeat Step1 to 3 for each Programme Number for which the Skip function is desired How to Cancel the Skip Function SYS SELECT CH SELECT AUTO TUNE MANUAL ...

Page 30: ...BRIGHTNESS COLOUR SHARPNESS NTSC TINT MENU DYNAMIC MENU STANDARD MENU SOFT STANDARD MENU CONTRAST BRIGHTNESS COLOUR SHARPNESS C TEMP STANDARD PICTURE NTSC TINT Picture Menu Function DYNAMIC STANDARD SOFT For viewing in brighter environments This menu selects a higher than normal levels of Brightness and Contrast For viewing in normal evening lighting environments This menu selects the normal level...

Page 31: ...witch between modes PROGRESSIVE 100 Hz MODE AUTO AI SCAN MODE AUTO ON PICTURE P NR AUTO MODE Function AUTO 100 Hz MODE PROGRESSIVE The TV software will select the best mode for the signal being viewed 100Hz will give a steady picture for most signal transmission Recommended when receiving NTSC signals Note We recommend that you set Scan mode to Progressive when viewing a PAL 60 or NTSC transmissio...

Page 32: ...r Item Function Effect BALANCE VOLUME Less More BASS Less More TREBLE Less More Adjusts low sounds Adjusts high sounds Adjust left and right volumes SUB HEADPHONE Less More HEADPHONE VOL Less More Adjust Headphone volume Adjust Sub Headphone volume Adjusts output volume Left SP Right SP MENU VOLUME BASS TREBLE BALANCE SURROUND SUB HEADPHONE HEADPHONE VOL OFF DYNAMIC SOUND MENU DYNAMIC MENU STANDAR...

Page 33: ...s not displayed when the N Button is pressed The Normal mode is the factory preset condition Returning to this original condition is called Normalization Helpful Hint N Normalization SURROUND Press to switch between ON and OFF SURROUND ON SURROUND OFF OR The benefits of surround sound are enormous You can be completely enveloped in sound just as if you were at a concert hall or cinema The surround...

Page 34: ...U FLICKER REDUCTION Lets you control any picture movement Set to Dynamic to activate motion compensation to smooth the image and get rid of picture movement Set to Normal to correct minor picture movement or if slight ghosting of figures occurs when using the Dynamic setting Set to Off to have no flicker reduction at aIl occasional broadcasts may benefit from using this setting TELETEXT OFF TIMER ...

Page 35: ...URE SHIFT For use as a screen saver this function changes the entire picture position shift approximately 2 mm every 15 minutes CHILD LOCK TUNING MENU PICTURE SHIFT CHILD LOCK CONVERGENCE LANGUAGE OFF ON SETUP MENU ENGLISH If the Child Lock function is set ON picture and sound of the TV AV mode being viewed will disappear and a Black screen will appear VCR GAME TELETEXT OFF TIMER FLICKER REDUC STR...

Page 36: ... once more and the keys will reappear Picture in Pcture PIP Press the Red button Each time the location of the sub picture is changed Press the Yellow button Each time the main picture and the sub picture are swapped Press the Blue button to exit from the PIP mode Picture and Picture MULTI PIP Press twice to view two pictures picture and picture at the same time Press the Yellow button Each time t...

Page 37: ...ess to pause the search Press to exit from the feature Press to select each channel s freeze frame in turn Press to watch the selected channel exiting the feature HOLD STILL INDEX CH SEARCH Red Green Yellow Blue Press to select watching the current programme the teletext or the picture and text feature Picture and text No indication for TC 43P250H and TC 51P250H TV TEXT Still Strobe Press to exit ...

Page 38: ...ill be illegible unless you select the Text Language which matches the text being received Select the correct LANGUAGE Refer to page 35 LIST mode FASTEXT mode Red Green Yellow Blue SOUND Press to display the volume function with a green bar CONTRAST VOLUME Press to select the desired function Four differently coloured page numbers are situated at the bottom of the screen Each of these numbers can ...

Page 39: ...ULL size FulI Bottom SET UP Green Press to reveal hidden words e g quiz page answers Press again to hide Reveal Press and hold the page numbers will change to white indication and the page is stored Page Selection Two ways Press to increase or decrease the page number by one 1 2 3 4 5 6 7 8 9 0 STILL CH SEARCH Enter the page number directly using 0 9 on the remote control Stores a favourite page i...

Page 40: ...esired sub page number before the T disappears To select page 6 enter 0 0 0 and 6 9 0 T T0006 Yellow Viewing a normal TV programme Viewing the Teletext page 9 0 Select a new page number TV AV TELE TEXT Teletext page News Flash Update Index Press to display special functions to view the TV picture whilst searching for a Teletext page Press to view the TV picture When a news flash page has been sele...

Page 41: ... occurs it is recommended you switch from STEREO to MONO Even when the contents of the receiving signal undergo changes selection mode is kept intact When the receiving conditions deteriorate listening will be easier if the mode is set to the MONO position using the stereo bilingual sound selection button DUAL also known as DUAL MONO or as BILINGUAL is not currently transmitted in some countries V...

Page 42: ...rection or Connections Electrical Appliances Cars Motorcycles Fluorescent Lamps Volume Refer to page 15 Check whether the mute function has been activated on the Remote Control Not plugged into AC outlet Not switched on Contrast and Brightness Volume setting Check by pressing the Power Switch or Stand by Button on the Remote Control Colour Control Refer to page 30 31 Colour System Refer to page 34...

Page 43: ...AND 21 69 PAL G H I SECAM G K K1 28 69 PAL B AUST 13 57 PAL D K 13 62 NTSC M Japan 14 69 NTSC M U S A CATV S1 S20 OSCAR 1 125 U S A CATV C13 C49 JAPAN S21 S41 HYPER Z1 Z37 CHINA 5A 9A AUST Receiving Stereo System NICAM I NICAM B G NICAM D A2 German Tuning System Frequency synthesizer Auto Search Tuning POSITION 100 Position DIRECT 125 Position Audio Output Headphones Aerial Impedance 24 W 2 way 4 ...

Page 44: ...el number and serial number of this product can be found on its cabinet You should note this serial number in the space provided below and retain this book plus your purchase receipt as a permanent record of your purchase to aid in identification in the event of theft or loss and for Warranty Service purposes Model Number Serial Number ...

Reviews: