background image

Media player

Get started

Information

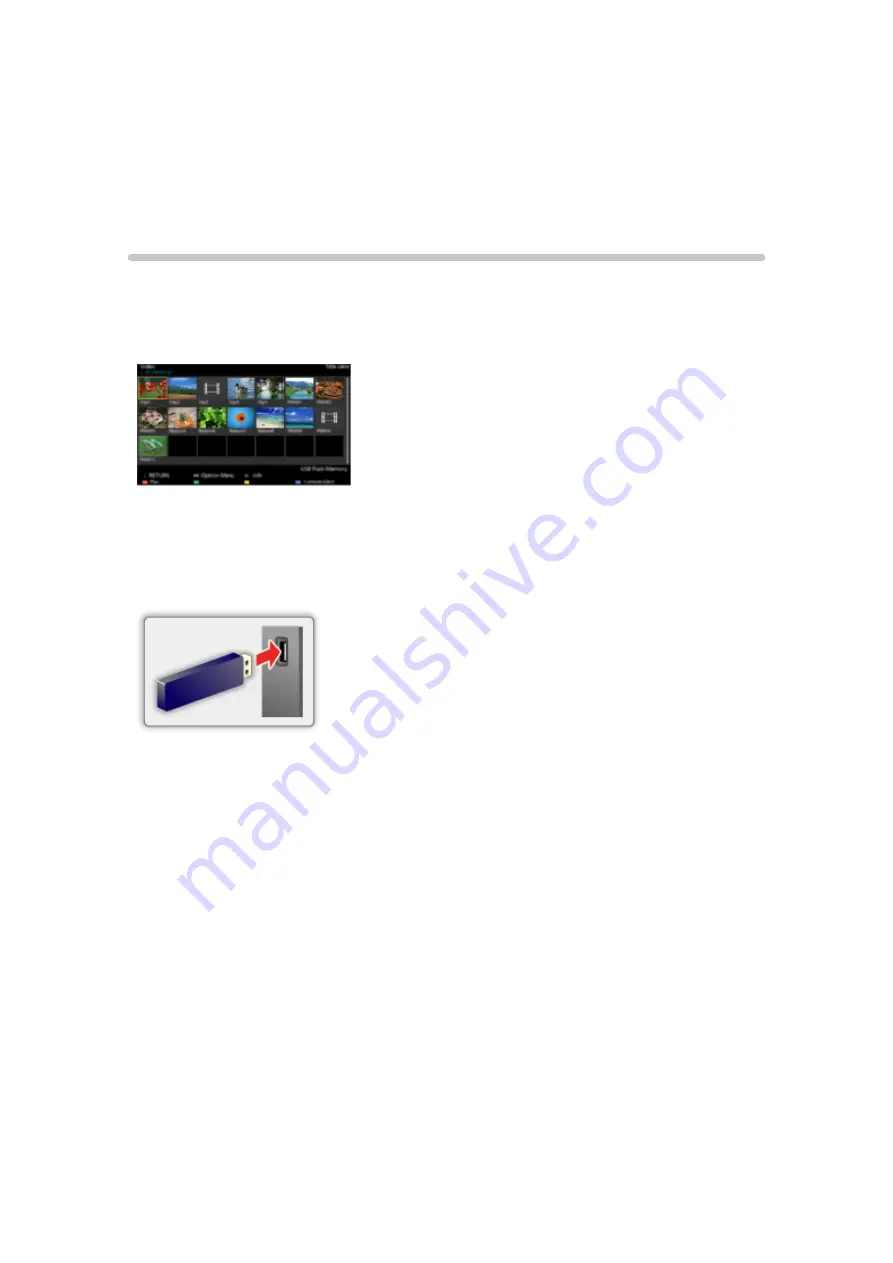
You can view still and motion images and play music saved on a USB flash 

memory.
(Example)


USB flash memory

When you use a USB device, insert straight in and pull straight out.


Media player only supports USB Mass storage class devices.


Remove USB device safely with 

USB device setup

.

(

Setup

 > 

USB device setup

)

- 63 -

Summary of Contents for TC-32ES600C

Page 1: ...eHELP English TC 32ES600C TC 40ES600C TC 49ES600C ...

Page 2: ...16 Antenna Cable service without a box Initial setting 17 Select channels 18 Favorite channels 19 Closed Caption 20 SAP 21 Other 22 Blu ray DVD Game Console etc Connecting and viewing 23 Example of AV connections 24 HDMI connection notice 26 HDMI connection caution 27 Input signal 28 For best picture Picture mode 29 Auto brightness ECO 30 Aspect setting 31 Screen mode 32 Zoom adjustments 34 2 ...

Page 3: ...nnection Network status 41 my Home Cloud settings 42 VIERA network name 43 TV remote App settings 44 Network link 45 File sharing settings 46 Mirroring settings 47 Software update 48 New software notice 49 How to use Operate 50 Home network DLNA Get started Information 51 Photos Viewing Photos 52 Photo view 53 Options menu 54 Using Slideshow 55 Slideshow settings 56 Videos Viewing Videos 57 3 ...

Page 4: ... 63 Media warning messages 64 File sharing 65 Notice 66 Photos Viewing Photos 67 Photo view 68 Sort the photos 69 Options menu 70 Thumbnails size 71 Using Slideshow 72 Slideshow settings 73 Soundtrack settings 74 Videos Viewing Videos 75 Video view 76 Options menu 77 Music Playing Music 78 Music view 79 Options menu 80 4 ...

Page 5: ... Link HDAVI Control Basic feature 88 Connecting note 89 VIERA Link connections 91 VIERA Link settings 94 VIERA Link settings feature 95 VIERA Link 96 VIERA Link menu 97 Control by Smartphone etc Smartphone remote 99 Turn on the TV via IP 100 Mirroring 101 Using USB Keyboard Keyboard 102 All settings How to use Setting the menu 103 Picture Basic settings 104 Pro settings 106 Advanced picture 107 5 ...

Page 6: ...Setup MY APP setting 121 USB device setup 122 Parental control 123 ANTENNA Cable setup 125 Language settings 127 Display customization 128 Closed Caption 129 VIERA Link settings 131 System settings 132 Other settings 133 Support FAQ Help menu Using Help menu 134 FAQ Picture Viewing 135 Picture Snowy none 136 Picture Distortion 137 Picture Unusual 138 Picture Continue 139 Sound None 140 6 ...

Page 7: ...inet 151 Pedestal Power cord 152 Press the Remote control button INFO Letters in box Remote control button Menu Letters in Cyan Menus on screen display References in this eHELP The images shown in this eHELP are for illustrative purposes only This eHELP covers all models however some features may not be available on certain models Refer to the paper manual and the actual menu in the TV etc to conf...

Page 8: ...e It provides easy access to special features such as the Media Player videos games communication tools etc Home Screen Example HOME OK OK HOME Home Screen Full Screen TV Various Home Screen etc Selected content screen TV application etc Home Screen Selection Choose your preferred Home Screen layout 8 ...

Page 9: ...OME again to return to Home Screen Selection You can change the default Home Screen when the TV is turned on Using Home Screen my Home Screen Settings 2 Select a Home Screen icon using and press to access the feature To watch full screen TV 1 Select the TV window with 2 Press to watch Also refer to Tutorial from the tool guide Select Tutorial from tool guide on the top of the screen and press Pres...

Page 10: ...e watching the TV on this full screen select Settings from tool guide Then set the Power ON Option Press HOME to display the tool guide if it is not displayed Various Home Screens You can change the layout of the Home Screen according to your lifestyle and personal preferences Settings You can customize Home Screen For example you can change the wallpaper rename the screen add delete or set your p...

Page 11: ...this function fully you need a broadband network environment Ensure the network connections and network settings are completed Be sure to update the software when a software update notice is displayed on the TV screen If the software is not updated you will not be able to use my Home Screen You can update the software later manually 11 ...

Page 12: ...sing APPS list Features Special features Internet contents network contents Media Player etc can be accessed easily from Apps applications list APPS list Apps list is subject to change without notice 12 ...

Page 13: ...pecial features such as Internet content network content Media Player etc from Apps list applications list 1 Display APPS list with APPS Example To exit APPS list EXIT 2 Select an icon of the features with and press to access 13 ...

Page 14: ...lly For example Screen Settings Account Information Restriction etc 1 Display APPS list with APPS 2 Select the setup menu on APPS list with and press to access 3 Follow the on screen instructions Setup items may be changed without notice 14 ...

Page 15: ...e is assigned at the factory setting Only one application can be assigned to MY APP To change the application to assign 1 Display the menu with MENU 2 Select Setup MY APP setting and press to access 3 Select the application to assign and press to set To use this function fully you need a broadband network environment Ensure the network connections and network settings are completed 15 ...

Page 16: ...control to change channels If the box is connected to the TV using a COAX cable Antenna Cable in then set the TV channel to CH3 or CH4 Note that the picture will not be in HD CC SAP is not available when watching TV with a Cable or Satellite box connected via HDMI If you have a High Definition box ensure that it is outputting 720p or 1080i signal Tip press the TV s INFO button to verify Check your...

Page 17: ...mming source in ANTENNA Cable signal 2 Select Auto program and then the appropriate scan mode All channels Analog only Digital only 3 Start scanning The tuner setup menu auto scan etc is only available when INPUT is set to TV If no channels are found by the end of the scan then check the following Antenna s position or availability of Cable service Cable Satellite or Fiber Optic services with a bo...

Page 18: ...Select channels Select desired channel or CH buttons are also available on the TV Select desired digital channel To directly enter a digital channel number use button to enter the dash e g CH15 1 18 ...

Page 19: ...e Favorite channel OPTION Options menu Set favorite Select the list number using and or directly to save the displayed channel Delete a Favorite channel OPTION Options menu Set favorite Select the list number using and to delete To change the page in Set favorite FAVORITE or repeatedly Display a Favorite channel FAVORITE Favorite channels Select the list number using and or directly To change the ...

Page 20: ...ite or Cable box s CC function For viewing the CC of digital broadcasting set the aspect to Full If viewing with JUST ZOOM or 4 3 characters might be cut off If the CC is set to On on both the receiver and TV when the signal is 480i except for the HDMI connection the CC may overlap on the TV If a digital program is being output in analog format the CC data will also be output in analog format If t...

Page 21: ...P Digital mode Select available audio service when receiving a digital channel Audio track is automatically selected as Preferred audio type and Preferred SAP language settings MENU Menu Sound Preferred audio type MENU Menu Setup Language Preferred SAP language If you change the audio settings with the SAP button Preferred SAP language and Preferred audio type settings will not change Example Trac...

Page 22: ... time Clock 2 Options menu This menu consists of shortcuts to convenient functions Options menu is also available in Menu OPTION Options menu Channel surf mode Specifies favorites or type of channels to view when pressing the channel up down button Set favorite Sets favorite channel Edit CH caption Edits the channel identifier Signal meter Checks the antenna s signal strength Options menu is only ...

Page 23: ...nections Watching TV Blu ray DVD Game Console etc Example of AV connections 2 Select Input 1 Display Input select menu with the connected equipment turned ON INPUT 2 Select the input used in step 1 Select correct input source using and press When you connect to Component or Video input you need to select Video or Component Press INPUT and select AV Video Component Press to choose Video or Componen...

Page 24: ...o use this connection if the connected equipment has HDMI terminal HDMI IN HDMI cable HDMI OUT AV Equipment e g Blu ray Disc player For devices with DVI output Recommended to use this connection if the connected equipment has DVI terminal only HDMI IN HDMI DVI Conversion cable DVI OUT AUDIO IN Audio cable AUDIO OUT AV Equipment e g Blu ray Disc player 24 ...

Page 25: ... if the connected equipment has the Component terminal only COMPONENT IN Component cable COMPONENT OUT AV Equipment e g Blu ray Disc player Connecting to the VIDEO input For SD Standard Definition only COMPOSITE IN VIDEO cable COMPOSITE OUT AV Equipment e g Camcorder 25 ...

Page 26: ... the world s first complete digital consumer AV interface complying with a non compression standard If the external equipment has only a DVI output connect to the HDMI terminal via a DVI to HDMI adapter cable When the DVI to HDMI adapter cable is used connect the audio cable to the audio input terminal Audio settings can be made on the HDMI in menu screen Applicable audio signal sampling frequenci...

Page 27: ... has an aspect adjustment function set the aspect ratio to 16 9 The HDMI connectors are type A The HDMI connectors are compatible with HDCP High Bandwidth Digital Content Protection copyright protection Devices with no digital output terminal may be connected to the input terminal of either COMPONENT IN or VIDEO IN to receive analog signals 27 ...

Page 28: ...hose listed below may not be displayed properly The signals are reformatted for optimal viewing on your display Component HDMI Input signal Component HDMI 480 60i 480 60p 720 60p 1 080 60i 1 080 60p 1 080 24p Applicable input signal 28 ...

Page 29: ...Recommended for normal viewing conditions with subdued room lighting Home theater For watching movies in a darkened room It provides a soft film like picture Cinema Reproduces the original image quality precisely without any revision Allows you to set the professional picture settings in Pro settings Use the mode below to adjust the picture mode in more detail Custom Customizes each item according...

Page 30: ...ure automatically dims the brightness of the screen when the room lighting is lowered C A T S features a built in delay when the lighting conditions change The adjustment happens gradually If you prefer a consistent brightness disable C A T S by Menu Picture scroll down to C A T S and turn it off Or Menu Picture Picture mode then select viewing mode such as Custom 30 ...

Page 31: ...bottom or to zoom the picture Use FORMAT button to change the aspect ratio FORMAT to cycle through the aspect modes 480i 480p Full JUST 4 3 ZOOM 1080p 1080i 720p Full JUST 4 3 ZOOM H FILL SIDECUT JUST SIDECUT ZOOM For screen format settings All settings Picture Screen settings 31 ...

Page 32: ...inition 480i 480p Full Enlarges the image horizontally to the screen s edges JUST Justifies the image by stretching it to the four corners on the screen Recommended for normal TV broadcast 4 3 Displays the image as original size ZOOM Enlarges the image to the entire screen Recommended for Letterboxed content 32 ...

Page 33: ...arges the image horizontally to the screen s side edges The side edges of the image are cut off SIDECUT JUST Justifies the image by stretching it to the four corners on the screen The aspect ratio remains the same around the center and enlarges the left and right side of the image SIDECUT ZOOM Enlarges the image to the entire screen The side edges of the image are cut off 33 ...

Page 34: ...ze can be adjusted in ZOOM 1 Select Zoom adjustments in the Picture menu MENU Menu Picture Screen settings Zoom adjustments 2 Adjust the V position or V size V position Vertical position adjustment Adjust using to desired position V size Vertical size adjustment Adjust using to desired size Press to reset 34 ...

Page 35: ... sound quality for watching music videos etc Speech Improves sound quality for watching news drama etc User Adjusts the sounds manually by using the equalizer to suit your favorite sound quality For the User mode Equalizer will appear on the Sound Menu instead of Bass and Treble Select Equalizer and adjust the frequency Gray out when using Home Theater Adjusts the Sound mode in more detail All set...

Page 36: ...tion may operate and disable optical output When an ATSC channel is selected the output from the DIGITAL AUDIO OUT jack will be Dolby Audio Dolby Digital When an NTSC channel is selected the output will be PCM When playing the movie on Movie player when the sound has been recorded in Dolby Audio Dolby Digital then the output from the DIGITAL AUDIO OUT terminal will be Dolby Audio Dolby Digital Whe...

Page 37: ...less connection If a wired network connection is available near the TV then using this LAN Ethernet connection is recommended Wired LAN connection Recommended for viewing high quality video at high bit rates and to avoid interference with 2 4 GHz devices Wireless LAN connection Use when your network router is not close enough to the TV or when a wired connection is not feasible 3 Connecting to the...

Page 38: ... service is not needed You can simply connect the TV directly to the equipment with a LAN crossover cable Wired connection Using Router TV Ethernet port LAN Ethernet cable Home network Modem Router Computer DLNA Certified media server To use and operate only DLNA features a broadband network service is not needed You can simply connect the TV directly to the equipment with a LAN crossover cable 38...

Page 39: ...tly connected If you are not using the network for connecting anything else but the TV you can just connect the TV directly to the Cable DSL Ethernet modem with LAN Ethernet cable TV Ethernet port LAN Ethernet cable Modem 39 ...

Page 40: ...enu and select Network MENU Menu Network Select Network using from menu bar and press 2 Select the options and set Network connection Network status my Home Cloud settings VIERA network name TV Remote App settings Network link File sharing settings Mirroring settings Software update New software notice 40 ...

Page 41: ...u according to selected connection type Set the desired menu and complete the network connection 3 Displays Network status Select Try again and press to start connection test Success Completion message is displayed Error Select Status details Help and press to display solution of the connection error Follow the directions on the screen to complete the network settings You can also display Network ...

Page 42: ...my Home Cloud settings Displays the terms of service 1 Select my Home Cloud settings using and press 2 Select Notices 3 Follow directions on the screen 42 ...

Page 43: ...VIERA network name Set your favorite name for this TV 1 Select VIERA network name using and press 2 Enter favorite name with screen keyboard 43 ...

Page 44: ...1 Select TV Remote using and press 2 Switch On or Off with Wake on LAN Wireless LAN This function allows you to turn on the TV when you use Remote control via IP 1 Select Wake on LAN Wireless LAN using and press 2 Switch Off or On with Device to upload contents Selects device to upload content from the network equipment smartphone etc 1 Select Device to upload contents using and press 2 Select dev...

Page 45: ...limitation of access to this TV for each device on the home network 1 Select Registration type using and press 2 Switch Auto or Manual with Auto All the available device on the home network are accessible maximum 16 equipment Manual Sets the access limitation for each device in the Remote device List Remote device list Lists the available device on the home network 1 Select Remote device list usin...

Page 46: ...ttings 2 Select Network device list Display connected network devices 3 Select desired network device and press 4 Registration screen is displayed Enter the necessary information to register For registered network device enter User ID and Password 5 Press to register Regarding performance not all servers are guaranteed Up to 16 devices can be registered 46 ...

Page 47: ...ing Enables starting the mirroring function from the other devices smartphone etc without operating the TV 1 Select Easy Mirroring using and press 2 Switch On or Off with Not available when the TV is set to TV as Access Point Delete All Pairings Delete the pairing information for all paired devices 47 ...

Page 48: ...Software update 1 Select Software update using and press 2 Press to start the Software update screen 3 Follow directions on the screen Make sure to set this TV s Clock before the update starts 48 ...

Page 49: ...New software notice Select On Off to display new software update information when TV is turned on 1 Select New software notice using 2 Switch On or Off with 49 ...

Page 50: ...board type You need a broadband environment to use this service Please confirm Network connections and Network settings before using this function Depending on the usage conditions it may take a while to download all the data Internet services available for this TV are subject to change without notice Not all content is available depending on the country and area 50 ...

Page 51: ...u to share photos videos and music stored in the DLNA Certified media server for example PC connected to your home network and enjoy the contents on the TV screen Please confirm Network connection and Network settings before using this function Network services Connect to network Media server You can share the content Photo Video Music etc stored in DLNA Certified media server with your home netwo...

Page 52: ...vailable DLNA servers are displayed Select desired server using from DLNA server list and press 4 Select photo Thumbnails and contents are displayed Select desired content using from file list and press 5 View Follow the Navigation and guide to operate Displayed Navigation and guide will be different depending on data type 52 ...

Page 53: ...etc Information differs depending on selected data Playback screen INFO Display hide Guide and Banner Photo status Displays current photo status Slideshow Single view Navigation Guide Displays available functions In DMR mode Slideshow is not available In DMR mode OK Next Prev are not available 53 ...

Page 54: ...ressing the OPTION button 1 Display Options menu with OPTION Options menu is also available in Menu 2 Select the item Select the desired menu using and press Slideshow settings Available menus are displayed on Options menu depending on data condition and situation 54 ...

Page 55: ...the item by and adjust the settings using Picture quality may deteriorate depending on the slideshow settings Picture setting may not work depending on the slideshow settings 3 Start Slideshow After adjusting each setting select Start slideshow with and press RETURN Stop in mid cycle 55 ...

Page 56: ...nsition effect shown between photos Display interval Long Normal Short Sets the time each image is displayed in the Slideshow mode Repeat playback On Off Turn the Slideshow Repeat cycle function on or off Soundtrack settings Off Music 1 Music 2 Music 3 Music 4 Music 5 Select the music 56 ...

Page 57: ...vailable DLNA servers are displayed Select desired server using from DLNA server list and press 4 Select video Thumbnails and contents are displayed Select desired content using from file list and press 5 Play Follow the Navigation and guide to operate Displayed Navigation and guide will be different depending on data type 57 ...

Page 58: ...e and Banner Movie banner Displays current Video status Drive type Date and time or File name and Elapsed time Navigation Guide Displays available functions In DMR mode Next skip Prev skip are not available Forward Reverse Five levels of speed from 1 to 5 are available In DMR mode Resume playback is not available Subtitles are not supported in MKV format 58 ...

Page 59: ...back Subtitle settings Sets the subtitle setting This function is available during playback Subtitle Display hide subtitles if available Subtitle Text Selects the font type to display subtitles correctly if available Subtitle text size Selects the font size of subtitles Subtitle text color Selects the color of subtitles Subtitle text position Adjusts the position of subtitles on the screen Subtitl...

Page 60: ...ble DLNA servers are displayed Select desired server using from the DLNA server list and press 4 Select music Thumbnails and contents are displayed Select desired content using from file list and press 5 Play Follow the Navigation and guide to operate Displayed Navigation and guide will be different depending on the data type 60 ...

Page 61: ...a Playback screen INFO Display hide Guide and Banner Music Guide Displays current Music status Artist name Album name Song name Elapsed time Navigation Guide Displays available functions Forward Reverse Five levels of speed from 1 to 5 are available In DMR mode Next skip Prev skip User BGM settings are not available 61 ...

Page 62: ...y Options menu with OPTION Options menu is also available in Menu 2 Select the item Select the desired menu using and press Music options Repeat playback Set play repeat function Off Repeat folder One song Available menus are displayed on Options menu depending on the data condition and situation 62 ...

Page 63: ...ages and play music saved on a USB flash memory Example USB flash memory When you use a USB device insert straight in and pull straight out Media player only supports USB Mass storage class devices Remove USB device safely with USB device setup Setup USB device setup 63 ...

Page 64: ... The device is not inserted No media Device removed The device is removed No photos No movies No music files to play No playable media The device has no data or this type of data is not supported Cannot read file The file is broken or unreadable The TV does not support the format 64 ...

Page 65: ... can select and play movies photos and music files on Network Devices as the USB Devices connected to the TV with Media player For more information about settings refer to the page below Network services Network settings File sharing settings 65 ...

Page 66: ...able Depending on how you create the files and the structure of folders the files and folders may not be displayed Partly degraded files might be displayed at a reduced resolution The folder and file names may be different depending on the digital camera used The function cannot display still images that are not DCF formatted i e TIFF BMP Images imported from a PC must be compatible with EXIF 2 0 ...

Page 67: ...ayed Enter User ID Password to access User ID Password are already entered 4 Select the Photos in Media select Select the media using and press 5 Select the photo in thumbnail view Select the data using and press How data is displayed depends on data storage conditions 6 View Follow the Navigation and guide to operate Displayed Navigation and guide may differ depending on data type For File sharin...

Page 68: ...ation panel File name Date Size etc Information differs depending on selected data Displays function guide for each color button on the bottom of the screen Playback screen INFO Display Hide Guide and Banner Photo status Displays current photo status Slideshow Single view Navigation Guide Displays available functions 68 ...

Page 69: ...t menu Folders Sort by date Sort by month 2 Select the sort type Select the type using and press 3 Displayed each screen Folders Ascending order of numeric alphabetical Sort by date Ascending order of the day Sort by month Ascending order of the month 69 ...

Page 70: ...e OPTION button 1 Display Options menu with OPTION Options menu is also available in Menu 2 Select the item Select the desired menu using and press Slideshow settings Thumbnails size Available menus are displayed on Options menu depending on the data condition and situation 70 ...

Page 71: ...Thumbnails size To change the number of photos on a thumbnail screen at a time 71 ...

Page 72: ...the item by and adjust the settings using Picture quality may deteriorate depending on the slideshow settings Picture setting may not work depending on the slideshow settings 3 Start Slideshow After adjusting each setting select Start slideshow with and press RETURN Stop in mid cycle 72 ...

Page 73: ... photo being displayed Display interval Long Normal Short Sets the time each image is displayed in the Slideshow mode Repeat playback On Off Turn the Slideshow Repeat cycle function on or off Soundtrack settings Off Music 1 Music 2 Music 3 Music 4 Music 5 User selected Auto Select the music User selected Plays the soundtrack registered in the Soundtrack settings menu Auto Plays the songs on the US...

Page 74: ... in Slideshow settings using 2 Select User selected using 3 Displays Soundtrack popup menu then select the desired song with and press to register This song Registers current music All songs in folder Registers the music in a folder Picture settings may not work depending on the slideshow settings 74 ...

Page 75: ... Enter User ID Password to access User ID Password are already entered 4 Select the Videos in Media select Select the media using and press 5 Select the video in thumbnail view Select the data using and press How data is displayed depends on data storage conditions 6 Play Follow the Navigation and guide to operate Displayed Navigation and guide will be different depending on data type For File sha...

Page 76: ... Displays function guide for each color button on the bottom of the screen Playback screen INFO Display Hide Guide and Banner Movie banner Displays current Video status Drive type Date and time or File name and Elapsed time Navigation Guide Displays available functions Forward Reverse Five levels of speed from 1 to 5 are available Subtitles are not supported in MKV format 76 ...

Page 77: ...ayback Repeat playback Set play repeat function Off On Subtitle settings Sets the subtitle setting This function is available during playback Subtitle Display hide subtitles if available Subtitle Text Selects the font type to display subtitles correctly if available Subtitle text size Selects the font size of subtitles Subtitle text color Selects the color of subtitles Subtitle text position Adjus...

Page 78: ... Enter User ID Password to access User ID Password are already entered 4 Select the Music in Media select Select the media using and press 5 Select the music in thumbnail view Select the data using and press How data is displayed depends on data storage conditions 6 Play Follow the Navigation and guide to operate Displayed Navigation and guide will be different depending on data type For File shar...

Page 79: ...ers depending on selected data Displays function guide for each color button on the bottom of the screen Playback screen INFO Display Hide Guide Music Guide Displays current Music status Artist name Album name Song name Elapsed time Navigation Guide Displays available functions Forward Reverse Five levels of speed from 1 to 5 are available 79 ...

Page 80: ...lay Options menu with OPTION Options menu is also available in Menu 2 Select the item Select the desired menu using and press Music options Repeat playback Set play repeat function Off Repeat folder One song Available menus are displayed on Options menu depending on data condition and situation 80 ...

Page 81: ...matically turn Off at a designated of time 1 Display the menu MENU Menu 2 Select Timer Select desired menu using from menu bar and press 3 Select the item and adjust Select desired item using and adjust with Set Sleep timer All settings Timer Sleep Off timer 81 ...

Page 82: ...tup from menu bar Select desired menu using from menu bar and press 3 Select Parental control Select the menu using and press 4 Select the item and adjust Select desired item using and adjust with The Off rating is independent of other ratings When placing a lock on a specific age based rating level the Off rating and any other more restrictive ratings will also be blocked The channels will be blo...

Page 83: ...s your first time entering the password enter the password twice in order to register it Make a note of your password Do not forget it If you have forgotten your password consult your local dealer When you select a locked channel a message will be displayed that allows you to view the channel after you input your password 83 ...

Page 84: ...ed for children under 17 NC 17 X No one 17 or under allowed U S TV PROGRAMS RATINGS U S TV Age Based Ratings TV NR Not Rated TV Y All children TV Y7 Directed to children age 7 and older TV G General Audience TV PG Parental Guidance suggested TV 14 Parents strongly cautioned parental guidance is suggested for children under 14 TV MA Mature Audience only CANADIAN ENGLISH RATINGS C E L R E Exempt pro...

Page 85: ...exual situations V Violence The V Chip system used in this set is capable of blocking NR programs non rated not applicable and none as per FCC Rules Section15 120 e 2 If the option of blocking NR programs is chosen unexpected and possibly confusing results may occur and you may not receive emergency bulletins or any of the following types of programming Emergency Bulletins Such as EAS messages wea...

Page 86: ...red menu using from menu bar and press 3 Select Closed Caption in Display customization Select the menu using and press 4 Select the item and adjust Select desired item using and adjust with Some functions will be disabled depending on the type of input signal Reset to defaults will be grayed out if no changes are made For Closed Caption settings All settings Setup Closed Caption For Smart TV Inte...

Page 87: ...elf Check with your Cable or Satellite provider for instructions The TV s CC button does not operate the Satellite or Cable box s CC function If the CC is set to On on both the receiver and TV when the signal is 480i except for the HDMI connection the CC may overlap on the TV If a digital program is being output in analog format the CC data will also be output in analog format If the recorder or o...

Page 88: ... with HDMI cables enables VIERA Link controls Available HDAVI Control functions Version Operations HDAVI Control or later Automatic Input Switching Power on link Power off link Speaker control HDAVI Control 2 or later VIERA Link control only with the TV s remote control Unselected device auto off for available equipment only HDAVI Control 3 or later Automatic lip sync function HDAVI Control 5 Audi...

Page 89: ...cannot be utilized For more details on the external equipment s connections please refer to the operating manual for the equipment HDMI connections to some Panasonic equipment allow you to interface automatically This function may not work normally depending on the equipment condition The equipment can be operated by other remote controls with this function on even if the TV is in Standby mode Ima...

Page 90: ...atible with HDAVI control is changed switch the power of this unit Off and On again while the power of all equipment is On so that the unit can correctly recognize the connected equipment and check that the connected equipment playback operates 90 ...

Page 91: ...ay Disc player DVD Recorder Connect the HDMI terminal of this TV to the DVD recorder with VIERA Link function using a fully wired HDMI cable You can use any HDMI terminal on this TV TV HDMI HDMI cable DVD recorder with VIERA Link function 91 ...

Page 92: ... No optical cable is necessary when connecting a Home Theater supporting HDAVI control 5 with an HDMI cable Audio will be supported via ARC Audio Return Channel One AV amp and one Blu ray Disc player DVD recorder can be operated with this unit by connecting with an HDMI cable TV HDMI TV DIGITAL AUDIO OUT HDMI cable Optical cable Home theater system with VIERA Link function AV amp with VIERA Link f...

Page 93: ... LUMIX with VIERA Link function Individual HDMI equipment may require additional menu settings specific to each model Please refer to their respective manuals When audio from other equipment connected to this unit via the HDMI is output using DIGITAL AUDIO OUT of this unit the system switches to 2CH audio When connecting to an AV amp via HDMI you can enjoy higher sound quality Some devices use Min...

Page 94: ...sabled depending on the HDAVI Control version of the equipment 1 Display the menu MENU Menu Setup 2 Select VIERA Link settings Select VIERA Link settings with and press 3 Select VIERA Link and set to On Select VIERA Link and press then select On with 4 Select and set other VIERA Link settings Power on link Power off link Unselected device auto off 94 ...

Page 95: ...d Power off link When Yes is selected and the TV is turned off all connected VIERA Link compatible equipment is also automatically turned off A Panasonic DVD Recorder will not turn off if it is still in Rec mode The TV remains on even if the VIERA Link compatible equipment is turned off Unselected device auto off On The connected VIERA Link compatible equipment will be turned off automatically whe...

Page 96: ...em and set VIERA Link control Speaker output Back to TV Select the desired menu using and set with Items in the VIERA Link menu may be grayed out if no compatible equipment is connected must be HDAVI Control 2 or later or if the equipment has not initiated a connection with the TV In that case switch the equipment s power Off and On while the TV is On 96 ...

Page 97: ...IERA Link control only with the TV s remote control 1 Select VIERA Link control using 2 Select the desired equipment with You can select available items only Recorder Home theater Player Camcorder LUMIX Other If there is more than one equipment item a number after the name indicates the number of items e g Recorder 1 Recorder 2 Recorder 3 The number of equipment items that can be connected is thre...

Page 98: ... Back to TV Returns the input selection of the device selected with the VIERA Link Control to the TV input 1 Select Back to TV using and press 98 ...

Page 99: ... TV s remote control 1 Select Network MENU Menu Network 2 Select TV Remote in TV Remote App settings Select desired menu using 3 Set the item Switch to On using This function is subject to change without notice For more information Support FAQ Information Detailed information 99 ...

Page 100: ...function enables you to turn on the TV with control command by the PC etc When you need to turn on the TV using this system set Wake on LAN Wireless LAN to On MENU Menu Network TV Remote App settings Wake on LAN Wireless LAN 100 ...

Page 101: ...artphone etc is registered once you use this function Easy Mirroring You can also start the mirroring function from the other devices smartphone etc when Easy Mirroring is set to On All settings Network Network settings You cannot use Easy mirroring function while the TV is set to TV as Access Point This function may be available with the other devices smartphone etc supporting the mirroring funct...

Page 102: ...nu Setup System Keyboard type Key map Some of the keys of USB keyboards may correspond to the operation of the remote control Keyboard Remote Control Enter OK Back Space RETURN ESC EXIT 0 9 Numeric buttons F1 HOME F2 APPS F3 MENU F4 INPUT F5 F6 Channel down Channel up F7 F8 Volume down Volume up F9 F10 F11 F12 Colored buttons 102 ...

Page 103: ...put signal or condition e g Zoom adjustments will be grayed out if the aspect is not set to ZOOM 1 Display the menu MENU Menu 2 Select the menu from menu bar Select desired menu using from menu bar and press 3 Select the item and adjust Select desired item using You can also access to desired menu using Adjust the item Using Set change the item Using 103 ...

Page 104: ... intensity Contrast Brightness Color Tint Sharpness Adjusts the color brightness etc for each picture mode to suit your preference Display range Contrast Color Sharpness 0 100 Brightness Tint 50 50 Color temp Selects color temperature preference from cool bluish to warm reddish or normal Vivid color On Off Enhances green and blue color reproduction especially outdoor scenes Adaptive backlight cont...

Page 105: ...by Menu Picture scroll down to C A T S and turn it off Or Menu Picture Picture mode then select viewing mode such as Custom Video NR Auto High Mid Low Off Reduces noise commonly called snow Leave it off when receiving a strong signal Gray out conditions Pure direct menu is set to On MPEG NR Strong Medium Weak Off Reduces noise of specific digital signals of DVD Cable box etc Gray out conditions Pu...

Page 106: ... areas W B low R G B 50 Adjusts the white balance for dark red green blue areas Reset to defaults Resets W B detail adjustment to factory defaults settings Gamma detail adjustment Gamma Gamma correction Adjusts the intermediate brightness of the image Reset to defaults Resets Gamma detail adjustment to factory defaults settings Reset to defaults Resets all Pro settings adjustments to factory defau...

Page 107: ...ased content by transforming 24 fps to 30 fps non HDMI Available for interlaced content 480i or 1080i via analog source Black level Light Dark Select Dark when details are washed out in dark areas of picture 3D Y C filter On Off Minimizes rough edges dot crawl in the picture from a composite source 107 ...

Page 108: ...ects the screen area displaying the image for FULL aspect On Enlarges the image to hide the edge of the image Off Displays the image in the original size Set to On if noise is generated on the edge of the screen H size Adjusts the horizontal display range to reduce noise of both side edges of an image Gray out conditions Photo content Zoom adjustments Adjusts vertical position and size when FORMAT...

Page 109: ...creen off when you select The sound is active even if the screen turns off Press any buttons to turn the screen on This feature is effective in reducing power consumption when listening to the sounds without watching the TV screen 109 ...

Page 110: ...Other settings Reset to defaults Resets all picture adjustments to factory default settings except for the advanced settings 110 ...

Page 111: ...ity for watching news drama etc User Adjusts the sounds manually by using the equalizer to suit your favorite sound quality For the User mode Equalizer will appear on the Sound Menu instead of Bass and Treble Select Equalizer and adjust the frequency Gray out when using the Home Theater Bass Increases or decreases the bass response Gray out if Sound mode is set to User Gray out when using Home The...

Page 112: ...requency level by using the cursor button To enhance the bass sound raise the level of the lower frequency To enhance the treble sound raise the level of the higher frequency To reset the levels of each frequency to the default settings select Reset to defaults by using the cursor button and then press the button Gray out when using Home Theater Balance Emphasizes the left right speaker volume Gra...

Page 113: ... Off when using external speakers A I sound On Off Equalizes overall volume levels across all channels and external inputs Gray out when using Home Theater Volume leveler Minimizes volume disparity after switching to external inputs Gray out when using Home Theater Preferred audio type Main Audio Hearing Impaired Visually Impaired Allows setting of the accessible audio format when its broadcast an...

Page 114: ...lid audio format when HDMI viewing Auto When the TV speakers are active audio format is fixed to PCM When the sound is delivered from theater speakers audio format is fixed to Bitstream Bitstream Dolby Audio Dolby Digital Dolby Digital Plus is output as Dolby Audio Bitstream Other digital audio output signals are output as PCM PCM Digital audio signal is output as PCM HDMI input Digital Analog The...

Page 115: ...mplete the network settings Network status Tests the connection between the TV to the local router and the Internet Displays Current settings and status screen Network type Wireless settings MAC address IP Address etc Displayed items differ depending on the type of network connection my Home Cloud settings Notices Displays the terms of service VIERA network name Set your favorite name for this TV ...

Page 116: ...d contents from the network equipment smartphone etc Network link Settings for DLNA Server DLNA server On Off Enables to use this TV as DMS for network devices DLNA Certified VIERA Set to On to enable the settings below Registration type Auto Manual Selects the limitation of access to this TV for each device on the home network Auto All the available devices on the home network are accessible maxi...

Page 117: ...nfirm the network connection type is set to Ethernet cable Network services Network settings Network connection Network status Not available when the TV is set to TV as Access Point Delete All Pairings Delete the pairing information for all paired devices Software update Check if software firmware update for the TV is available Press to start the Software update screen Follow directions on the scr...

Page 118: ...Timer Sleep Off timer MENU Menu Timer Sleep Sleep 90 minutes 60 minutes 30 minutes 15 minutes Off Selects how long the TV stays on before it automatically turns off 118 ...

Page 119: ...e manually or automatically via an Internet connection Date Time Sets current date or time Time zone EST CST MST PST AKST HST NST AST Selects your time zone to enable correct automatic date and time settings DST On Off Selects if Daylight Saving Time is currently observed 119 ...

Page 120: ...urns off when no operation of remote and side panel key continues for more than 4 hours Changing the default configuration may increase Annual Power Consumption No signal for 10 minutes Power TV off Stay on To conserve energy the TV automatically turns off when NO SIGNAL and NO OPERATION continue for more than 10 minutes 120 ...

Page 121: ...Setup MY APP setting MENU Menu Setup MY APP setting MY APP setting Assigns your favorite application to MY APP of the TV s remote control 121 ...

Page 122: ...USB device setup MENU Menu Setup USB device setup Remove USB device safely to prevent the damage of the data or device 122 ...

Page 123: ...ame and Program Set Custom in Mode to specify Channel Game and Program settings Channel These channels will be blocked regardless of the program ratings Mode Custom All Off Locks All or Unlocks Off all channels For Custom locks specified channels Set Channel 1 Channel 7 Channel 1 7 Designates channel number to be blocked at any time regardless of its broadcast content Game On Off Restricts access ...

Page 124: ...ed shows to lock according to TV ratings Sets each rating level MPAA U S TV C E L R C F L R MPAA Selects U S movie ratings to lock U S TV U S TV program ratings C E L R Canadian English ratings C F L R Canadian French ratings DRRT This television is designed to support the Downloadable U S Region Rating System when available Currently available only in U S 124 ...

Page 125: ...nnect the box to an AV IN terminal and skip this setting Channel surf mode All Favorite Analog only Digital only Sets the mode to select the channel with the Channel up down button Favorite Only channels registered as FAVORITE Auto program All channels Digital only Analog only Select scan type and press to start scanning automatically After the scanning is completed select Apply All previously sav...

Page 126: ...ds Yes or skips No channels Apply After the editing is completed press to save the settings Cancel Cancels the changes Signal meter Check the signal strength if interference is found or freezing occurs on a digital image If the signal is weak check the antenna If you cannot figure out the problem consult your local dealer Not available if Cable is selected in ANTENNA Cable signal Available only fo...

Page 127: ...çais Selects the screen menu language Preferred SAP language English Spanish French Selects the preferred language for hearing or visually impaired if offered during digital broadcast Preferred language takes precedence over the preferred audio type Available only in the U S 127 ...

Page 128: ...bel of the external equipment Devices connected to external input terminals can be labeled for easier identification during the input selection When you label an input as Not used then it will be hidden from the Input select menu Select Customize to enter your own labels for the input ex Computer 128 ...

Page 129: ... Closed Captions Analog CC1 4 T1 4 Choose the Closed Caption service of Analog broadcasting CC1 4 Information related to pictures Appears at the bottom of the screen T1 4 Textual information Appears over the entire screen Digital Primary Second Service 3 Service 4 Service 5 Service 6 The Digital Closed Caption menu lets you configure the way you choose to view the digital captioning 129 ...

Page 130: ...sed etc Foreground Selects the color of text Foreground opacity Selects the opacity of text Background Selects the color of text box Background opacity Selects the opacity of text box Outline Selects the outline color of text Identifies the settings options on the screen Reset to defaults Resets all Closed Caption settings to factory default settings 130 ...

Page 131: ...turned on and the Play mode is selected Power off link Yes No When Yes is selected and the TV is turned off all connected VIERA Link compatible equipment is also automatically turned off The TV remains on even if the VIERA Link compatible equipment is turned off Unselected device auto off On Off The connected VIERA Link compatible equipment will be turned off automatically when not in use under th...

Page 132: ...dian French Canadian multilingual std Spanish Latin America Spanish Spain Selects the country region of the keyboard connected to this TV Factory defaults Clears all TV settings and memory to factory defaults License Displays the software license information 132 ...

Page 133: ...Other settings MENU Menu Setup Other settings Power save Saving Standard Reduces screen brightness to lower power consumption Eye friendly for viewing in a dark room 133 ...

Page 134: ... press 3 Select the Help menu Select desired menu using and press eHELP TV Self test Version Device information eHELP This screen TV Self test Verifies proper function of the TV for picture and sound Follow the instructions on the screen to complete the self test Version Displays TV s software firmware version Device information Displays the device information of this TV 134 ...

Page 135: ...turned on and functioning correctly Why doesn t the picture look like it is in High Definition Press the INFO button on the remote to confirm the type of signal being received HD signal should be 720p 1080i or 1080p Select a High Definition channel from your HD source Cable Satellite or fiber optic service HD channels sometimes broadcast non HD content Ensure that your HD source HD box Blu ray pla...

Page 136: ... Component and VIDEO connection since these terminals are shared When using an external video source such as a Cable Satellite box or DVD player check that the device is on and functioning correctly Press MENU on the TV s remote control If the menu is displayed then the TV is working recheck above steps Why is the picture snowy when ANTENNA Cable setup is selected When using a cable service withou...

Page 137: ...e FORMAT button on the remote control Check the aspect settings on your external video source such as Cable Satellite box DVD Blu ray Disc player etc Some content such as film based movies are available in extra wide format Top and bottom bars are unavoidable Why is the picture chaotic and or torn and or with a buzz in the speakers Check if electrical products such as kitchen appliances fluorescen...

Page 138: ...MI Check the HDMI cable is connected properly Watching TV Blu ray DVD Game Console etc Connecting and viewing Turn the TV and equipment off then turn them on again Check an input signal from the equipment Watching TV Blu ray DVD Game Console etc Input signal Use equipment compliant with EIA CEA 861 861D 138 ...

Page 139: ...The panel is made up of a few million pixels and is produced with advanced technology through an intricate process Sometimes a few pixels may be bright or dark These pixels do not indicate a defective panel and will have no impact on the performance of the TV Why is the picture brightness changing Turn the C A T S feature off MENU Menu Picture C A T S 139 ...

Page 140: ... by pressing the SAP button on the remote control If the TV is connected to a Panasonic Home Theater via HDMI cable then check VIERA Link controls If the TV is connected to a Home Theater via optical cable then Check the connection the audio system is on the correct input is selected Check HDMI in analog digital audio settings MENU Menu Sound HDMI input 140 ...

Page 141: ...ng Cable or Satellite box check the device s audio settings Example try changing the box s Audio Range to narrow Why is there a clicking ticking or buzzing sound coming from the TV unit When TV power is turned on or shut off there are electrical components that make a click sound This is normal operation Changes in the temperature and humidity of the room may cause thermal expansion and contractio...

Page 142: ...t through your router by an Ethernet cable or a Panasonic Wireless LAN built in 3 Start Network connection wizard then follow the directions on the screen to connect If the connections still fails then check with your Internet service provider or router modem manufacturer if there are firewall content filter or proxy settings that may block the TV from accessing the Internet 142 ...

Page 143: ... Internet If a newer version is available update your TV Follow the on screen instructions do not power off the TV until the update is complete Be patient firmware update may take a while How do I get the software update information and download periodically In the main menu select Network Highlight New software notice Make sure that setting is On When the TV is turned On update message is display...

Page 144: ...x CC must be enabled on the device Closed Caption is available only for supported TV programming and supported contents via Video Composite input Why does the screen and back cover of the TV get warm The main unit radiates heat and some of the parts may become hot This is normal operation and does not affect the performance of the set Ensure good ventilation Do not block the ventilation holes of t...

Page 145: ...will be hidden from the Input select menu To make the input visible again 1 Display the Menu and select Setup 2 Select Input labels from Display customization and press 3 Select desired input and press to change the label Some menu items are grayed out and unable to be selected Why Depending on certain modes or the selected input some options are not available 145 ...

Page 146: ...efaults and settings In the main menu select Setup and then select System Highlight Factory defaults and press Enter your password if locked Confirmation message will be displayed Follow the directions on screen to reset the TV to its original factory defaults 146 ...

Page 147: ...Information Detailed information Support information about the application optional devices operation etc may be found on the following website http panasonic jp support global cs tv English only 147 ...

Page 148: ...t for Media player DLNA MP4 files Video codec H 264 H 265 HEVC MPEG1 MPEG2 Audio codec AAC Dolby Audio Dolby Digital Dolby Digital Plus HE AAC MPEG Audio MP3 MKV files Video codec H 264 H 265 HEVC MPEG1 MPEG2 Audio codec AAC Dolby Audio Dolby Digital Dolby Digital Plus HE AAC MPEG Audio MP3 Vorbis FLV files Video codec H 264 Audio codec AAC MP3 3GPP files Video codec H 264 Audio codec AAC HE AAC 1...

Page 149: ...MPlayer srt sub txt The video file and subtitles text file are inside the same folder and the file names are the same except for the file extensions If there are more than one subtitles text files inside the same folder they are displayed in the following order of priority srt sub txt Some files may not be played back even if they fulfill these conditions Some files may not be played back correctl...

Page 150: ... in diluted mild liquid dish soap 1 part mild liquid dish soap diluted by 100 times the amount of water and then wring the cloth to remove excess liquid Use this cloth to wipe the surface of the display panel then wipe it evenly with a dry cloth of the same type until the surface is dry Do not scratch or hit the surface of the panel with fingernails or other hard objects Furthermore avoid contact ...

Page 151: ...and then wipe it dry with a dry cloth Do not allow any mild liquid dish soap to come into direct contact with the surface of the TV If water droplets get inside the unit operating problems may result Avoid contact with volatile substances such as insect sprays solvents and thinner otherwise the quality of the cabinet surface may be adversely affected or the coating may peel off Do not let articles...

Page 152: ...not use products such as solvents thinner or household wax for cleaning as they can damage the surface coating If using a chemically treated cloth follow the instructions supplied with the cloth Do not attach sticky tape or labels as they can make the surface of the pedestal dirty Do not allow long term contact with rubber vinyl products or the like Doing so will cause deterioration Power cord Wip...

Page 153: ...v 2 000 ...

Reviews: