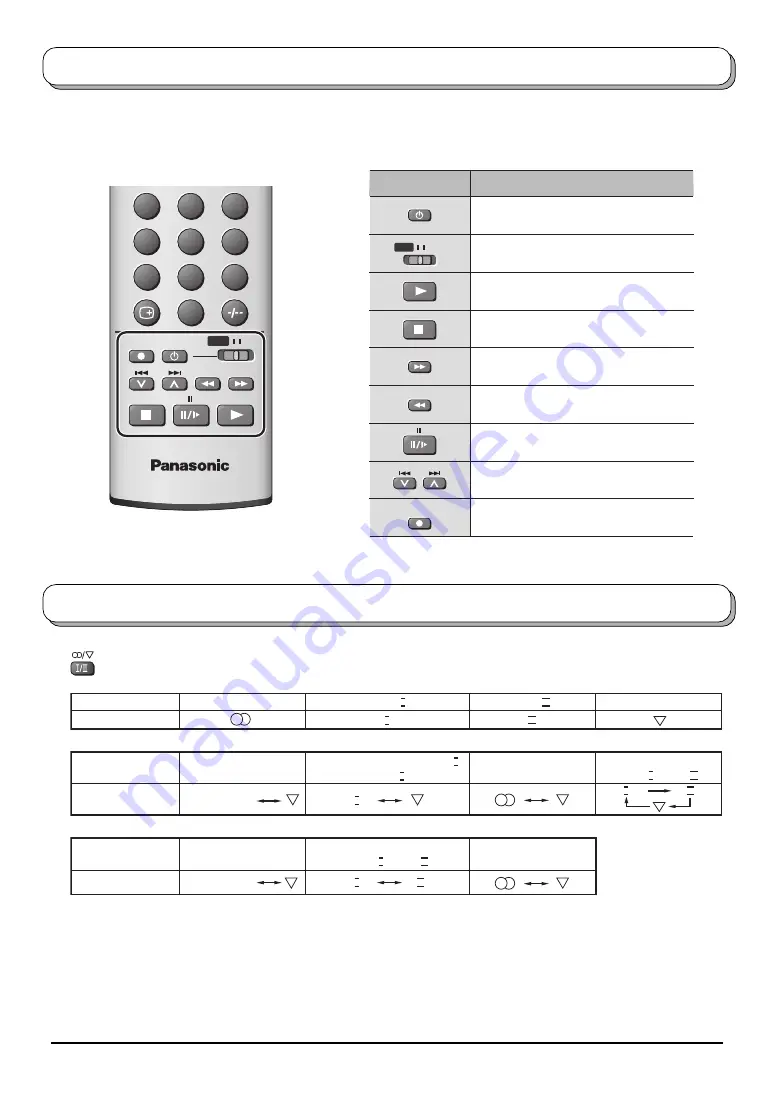
background image

28

VCR / DVD operation

Button

Function

Standby

VCR / DVD selection switch

Play

Stop

Pause / Still

Record

VCR : Fast Forward / Cue
DVD : Slow / Search

VCR : Rewind / Review
DVD : Slow / Search

VCR : Programme Number up / down
DVD : Skip

VCR

DVD

REC

The Remote Control is capable of operating some functions of selected VCR and DVD (Digital Versatile Disc)
equipment. Some VCR and DVD equipment have different functions, so to ensure compatibility please refer to the
equipment’s instruction book or consult your dealer for details.

1

2

3

4

5

6

7

8

9

0

TV

VCR

DVD

REC

When you receive the stereo / bilingual sound system, sound output modes can be selected by pressing
the 

Stereo / Bilingual Sound Selection

 button.

Notes:

• If the stereo signal is poor or the receiving conditions are not optimum or if STEREO:MONO automatic switching

occurs, it is recommended you switch from STEREO to MONO.

• Even when the contents of the receiving signal undergo changes, selection mode is kept intact.
• When the receiving conditions deteriorate, listening will be easier if the mode is set to the MONO position, using

the stereo / bilingual sound selection button.

• DUAL, also known as DUAL MONO or as BILINGUAL is not currently transmitted in some countries.

Type of broadcast

Mode Indicator

Type of broadcast

Mode Indicator

Regular broadcast

(Standard Audio)

NICAM STEREO

STEREO

Mode Indicator

NICAM 

.......Used in New Zealand, Singapore, Hong Kong etc.

I

No Indicator

Regular broadcast

(Standard Audio)

No Indicator

II

I

I

II

I

II

NICAM DUAL MONO

(MAIN I / SUB II )

BILINGUAL or DUAL MONO:

MAIN I / SUB II

A2(German) 

.......Used in Australia, Malaysia etc.

Audio Signal

STEREO

MAIN I

SUB II

MONO

R NICAM MONO I

(MAIN I )

Stereo / Bilingual Sound Selection

Summary of Contents for TC-26LX1H

Page 1: ...No Please read these instructions before operating your set and retain them for future reference English TQBC0895 1 2 3 4 5 6 7 8 9 0 TV VCR DVD MENU REC TV AV N R TUNE OK ASPECT SURROUND CHANGE CHSEA...

Page 2: ...O TUNE via front panel 15 MANUAL TUNE 16 MANUAL TUNE via front panel 16 Channel Allocation 17 PICTURE 18 SOUND 19 SETUP 20 Aspect Controls 21 Still 22 Channel search 22 Multi window 23 Photo View mode...

Page 3: ...y into the socket DO NOT use at a voltage other than indicated Warnings and Precautions DO NOT touch the power plug if your hands are wet Turn the power Off before connecting other electrical equipmen...

Page 4: ...r near the TV set DO NOT insert foreign objects metal or easily flammable objects DO NOT stand or place heavy objects on the unit Particular care should be taken by families with small children DO NOT...

Page 5: ...rgeable Ni Cad batteries They are different in shape and performance and may fail to ensure correct operation Battery cautions The incorrect use of batteries can cause electrolyte leakage which will c...

Page 6: ...between 40 right and left direction How to use the LCD stand Note To avoid interference appearing on the screen do not bundle the RF cable and mains lead together 1 Push down hooks and pull the cover...

Page 7: ...Your local Television Service Centre or Dealer may be able to assist you in obtaining the correct Aerial system for your particular area and the accessories required Any matters regarding Aerial insta...

Page 8: ...on screen selector keys that appear clear after a few seconds If you want to select an input when the keys are not shown press any coloured button and the keys will reappear Note The volume level of t...

Page 9: ...T S VIDEO MONO VIDEO Y PB CB PR CR MONO MONO L R AUDIO AV1 2 IN MONITOR OUT AUDIO IN VIDEO IN L R VIDEO OUT S VIDEO OUT AUDIO OUT R L MONITOR VCR Example of output signal source Amplifier to speaker s...

Page 10: ...be switched on by pressing the button again if it was in Standby mode Note This TV will still consume some power as long as the mains plug is still inserted into the wall socket Power Indicator Remote...

Page 11: ...or AV input see page 8 AV3 terminals see page 8 Headphones jack see page 8 PC Card slot see page 25 SD Card slot see page 25 Multi Window see page 23 Photo View mode button see page 24 27 Press to sto...

Page 12: ...a number of features to store settings after adjustments have been made or options have been set The TV AV button is used to exit the menu system and return to the normal viewing screen An On Screen...

Page 13: ...n useful for example when weather conditions are affecting reception quality of a program To cancel the FINE TUNE tune again by MANUAL TUNE It is possible to skip Program Number on which no TV station...

Page 14: ...erformed the unit memorises the channels tuned in order from Programme No 1 Press the 1 button to view channel 2 Press the 2 button to view channel 4 Press the 3 button to view channel 6 During Positi...

Page 15: ...display the programme now stored on programme position 1 Press the TV AV button at any time to go back to watching TV please read the Notes in the above procedure MENU 1 2 3 4 6 7 8 9 0 OK 5 MENU RET...

Page 16: ...gramme Search and Change sound system Press or to change programme position or start search When the desired station is found press STR to store The programme position will flash Repeat above procedur...

Page 17: ...3 S 1 S 2 S 3 S 1 S 2 S 3 S 1 S 1 S 2 S 3 21 22 23 24 28 57 58 59 62 63 69 90 91 92 93 94 95 96 97 98 99 70 73 74 75 76 77 78 79 80 81 89 100 107 117 118 120 125 100 125 Z10 Z11 Z12 Z13 Z14 Z15 Z16 Z...

Page 18: ...AV4 mode You can change the level of each Item BACKLIGHT CONTRAST BRIGHTNESS COLOUR SHARPNESS NTSC TINT C TEMP AI D PNR and MPEG NR for each MENU DYNAMIC STANDARD and CINEMA according to your personal...

Page 19: ...gher sound output The levels of sound between the left and right speakers can be adjusted to suit your listening position Can be adjusted independently of the TV speakers so that everyone can enjoy li...

Page 20: ...ignals such as certain TV games and rental video tapes may be improved TV AV OFF TIMER CH COLOUR SET CHILD LOCK BLUE BACK VCR GAME 3D COMB TUNING MENU SETUP ON OFF ON OFF OFF ACCESS Displayed during A...

Page 21: ...en you wish to expand a 4 3 picture to fill the whole screen rather than watching a programme with black stripes down the left and right sides of the picture The 4 3 picture will be stretched horizont...

Page 22: ...is pressed to exit the feature Press the Red button to select each channel s freeze frame in turn Press the Green button to watch the selected channel exiting the feature Press the Blue button to watc...

Page 23: ...the main and sub windows are both TV mode these are the same TV channel This operation cannot be made during progressive signal or 1080i signal input Y PB PR Picture out of picture mode The two pictu...

Page 24: ...lease note that our company shall not accept any liability for damage or loss of stored data Before inserting or removing the PC Card make sure that the TV is turned off Otherwise it may damage the un...

Page 25: ...that a card is correctly inserted Press the SD button again to exit Photo View mode Compatible Card miniSD Card requires miniSDTM adapter The media listed in the right column above can be read via th...

Page 26: ...decrease the levels of these options according to your personal preference The picture hue can be adjusted to suit your taste Allows you to set the overall colour tone of the picture Choose from COOL...

Page 27: ...ng three modes 12 images are displayed Press to select desired image Press the OK button to display Single mode Single mode A single image selected from the index area fills the screen You can also ro...

Page 28: ...nditions are not optimum or if STEREO MONO automatic switching occurs it is recommended you switch from STEREO to MONO Even when the contents of the receiving signal undergo changes selection mode is...

Page 29: ...VCR DVD Power button press the manufacturer code enter the two digit code and press the VCR DVD Stop button 1 2 3 4 5 6 7 8 9 0 1 2 3 4 6 7 8 9 0 TV OK 5 Notes After setting execute operation confirma...

Page 30: ...ption may have deteriorated Sound System Picture Sound Colour Controls set at minimum levels Colour System This is a characteristic of liquid crystal panels and is not a problem The liquid crystal pan...

Page 31: ...127 V 165 W 200 240 V 129 W 200 240 V 163 W Standby condition 1 8 W Standby condition 1 8 W Power Off 1 5 W Power Off 1 5 W Wide XGA 1 280 768 pixels 15 9 aspect ratio LCD panel 566 4 mm W 339 8 mm H...

Page 32: ...etain this book plus your purchase receipt as a permanent record of your purchase to aid in identification in the event of theft or loss and for Warranty Service purposes Model Number Serial Number Pr...

Reviews: