background image

Copy Mode

25

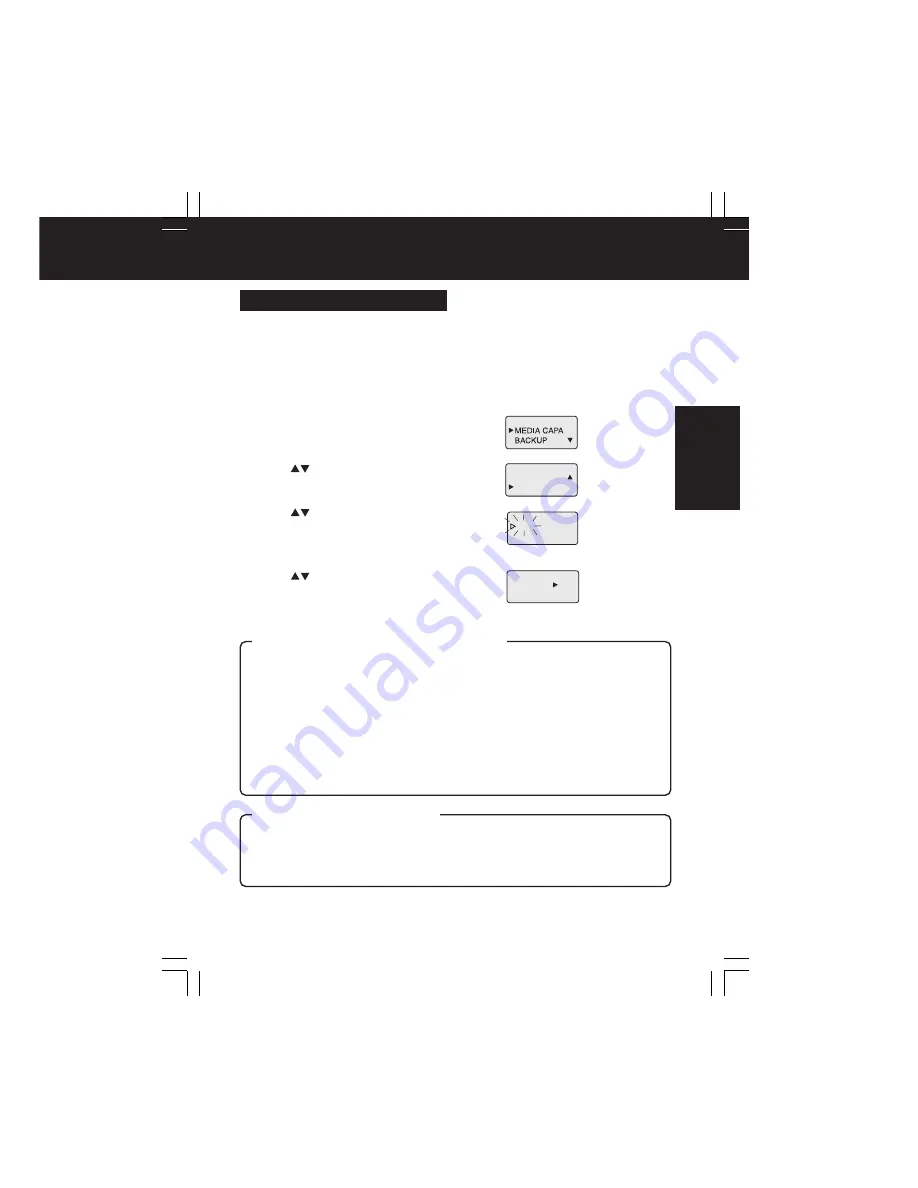
Format the PC Card HDD

1

Display the menu.

 (p. 21)

• See page 22 for menu details.

2

Press 

 to select “HDD-FORMAT”,

then 

press SET.

3

Press 

 to select “YES”, then

press SET

.

• Selected item flashes until SET is pressed.
• Press MENU to redisplay menu.

4

Press 

 to select “YES”, then

press SET

.

• To cancel format, select “NO”.

SD-FORMAT
HDD-FORMAT

YES
NO

FORMAT?

Formatting Cards

• Formatting a PC Card HDD with this unit must be done in Copy mode, not PC mode (USB

connection). However, if the disk has multiple partitions created on a device, such as a
notebook PC, formatting on this unit will restore the disk to a single partition (factory default).
To avoid this, use the same device used previously to format the card.

• Windows 95/98 has a FDISK.EXE utility for managing disk partitions, but it must never be

used to partition a PC Card HDD. Otherwise, the storage capacity of the PC Card HDD will be
reported incorrectly, and it will no longer work properly. Also, do not use Windows 95/98 to
format a PC Card HDD that contains multiple partitions or data in other partitions of the disk
may become corrupted, and any saved data may become unusable.

• Only the first partition of a multi partition disk created on a separate device, such as a

notebook PC will be recognised.

• Also avoid formatting other types of PC Cards using PC mode (USB connection), otherwise

the format may not be mutually recognizable by the computer and the unit, or data corruption
may occur. Always use the unit to format PC Cards.

When a card is formatted, all data saved on the card is irreversibly deleted.

Check the card storage capacity and any data stored on the card, then copy important data
to another drive or card before formatting. Also, since some files types can only be displayed
on a PC, use a PC to check card contents.

• When using this unit to format cards, use only the correct type of card. Always check card

storage capacity and any stored data before formatting.

YES
NO

The product numbers for cards that can be formatted using the unit are given below.
Card product numbers not listed cannot be formatted (as of Oct. 1, 2002).

Matsushita

•RP-PH005A

Toshiba

•PAMHD002
•PAMHD005

Melco

•RHDC-2G
•RHDC-5G

Io Data
Devices

•PCHDT-2Gt
•PCHDT-5Gt

Logitech

•LPM-HD2G
•LPM-HD5G

Kingston

•DP-PCM2/

2GB

•DP-PCM2/

5GB

Caution regarding PC Card HDD Formats

Caution regarding Formatting

Eng.p21-25.p65

2003/02/13, 16:48

25

Summary of Contents for SV-PT1EB

Page 1: ...Before attempting to connect operate or adjust this product please read these instructions thoroughly LSQT0623A Model No SV PT1EB SD Media Storage Operating Instructions Eng p1 5 p65 2003 02 13 16 47 1 ...

Page 2: ... laws Even for the purpose of private use recording of certain material may be restricted Please note that the actual controls and components menu items etc of your SD Media Storage may look somewhat different from those shown in the illustrations in these Operating Instructions Other names company names and product names printed in these instructions are trademarks or registered trademarks of the...

Page 3: ...ent cover is obtained A replacement fuse cover can be purchased from your local Panasonic Dealer IF THE FITTED MOULDED PLUG IS UNSUITABLE FOR THE SOCKET OUTLET IN YOUR HOME THEN THE FUSE SHOULD BE REMOVED AND THE PLUG CUT OFF AND DISPOSED OF SAFELY THERE IS A DANGER OF SEVERE ELECTRICAL SHOCK IF THE CUT OFF PLUG IS INSERTED INTO ANY 13 AMPERE SOCKET If a new plug is to be fitted please observe the...

Page 4: ...g the Battery Pack 17 Inserting the Card 18 Turning the Power On 19 HDD SAFETY Switch 20 Remaining Battery Life Display 20 Before Use Copy Mode Display Indicator 21 Menus 22 Copying 23 Formatting Cards Format the SD Memory Card 24 Format the PC Card HDD 25 TV Mode Setup Setup Connections 26 TV Mode Functions Initial Screen 27 Display Information Displayable Image Formats 28 Folders and Files 28 Im...

Page 5: ...ode Warning and Instruction Displays 52 Reset Function 54 Before Requesting Service 55 Specifications 57 ForYour Information Slide Show Settings Selecting Images 32 Setting Screen Transition Effects Speed 33 Presentation Performing Presentation 34 Selecting Presentation Content 35 Editing Deleting Images DELETE 36 Copying Images COPY 37 Protecting Images PROTECT 38 How to Select Images 39 Full Scr...

Page 6: ...lic of Ireland customers only www panasonic co uk Order accessory and consumable items for your product with ease and confidence by telephoning our Customer Care Centre Mon Friday 9 00am 5 30pm Excluding public holidays Or go on line through our Internet Accessory ordering application Most major credit and debit cards accepted All enquiries transactions and distribution facilities are provided dir...

Page 7: ... drop this unit Do not place objects on top of this unit and do not drop objects onto this unit Do not attempt to twist or apply excess pressure to this unit Do not use this unit s jacks for purposes other than those specifically designated for each jack Always ensure that the cables are properly connected Do not insert foreign objects into this unit The battery and the storage media are the only ...

Page 8: ...e Battery will no longer be rechargeable Keep the Battery terminals clean Card Data Protection Refer to page 10 for details on compatible cards Do not unplug the AC adaptor or disconnect the USB cable connecting a PC while this unit is in operation Do not remove the card while it is being accessed Be sure the card does not contain important data before formatting it Formatting irreversibly deletes...

Page 9: ... When holding the PC Card HDD always hold it by the outside edges Do not remove the label that is attached to the PC Card HDD If this label is removed you may not be eligible for warranty service or other services Before removing the PC Card HDD from its special carrying case make sure that the side of the case labeled PC Card HDD is facing upwards If the case cover is opened and the labeled side ...

Page 10: ...Windows 2000 shall refer to Microsoft Windows 2000 Professional In this manual the name Windows Me shall refer to Microsoft Windows Millennium Edition In this manual the name Windows XP shall refer to Microsoft Windows XP Home Edition or Microsoft Windows XP Professional Before Using Compatible Card DCIM Folder The digital camera creates this folder automatically 100_PANA Folder Folder names consi...

Page 11: ... to a Memory Card The contents of the BACKUP folder cannot be checked during TV mode Use the computer to check the contents at this time Secure data files audio files that include copyright restrictions will not be copied The portion of the CARD folder name is assigned automatically in numerical order within the range of A001 A999 B001 Z999 Because of this please do not change the file names yours...

Page 12: ...ces such as digital cameras digital video cameras etc that allow you to do so See the device manual If no MISC folder has been created on the card to which the data will be copied the MISC folder will also be copied When copying a DCIM folder name e g 100_PANA and that name already exists on the card change the name to 101_PANA before copying If an overwrite operation is about to occur in a folder...

Page 13: ... zooming rotating and enhancing colours for the data stored on a card while viewing the data on a TV screen Only JPG TIF and MOV type files can be displayed Other files require the unit to be in PC Mode or PC Mode pp 44 51 In PC mode the unit is connected to a computer using a supplied USB cable allowing the unit to function as an external disk drive The data on the card inside the unit can then b...

Page 14: ...s battery level data transfer progress and various menus pp 20 25 With USB cable connection displays card selection options p 46 Cursor Buttons Moves the cursor up down left and right MENU Button Displays Clears menu SD Memory Card Slot Open to insert remove SD Memory Card or MultiMediaCard p 18 STANDBY Button Press this button for approx 2 seconds to turn power ON OFF SET Button Executes selected...

Page 15: ...upplied USB cable it can function as an external drive pp 44 51 S V Output Connector You can use the supplied video cable to connect this unit to the S Video or Video terminals of a TV to view images p 26 DC Input Connector Power Supply This unit can be supplied with external power by connecting the AC adaptor supplied to this connector pp 17 26 44 HDD SAFETY Detection Switch This switch pops out ...

Page 16: ...s unit or subject it to strong impacts 1 Open the carrying case 2 Insert this unit into the lower compartment 3 Insert the PC Card HDD case into the upper compartment with the PC Card HDD mark facing upwards 4 Close the carrying case When transporting the unit always turn off the power and insert the PC Card HDD into its case and then place the case inside the carrying case Attaching the Hand Stra...

Page 17: ...it will not be used for a long period Do not install remove battery or plug in or unplug the AC adaptor with unit power ON This may cause unit damage or loss of data Do not unplug AC adaptor while recharging POWER Lamp Indications During Charging During normal charging the POWER Lamp flashes in approx 1 second intervals Charging usually finishes in about 90 minutes However if the lamp flashes fast...

Page 18: ...DD or PC Card all the way into the slot 3 Close the cover To remove Card Press EJECT TAB twice Always insert card in the correct direction Failure to do so may result in damage to the card and this unit The PC Card HDD and Memory Card are precision devices Do not subject them to excessive pressure or strong impacts If the card door does not close completely remove the card check insertion orientat...

Page 19: ...rating mode in sequence p 13 Note If using the unit on battery power only the power will turn off automatically if no unit operations are carried out for 5 minutes in order to conserve battery power The power cannot be turned off while the HDD SAFETY Detection Switch has been activated p 20 In case of a power outage the unit utilises the supplied battery as a backup in order to protect the unit an...

Page 20: ... the HDD SAFETY Detection Switch is activated while the unit is connected to a PC SAFETY MODE PUT IT DOWN will appear on the unit LCD Copy operation in progress at this time will be suspended and computer errors may also occur Remaining Battery Life Display When the BATT and the battery icon start flashing all buttons except power off are inoperable Connect the AC adaptor or recharge the battery I...

Page 21: ...ups set TV formats and format cards If unit is on battery power only power shuts off automatically if you perform no operation for 5 minutes to conserve battery POWER Lamp When using battery When using AC adaptor When a PC Card HDD is inserted Press SET If a button is not pressed within 10 seconds Press MENU Copying p 23 Menus p 22 When HDD SAFETY is ON and is activated p 20 the PC Card HDD cannot...

Page 22: ...et to OFF TV Format Selection NTSC PAL This unit can be set to the TV format used in your country NTSC or PAL NTSC is the TV format used in countries such as the United States Canada and Japan and PAL is used in some European countries and Oceania Formatting Cards SD FORMAT HDD FORMAT Formatting a card irreversibly erases all contained data 1 Display the menu as described on page 21 Press MENU aga...

Page 23: ...than a PC Card HDD is inserted copy will be done in the folder structure of the Memory Card used When copying from HDD SD only the CARD folder on the HDD can be copied When unit is on battery power only not pressing a button for 10 seconds changes display to show battery life remaining Press SET to resume previous operation Copying cannot be done if Memory card is write protected Secure data inclu...

Page 24: ...atting procedure If error reoccurs the SD Memory Card may be damaged SD Memory Card can also be formatted on some digital cameras Refer to digital camera manual Note SD Memory Cards formatted under Windows XP may be FAT 32 format because FAT 32 is the default format selected for this OS This unit and many digital camera types do not support FAT 32 A FAT 32 formatted SD Memory Card should be reform...

Page 25: ... corrupted and any saved data may become unusable Only the first partition of a multi partition disk created on a separate device such as a notebook PC will be recognised Also avoid formatting other types of PC Cards using PC mode USB connection otherwise the format may not be mutually recognizable by the computer and the unit or data corruption may occur Always use the unit to format PC Cards Whe...

Page 26: ...wer shuts off automatically if no operation is done for 5 minutes to conserve battery The USB cable must be disconnected from the unit to use TV Mode Otherwise the unit switches to PC Mode automatically Always power down this unit before inserting removing the card You can view DSC photos and PC presentation files on a TV when it is connected to this unit Refer to next page for available functions...

Page 27: ...ect card for display then press SET IMAGE DISPLAY Image files stored on the card are displayed in the Index Area They can be searched by image date p 29 Images can be shown full screen and you can use the zoom rotate add colour effects image information and delete functions pp 40 43 ALBUM Index area images can be displayed in a 6 or 9 image album screen p 30 Also when a single image is selected yo...

Page 28: ...d in the Index Area p 27 are described in the table below Refer to page 10 for details on the folder structure File and folder names will not be displayed correctly if more than 8 characters are used spaces and special symbols are used Use care when changing file and or folder names Note Folder JPEG File TIFF File MOV File Protect Blue Pink Grey Folder contains displayable images Folder contains p...

Page 29: ...Index Area in order beginning with the most recent date Note SEARCH DATE This searches through the folders and files in the Index Area by date To search for files within folders display the images within the folder and then start the search a Press to select the year then press to move the cursor to the next item Now repeat to select month and day b Press SET A search begins for files created on o...

Page 30: ...E SELECT then move cursor over the image and press SET p 40 Images in the index can be displayed on a TV screen in groups of 6 or 9 at a time like a photo album To return to Index Area When 6 IMAGES is selected 1 Select Album display then press MENU 2 Press to select WALL BRIGHTNESS then press 3 Press to select GRAY 1 GRAY 2 or GRAY 3 and then press SET If using a normal TV use the BLACK setting W...

Page 31: ... of saved files is great it may take time to go into Pause Stop mode You can display selected images as a Slide Show in a variety of transition effects and speeds The Sub Menu will disappear if MENU is pressed while the Sub Menu is displayed Selecting RETURN TO MENU will redisplay the Main Menu Selecting RETURN changes the display back one level Selecting EXIT returns display to first level of hie...

Page 32: ...d image Repeat Step 3 until all images for the Slide Show are selected Images will be displayed in the order selected Images in a folder must first be displayed in the index for selection p 29 4 Press MENU when selection is complete 5 Press to select YES CONTINUE or CANCEL then press SET YES To exit setup CONTINUE To continue selection CANCEL To cancel image selection 6 Press to return to SLIDE SE...

Page 33: ...desired transition speed then press SET FAST images change every 2 seconds NORMAL images change every 5 seconds SLOW images change every 10 seconds If larger file size images are included display takes longer and transition time may exceed the selected setting 4 Press to return to SLIDE SETUP Setting Screen Transition Speed The Sub Menu will disappear if MENU is pressed while the Sub Menu is displ...

Page 34: ... to select a folder then press SET The first slide is displayed Performing Presentation To display the next slide Press Pressing displays previous slide To exit presentation Press CANCEL Selecting RETURN TO MENU will redisplay the Main Menu Selecting RETURN changes the display back one level Selecting EXIT returns display to first level of hierarchy p 29 Slides will be presented in the order they ...

Page 35: ...NTINUE To continue selection CANCEL To cancel selection and return to menu To unselect images Press to select RELEASE then press SET The selected images are returned to the their original state To preview the presentation contents REHEARSAL Press to select REHEARSAL then press SET Each slide will appear approx 2 seconds Pressing CANCEL will cancel this operation Pressing SET will pause this operat...

Page 36: ...be deleted unless protection is cancelled p 38 To select a file within a folder it must first be displayed in the index p 29 For select delete follow How to Select Images instructions on page 39 4 Press to select YES then press SET The selected images will be deleted To cancel the operation select NO TV Mode Editing You can delete images from a card copy data from one card to another and protect d...

Page 37: ... the other card To cancel the operation select NO TV Mode Editing Copying Images COPY Example when selecting SELECT Copy data from one card to another A card to receive copied data must be inserted The Sub Menu will disappear if MENU is pressed while the Sub Menu is displayed Selecting RETURN TO MENU will redisplay the Main Menu Selecting RETURN changes display back one level Selecting EXIT return...

Page 38: ...ss to select SET then press SET The image or folder will be protected A key icon appears in the upper left corner of the image To cancel protection of an image select RELEASE TV Mode Editing Protecting Images PROTECT Important file data can be protected from accidental deletion The Sub Menu will disappear if MENU is pressed while the Sub Menu is displayed Selecting RETURN TO MENU will redisplay th...

Page 39: ...cels selection appears in the bottom right corner of the selected image Repeat Step 1 until all desired images are selected 2 Press MENU when image selection is finished Pressing MENU again resumes selecting operation 3 Press to select YES CONTINUE or CANCEL then press SET YES To finish selection CONTINUE To continue selection CANCEL To cancel selection and return to menu How to Select Images Eng ...

Page 40: ... Also you can use zoom rotate add colour effects display image information and delete the image Selecting Images To display the next image Press to display next image in the current index Press for previous image 1 Display an album p 30 2 Press MENU 3 Press to select FILE SELECT then press SET Display an Image from an album To display the next image Press to display next image in the current album...

Page 41: ...e a Select DELETE from the zoom menu then press SET b Press to select YES then press SET With a full screen index or album image displayed you can zoom rotate add colour effects and display image information Press MENU to display the sub menu for function selection Selecting RETURN then pressing SET redisplays the index or album Sub menu functions are described on pages 41 43 Before operating any ...

Page 42: ...Rotating an Image ROTATE To save rotated images Select SAVE from the rotate menu then press SET Image will hereafter be displayed in the saved form Selecting RETURN redisplays previous menus one by one To temporarily exit the sub menu press MENU Pressing MENU again displays the menu previous to the one just exited MOV files and some other types of rotated image files cannot be saved Note When LEFT...

Page 43: ... the sub menu then press SET p 41 When a single image is displayed in a full screen the image information will remain constantly displayed Once this setting is made information will appear on any image displayed in full screen while the unit is on Properties is cancelled when unit is turned off Displaying Image Information PROPERTIES To cancel properties display Repeat the above procedure You can ...

Page 44: ...re Setup Connections Connect USB cable correctly referring to the symbol on the PC USB port For more on USB connection see your PC manual For PC connection a fully charged battery must be installed followed by the AC adaptor Without a battery installed power will not be supplied It is recommended that you charge the battery fully before use Never disconnect USB cable or AC adaptor during communica...

Page 45: ...ws has finished installing the software that your new hardware device requires displayed click on Finish Only for Windows 98SE Selecting Return redisplays previous menus one by one Once the USB driver is installed successfully it need not be installed again for USB connection After installation double click the My Computer icon and confirm that a Removable Disk icon was added to the drive icon lis...

Page 46: ...ed p 44 it will be recognised as a Removable Disk You can then copy move delete and display files on this unit the same as with a normal disk drive HDD Lamp SD Lamp Drive letters e g H and method of opening My Computer may vary depending on the PC With USB cable connected the Removable Disk icon will not appear while the SD or HDD Lamp flashes as the PC checks the connection Check for the icon onc...

Page 47: ... the data Always follow above procedure when removing USB cable With Windows 98SE there is no special Safety Remove Hardware operation If using Windows 98SE do not repeatedly remove and connect the unit or repeatedly switch the computer to standby or off while the unit is connected PC Card HDD can be directly inserted into Card Slot of a PC and used as a disk drive However always click on the PC c...

Page 48: ... executed If PowerPoint has not been installed a warning is displayed Click OK then install PowerPoint 4 Click on Next 5 Confirm installation destination then click on Next To install into another folder click on Browse and select a folder 6 Click on Finish If you do not want to restart the computer right away select No I will restart my computer later 7 Be sure CD ROM access light is out before r...

Page 49: ...are processed to reduce TV screen flicker It is advisable to leave this option checked 6 Click on Create Conversion of PowerPoint files to JPEG files is started Afterward It was created is displayed 7 Click on OK 8 Check the created folder a Confirm that a save destination folder was created on the PC b Disconnect the USB cable correctly p 47 c Switch to TV mode and confirm the folder color is pin...

Page 50: ...ing JPEG Addin Software For Windows XP log in with the same username used when software was installed 1 Right click the My Computer icon and then select Properties The System Properties screen will be displayed 2 Click the Device Manager tab 3 Select Panasonic SD Media Storage USB then click Remove 4 Click on OK 5 Click on Refresh The Add New Hardware Wizard will start Refer to page 45 for details...

Page 51: ...d while the HDD Lamp flashes If the HDD Lamp stays off and the PC screen does not return to its previous state press Enter once more If this has no effect disconnect the USB cable and restart the computer After processing is complete check that the required operation has completed normally Repeat the operation if necessary For Windows 2000 XP If the HDD SAFETY Detection Switch is activated while t...

Page 52: ...ny key then reset the unit p 54 or turn the power off then back on again and repeat copying operation The HDD SAFETY Detection Switch has activated and the HDD has stopped for protection Place the unit on a flat level surface SD Memory Cards formatted to FAT32 specifications cannot be used Format will be displayed Transfer desired files to PC then format the card pp 24 25 Secure data files audio f...

Page 53: ...AC adaptor Selection cannot be changed between a PC Card HDD PC Card and an SD Memory Card during data transfer between the unit and a PC Wait for transfer to finish then make your selection Insert the battery Data transmission was interrupted Disconnect the USB cable Check that the battery and AC adaptor are connected correctly then reconnect the USB cable The mode is being changed Please wait a ...

Page 54: ...ect files The battery is spent Operation will be cancelled and power will turn off Recharge the battery The battery is spent Copy operation will stop and power will turn off Recharge the battery The operation timed out due to no selection during a Slide Show presentation copying deleting or file protecting operation Repeat the selection Battery level is getting low Turn off the power and recharge ...

Page 55: ...d or copied Turn unit off after SD HDD access Lamp goes out Power will not turn off when HDD SAFETY Detection Switch is activated Place unit on flat level surface then turn off the power Insert card correctly Be sure copy destination has sufficient free space Delete unnecessary data to free up space If HDD SAFETY Detection Switch was activated place unit on flat level surface Secure data files aud...

Page 56: ... frame of QuickTime format data can be displayed When the USB cable is connected ensure that the battery has been installed then connect the AC adapter Connect USB cable properly Select a read or write destination card Correctly install PC Card HDD in this unit If HDD SAFETY Detection Switch was activated place unit on flat level surface The PC Card HDD is a precision hard disk drive If it is drop...

Page 57: ...840 pixels Copy Functions Copy Mode Copying of all data from SD Memory Card MultiMediaCard PC Card HDD PC Card Copying of selected folders from PC Card HDD PC Card SD Memory Card MultiMediaCard TV Mode Copying of all data and selected files and folders from SD Memory Card MultiMediaCard PC Card HDD PC Card Copying of all data and selected folders from PC Card HDD PC Card SD Memory Card MultiMediaC...

Page 58: ...mensions 54 W x 5 H x 86 D mm 2 2 16 W x 1 15 16 H x 3 6 16 D inch Video Output Composite Output NTSC format PAL format 1 V p p 75 ohm S Output Y and C signals NTSC format PAL format 1 V p p 75 ohm Dimensions 73 W x 25 8 H x 107 5 D mm 2 14 16 W x 1 H x 4 4 16 D inch Weight 5 63 oz 160 g Not including PC Card HDD and battery pack Operating Weight 8 8 oz 250 g Operating Temperature 32 F 95 F 0 C 35...

Page 59: ...For Your Information 59 Memo Eng p57 60 p65 2003 02 13 16 48 59 ...

Page 60: ...Matsushita Electric Industrial Co Ltd Web Site http www panasonic co jp global Printed in Japan LSQT0623A S0203A0 B Eng p57 60 p65 2003 02 13 16 48 60 ...

Reviews: