background image

PR

^Çî~åÅÉÇ=cìåÅíáçåë

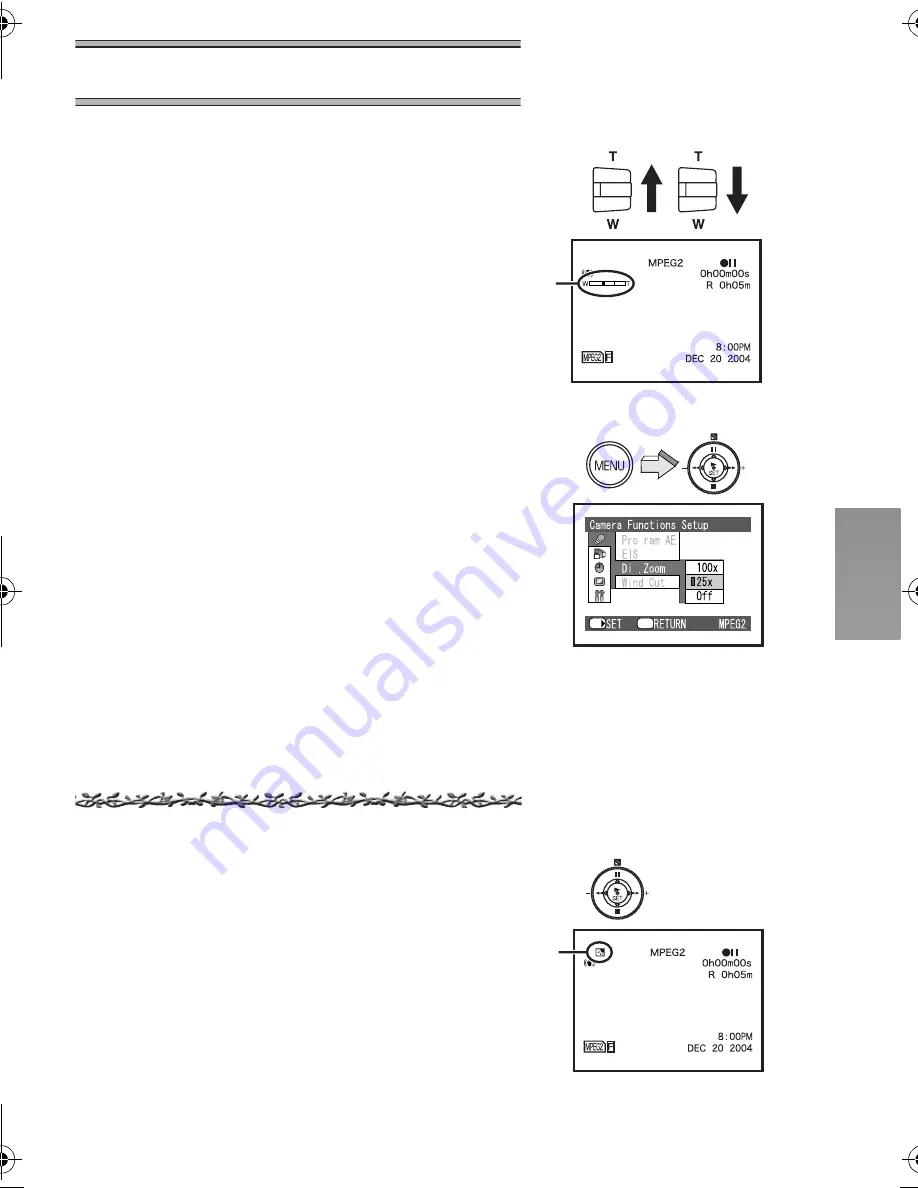
wççã=fåLlìí=cìåÅíáçåë

Allows the user to vary the field of view that will be 
photographed.

Set the Recording Mode

N

For close-ups (zoom in):
Push the [T/W] Lever towards [T].
For wide-angle shots (zoom out):
Push the [T/W] Lever towards [W] 

Zoom indication 

1

 is displayed for a few 

seconds.

For other notes, see page 82.

ª

Digital Zoom Function

This function is useful when you want to record 
close-up shots of subjects located beyond a normal 
zoom range of 1 time to 10 times magnification.
With the Digital Zoom Function, you can select a 
magnification of 25

a

 or even to 100

a

.

Set [Dig. Zoom] on [Camera Functions Setup] to 
desired mode.

25

a

: Digital Zoom Functions to 25 times

100

a

: Digital Zoom Functions to 100 times

When magnification ratio exceeds 10 times, it 
changes to digital zoom.

As the magnification of Digital Zoom increases, the 
quality of image may deteriorate.

_~ÅâäáÖÜí=`çãéÉåë~íáçå=
cìåÅíáçå

This prevents a recording subject from being recorded 
too dark in backlight. (Backlight is the light that shines 
from behind a recording subject.)

Set the Recording Mode

1

Press the [

ª

] Button.

The [

ª

] Indication 

A

 is displayed.

Press the [

ª

] Button again to resume Normal 

Recording mode.

For other notes, see page 82.

1

1

N

SET/

Menu

g

g

A

AV100PP.book  35 ページ  2003年8月22日 金曜日 午後4時30分

Summary of Contents for SV-AV10A Operating

Page 1: ...AV100 Before use please read these instructions completely VQT0F57 For USA assistance please call 1 800 211 PANA 7262 or send e mail to consumerproducts panasonic com For Canadian assistance please call 1 800 561 5505 or visit us at www panasonic ca PP ...

Page 2: ... computer Article 5 Reverse Engineering Decompiling or Disassembly Licensee may not reverse engineer decompile or disassemble the Software except to the extent either of them is permitted under law or regulation of the country where Licensee resides Matsushita or its distributors will not be responsible for any defects in the Software or damage to Licensee caused by Licensee s reverse engineering ...

Page 3: ... back Still Pictures 33 Play Back All of the Still Pictures One by One Slide Show 34 Çî åÅÉÇ cìåÅíáçåë Zoom In Out Functions 35 Backlight Compensation Function 35 Adjusting White Balance 36 Manual Exposure Adjustment 37 Manual Focus Adjustment 37 Recording in Special Situations Program AE 38 Digital Electronic Image Stabilizer Function 39 Wind Noise Reduction Function 39 Using the Play Menu Functi...

Page 4: ...eo Camera Please read these Operating Instructions carefully and keep them handy for future reference fåÑçêã íáçå Ñçê vçìê p ÑÉíó IMPORTANT Please respect all copyrights Whatever you have recorded and created can be used for your personal entertainment only Under copyright laws other materials cannot be used without obtaining permission from the holders of the copyrights WARNING TO REDUCE THE RISK...

Page 5: ...the page to be referred to Note that the SD Video Camera may not play back data recorded or created on another product and another product may not play back data recorded on the SD Video Camera The nameplate of the SD Video Camera is fixed on the bottom of the battery compartment Extremely high precision technology is employed to produce the LCD Monitor screen featuring a total of approximately 12...

Page 6: ...t and receiver Connect the equipment into an outlet on a circuit different from that to which the receiver is connected Consult the dealer or an experienced radio TV technician for help FCC Caution To assure continued compliance follow the attached installation instructions and use only shielded interface cables with ferrite core when connecting to a computer or peripheral devices Any changes or m...

Page 7: ... This product is capable of recording in the MPEG2 format producing video quality that is comparable to digital camcorders To achieve this level of performance large amounts of data must be written to the SD card in real time The read and write speed of the SD card may differ from manufacturer to manufacturer In MPEG2 motion image recording SD card with the high speed transmission rate of 10 MB s ...

Page 8: ... CGA S302A l 12 Supplies power to the SD Video Camera 3 AC Cord K2CA2EA00002 l 12 4 USB Cable K2KZ4CB00002 l 63 5 Remote Controller N2QACC000005 and Button Type Battery CR2025 l 68 6 AV Cable K2KC4CB00009 l 54 55 7 Hand Strap VFC4012 l 68 8 AV Cradle VSK0653 l 13 9 Lens Cap VGQ7448 and Lens Cap Cord VFC4035 l 68 ...

Page 9: ... manual describes installation only 11 Card Case Movie Stand VFC4032 l 69 and SD Memory Card 512 MB RP SDH512VE0 l 14 12 Wearable Carry Case VFC4020 Put the SD Video Camera in the Wearable Carry Case supplied after use or when carrying it léíáçå ä ÅÅÉëëçêó 1 Battery Pack CGA S302A 1B l 12 Supplies power to the SD Video Camera 5 1 2 ...

Page 10: ...n 6 5 1 SET l 18 29 30 33 Backlight Compensation ª l 35 12 Menu Button MENU l 18 13 Recording Playback Mode Selector Button REC PLAY l 17 14 Mode Selector Button MODE l 17 15 Microphone built in stereo 16 Reset Button RESET l23 87 17 Speaker 18 Zoom Lever T W l 35 Volume Adjustment Lever rVOLs l 31 19 Recording Start Stop Button l 27 28 32 55 20 AV Cradle Connector MULTI l 13 21 Strap Holder l 68 ...

Page 11: ...p Í l 13 32 Release Button l 13 33 Device Connector l 13 34 Mode Selector Button MODE l 17 35 Recording Playback Mode Selector Button REC PLAY l 17 36 Menu Button MENU l 18 37 Multi function Button Operating Select Function 6 5 1 SET l 18 29 30 33 38 Recording Start Stop Button l 27 28 32 55 39 Zoom Button T W l 35 Volume Adjustment Button rVOLs l 31 25 26 27 30 31 32 33 35 34 36 37 38 39 28 29 ...

Page 12: ...nect the DC Input Lead to the DC IN 4 9V socket on the SD Video Camera 4 Connect the AC Cord to the AC Adaptor and the AC Main socket Power Lamp 1 flashes and Charging starts When recharging turn the power of the SD Video Camera off 5 Wait until Power Lamp 1 goes off When recharging is completed Power Lamp 1 goes off If the Power Lamp flashes quickly or slowly when recharging recharging is not nor...

Page 13: ...ooves 1 of the SD Video Camera fit in the leading protrusions 2 Q Push the tray until you hear it click R Connect the DC Input Lead to the DC IN 4 9V socket on the AV Cradle S Connect the AC Cord to the AC Adaptor and the AC Main socket Power Lamp C flashes and Charging starts When recharging turn the power of the SD Video Camera off When recharging is completed Power Lamp C goes off Be sure to tu...

Page 14: ...ory Card Slot horizontally Turn off the SD Video Camera before inserting removing a Card P Close the Card Slot Cover securely ªRemoving the Memory Card Open the Card Slot Cover and press the center of the Card A and then pull it straight out B After removing the Card close the Card Slot Cover The SD Video Camera may be damaged if the Card is forced out when the Card is fully inserted Keep the SD M...

Page 15: ...osition of the LCD Monitor is set to 2 or 4 when you select the Recording Mode only the indication which is limited REC pause REC or Warning appears on screen display If you desired the indication returned to normal set position of the LCD Monitor to 1 or 3 The LCD image may appear slightly brighter than the actual recorded image This is done intentionally to provide better visibility when the cam...

Page 16: ...isplayed However recording images are recorded normally If a general Warning indication appears return the LCD Monitor to the Vertical style in order to verify contents l 71 ªUsing the Multi function Button In this SD Video Camera the Multi function Button is tilted to the right to 45 degrees in order to make it easy to do operation in both the Vertical and Horizontal Style Move the cursor and sel...

Page 17: ...ge 79 ªAbout the Operation Modes Six operation modes are provided as follows Motion image MPEG2 Motion image MPEG2 format recording mode l 27 Motion image MPEG2 format playback mode l 29 Motion image MPEG4 Motion image MPEG4 format recording mode l 28 Motion image MPEG4 format playback mode l 30 Still picture PICTURE Still picture JPEG format still picture recording mode l 32 Still picture JPEG fo...

Page 18: ...ub Menu and then press the 1 SET Button R Press the side of the Multi function Button to select a desired item and then press the 1 SET Button S Press the MENU Button Menu screen disappears and the selected item is now being set Return to the menu one before Press the 6 side of the Multi function Button Press the MENU Button when playing back the motion image or still picture to edit the file bein...

Page 19: ... 8 Date and Time Indication Indication l 23 9 Date and Time Setting Date Set l 22 Display Setup 10 OSD Indication OSD Output l 25 11 LCD Brightness Adjustment LCD Bright l 24 12 LCD Color Adjustment LCD Color l 24 Initial Setup 13 Beep Sound Beep This SD Video Camera will emit sound when the power switch is changed over the REC Button is pressed or other operations are engaged If you do not need o...

Page 20: ...ist Play l 44 6 Creating the Play List Create l 43 7 Editing the Play List Edit l 44 8 Edit a title of the Play List Title l 46 9 Deleting a Play List Delete l 47 Program 10 Switching a Program Switch l 48 11 Playing back the Program Play l 48 12 Edit a title of the Program Title l 49 Go To 13 Go to Top of List Top l 50 14 Go to End of List End l 50 MPEG2 mode only 1 2 3 ETC 4 5 6 7 8 9 ETC 10 11 ...

Page 21: ...atting a Card Format Card l 51 Others 18 Setting a Repeat Playback Repeat Play l 52 19 Display Mode Display l 53 PICTURE mode Scene 20 Setting DPOF DPOF l 42 Others 21 Setting a Slide Show Slide Show l 53 The other functions of PICTURE mode are the same as those of MPEG4 mode 18 19 ETC ETC 15 16 17 20 ETC ETC 21 ...

Page 22: ...tup and then press the 1 SET Button P Select Date Set and press the 1 SET Button Q Press the 6 5 side of the Multi function Button to set the desired Date and Time 6 5 Select the item Change the value Year will cycle in the order shown below 2003 2004 2079 2003 R Press the 1 SET Button A verification message appears S Select YES and press the 1 SET Button If NO is selected returns to step 4 For ot...

Page 23: ...etup 1 Date 2 Date Time 3 Off When battery and AC adaptor are not attached and the RESET Button is pressed the date and time will be set to JAN 1 2003 12 00AM When the built in battery has been exhausted set the date and time after the battery has charged l 66 Date Mode Display M D Y 8 00PM DEC 20 2004 D M Y 20 00 20 12 2004 Y M D 20 00 2004 12 20 SET Menu SET Menu 1 2 3 ...

Page 24: ...press the 1 SET Button Q Select LCD Bright or LCD Color and press the 1 SET Button R Press the 6 5 side of the Multi function Button for adjustment If LCD Bright 1 is selected BRIGHT indication appears the brightness can be increased by moving the A to the right If LCD Color 2 is selected COLOR indication appears the color can become darker by moving the B to the right S Press the 1 SET Button T P...

Page 25: ...out 30 frames per 1 second under MPEG2 format Therefore you can enjoy a beautiful and smooth motion image The picture data of MPEG4 is inferior to those of MPEG 2 in smoothness because the number of the frames transferred in MPEG4 is less than that in MPEG2 However it is suitable for use in PC because the transfer rate is higher ªOSD Indication on LCD Monitor This SD Video Camera can appear or dis...

Page 26: ... recover the writing speed on the free space of the SD Memory Card It may take time to finish its process Be sure to clean up the SD Memory Card before use N Press the REC PLAY Button to select Playback Mode and set the operation mode O Press the MENU Button and select Clean Up on Card and press the 1 SET Button P The confirmation screen appears and then select YES and press the 1 SET Button Clean...

Page 27: ...ture quality and then press the 1 SET Button Select one of FINE or NORM FINE High image quality 704 k 480 pixels NORM Normal image quality 352 k 480 pixels Press the MENU Button after completing the setting P Press the Recording Start Stop Button Recording starts While recording the motion image press the Recording Start Stop Button to stop recording Be sure to clean up the SD Memory Card before u...

Page 28: ...Functions Setup to desired picture quality and then press the 1 SET Button Select one of S FINE FINE NORM or ECO S FINE Super high image quality 320 k 240 pixels 15fps FINE High image quality 320 k 240 pixels 12fps NORM Normal image quality 176 k 144 pixels 12fps ECO Low image quality 176 k 144 pixels 6fps Press the MENU Button after completing the setting P Press the Recording Start Stop Button R...

Page 29: ...l pause at the last scene of the last file ªOperation during Playback Stop Reverts to the index picture screen Pause Press during playing 6 5 Finding the beginning of a file Tap this button 6 5 Rewinding fast forwarding Press and hold this button for more than 1 second During pause 6 5 Go back advance one frame Tap this button Go back Playback at intervals of 0 5 seconds Advance Playback at interv...

Page 30: ...nuously from the selected file to the last file the display will pause at the last scene of the last file The size of a playback screen changes with recorded quality of image ªOperation during Playback Stop Reverts to the index picture screen Pause Press during playing 6 5 Finding the beginning of a file Tap this button 6 5 Rewinding fast forwarding Press and hold this button for more than 1 secon...

Page 31: ... cancelled ÇàìëíáåÖ íÜÉ sçäìãÉ During playback the zoom control is used to adjust the volume N Press r T or s W of the VOL Lever The VOLUME indication 1 appears Push the VOL Lever towards r T to increase the volume Push the VOL Lever towards s W to decrease the volume If the volume buttons are left unoperated for 1 second the VOLUME indication will automatically disappear 1 VOL j N ETC SET Menu ...

Page 32: ...he MENU Button and set Quality on Record Functions Setup to desired picture quality and then press the 1 SET Button Select one of FINE or NORM Press the MENU Button after completing the setting P Press the Recording Start Stop Button The still image is recorded on the Memory Card The sound cannot be recorded For other notes see page 81 SET Menu N P O ...

Page 33: ... Press the 6 5 side of the Multi function Button to select a desired file P Press the 1 SET Button A still picture file is played back ªOperation during Playback Stop Reverts to the index picture screen 6 Displays the previous screen 5 1 SET Displays the next screen Only JPEG images that were created by this product will be displayed correctly Files that are copied to the SD card may not be displa...

Page 34: ...hers to desired mode Select All or DPOF All Playing back all still pictures DPOF Playing back all the DPOF set pictures l 42 P Press the 1 SET Button The indication 1 appears Images are displayed one by one for approx 5 seconds each Press to stop Press to pause Only JPEG images that were created by this product will be displayed correctly Files that are copied to the SD card may not be displayed p...

Page 35: ...Zoom Function you can select a magnification of 25a or even to 100a Set Dig Zoom on Camera Functions Setup to desired mode 25a Digital Zoom Functions to 25 times 100a Digital Zoom Functions to 100 times When magnification ratio exceeds 10 times it changes to digital zoom As the magnification of Digital Zoom increases the quality of image may deteriorate _ ÅâäáÖÜí çãéÉåë íáçå cìåÅíáçå This prevents...

Page 36: ...tic White Balance Adjustment AWB Indoor Mode recording under incandescent light Outdoor Mode z Fluorescent light Mode The white balance setting that was previously set manually 1 To Resume Automatic Adjustment Press the 1 SET Button and set AWB Or set the Auto Manual Selector Switch to AUTO For other notes see page 82 ªWhite Balance Sensor The White Balance Sensor 1 determines the nature of the li...

Page 37: ...he Auto Manual Selector Switch to AUTO For other notes see page 82 j åì ä cçÅìë ÇàìëíãÉåí Focus can be adjusted manually for recording in a situation where auto focus may not function well Set the Recording Mode 1 Set the Auto Manual Selector Switch to MANUAL The AWB and AF Indications are displayed 2 Slide the Auto Manual Selector Switch to SELECT and select AF 3 Press the 1 SET Button to set MF ...

Page 38: ...movements such as sports scenes 7 Portrait Mode Focuses on the main subject of the image and leaves the background slightly out of focus 4 Low Light Mode Preserves the mood of dim light settings without altering picture brightness Ω Spotlight Mode Neutralizes the additional brightness created by a spotlight º Surf Snow Mode Compensates for excessive illumination from sun glare to produce a clear p...

Page 39: ...Electronic Image Stabilizer Set EIS on Camera Functions Setup to Off This function is memorized even if the SD Video Camera turned off Under fluorescent lighting image brightness may change táåÇ kçáëÉ oÉÇìÅíáçå cìåÅíáçå This function reduces the noise that the wind makes as it hits the microphone during recording MPEG2 MPEG4 Mode only Set the Recording Mode 1 Press the MENU Button and select Wind ...

Page 40: ... Still Picture One scene means a still picture recorded by pressing the Recording Start Stop Button ªDeleting Scenes Delete You can delete unnecessary scenes 1 Press the MENU Button and select Delete on Scene and press the 1 SET 2 Select the scene to delete and then press the 1 SET Button 3 The confirmation screen appears and then select YES and press the 1 SET Button Select NO to cancel deletion ...

Page 41: ... and then use the foresaid procedure to unlock the scene The indication will disappear and locking will be released For other notes see page 83 ªDisplaying Information Using Menu Screen Detail You can display various information for a including scene number picture quality recording date time and length and File Lock DPOF settings 1 Press the MENU Button and select Detail in Scene and press the 1 ...

Page 42: ...on to select the desired number of prints and then press the 1 SET Button The Indication is displayed and attached to the selected scene Up to 99 prints can be set for one scene To Release All the DPOF Settings 1 Press the MENU Button and select DPOF on Scene to Cancel all and then press the 1 SET Button 2 The confirmation screen appears and then select YES and press the 1 SET Button To Check the ...

Page 43: ...NU Button Q The confirmation screen appears and then select YES and press the 1 SET Button More than 99 scenes cannot be recorded on a play list The Play List may not be able to be created if the Memory Card is nearly full Even if you delete a scene from the play list the original scene will not be deleted If you delete a original scene the scene in the play list will be deleted ªSwitching to Thum...

Page 44: ... cancel playback midway press the Button ªAdding Deleting Scenes from Play List Edit You can later add delete scenes to the play list 1 Press the MENU Button and select Edit on PlayList and press the 1 SET Button 2 Select the play list to edit and then press the 1 SET Button The scenes of the program will appear in the upper row and the scenes of selected play list will appear in the lower row ETC...

Page 45: ...to be added R Repeat step 4 in order to add the desired scene and then press the MENU Button S The confirmation screen appears and then select YES and press the 1 SET Button Deleting scenes Follow steps 1 2 of Adding Deleting Scenes from Play List Edit 3 Press the side of the Multi function Button down to move the cursor to the lower row and press the 6 5 side of the Multi function Button to selec...

Page 46: ...ition of title input frame A and press the 1 SET Button You can give titles of up to 20 characters Q Repeat step 3 in order to enter the desired character and after entering the title select Enter and then press the 1 SET Button If you cancel the setting of Title select Cancel and the confirmation screen appears and then select YES R The confirmation screen appears and then select YES and press th...

Page 47: ...delete and then press the 1 SET Button P The confirmation screen appears and then select YES and press the 1 SET Button Select NO to cancel deletion Even if you delete a scene from the play list the original scene will not be deleted TITLE A B C D E F G H I J K L M N O P Q R S T U V W X Y Z À È Ì Ò Ù Á É Í Ó Ú Ã Ñ Õ Â Ê Î Ô Û Ä Ë Ï Ö Ü Ç 1 Enter Cancel 1 2 3 4 5 6 7 8 9 0 Delete SET TITLE a b c d ...

Page 48: ... MENU Button and select Switch on Program and press the 1 SET Button O Select the program to display and then press the 1 SET Button To display scenes of all programs all recorded scenes select All programs ªPlaying Back Program Play You can play back only the selected program 1 Press the MENU Button and select Play on Program and press the 1 SET Button 2 Select the program to play back and then p...

Page 49: ...title will appear See Changing Title of Play List Title for how to enter a title l46 P After entering the title select Enter and then press the 1 SET Button If you cancel the setting of Title select Cancel and the confirmation screen appears and then select YES Q The confirmation screen appears and then select YES and press the 1 SET Button ETC g SET Menu N O g SET Menu P TITLE A B C D E F G H I J...

Page 50: ...aying back scene Top To go to the start End To go to the end of last scene Specify To go to a specified point Select Specify O Press the 6 5 side of the Multi function Button and select desired point 2 and then press the 1 SET Button 1 The present playback point 2 The select point 6 5 Tap this button MPEG2 Move the point to every 10 seconds MPEG4 PICTURE Move the point to every scene 6 5 Press and...

Page 51: ...n Up Recover writing speed of the data to a Card l 26 Be sure to clean up the SD Memory Card before use ªFormatting the Memory Card Format Card If a Memory Card becomes unreadable by the SD Video Camera formatting it may make it reusable Formatting erases all the data recorded on the Memory Card N Press the MENU Button and select Format Card on Card and press the 1 SET Button O The confirmation sc...

Page 52: ...et the operation mode to MPEG2 or MPEG4 O Press the MENU Button and set Repeat Play on Others to On and then press the 1 SET Button Select Off to cancel Repeat Play setting P Press the 1 SET Button Playback will start The indication 1 appears To cancel playback midway press the Button However the Repeat Play setting will not be cancelled To release Repeat Play Use one of the following 2 methods to...

Page 53: ...Does not display any information ªSlide Show Plays back all of still pictures one by one recorded on the Memory Card PICTURE Mode only 1 Press the MENU Button and set Slide Show on Others to desired mode Select All or DPOF All Playing back all still pictures DPOF Playing back all the DPOF set pictures 2 Press the 1 SET Button 1 All 2 DPOF The indication A appears Images are displayed one by one fo...

Page 54: ...N OUT Socket of the AV Cradle to the AV Input Sockets of the external device 2 using supplied AV Cable 1 A When not using the AV cradle Turn off the SD Video Camera before connecting the AV Cable P Press the REC PLAY Button to select Playback Mode and set the operation mode Q Press the 6 5 side of the Multi function Button to select a desired file and press the 1 SET Button A file is played back D...

Page 55: ...uality l 27 28 32 R Press the MENU Button and select Input Source on Record Functions Setup to LINE and then press the 1 SET Button S Set up the external device Turn on the SD Video Camera Confirm that the image or sound signal is input into the SD Video Camera If the image or sound signal is input image is displayed on the LCD Monitor and sound comes from the speaker on the SD Video Camera T Pres...

Page 56: ... USB Terminal Cover O Connect with the AC Adaptor 1 l 12 P Connect the USB Terminal 2 of the SD Video Camera to the USB Terminal of the personal computer 3 using supplied USB Cable 4 While connecting the PC and SD Video Camera do not delete the data inside a card or format a card with the PC Do not use any other USB Cables except the supplied one Connect the USB cable after the USB driver is insta...

Page 57: ...rded Memory Card l 14 Turn off the SD Video Camera before removing a Card O Insert the Memory Card into the card slot of DMR E100H and then save the files on the hard disk or DVD RAM For details refer to the operating instructions of DMR E100H Play list cannot be saved Playing back motion images that were recorded with the DVD Video Recorder When a program recorded with MPEG4 format using DMR E100...

Page 58: ...indows NT and Macintosh Operation on an upgraded OS is not guaranteed Operation on an OS other than the one pre installed is not guaranteed Dual CPUs or Multi boot environments are not supported Only users having system administrator Administrator authority can use these software applications The software is available in English Even if you operate a personal computer in French the application and...

Page 59: ...and products mentioned in these Operating Instructions are usually the registered trademarks or trademarks of the manufacturers who developed the systems or products concerned The contents or complete reproduction or copy of these Operating Instructions could be changed without notice When installing or using this software specify the user name to Administrator computer administrator or any other ...

Page 60: ...SE Windows Me Windows 2000 Professional Windows XP Home Edition Professional CPU Intel Celeron 800 MHz or higher Intel Pentium III 600 MHz or higher HDD 400 MB or more RAM 256 MB or more Display High Color 16 bit or more with a resolution of 800 k 600 pixels or more Drive CD ROM Drive I F USB terminal Others Pointing device such as a mouse or equivalent to mouse The following software except for t...

Page 61: ...tage USB Driver screen appears click Next P Read License Agreement carefully and click Yes if you accept the terms of the agreement Q Complete the installation according to the message The USB Driver is installed automatically If you use other than Windows XP when the DirectX 8 1 setup screen appears install it according to the message Failure to install DirectX 8 1 disables you from using MediaSt...

Page 62: ... connect the USB cable until the USB driver has been installed When MediaStage USB Driver is already installed you do not need to install USB Driver N Insert the supplied CD ROM into the personal computer s CD ROM drive The launcher for installation is activated automatically O Click USB Driver P Click Next Q Click Finish O P Q ...

Page 63: ...ars in My Computer Do not use any other USB Cables except the supplied one For other notes see page 84 When the SD Video Camera is connected for the first time Found New Hardware Wizard screen appears For Windows Me 98SE Users 1Click Next 2Click Finish For Windows XP Users 1Click Next When the supplied CD ROM is inserted click Next again 2Click Continue Anyway 3Click Finish Since Found New Hardwar...

Page 64: ...out then remove the USB Cable Keep the SD Video Camera turned on N Double click the in task tray Hardware disconnect dialog box appears O Select Panasonic SD Video CAMERA USB Interface and click Stop P Click OK Click OK and you can safely disconnect the cable fÑ óçì åç äçåÖÉê åÉÉÇ ëçÑíï êÉ Eråáåëí ääF 1 Select Start Settings Control Panel 2 Double click Add Remove Programs 3 Select the software to...

Page 65: ...emory Card l 85 DCIM The images IMGA0001 JPG etc in this folder are recorded in the JPEG format 100 0001 or similar indication is displayed on the SD Video Camera MISC Files in which DPOF Data has been set to the image are in this folder Slide show data created by MediaStage for AV100 are in this folder AUTPLAY0 MRK etc SD_VIDEO MPEG2 motion images MOV001 MOD etc and MPEG4 motion image is recorded...

Page 66: ...bout 6 months by 1 charge It changes with operating After recharging the built in battery adjust the date and time l 22 rëáåÖ íÜÉ léíáçå ä b êéÜçåÉë While recording or playing back on an SD Video Camera the sound can be heard using optional earphones 1 Plug the Earphone terminal in to the Terminal If the volume while playing back is loud or soft you can adjust the volume by using the Volume Adjust...

Page 67: ...serting the battery Warning Danger of explosion if battery is incorrectly replaced Replace only with the same or equivalent type recommended by the equipment manufacturer Discard used batteries according to manufacturer s instructions Risk of fire explosion and burns Do not recharge disassemble heat above 212xF 100xC or incinerate Keep the Button Type battery out of the reach of children Never put...

Page 68: ...thin the above ranges ªAttaching the Hand Strap Lens Cap To protect the Lens surface attach the Lens Cap 1 Pass the end of Lens Cap Cord through the hold A in the Lens Cap 2 Pass the Hand Strap through the Lens Cap Cord 3 Pass the shorter loop of the Hand Strap through the Strap Holder 4 Pass the longer loop of the Strap through the shorter loop 5 Attach the Lens Cap on the SD Video Camera Fit the...

Page 69: ...of the Stand and the grooves 2 of the SD Video Camera and place the SD Video Camera on the Stand ÑíÉê rëÉ 1 Turn off the SD Video Camera l 17 2 Take out the Memory Card l 14 3 Retract the LCD Monitor 4 Attach the Lens Cap on the SD Video Camera l 68 If you do not use for a long time N Remove the AC Adaptor and take the battery out l 12 O Attach the Lens Cap on the SD Video Camera l 68 P Put the SD...

Page 70: ... Image Mode MPEG4 MPEG4 Motion Image Mode PICTURE Still Picture Mode 6 Electronic Image Stabilizer l 39 7 Zoom D Zoom Magnification l 35 8 Manual Exposure Adjustment l 37 9 Wind Noise Reduction l 39 10 Card Mode Blue MPEG2 Motion Image is ready to record Red MPEG2 Motion Image is recording Red SD Memory Card is not inserted SD Memory Card is locked Blue MPEG4 Motion Image is ready to record Red MP...

Page 71: ...rding Return the LCD monitor and verify contents l 16 CARD ACCESS While checking a Card CARD ERROR Error occurred when the recording starts or while recording Turn on power again If a card is not corresponding the SD Video Camera cannot recognize the card Perform format with this SD Video Camera CARD LOCKED The write protect switch of the SD Memory Card is set to LOCK l 77 PROGRAM NO FULL The numb...

Page 72: ... Elapsed time indication 6 Playback Mode l 29 30 33 1 Playback l 29 30 33 Pause l 29 30 33 6 5 Review Playback Cue Playback l 29 30 33 9 Backward Forward finding the beginning of a file 2 1 Go back Advance one frame 2 1 Backward Forward Slow Playback 8 7 Start End of last scene pause 7 Volume indication 8 Date Time indication 9 File Name 10 File Lock l 41 11 Slide Show l 34 42 53 12 DPOF setting l...

Page 73: ...le Motion images and still pictures are not recorded on the card Cannot delete scene You tried to delete the locked files DPOF is not set to a scene You tried to select DPOF in SlideShow but the card has no scenes with DPOF setting Card has no PlayList You cannot select Switch or Play on Playlist because no play lists are created Cannot lock scene in PlayList mode When activating the playback scre...

Page 74: ...ode Deletion of PlayList Found error in PlayList Delete error PlayList now or Found error in PlayList Delete all PlayList now Yes When connecting to AC adaptor or the remaining capacity of the battery is enough The play lists with errors or all play lists are deleted When the remaining capacity of the battery is low Please connect AC adapter or change battery No PlayList error Cannot use this card...

Page 75: ...Battery or AC Adaptor again Thereafter turn on the SD Video Camera Do not use your SD Video Camera near radio transmitters or high voltage lines If you record pictures near radio transmitters or high voltage lines recorded images or sounds may be adversely affected Do not use the SD Video Camera for surveillance purposes or other business use If you use the SD Video Camera for a long period of tim...

Page 76: ...deo Camera and the battery may rise while charging the battery Such rise of temperature does not indicate a fault Do not install remove plug or unplug the battery or power cord while the power is on ªAbout the LCD Monitor In a place with drastic temperature changes condensation may form on the LCD Monitor Wipe it with a soft dry cloth If your SD Video Camera is extremely cold when you turn its pow...

Page 77: ...fter charging the life has expired Replace it with a new battery Do not throw the Battery into fire because it may cause an explosion Always Keep the Terminals of the Battery Clean Prevent the terminals from getting clogged with dirt dust or other substances If you drop the Battery accidentally check to see if the Battery body and terminals are damaged Attaching a deformed Battery to the SD Video ...

Page 78: ...er Flashing approx every 6 seconds The ambient temperature or that of the battery itself is too high or too low Charging proceeds but will take a longer time Turning off Charging is completed If the Power Lamp turns off when charging is not completed the AC Adaptor or the battery is probably defective Contact your nearest Panasonic dealer kçíÉë åÇ eáåíë ª Power Supply l 12 When the Battery Level I...

Page 79: ...mory Card or erase the data stored on the Memory Card It is recommended to save important data onto a personal computer Some cards may pop out when they are removed Cannot guarantee the contents of recording when pictures are recorded on a MultiMediaCard ª Using the LCD Monitor l 15 Forcefully rotating the LCD Monitor beyond ranges described in these operating instructions will damage the SD Video...

Page 80: ...WITCH may be displayed on some Panasonic digital video cameras in such a case This is not a fault of the SD Video Camera The sounds recorded will be in monaural Playing back MPEG4 motion images recorded in the S FINE mode is not guaranteed for digital devices other than this SD Video Camera MPEG4 motion images of the S FINE mode cannot be recorded in the MultiMediaCard The capacities of the record...

Page 81: ...les recorded by another device or another application may not be played back Files recorded on the SD Video Camera may not be played back on another movie camera or the file size may not be displayed correctly When playing back a picture recorded by other equipment picture size may differ ª Recording Still Pictures l 32 The image size is 640 k 480 VGA If NORM is selected for recording mosaic patte...

Page 82: ...r multiple light sources White Balance cannot be set in the digital zoom range ª Manual Exposure Adjustment l 37 The brightness of the LCD monitor may differ from that of the actual recorded pictures ª Manual Focus Adjustment l 37 If you focus on the subject by pushing the zoom lever to W the focus may be faulty when you push the zoom lever to T To focus on the subject sharply push the zoom lever ...

Page 83: ...king many files may take a little time Wait until the Card Access Lamp goes out ª Designating Scenes to be Printed DPOF l 42 DPOF is the abbreviation of Digital Print Order Format DPOF is used to select images you want to print DPOF can only be used with products that support this feature The number of prints can be set from 0 to 99 This SD Video Camera may not recognize the DPOF set by another ty...

Page 84: ...ce on Record Functions Setup to CAMERA ª Using the DVD Video Recorder with a Hard Disk l 57 You can save files on the Hard Disk by connecting to the DVD Video Recorder with the supplied AV cable However the picture quality is deteriorated ª Connecting with the PC l 63 To erase pictures that you recorded on the Memory Card by using the SD Video Camera be sure to erase them on the SD Video Camera or...

Page 85: ...ter will recognize the SD Video Camera 1Click Next 2Confirm whether your device is configured to the optimal driver detection setting and click Next 3Insert the supplied CD ROM into the CD ROM drive 4Enter the path as D USB Driver files example of D drive assigned as CD ROM drive 5Click Next 6Click Next 7Click Finish When playing MPEG2 motion pictures directly from the SD Memory Card with MediaSta...

Page 86: ...the SD Video Camera _ÉÑçêÉ oÉèìÉëíáåÖ pÉêîáÅÉ Power 1 The SD Video Camera power cannot be turned on 1 1 Is the power source connected correctly 1 2 Is the Battery fully charged Charge it with the AC Adaptor 2 The SD Video Camera power shuts off automatically 2 If you do not use the SD Video Camera for more than 5 minutes the power shuts off automatically to save the Battery power 3 The SD Video Ca...

Page 87: ... Memory Card is formatted it cannot be used 4 Either the SD Video Camera or the Memory Card may be damaged Please consult your Panasonic dealer 5 Playing back or recording do not function and the screen has frozen 5 Set the Power Switch to OFF If the SD Video Camera is not turned off after setting to OFF unplug the AC Adaptor and remove the battery 6 Sound is not heard while a still picture is pla...

Page 88: ...wnloaded from Microsoft s Web site 3 Red blue green or white dots appear on the screen 3 0 01 or less of the pixels of some LCD Monitors may remain turned on or off 4 When the USB cable is connected a green mark is indicated in USB Mass Storage Device in Device Manager of the Windows OS 4 If the USB cable is connected without installing the USB Driver supplied will be indicated on some OSs Remove ...

Page 89: ...vision System EIA Standard 525 lines 60 Fields NTSC color signal Video Input Output Level 1 0 Vp p 75 ohm AV mini jack Audio Input Level Line 316 mV 10 kohm or more AV mini jack Mic Stereo Microphone Audio Output Level Line 316 mV 10 kohm or more AV mini jack USB Card reader writer function No copyright protection support USB 2 0 compliant max 12 Mbps Dimensions Approx 1 5 16 k 3 9 16 k 2 9 16 33 ...

Page 90: ...6 59 W k 31 H k 96 D mm Weight Approx 4 59 oz 130 g Battery Pack Panasonic CGA S302A Information for your safety Dimensions Approx 1 7 16 k 5 16 k 2 1 8 36 W k 7 H k 53 D mm Weight Approx 1 oz 28 g Input AC 110 240 V 50 60 Hz 0 2 A Output DC 4 9 V 1 4 A Nominal Voltage 3 7 V Nominal Capacity 1050 mAh ...

Page 91: ...rranty only applies to products purchased and serviced in the United States or Puerto Rico This warranty is extended only to the original purchaser of a new product which was not sold as is A purchase receipt or other proof of the original purchase date is required for warranty service Carry In or Mail In Service For Carry In or Mail In Service in the United States call 1 800 211 PANA 1 800 211 72...

Page 92: ...NCIDENTAL OR CONSEQUENTIAL DAMAGES RESULTING FROM THE USE OF THIS PRODUCT OR ARISING OUT OF ANY BREACH OF THIS WARRANTY As examples this excludes damages for lost time travel to and from the servicer loss of media or images data or other memory content The items listed are not exclusive but are for illustration only ALL EXPRESS AND IMPLIED WARRANTIES INCLUDING THE WARRANTY OF MERCHANTABILITY ARE L...

Page 93: ...4300 Fax 787 768 2910 Centralized Factory Servicenter Panasonic Services Company 1705 N Randall Road Elgin IL 60123 7847 Attention SD Products Repair Please carefully pack and ship prepaid and insured to the Elgin Centralized Factory Servicenter Customer s in Puerto Rico please ship or carry in to location below Service in Puerto Rico Product Repairs MAIL TO Web Site http www panasonic com You can...

Page 94: ...5 24 Lens Cap 68 ª M Manual Exposure Adjustment 37 Manual Focus Adjustment 37 MediaStage for AV100 60 Menu 18 19 MPEG2 Motion Image 25 27 29 MPEG4 Motion Image 25 28 30 ª O Operation Mode 17 OSD Indication 25 ª P Picture Quality 27 28 32 PlayList 43 Portrait Picture 16 Program 48 Program AE 38 ª R Recording LED 19 Remote Controller 68 Repeat Play 31 52 RESET Button 23 87 ª S Scene 40 SD Memory Car...

Page 95: ...nar para introducir los terminales de la batería en los terminales del compartimento de la misma y colocar la batería Acoplar la batería con la etiqueta mirando hacia arriba Después de haber colocado la batería cerrar la tapa 3 Conectar el cable de entrada CC DC IN 4 9V a la toma en la Videocámara SD La luz indicadora de encendido 1 parpadea y la carga empieza Durante la recarga apagar la Videocám...

Page 96: ... el soporte AV Las ranuras 1 de la Videocámara SD encajan en las protuberancias principales 2 Q Empujar la bandeja hasta que hace clic R Conectar el cable de entrada CC en la DC IN 4 9V toma del soporte AV La luz indicadora de encendido C parpadea y la carga empieza Durante la recarga apagar la Videocámara SD Cuando la recarga ha terminado la luz indicadora de encendido se apaga S Conectar el cabl...

Page 97: ...ir la tapa del compartimento de la tarjeta O Sujetar la tarjeta de memoria colocando el ángulo cortado 1 de frente con la etiqueta 2 en la parte delantera e insertarla totalmente en el compartimento de la tarjeta de memoria horizontalmente Apagar la Videocámara SD antes de insertar quitar la tajeta P Cerrar bien la tapa del compartimento de la tarjeta 1 2 N O ...

Page 98: ...nformaciones sobre el modo de funcionamiento Hay seis modos de funcionamiento Imágenes dinámicas MPEG2 Modo de grabación de imágenes dinámicas formato MPEG2 Modo de reproducción de imágenes dinámicas formato MPEG2 Imágenes dinámicas MPEG4 Modo de grabación de imágenes dinámicas formato MPEG4 Modo de reproducción de imágenes dinámicas formato MPEG4 Imágenes estáticas PICTURE Modo de grabación de im...

Page 99: ...ada y luego pulsar el botón 1 SET P Pulsar el botón de grabación Start Stop Durante la grabación de la imagen dinámica pulsar el botón de grabación Start Stop para detener la grabación oÉéêçÇìÅÅáµå ÇÉ áã ÖÉåÉë Çáå ãáÅ ë áã ÖÉåÉë Éëí íáÅ ë 1 Pulsar el botón REC PLAY para seleccionar el modo reproducción y poner el modo de funcionamiento 2 Pulsar el lado 6 5 del botón Multifunción para seleccionar e...

Page 100: ...erica One Panasonic Way Secaucus NJ 07094 Panasonic Sales Company PSC Division of Matsushita Electric of Puerto Rico Inc Ave 65 de Infantería Km 9 5 San Gabriel Industrial Park Carolina Puerto Rico 00985 Panasonic Canada Inc 5770 Ambler Drive Mississauga Ontario L4W 2T3 C 2003 Matsushita Electric Industrial Co Ltd ...

Reviews: