background image

En

gli

s

h

15

RQT6091

Listening to CDs

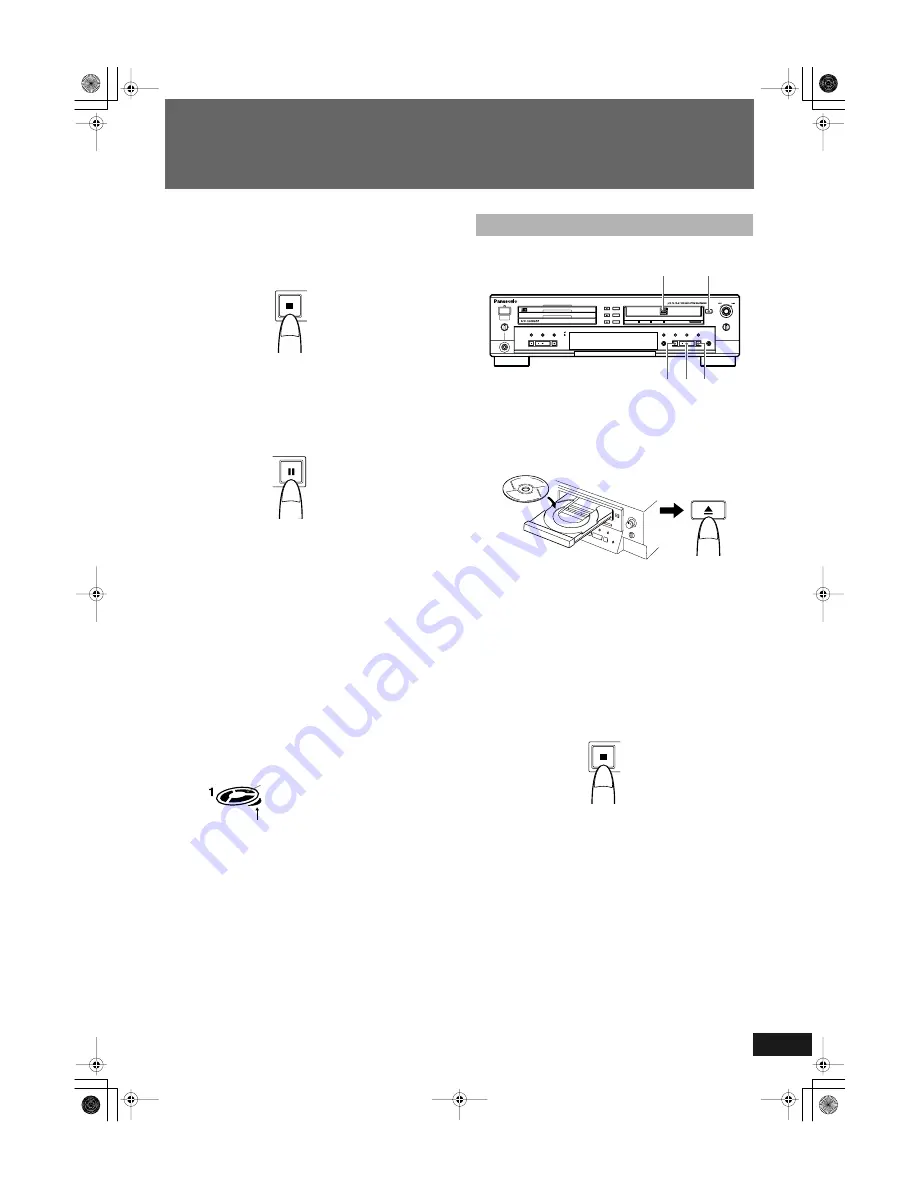
Stopping CD playback

To stop playback at any time 

• Stop playback of a disc in the 3-CD changer by pressing the CD

Control STOP 

s

 button. The total number of tracks and playing

time is shown in the information display.

• When all the tracks on a CD have been played through, play-

back stops automatically.

To stop playback temporarily 

• If the CD Control PAUSE 

S

 button is pressed, playback is

paused temporarily. When the CD Control PLAY 

p

 button is

pressed, playback resumes from the place where it was paused.

• This button works when the 3-CD changer is selected as the

playback source. 

Removing a CD from the 3-CD changer

To remove a CD from the 3-CD changer, press the OPEN/CLOSE

0

 button next to the tray holding the CD to be removed. To remove

the CD that is currently being played back, it is recommended that
playback first be ended by pressing the CD Control STOP 

s

 but-

ton before pressing the OPEN/CLOSE 

0

 button. After pressing the

OPEN/CLOSE 

0

 button, the tray will open and the CD can be

removed. Press the OPEN/CLOSE 

0

 button once more to close the

tray. 

Number of CDs and play status display

The display window shows whether or not a CD has been loaded
into each of the CD trays as well as the play status of the CD.

1

Press the CDR OPEN/CLOSE 

0

 button to open 

the CDR disc tray.

2

Load a disc in position and close the tray by 
pressing the CDR OPEN/CLOSE 

0

 button again.

• When a CD-R or CD-RW is loaded in the CDR, the unit deter-

mines the format of the disc and whether it is finalized or not.

3

Press the CDR Control PLAY 

p

 button to select 

the CDR function and start playback at track 1. 

• Playback stops automatically at the end of the last track on the

disc.

To stop CDR playback

• Stop playback of a disc in the CDR by pressing the CDR Con-

trol STOP 

s

 button. The total number of tracks and play time

will be shown in the information display. 

This icon lights in sequence when a CD is 
playing, and blinks when play is paused. If 
no disc is loaded, the light remains out 
and “NO DISC” is shown in the 
information display. 

This lights when the CD in the tray has 
been selected to be played.

CDR Playback Operations

MAX

MIN

PLAY MODE

PHONES

OPEN /
CLOSE

REC SELECTOR

MIX BALANCE

MULTI JOG

REC LEVEL

+

CANCEL

SET

MENU

REC/

REC MUTE

SYNCHRO

CD EDIT

CD REC

FINALIZE

LINE

CD

DIGITAL

COMPACT DISC RECORDER    SL-PR300

DISC 

1

DISC 

2

DISC


3

OPEN /
CLOSE

DISC

SELECTOR

3

2

1

LINE

CD

1

2

3

s

S

OPEN /
CLOSE

SL-PR300EB.fm  Page 15  Thursday, September 20, 2001  3:42 PM

Summary of Contents for SLPR300 - CD RECORDER

Page 1: ... REC SELE CTO R MEN U PITC H 0 CAN CEL REPEAT CD COMPACT DISC RECORDER RAK PR300 CD R RW CD EDIT FINALIZE DISPLAY 1 2 4 5 7 8 3 6 9 0 10 FADE SYNCHRO DISC SELECTOR _ CONTROL PITCH SET PITCH Compact Disc Recorder Operating Instructions Model No SL PR300 Before connecting operating or adjusting this product please read these instructions completely Please keep this manual for future reference Note E...

Page 2: ...g the Unit for High speed Recording 32 Setting the Auto Track Spacing Function 32 Synchronized Recording from External Sources 33 Mixed Input Recording 34 Special Recording Edit Operations 36 Skipping a Recorded Track on a CD R or CD RW Track Skip 36 Erasing a Track or Tracks Erase Function 36 Erasing All Tracks Disc Erase Function 37 Finalizing a Disc 38 Making Recording of a Finalized CD RW Disc...

Page 3: ...markings identifying the terminals in your plug proceed as follows The wire which is coloured Blue must be connected to the terminal which is marked with the letter N or coloured Black or Blue The wire which is coloured Brown must be connected to the terminal which is marked with the letter L or coloured Brown or Red WARNING DO NOT CONNECT EITHER WIRE TO THE EARTH TERMINAL WHICH IS MARKED WITH THE...

Page 4: ...ollows Front Open space with no obstructions Sides At least 3 cm of space on each side Top At least 5 cm of space between the top of the unit and the nearest object Back At least 15 cm of space between the back panel and the nearest object wall Bottom Place the unit on a flat level surface with no obstructions This product may receive radio interference caused by mobile telephones during use If su...

Page 5: ...o the unit can occur if the unit is repaired disas sembled or reconstructed by unqualified persons Extend operating life by disconnecting the unit from the power source if it is not to be used for a long time Placement Voltage AC Mains Lead Protection Foreign Matter Service Features The following is a list of some of the functions and conve niences obtained by having a 3 CD changer and CDR com bin...

Page 6: ... phono cables for the LEFT channel and the red plugs for the RIGHT channel Insert the plugs all the way in Incomplete connections may cause noise to household mains socket Only for Asian countries Before connecting the AC mains plug to the household mains socket check that the voltage selector s setting cor responds with your AC mains voltage If different reset the voltage selector to prevent risk...

Page 7: ...om an external device cannot be digitally output from this unit To listen to the sound from the external device connect an amplifier or receiver to the LINE OUT PLAY ter minal on this unit Digital Connections LINE DIGITAL IN COAXIAL OPTICAL DIGITAL OUT REC IN PLAY OUT COAXIAL OPTICAL VOLTAGE SELECTOR Optical digital cable not supplied Receiver or amplifier with digital optical terminal Optical dig...

Page 8: ... LEVEL Control Use this control for selecting and setting use options changing clock settings skipping forward backward through tracks on a CD etc Also use it to adjust the level of the source signal when record ing discs MIX BALANCE Control Use the MIX BALANCE control to adjust the mixing levels of independent signals being recorded simultaneously see page 35 CDR Control Operation Buttons SYNCHRO...

Page 9: ...k to connect headphones not supplied to the unit Plug type 6 3 mm stereo PHONES LEVEL Volume Control Use this to adjust the volume being output to headphones con nected to the unit Note Avoid listening for prolonged periods of time to prevent hearing damage Remote Control Sensor This sensor receives commands from the remote control Note In this manual procedures using buttons on the front panel of...

Page 10: ...s and sampling frequency indicators Light to indicate whether the recording is analog or digital During digital recording the appropriate frequency indicator lights to indi cate the sampling frequency of the source being played back Timer operation indicators Indicate that a Timer play or recording function has been set and whether it is set for everyday or one time operation Music calendar Indica...

Page 11: ...enu operations PITCH 0 Button Press to restore playback speed of the CD player to normal STANDBY ON Button Press to turn the power of this unit on or to put it in the standby mode see page 13 DISPLAY Button Press to change the type of information that is shown in the infor mation display see page 27 FINALIZE Button Press to start finalization of a CD R or CD RW see page 38 CD and CD R RW Deck Sele...

Page 12: ...rom a position that is not directly in front or on the same level as the main unit When the distance over which the remote control can be oper ated starts to drop the batteries are nearing the end of their ser vice life The batteries provided are for checking system operations only Replace them with new batteries as soon as possible Do not drop the remote control or subject it to strong impact Do ...

Page 13: ...urrently selected function 3 CD changer or CDR does not change If the power cord is unplugged from the wall socket for more than a few seconds the internal clock program etc of the main unit may require resetting When this occurs please set the clock and timer functions again Turning the Power On and Standby Mode CD1 CD2 CD3 CD REC PLAY MODE REC RECMUTE REC SELECTOR MENU PITCH 0 CANCEL REPEAT CD P...

Page 14: ...e sequence of DISC2 Î DISC3 Î DISC1 and then playback stops automatically When play starts from DISC3 The CDs are played in the sequence of DISC3 Î DISC1Î DISC2 and then playback stops automatically If one of the trays does not contain a CD play skips to the CD in the next tray in the sequence Notes The DISC SELECTOR 1 2 and 3 buttons do not function dur ing program and random play modes If a tray...

Page 15: ...isplay window shows whether or not a CD has been loaded into each of the CD trays as well as the play status of the CD 1 Press the CDR OPEN CLOSE 0 button to open the CDR disc tray 2 Load a disc in position and close the tray by pressing the CDR OPEN CLOSE 0 button again When a CD R or CD RW is loaded in the CDR the unit deter mines the format of the disc and whether it is finalized or not 3 Press...

Page 16: ...ack or begin ning of next track in the case of skipping may be cut not read when playback starts again The total track time does not always match total playback time time shown in the information display exactly because the playback time includes lead in and lead out spaces as well 1 Press the CD or CDR button to select the deck CD button To control discs in the 3 CD changer CDR button To control ...

Page 17: ...ion is not possible when either program or random play mode is in use 1 Press the CD and CDR Deck Selection button CD or CDR corresponding to the tray holding the CD currently playing 2 Press the r reverse or f forward button corresponding to the direction you want search Release the button when you find the location you want to play If playback is paused when a search is performed there is no sou...

Page 18: ...epeat play mode Press the REPEAT button on the remote control The REPEAT indicator will be shown in the PLAY MODE section of the display window Press the button repeatedly to choose the desired setting The selection in the information display changes in the following order REPEAT ALL Repeat playback of all of the CDs loaded in the 3 CD changer 3 CD changer only Ð REPEAT 1CD Repeat playback of the ...

Page 19: ...h has been adjusted when digital synchronized recording is performed the pitch is automatically restored to 0 The amount of pitch adjustment 0 is shown in the infor mation display when one of the pitch buttons is pressed When the speed of CD playback is changed using the pitch con trol buttons there is no signal output from the DIGITAL OUT OPTICAL terminal Pitch control cannot be used for the CDR ...

Page 20: ...ress the SET but ton When the SET button is pressed next the programming step and track number columns will flash 5 Select and enter a track number 1 99 by turning the MULTI JOG control and then press the SET button The following is an example of track 2 on the CD in tray DISC1 being entered as Step 01 When the SET button is pressed the programming of Step 01 is registered and programming for Step...

Page 21: ...press the CD Control STOP s button and use the MULTI JOG Control to review the programmed tracks The program steps PG S and track numbers will be shown in the information display one at a time as you toggle through the program S Step step number To return to continuous playback In the CD stop mode repeatedly press the PLAY MODE button on the main unit until the total playing time is shown in the i...

Page 22: ...ation display Press the CANCEL button to erase the track from the program The step number for each track following the one erased is automatically reduced by one i e steps are renumbered To erase the entire pro gram press the CANCEL button until PG NO PROGRAM is shown in the information display To change the contents of the program In the CD stop mode press the SET button followed by the CAN CEL b...

Page 23: ...Edit recording See page 29 Select tracks to be recorded from one or all of the CDs in the 3 CD changer while listening to them New to this feature is an automatic disc finalization function that can be set before recording begins High speed recording CD R 4x CD RW 2x Program Edit recording See page 30 Program tracks to be recorded from one or all of the CDs loaded in the 3 CD changer New to this f...

Page 24: ...at the original digital signals will be recorded regardless of the sampling frequency 32kHz 44 1kHz or 48kHz of the signal from the source 1 Insert a recordable CD R or CD RW 2 Select a recording source Use the REC SELECTOR button to select the recording source Press the button repeatedly to toggle between sources The source type will appear in the display window and a lamp DIGITAL CD or LINE will...

Page 25: ...ur seconds of silence the unit stops in the recording pause mode after the button is released The REC MUTE function cannot be used at the beginning of recording started from the recording pause mode Fade In Fade Out Recording analog only This feature can be used to record analog sound other than CD ANALOG Located immediately below the CONTROL CD button on the remote control is a special button FAD...

Page 26: ...main unit remote control to insert a track mark Notes Even if automatic track marking is turned off automatic track marking will be performed during synchronized one button recording When this occurs manual track marking is tempo rarily disabled Tracks must be at least four seconds in length Pressing the SET button less than four seconds after the previous track mark cre ates a new track mark once...

Page 27: ...gnal If the source CD being recorded from the 3 CD changer is itself a first generation digital copy digital recording cannot be per formed When this occurs the recording type will switch from digital to analog automatically This type of recording cannot be started during CD playback It must start from the beginning of the first track of the CD When the CD REC button is pressed the function is aut...

Page 28: ...ng level when recording a digital signal If the source CD being recorded from the 3 CD changer is itself a first generation digital copy digital recording cannot be per formed When this occurs the recording type will switch from digital to analog automatically Upon completion of recording STOP DUBBING is shown in the information display Always wait for the STOP DUBBING message to be cleared before...

Page 29: ...ain unit remote control to add the track to the program or the CANCEL button main unit remote control to skip the track a When the track now playing is to be recorded b When the track is not to be recorded When the first track has been stored in memory After making the last programming choice START TO DUB is shown in the information display Press the SET button main unit remote control to continue...

Page 30: ...nformation display Notes There is no need to adjust the recording level when recording a digital signal The last program information the most recently created pro gram still stored in the unit s memory will be erased if the trays of the 3 CD changer are opened This type of recording allows you to make a program of your favor ite tracks on any of the CDs loaded in the 3 CD changer in any order you ...

Page 31: ...D FINALIZE is shown in the information window No response no input assumes that finalization is to be per formed or you can press the SET button main unit remote con trol to confirm that finalization is to be done Press the CANCEL button main unit remote control to keep the disc unfinalized Note This message will be shown if the menu FINALIZE function setting is ON The default setting is OFF When ...

Page 32: ...hen performing synchronized one button recording or using the listening edit or program edit modes to record from the 3 CD changer to the CDR 1 When the unit is in the stop mode press the MENU button main unit remote control 2 Turn the MULTI JOG control or press the P p menu button on the remote control until TRACK SPACE is shown in the information display 3 Press the SET button main unit remote c...

Page 33: ...ecording pause mode The source device must be stopped at this time 4 Start playing of the source unit Notes When recording with the SYNCHRO button recording starts when the input level is detected If the track starts very quietly with a low input level the beginning of the track may not be recorded When recording from an analog source such as records or tapes recording may not start if the recordi...

Page 34: ...e songs from external digital CD or MD players This function is only for use with externally connected digital audio equipment It cannot be used with the 3 CD changer Note When performing synchronized start recording from an external component it is possible that part of the signal at the beginning of the first track will not be recorded If this should occur please perform manual recording 1 Load ...

Page 35: ... meter is not exceeded when the highest signal is applied The pitch controls may be used to adjust the speed of CD play back for mixing and recording purposes When you have finished adjusting the recording level and the mix balance set the sources back to the point where you want to start recording from 5 Press the CDR Control PLAY p button on the main unit to start recording 6 Start playback of t...

Page 36: ...back on this unit and other CD players that support the track skip function You cannot use the track skip function when recording to unfi nalized CD R discs or CD RW discs from the 3 CD changer 1 Load the unfinalized CD RW to be edited in the CDR disc tray The number of tracks and play time are shown in the informa tion display 2 When the unit is in the stop mode press the MENU button main unit re...

Page 37: ...all the way through the disc s TOC Table of Contents ERASE DISC flashes in the information display during the eras ing process Note If the disc is damaged or there is disc related trouble this func tion may not be possible 1 Load the CD RW to be erased in the CDR disc tray The number of tracks and play time are shown in the informa tion display 2 When the unit is in the stop mode press the MENU bu...

Page 38: ...after they have been finalized During the finalization process it will not be possible to remove or load discs in the 3 CD changer nor is playback of CDs loaded in the 3 CD changer possible Once a CD R disc has been finalized further recording on that disc cannot be performed However if you erase the TOC Table of Contents on a CD RW disc the disc can be recorded on again 1 Load a finalized CD RW d...

Page 39: ...tting to OFF using the following procedure see step 4 1dts is trademark of Digital Theater Systems Inc 2HDCD is a registered trademark of Pacific Microsonic Inc Note When recording from the 3 CD changer the sampling rate con verter is always turned off 1 When the unit is in the stop mode press the MENU button main unit remote control 2 Turn the MULTI JOG control on the main unit or press the P p m...

Page 40: ... and the unit is reset to the factory default settings 1 When the unit is in stop mode press the MENU button main unit remote control 2 Turn the MULTI JOG control on the main unit or press the P p menu button on the remote control until SET DEFAULT is shown in the information display 3 Press the SET button main unit remote control SET DEFAULT is shown in the information display Press the CANCEL bu...

Page 41: ...column stops flashing and the minutes column starts flashing 6 Turn the MULTI JOG control on the main unit until the minutes column reads 15 7 Press the SET button In case of the standby mode 1 Press the MENU button main unit 2 Follow the instructions for steps 4 7 above The current time 13 15 is shown in the information display If the CANCEL button is pressed while setting the minutes col umn the...

Page 42: ...Press the MENU button twice The present time is shown in the information dis play Follow the instructions for steps 4 7 above For instructions on how to use the daily timer and one time timer please refer to the following pages To ascertain the correct time In most areas there is a telephone number you can call for the cor rect time Consult your telephone directory for assistance SL PR300EB fm Pag...

Page 43: ...ops flashing and the minute column starts flashing 9 Turn the MULTI JOG control on the main unit to set the minutes column to 15 10 Press the SET button The off time of the timer is shown and the hour column flashes 11 Turn the MULTI JOG control on the main unit to set the hour column to 8 12 Press the SET button The hour column stops flashing and the minutes column flashes 13 Turn the MULTI JOG c...

Page 44: ...dby Mode 1 Press the MENU button to display DAILY TIMER or ONCE TIMER 2 Press the CANCEL button main unit remote control DAILY OFF or ONCE OFF is shown in the information display the DAILY p or ONCE p indicator is cleared from the display window and the timer operation is canceled With Unit Power Turned On 1 Follow steps 1 through 5 in Timer Play wake up play to display DAILY TIMER or ONCE TIMER 2...

Page 45: ...two min utes before the programmed start time When an operation is completed once using the Once Timer mode the timer program is cleared If digital signals are not received when timed recording starts using the DIGITAL IN setting UNLOCK is shown in the information display and no signals will be recorded When using the timer to record a digital satellite broadcast pro gram for instance check to see...

Page 46: ...ng and erasing playback is possible Recording is possible if the disc has been recorded to by another unit and the adjustment information has been maintained Replace the disc with a CD R or CD RW that can be recorded on CDR NO DISC A CD CD R or CD RW has not been inserted Insert a CD CD R or CD RW BLANK DISC A CD R or CD RW with nothing recorded on it has been inserted Playback and erase functions...

Page 47: ...ons and perform analog recording NOT AUDIO IN The digital signal is not an audio format Set the source component to output a digital audio signal For example if a data track on a CD is selected switch to a track that con tains audio data NOT REC MUTE The 1 REC REC MUTE button has been pressed at a time when the function cannot be performed See page 25 for information on when the muting function ca...

Page 48: ...he following is a brief description of some of the acronyms used in this manual ATIP Absolute Time in Pregroove The reflected light returned from the pregroove of a CD R disc generates a carrier signal providing tracking motor control and focus signals Additional information including the Recommended Optimum Recording Power value is also encoded in a frequency modulation of the carrier signal CD R...

Page 49: ...SC is displayed Replace the disc with one on which tracks have been recorded The time display flashes in the dis play window A power failure has occurred or the power cord has been disconnected Set the clock and re program the timer 41 CD PLAYER Play fails to start The CD has been inserted upside down Insert it properly with the label side facing up 14 Condensation has formed on the lens Turn on t...

Page 50: ...not be played An unfinalized CD RW may not be played properly For example sound files that you have deleted may be played In such a case finalize the disc first or use the CDR of this unit for play You cannot skip tracks on an unfinalized CD R or CD RW disc Be sure to store CDs in their cases to protect them from dust scratches and warping Do not place or store CDs in the following places Location...

Page 51: ...3 during playback 1 kHz Pickup Wavelength 785 nm Laser power No hazardous radiation is emitted Timer Section Timer system DAILY TIMER operation ON OFF timer ONCE TIMER operation ON OFF timer Clock display 24 hour display Common Specifications Inputs Analog LINE IN 300 mV Full scale 12 dB 50 kΩ Digital OPTICAL x 1 COAXIAL x 1 Sampling frequency 32 kHz 44 1 kHz 48 kHz Outputs Analog LINE x 1 set 2 V...

Page 52: ...Matsushita Electric Industrial Co Ltd Web site http www panasonic co jp global RQT6091 B M0901YN0 SL PR300EB cover2 fm Page 45 Thursday September 20 2001 4 44 PM ...

Reviews: