background image

9

LSQT1214

Before using

6

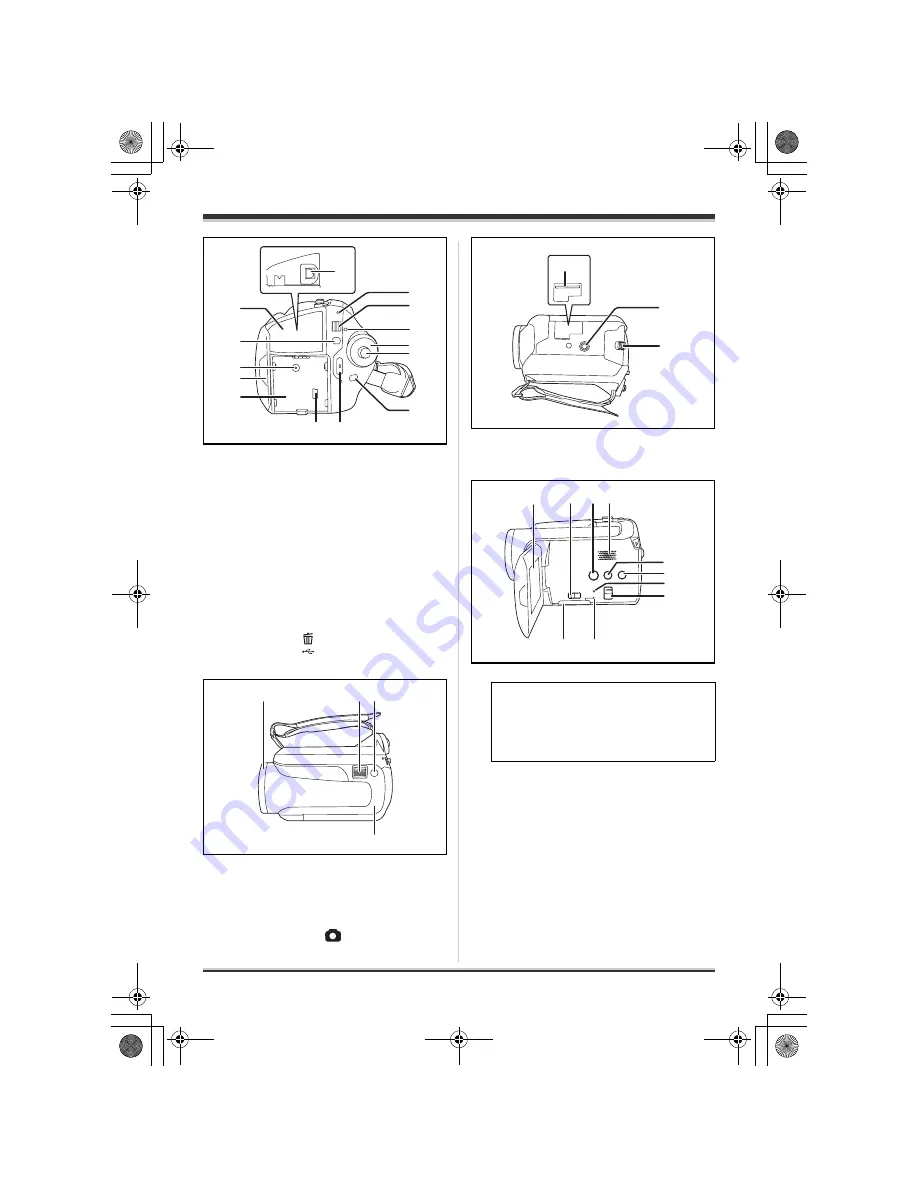
Terminal cover

7

Menu button [MENU] (

l

27)

8

DC input terminal [DC/C.C. IN] (

l

21)

9

LCD monitor open part (

l

11)

10 Battery holder (

l

18)

11 Audio-video output terminal [A/V] 

(

l

70, 71)

12 Status indicator (

l

21)

13 Power switch [OFF/ON] (

l

21)

14 HDD/computer access lamp [ACCESS/

PC] (

l

16, 80)

15 Mode dial (

l

23)

16 Joystick (

l

23)

17 Delete button [

] (

l

59, 63, 64)

18 USB terminal [

] (

l

72, 79)

19 Recording start/stop button (

l

34)

20 Lens cover open/close ring (SDR-H250) 

(

l

10)

21 When recording: Zoom lever [W/T] (

l

41)

When playing back: Volume lever 
[

s

VOL

r

] (

l

55)

22 Photoshot button [

] (

l

37)

23 Illumination LED (

l

88)

24 Card slot (

l

22)

25 Tripod receptacle (

l

11)

26 Battery release lever [BATTERY] (

l

18)

27 LCD monitor (

l

11)

28 Card slot open lever (

l

22)

29 DVD COPY button [DVD COPY] (

l

81)

30 Speaker
31 Power LCD plus button 

[POWER LCD PLUS] (

l

31)

32 Video light button [LIGHT] (SDR-H250) 

(

l

42)

33 Reset button [RESET] (

l

99)

34 Mode select switch [AUTO/MANUAL/

FOCUS] (

l

33, 48, 49)

35 Card slot cover [SD CARD] (

l

22)

36 Card access lamp [ACCESS] (

l

17, 80)

11

12

14

13

15
16

18

6

7

8
9

10

17

19

21 22

23

20

Due to limitations in LCD production 
technology, there may be some tiny bright 
or dark spots on the LCD monitor screen. 
However, this is not a malfunction and 
does not affect the recorded picture.

25

26

24

27

29 30

31

36

35

33

32

28

34

LSQT1214_GN.book  9 ページ  2007年2月8日 木曜日 午後8時50分

Summary of Contents for SDR-H20

Page 1: ...d Hard Disk Video Camera Model No SDR H250GN SDR H20GN The illustration shows SDR H250 SDR H20 does not have a video light Before use please read these instructions completely LSQT1214 A LSQT1214_GN book 1 ページ 2007年2月8日 木曜日 午後8時50分 ...

Page 2: ...OTHER CONFINED SPACE ENSURE THE UNIT IS WELL VENTILATED TO PREVENT RISK OF ELECTRIC SHOCK OR FIRE HAZARD DUE TO OVERHEATING ENSURE THAT CURTAINS AND ANY OTHER MATERIALS DO NOT OBSTRUCT THE VENTILATION VENTS DO NOT OBSTRUCT THE UNIT S VENTILATION OPENINGS WITH NEWSPAPERS TABLECLOTHS CURTAINS AND SIMILAR ITEMS DO NOT PLACE SOURCES OF NAKED FLAMES SUCH AS LIGHTED CANDLES ON THE UNIT DISPOSE OF BATTER...

Page 3: ...gistered trademark of Leica Camera AG Microsoft Windows and DirectX are either registered trademarks or trademarks of the Microsoft Corporation in the United States and or other countries IBM and PC AT are registered trademarks of International Business Machines Corporation of the U S Celeron Intel and Pentium are the registered trademarks or trademarks of the Intel Corporation in the United State...

Page 4: ... with the video light SDR H250 42 Backlight compensation function 43 Fade in fade out function 43 Soft skin mode 44 Tele macro function SDR H250 45 Colour night view function 45 Self timer recording 46 Recording guideline function 46 Wide mode 47 Image stabilizer function 47 Wind noise reduction function 47 Manual recording functions 48 Scene mode 48 Manual focus adjustment 49 White balance 49 Man...

Page 5: ...edures 79 About the computer display 80 To disconnect USB cable safely 81 Using the recorded images on a computer 81 DVD COPY function 81 Playing back and importing images 82 Creating DVD Video discs with the selected images 84 Others Menus 86 Menu list 86 Other menus 87 Indications 89 Indications 89 Messages 91 Functions that cannot be used simultaneously 93 Frequently asked questions 94 Troubles...

Page 6: ...also record motion pictures and still pictures on an SD card Easy recording l 34 No need to search for the recording start position The new recording will not overwrite any previously recorded scene Easy playback l 53 Recorded scenes are displayed as thumbnails You can easily search for the scenes you want to watch HDD HDD HDD LSQT1214_GN book 6 ページ 2007年2月8日 木曜日 午後8時50分 ...

Page 7: ...urite scenes recorded on the HDD Using with a computer l 75 If you use the supplied software you can create a backup DVD of the scenes recorded on this unit with just one button You can also make an original DVD Video by exporting the scenes to a computer and then editing them LSQT1214_GN book 7 ページ 2007年2月8日 木曜日 午後8時50分 ...

Page 8: ...l 50 Remote control sensor SDR H250 l 13 5 Microphone built in stereo SD Memory Card 512 MB Battery pack SDR H250 Battery pack SDR H20 AC adaptor DC cable AV S cable AC cable Remote control SDR H250 Button type battery SDR H250 Lens cap SDR H20 USB cable CD ROM Optional accessories AC adaptor VW AD11GN Battery pack lithium CGR DU06 640 mAh SDR H20 Battery pack lithium CGA DU07 680 mAh SDR H20 Batt...

Page 9: ...l 37 23 Illumination LED l 88 24 Card slot l 22 25 Tripod receptacle l 11 26 Battery release lever BATTERY l 18 27 LCD monitor l 11 28 Card slot open lever l 22 29 DVD COPY button DVD COPY l 81 30 Speaker 31 Power LCD plus button POWER LCD PLUS l 31 32 Video light button LIGHT SDR H250 l 42 33 Reset button RESET l 99 34 Mode select switch AUTO MANUAL FOCUS l 33 48 49 35 Card slot cover SD CARD l 2...

Page 10: ...ver when not in use Rotate the lens cover open close ring Attach the lens cap to protect the surface of the lens 1 Pass the end of the lens cap cord through the belt 2 Pass the lens cap through the loop 3 To attach or remove the lens cap hold both sides of the lens cap with the tips of your finger and thumb Using grip belt Using the lens cover SDR H250 37 3 1 2 Attaching the lens cap SDR H20 LSQT1...

Page 11: ...u can record the image while viewing it on the LCD monitor 1 Place your finger on the LCD monitor open part A and pull the LCD monitor out in the direction of the arrow It can open up to 90o 2 Adjust the angle of the LCD monitor as desired It can rotate up to 180o A towards the lens or 90o B towards the opposite direction The brightness and colour level of the LCD monitor can be adjusted from the ...

Page 12: ...pe battery When the button type battery runs down replace it with a new battery part number CR2025 The battery should normally last about 1 year however this depends on how frequently the unit is used Keep the button type battery out of the reach of children Using the remote control SDR H250 ZOOM START STOP PHOTO SHOT EXT DISPLAY DATE TIME VOL PLAY STOP SKIP SKIP MENU ENTER PAUSE SEARCH STILL ADV ...

Page 13: ... the unit s remote control sensor A Within approx 5 m Angle Approx 10o up and 15o down left and right The remote control is intended for indoor operation Outdoors or under strong light the unit may not operate properly even within the usable ranges A A LSQT1214_GN book 13 ページ 2007年2月8日 木曜日 午後8時50分 ...

Page 14: ...atted in FAT32 system Concerning the internal HDD and cards that can be used on this unit Internal HDD Hard Disk Drive SD Memory Card SDHC Memory Card Display on the screen Indication in these instructions HDD SD Capacity 30 GB 1 8 MB 16 MB 32 MB 64 MB 128 MB 256 MB 512 MB supplied 1 GB 2 GB 4 GB Functions Recording motion pictures 2 Recording still pictures Creating playlists available not availa...

Page 15: ... 128 MB jSD cards from 256 MB to 4 GB other than the ones mentioned above Please confirm the latest information on the following website This website is in English only http panasonic jp support global cs e_cam Handling precautions Do not touch the terminals on the back of the card Do not expose the terminals of the card to water garbage or dust Do not place the card in the following areas jIn dir...

Page 16: ...l 91 Do not use the unit in a low pressure area The HDD may be damaged if you use this unit where the altitude is more than 3000 m Back up important recorded data to protect it Save recorded data periodically on a computer DVD disc etc for backup purposes If the HDD fails the recorded data cannot be repaired ACCESS PC lamp When this unit accesses the HDD reading recording playback erasing etc the ...

Page 17: ... the following operations are performed when the access lamp is lit then the SD card or the recorded data may be damaged or this unit may malfunction sOpening the card slot cover sRemoving the SD card sOperating the OFF ON switch or the mode dial sRemoving the battery or disconnecting the AC adaptor LSQT1214_GN book 17 ページ 2007年2月8日 木曜日 午後8時50分 ...

Page 18: ...t the battery holder and slide it until it clicks While sliding the BATTERY lever slide the battery to remove it Hold the battery with your hand so it does not fall Before removing the battery be sure to set the OFF ON switch to OFF and check that the status indicator is off Charging the battery Lights up Charging Goes off Charging completed Flashing The battery is over discharged discharged exces...

Page 19: ...ry CGA DU12 optional 7 2 V 1150 mAh 2 h 25 min CGA DU14 optional 7 2 V 1360 mAh 2 h 45 min CGA DU21 optional 7 2 V 2040 mAh 3 h 55 min Battery model number Voltage capacity Charging time Supplied battery CGR DU06 optional 7 2 V 640 mAh 1 h 40 min CGA DU07 optional 7 2 V 680 mAh 1 h 30 min CGA DU12 optional 7 2 V 1150 mAh 2 h 25 min CGA DU14 optional 7 2 V 1360 mAh 2 h 45 min CGA DU21 optional 7 2 ...

Page 20: ...he battery will become shorter in low temperatures We recommend charging a spare battery for use when recording Battery model number Voltage capacity Recording destination Maximum continuously recordable time Actual recordable time Supplied battery CGR DU06 optional 7 2 V 640 mAh HDD 1 h 35 min 40 min SD 1 h 45 min 45 min CGA DU07 optional 7 2 V 680 mAh HDD 1 h 40 min 45 min SD 1 h 55 min 50 min C...

Page 21: ...he unit is turned on with the lens cap attached the automatic white balance adjustment l 104 may not function properly Set the OFF ON switch to ON The status indicator A lights and the power turns on When the unit is turned on for the first time a message asking you to set the date and time will appear Select YES and set the date and time l 29 When the unit is turned on for the first time a select...

Page 22: ...power Check that the status indicator has gone off 2 Open the LCD monitor and then slide the card slot open lever A to open the card slot cover 3 Insert remove the SD card into from the card slot When inserting an SD card face the label side B upwards and press it straight in as far as it goes When removing the SD card press the centre of the SD card and then pull it straight out Set the OFF ON sw...

Page 23: ... then press the joystick to set it Menu screen operations l 27 Rotate the mode dial to select or 1 Press the centre of the joystick and icons will be displayed on the screen The indication disappears when the centre of the joystick is pressed again The indication changes each time the joystick is moved down Video recording mode l 34 Use this to record motion pictures Video playback mode l 53 Use t...

Page 24: ... to be played back and press the joystick The selected scene is played back on the full screen The operation icon is automatically displayed on the screen 2 Move the joystick up down left or right to operate The operation icon appears or disappears each time the centre of the joystick is pressed Operations during playback LSQT1214_GN book 24 ページ 2007年2月8日 木曜日 午後8時50分 ...

Page 25: ...1 Tele macro SDR H250 45 In manual mode 3 3 3 White balance 49 2 Iris or gain value 51 1 Shutter speed 51 In manual focus mode 4 4 21 Manual focus adjustment 49 Icon Direction Function Page 1 3 Playback pause 53 4 Stop playback and show thumbnails 53 2 Skip 53 6 Rewind 54 2 Reverse slow frame playback during pause 54 9 1 Skip 53 5 Fast forward 54 1 Forward slow frame playback during pause 54 1 2 1...

Page 26: ...ance 49 2 Iris or gain value 51 1 Shutter speed 51 In manual focus mode 4 4 21 Manual focus adjustment 49 Icon Direction Function Page 1 3 Slide show start pause 57 4 Stop playback and show thumbnails 57 E 2 Playback previous picture during pause 57 D 1 Playback next picture during pause 57 1 2 1 2NEXT NEXT 1 2NEXT 2 2 2 2NEXT NEXT 2 2NEXT 3 3 3 3NEXT NEXT 3 3NEXT 4 4 4 4NEXT NEXT 4 4NEXT LSQT1214...

Page 27: ...lect EXIT When the help mode is used functions cannot be set When the help mode is used motion pictures and still pictures cannot be recorded Switching the language You can switch the language on the screen display or the menu screen 1 Press the MENU button then select LANGUAGE and press the joystick 2 Select English and press the joystick Using the menu screen Refer to Menu list l 86 for informat...

Page 28: ...up or down in order to select the desired item 7 Press the joystick to enter the selection To get back to the previous screen Move the joystick left To exit the menu screen Press the MENU button The menu screen does not appear during recording or playing You cannot start other operations while the menu screen appears The menu screen transition is the same as when the buttons on the main unit are u...

Page 29: ...e joystick up or down to set the desired value The year will change as follows 2000 2001 2099 2000 The 24 hour system is used to display the time 3 Press the joystick to enter the selection The clock function starts at 00 seconds when the joystick is pressed After pressing the MENU button to finish the setting check the date and time display Changing the date and time display style Press the MENU ...

Page 30: ...s still being recharged Adjusting the LCD monitor 1 Press the MENU button then select SETUP LCD SET YES and press the joystick 2 Move the joystick up or down to select the item to be adjusted Then move the joystick left or right to make the adjustment The bar display moves BRIGHTNESS Brightness of the LCD monitor COLOUR Colour level of the LCD monitor When the LCD monitor is rotated by 180 towards...

Page 31: ... affect the images to be recorded If you turn on the unit when the AC adaptor is used this function will automatically be Bright SDR H250 The LCD monitor will become a little darker when the video light is lit Increasing and decreasing the brightness of the entire LCD monitor POWERLCD PLUS 1 2 3 5 4 1 2 1 2 LSQT1214_GN book 31 ページ 2007年2月8日 木曜日 午後8時50分 ...

Page 32: ...Keep your arms near your body 5 Slightly open your legs When you are outdoors record pictures with the sunlight behind you If the subject is backlit it will become dark in the recording When recording make sure your footing is stable and there is no danger of colliding with another person or an object Basic camera positioning 4 5 1 2 3 LSQT1214_GN book 32 ページ 2007年2月8日 木曜日 午後8時50分 ...

Page 33: ... unnecessary recording when you forget to pause recording and walk with the unit tilted upside down while recording continues If the unit continues to be tilted upside down from the normal horizontal position while recording motion pictures it is automatically set to recording pause Rotate the mode dial to select Press the MENU button then select SETUP AGS ON and press the joystick The AGS functio...

Page 34: ...ct ratio setting l 47 before recording the images or when watching them on the connected TV l 70 SDR H250 Open the lens cover before turning the unit on If the unit is turned on with the lens cover closed the automatic white balance adjustment may not function properly SDR H20 Remove the lens cap before turning the unit on If the unit is turned on with the lens cap attached the automatic white bal...

Page 35: ...elected recording destination C Remaining time left for recording When the remaining time is less than 1 minute R 0h00m flashes red D Recording time elapsed Sound is recorded from the internal stereo microphone on the front of the unit Take care not to block this microphone If the write protection switch on the SD card is set to LOCK it cannot be used for recording l 15 Each time the unit enters t...

Page 36: ...the background jWhen the unit is moved too much or too fast jWhen a subject with sharp movements has been recorded Particularly if it has been recorded in LP mode If you record still pictures on the HDD or an SD card the recordable time available for the motion picture will become shorter Recording modes and recordable time available for the motion picture Recording mode XP High quality SP Normal ...

Page 37: ...the lens cover closed the automatic white balance adjustment may not function properly SDR H20 Remove the lens cap before turning the unit on If the unit is turned on with the lens cap attached the automatic white balance adjustment may not function properly 1 Turn the unit on 2 Rotate the mode dial to select 3 Open the LCD monitor 4 Press the MENU button then select MEDIA SELECT HDD or SD CARD to...

Page 38: ...s clearly When zooming in on the subject with a magnification of 4k or higher it is difficult to reduce the slight shaking from holding this unit by hand We recommend decreasing the zoom magnification and approaching the subject when recording When recording still pictures hold the unit firmly with your hands and keep your arms stationary at your side so as not to shake the unit You can record sta...

Page 39: ... front of a light source jWhen close subjects and far subjects are included in the same scene jWhen the scene is dark jWhen there is a bright part in the scene jWhen the scene is filled with only horizontal lines jWhen the scene lacks contrast Concerning the focusing area SDR H250 When there is a contrasting object ahead or behind the subject in the focus area the subject may not be focused If so ...

Page 40: ... the picture quality Press the MENU button then select BASIC PICT QUALITY desired item and press the joystick Number of pixels and picture quality for still picture recording Icon Aspect Number of pixels 4 3 2048k1512 4 3 1280k960 4 3 640k480 16 9 1920k1080 Icon Aspect Number of pixels 4 3 640k480 16 9 640k360 Still pictures with a high picture quality are recorded Priority is given to the number ...

Page 41: ...bject may not be focused easily If you take your finger off the zoom lever during zoom operation the operation sound may be recorded When returning the zoom lever to the original position move it quietly HDD SD If the zoom magnification exceeds 10k SDR H250 32k SDR H20 then the digital zoom function will be activated The maximum magnification provided by the digital zoom can be switched Rotate the...

Page 42: ...layed even if you press the joystick Only some indications will appear on the screen When appears return the direction of the LCD monitor to normal position and check the warning alarm indication l 91 HDD SD Gain up mode works with the video light to enhance the light s brightness and brighten the natural colours in a scene Gain up mode cannot be used in picture recording mode Rotate the mode dial...

Page 43: ...ct appears dark Rotate the mode dial to select or 1 Press the joystick Then move the joystick down to display the icon shown in the illustration 2 Move the joystick up to select ª The image on the screen will become brighter To return to normal recording Select ª again If you turn off the power or operate the mode dial the backlight compensation function is cancelled HDD SD Fade in The image and a...

Page 44: ...urn off the power the fade function is cancelled While the fade in fade out function is selected it takes several seconds to display the image when you start recording It also takes several seconds to pause recording The thumbnails of scenes recorded using fade in become black or white HDD SD This is more effective if you record a person closely from the torso up Rotate the mode dial to select or ...

Page 45: ...focus manually l 49 In the following cases the tele macro function is cancelled jThe zoom magnification becomes lower than 10k jThe power is turned off or the mode dial is operated HDD SD This function allows you to record colour subjects in dark locations to stand out against the background Attach this unit to a tripod and you can record images free from vibration Minimum required illumination ap...

Page 46: ... the button is pressed halfway SDR H250 When you press the Photoshot button fully in auto focus mode the subject is focused just before recording SDR H250 To stop the timer midway through Press the MENU button The self timer setting is cancelled If you turn off the power the self timer standby mode is cancelled Depending on the time taken to bring the subject into focus the recording may take long...

Page 47: ...ilizer function Press the MENU button then select ADVANCED O I S OFF and press the joystick This function s default setting is ON In the picture recording mode pressing the Photoshot button halfway increases the effect of the image stabilizer function MEGA optical image stabilizer SDR H250 In the following cases the image stabilizer function may not work effectively jWhen the digital zoom is used ...

Page 48: ...witch to MANUAL 2 Press the MENU button then select BASIC SCENE MODE desired item and press the joystick 5 Sports To record sports scenes or scenes where there are quick motions Portrait To make people stand out against the background Low light To make the scene brighter in dark conditions Spotlight To make the subject under a spotlight look more attractive Surf snow To record images in bright pla...

Page 49: ... become whitish HDD SD If auto focusing is difficult due to the conditions then manual focusing is available Rotate the mode dial to select or 1 Set the AUTO MANUAL FOCUS switch to MANUAL 2 Move the switch down and set it to FOCUS position The manual focus indication MF and the icon shown in the illustration appear 3 Move the joystick left or right to bring the subject into focus The subject may n...

Page 50: ...hite balance sensor detects the type of light source during recording Do not cover the white balance sensor during recording or it may not function properly About the black balance adjustment SDR H250 This is one of the 3CCD system functions that automatically adjusts the black when the white balance is set in the manual adjustment mode When the black balance is adjusted the screen Auto white bala...

Page 51: ...e first HDD SD Shutter Speed Adjust it when recording fast moving subjects Aperture Adjust it when the screen is too bright or too dark Rotate the mode dial to select or 1 Set the AUTO MANUAL FOCUS switch to MANUAL The icon shown in the illustration is displayed automatically 2 Move the joystick left or right to select aperture or shutter speed 3 Move the joystick left or right to make the adjustm...

Page 52: ...sitivity lowers and the noise on the screen may increase You may see vertical lines of light in the playback image of a brightly shining subject or highly reflective subject but this is not a malfunction During normal playback image movement may not look smooth When recording in an extremely bright place the screen may change colour or flicker If so adjust the shutter speed manually to 1 50 or 1 1...

Page 53: ...orded the next or previous page is displayed by moving the joystick If you move and hold the joystick up or down you can fast forward or fast rewind the pages The screen will not change at this time but the scene numbers and scroll bar display will change Release the joystick when you have arrived at the page with the scene you want to display 4 Press the joystick The selected scene is played back...

Page 54: ...and hold the joystick left to rewind Move the joystick again to increase the speed Normal playback is restored when you move the joystick up Operating with the remote control SDR H250 Press the 6 or 5 button 1 Move the joystick up during playback to pause the playback 2 Move and hold the joystick right Slow motion pictures will be played back in reverse when you move and hold the joystick left Nor...

Page 55: ...ton Adjust the speaker volume during playback Move the volume lever to change the volume level The further the indicator moves to the right the higher the volume level becomes When the adjustment is completed the volume setting display will disappear Recorded scenes are grouped by date on this unit Frame by frame playback To adjust the volume Towards r increases the volume Towards s decreases the ...

Page 56: ...ils 4 Select the scene to be played back Even if scenes are recorded on the same day they are grouped separately when the number of scenes exceeds 99 Press the MENU button then select PLAY SETUP RESUME PLAY ON and press the joystick If playback of a motion picture is stopped R appears on the thumbnail view of the stopped scene The resume position on the HDD and the SD card is memorised If playback...

Page 57: ...hold the joystick up or down you can fast forward or fast rewind the pages The screen will not change at this time but the file numbers and scroll bar display will change Release the joystick when you have arrived at the page with the file you want to display 4 Press the joystick The selected file is played back on the full screen The operation icon is automatically displayed on the screen 5 Move ...

Page 58: ... the SD card the access lamp is lit do not remove the SD card It takes time to display the file depending on the number of pixels of the file When a file is displayed as on the thumbnail display playback is not possible If you attempt to play back a file recorded in a different format or file data is defective an error message may appear The time displayed may be different from the recording time ...

Page 59: ...cept the locked scenes jWhen PLAY MODE is set to BY DATE All the scenes selected by date except the locked scenes 3 Only when SELECT is selected in step 2 Select the scene to be deleted then press the joystick The selected scene is encircled by a red frame When the joystick is pressed again the selected scene will be cancelled Up to 50 scenes can be set in succession 4 Only when SELECT is selected...

Page 60: ...e locked so that they are not deleted by mistake However please be aware that if a medium is formatted then all the data on the medium will be erased Rotate the mode dial to select Select HDD or SD CARD in MEDIA SELECT 1 Press the MENU button then select PLAY SETUP LOCK SET YES and press the joystick 2 Select the scene to be protected then press the joystick display appears and the selected scene ...

Page 61: ...k 2 Select the scene to be added to the playlist then press the joystick The selected scene is encircled by a red frame When the joystick is pressed again the selected scene will be cancelled Up to 50 scenes can be set in succession The scenes are registered in the playlist in the order that they were selected After creating a playlist the order of the scenes in it can be changed with the MOVE fun...

Page 62: ... a playlist will not affect the original scenes Select playlist playback mode l 62 Playing back a playlist steps 1 and 2 1 Press the MENU button then select EDIT ADD YES and press the joystick 2 Select the scene to be added then press the joystick The selected scene is encircled by a red frame When the joystick is pressed again the selected scene will be cancelled Up to 50 scenes can be set in suc...

Page 63: ... Select the position to insert the scene then press the joystick To continue moving other scenes in the playlist Repeat steps 2 3 To complete editing Press the MENU button Deleting scenes on a playlist will not affect the original scenes Deleting scenes one at a time Select playlist playback mode l 62 Playing back a playlist steps 1 and 2 1 Press the button during playback 2 When the confirmation ...

Page 64: ...dy been deleted when the deletion is cancelled cannot be restored To complete editing Press the MENU button You can also delete scenes by pressing the MENU button selecting EDIT DELETE and then selecting ALL or SELECT Deleting scenes on a playlist will not increase the remaining capacity for recording The playlist itself is deleted if you delete all the scenes in it When a playlist is deleted the ...

Page 65: ...complete editing Press the MENU button Deleting still picture files recorded on an SD card by other products A still picture file other than JPEG that cannot be played back on this unit may be erased You can also delete files by pressing the MENU button selecting DELETE and then selecting ALL or SELECT In case of ALL the deletion may take time if there are many files Do not turn off this unit whil...

Page 66: ...mber of prints set to be in DPOF is displayed 3 Move the joystick up or down to select the number of prints then press the joystick You can select from 0 to 999 The selected number of pictures can be printed with the printer supporting DPOF To cancel the setting set the number of prints to 0 You can also select multiple files in succession To complete the settings Press the MENU button To cancel a...

Page 67: ...ere selected 4 Only when SELECT is selected in step 2 Press the MENU button 5 When the confirmation message appears select YES then press the joystick Copying of the file starts Only when SELECT is selected in step 2 To continue copying other files Repeat steps 3 5 To cancel copying halfway Press the MENU button To complete editing Press the MENU button The copied files are recorded after the stil...

Page 68: ... unit HDD Information concerning the space used and remaining on the HDD is displayed Rotate the mode dial to select Select HDD in MEDIA SELECT Press the MENU button then select SETUP HDD STATUS YES and press the joystick To exit the information screen Press the MENU button The 30 GB hard drive utilizes a portion of the storage space for formatting file management and other purposes 30 GB is 30 00...

Page 69: ...n other products such as a computer the time spent for recording may become longer and you may not be able to use the SD card Depending on the type of SD card being used it may take time to format During formatting do not turn this unit off When you format the SD card use a battery with sufficient battery power or the AC adaptor Do not open the card slot cover while formatting The formatting will ...

Page 70: ...have a TV with an SD card slot the motion pictures and still pictures recorded on an SD card may be played back on the TV Refer to the operating instructions of the TV for details about TV compatibility If the images are not displayed correctly on a wide screen TV adjust the aspect setting on the TV Refer to the operating instructions of the TV for details If the pictures are displayed squeezed ho...

Page 71: ...w Insert the SD card into the SD card slot on the DVD recorder then dub the contents onto the hard disk or a disc For details on how to dub the images refer to the operating instructions of the DVD recorder With a VCR HDD SD You can dub images played back on this unit onto other video devices You can create a playlist by gathering the scenes on the HDD that you want to dub then dub the scenes in t...

Page 72: ...device for details To stop dubbing Stop recording on the connected device Then stop playback on this unit If the date and time display and function indication are unnecessary cancel them before dubbing SDR H250 l 29 71 With a printer PictBridge HDD SD To print pictures by directly connecting this unit to the printer use a printer compatible with PictBridge Read the operating instructions for the p...

Page 73: ...cable after the pictures have been printed When you want to stop printing halfway Move the joystick down A confirmation message appears If YES is selected the number of prints set is cancelled and the screen returns to step 3 If NO is selected all the settings are kept and the screen returns to step 3 Avoid the following operations during printing These operations disable proper printing jDisconne...

Page 74: ...ble to print still pictures recorded with other products When the unit is connected directly to the printer the DPOF settings cannot be used Connect the printer directly to this unit Do not use a USB hub LSQT1214_GN book 74 ページ 2007年2月8日 木曜日 午後8時50分 ...

Page 75: ... original DVD Video discs l 84 You can also write data in the DVD VR DVD Video Recording format on DVD RAM or DVD RW discs D You can automatically write the images recorded on this unit s HDD to DVDs and create DVD Video discs l 81 You can also make DVD Video discs from the playlists you have created on the unit E You can exit ImageMixer3 for Panasonic F You can jump to the software support site G...

Page 76: ...ing system is not guaranteed Operating environment Hardware IBM PC AT compatible personal computer OS Microsoft Windows 2000 Professional Service Pack 3 or Service Pack 4 Microsoft Windows XP Home Edition Microsoft Windows XP Professional CPU Intel Pentium III 800 MHz or higher Pentium 4 Celeron or AMD Athlon XP Duron of equivalent performance Intel Pentium 4 1 7 GHz or higher recommended RAM Wind...

Page 77: ...DVD discs listed in the table above Refer to the operating instructions of your computer for details about the DVD discs which can be written to on the computer To playback a DVD disc created using ImageMixer3 the player must support playback of that DVD disc Refer to the operating instructions of the player Use discs made by a trustworthy manufacturer It may not be possible to record images prope...

Page 78: ...on screen does not appear double click the CD ROM drive icon in My Computer 2 Select the language for the installation and click Next 3 Click Next The software may not run properly if you cancel the installation at any point e g by clicking Cancel 4 Read carefully through the End User License Agreement check I accept the terms of the license agreement and click Next You cannot install the applicat...

Page 79: ...ting environment the name of the buttons may differ Example Change Remove Proceed with the uninstallation by following the on screen instructions After uninstalling the software be sure to reboot the computer Connection and recognition After the software is installed the unit must be connected to the computer and be correctly recognised by the computer Connect after installing the software If the ...

Page 80: ...lamp lights or appears on the LCD monitor Do not disconnect the USB cable or AC adaptor while the HDD or card is being accessed as it may damage the data The HDD and card cannot be accessed simultaneously It may be necessary to reboot the computer after connecting this unit to it for the first time When the unit is connected to a computer it is recognised as an external drive This unit supports on...

Page 81: ...ay not be displayed 2 Select USB Mass Storage Device and click Stop 3 Verify MATSHITA HDD Cam HDD USB Device or MATSHITA HDD Cam USB Device is selected and click OK Click Close and you can safely disconnect the cable If you disconnect the USB cable while the ACCESS PC lamp or card access lamp is on or while or appears on the LCD monitor it may damage the data Using the recorded images on a compute...

Page 82: ...rted to motion pictures and written onto the DVD disc Check on the DVD player or other player device whether the DVD Video disc you have created can be played properly If the disc cannot be played properly create the DVD Video disc by following the steps in Creating DVD Video discs with the selected images l 84 The images cannot be stored in the computer The images recorded on the DVD Video disc y...

Page 83: ...t it Select start All Programs Programs PIXELA ImageMixer3 for Panasonic ImageMixer3 for Panasonic 3 Click Playback Import Video The browser screen is displayed 4 Select SDR H250 SDR H20 HDD or Removable Disk SD card in Source The contents recorded on the HDD or SD card are displayed 5 To play back the scenes Click the desired scene and click Playback A To import images to your computer Click the ...

Page 84: ...n is not guaranteed with any other USB cables The USB function selection screen will appear 2 Select PC CONNECT HDD or SD CARD and press the joystick This unit will be automatically recognised by the computer and ImageMixer3 will start automatically If ImageMixer3 fails to start automatically take the following steps to start it Select start All Programs Programs PIXELA ImageMixer3 for Panasonic I...

Page 85: ...the menu screen by drag and drop You cannot add a still picture to the menu if it is not a file folder For details refer to software help l 79 11 Insert a DVD disc into the DVD drive and click Write tab It is recommended that you use a brand new DVD disc 12 Select the appropriate write settings and click Write 13 Check the write settings and click OK Writing to the disc starts When writing to the ...

Page 86: ... SET l 30 INITIAL SET l 88 ILLUMINATION l 88 DEMO MODE l 88 LANGUAGE l 27 Still picture recording menus BASIC SCENE MODE l 48 GUIDE LINES l 46 PICTURE SIZE l 40 PICT QUALITY l 40 CLOCK SET l 29 ADVANCED O I S l 47 SHTR EFFECT l 39 MEDIA SELECT HDD l 37 SD CARD l 37 SETUP DISPLAY l 87 DATE TIME l 29 DATE FORMAT l 29 FORMAT CARD 2 l 68 POWER SAVE l 87 BEEP SOUND l 88 LCD SET l 30 INITIAL SET l 88 IL...

Page 87: ... l 67 MEDIA SELECT HDD l 57 SD CARD l 57 SETUP DISPLAY l 87 DATE TIME l 29 DATE FORMAT l 29 FORMAT CARD 2 l 68 POWER SAVE l 87 BEEP SOUND l 88 LCD SET l 30 TV ASPECT l 70 ILLUMINATION l 88 LANGUAGE l 27 1 Only when MEDIA SELECT is set to HDD 2 Only when MEDIA SELECT is set to SD CARD DISPLAY The screen indications are selected as shown in the illustration below POWER SAVE OFF The power saving func...

Page 88: ...n ILLUMINATION This allows operations to be signaled by the lighting of the illumination LED on the top of the unit 1 Flash When you turn on the power When in a recording mode in orange When in a playback mode in blue 2 Flashes When you switch the mode to a recording mode in orange When you switch the mode to a playback mode in blue Lights During motion picture recording in orange During playback ...

Page 89: ... 30 R 10000 1 16 9 AUTO MNL Soft skin mode Tele macro SDR H250 Fade White Fade Black Colour night view function Video light SDR H250 Zoom microphone Wind noise reduction Power LCD plus function Motion picture recording mode 5 Sports mode Portrait mode Low light mode Spotlight mode Surf snow mode Auto white balance Indoor mode recording under incandescent lamp Outdoor mode Manual adjustment mode Wh...

Page 90: ...F already set to more than 1 Locked motion pictures and still pictures SDR H250 SDR H20 Number of recording pixels for still pictures 2048k1512 1920k1080 1280k960 640k480 640k480 640k360 The picture size is not displayed for still pictures recorded with other products that have different picture sizes from the sizes shown above Time display The built in battery is low l 30 The warning alarm indica...

Page 91: ...B or 16 MB SD card has been inserted in video recording mode CHECK CARD This card is not compatible or it cannot be recognised by the unit CARD LOCKED The write protection switch on the SD card is set to LOCK l 15 CARD FULL The SD card is full or the number of scenes has reached the maximum limit so no further data can be recorded Delete unnecessary scenes l 59 64 or insert a new SD card SCENE NUM...

Page 92: ... PLEASE TRY AGAIN AFTER A WHILE The unit has detected that it is being dropped so the operation has stopped INTERNAL TEMPERATURE TOO HIGH PLEASE TURN UNIT OFF AND WAIT A WHILE The internal temperature of this unit is high so it cannot be operated Turn off the power wait until the temperature falls and then turn on the power again OPERATION STOPPED TEMPERATURE TOO LOW The internal temperature of th...

Page 93: ...ction is used When the video light is on gain up mode When the iris gain is set Soft skin mode Set and cancel While recording Tele macro Set and cancel Help mode Video light on gain up mode In picture recording mode Scene mode When setting the AUTO MANUAL FOCUS switch to AUTO When the colour night view function is used When the video light is on When in video recording mode Change of white balance...

Page 94: ...pictures is not possible Is it possible to play back an SD card recorded with this unit on other products Motion pictures These can be played back on any device which supports motion pictures based on the SD Video standard the MPEG 2 video format and the MPEG 1 Audio Layer 2 audio format Still pictures These can be played on any device which supports DCF Design rule for Camera File system What sho...

Page 95: ...res Original still picture files JPEG files are also recorded onto the DVD disc Can I use the DVD COPY function to copy motion pictures recorded on SD cards onto DVD discs as well No you cannot You can use the DVD COPY function to copy only the images recorded on the HDD Can I make additions to a DVD disc on which data has already been written You can when you record data in the DVD VR format onto...

Page 96: ...8 Are you using the battery in an extremely cold place The battery is affected by ambient temperature In cold places the operating time of the battery becomes shorter Has the battery worn out The battery has a limited life If the operating time is still too short even after the battery is fully charged the battery has worn out and can no longer be used This unit cannot be operated though it is tur...

Page 97: ...y Close the card slot cover Recording starts but stops immediately The playback picture breaks up for a moment The unit is hot Follow the messages on the display To use the unit again turn the unit off and leave it for a while The unit arbitrarily stops recording Is the AGS function activated Record in the normal horizontal position or set AGS to OFF l 33 Can the SD card be used for motion picture...

Page 98: ... operating instructions of your TV and select the channel that matches the input used for the connection Is the TV ASPECT setting correct Change the setting to match the aspect ratio of the TV Press the MENU button then select SETUP TV ASPECT 16 9 or 4 3 and press the joystick Scenes or files cannot be deleted or edited Are the scenes or the files locked Locked scenes or files cannot be deleted Re...

Page 99: ...e RESET button with the projecting part of the lens cap B If you do not press the RESET button the power to this unit is turned off automatically about 1 minute later Even after you press the RESET button the indication may still appear repeatedly If so this unit needs repair Detach the power connected and consult the dealer who you purchased this unit from Do not attempt to repair the appliance b...

Page 100: ... The DVD COPY function cannot be used in the video recording mode or picture recording mode Rotate the mode dial to select or then press the DVD COPY button I cannot copy images using the DVD COPY function Have you already copied those images using the DVD COPY function Once images have been copied using the DVD COPY function they cannot be copied a second or subsequent time Import the images into...

Page 101: ...ffected Make sure to use the supplied cords and cables If you use optional accessories use the cords and the cables supplied with them Do not extend the cords and the cables Do not spray insecticides or volatile chemicals onto the unit If the unit is sprayed with such chemicals its body may be marred and the surface finish may peel off Do not leave rubber or plastic products in contact with the un...

Page 102: ...batteries when going out for recording Prepare batteries enough to last for 3 to 4 times the period during you want to record pictures in In cold places such as a ski resort the period during which you can record pictures is shortened When you travel do not forget to bring an AC adaptor so that you can recharge the batteries at your destination If you drop the battery accidentally check to see if ...

Page 103: ...t does form take the actions described below Causes of condensation Condensation takes place when the ambient temperature or humidity is changed as follows When this unit is brought inside from the cold e g a ski slope to a warm room When this unit is moved from an air conditioned car to outside When a cold room has been warmed up quickly When cool wind from an air conditioner is directly blown on...

Page 104: ...f certain light sources To avoid such phenomena adjust the white balance White balance adjustment determines the white colour under different light sources By recognising which is the white colour under sunlight and which is the white colour under a fluorescent light the unit can adjust the balance among the other colours Since the white colour is the reference for all the colours that make up lig...

Page 105: ...s lens inside moves mechanically it cannot keep up with a fast moving subject When for example recording a sports event with fast moving subjects the focus may lose its sharpness Recording a subject with little contrast It is easy to bring subjects with a sharp contrast or vertical lines or stripes into focus This means that a subject with little contrast such as a white wall may become blurry bec...

Page 106: ...or Total 800 K Effective pixels Moving picture 400 K 4 3 540 K 16 9 Still picture 410 K 4 3 550 K 16 9 Lens SDR H250 Auto Iris F1 8 to F2 8 Focal length 3 0 mm to 30 0 mm Macro Full range AF SDR H20 Auto Iris F1 8 to F3 7 Focal length 2 3 mm to 73 6 mm Macro Full range AF Zoom SDR H250 10k optical zoom 25 700k digital zoom SDR H20 32k optical zoom 50 1000k digital zoom Monitor 2 7z wide LCD monito...

Page 107: ...to 40 C Operating humidity 10 to 80 Operating altitude Less than 3000 m above sea level Recording media SD Memory Card 32 MB 1 64 MB 1 128 MB 1 256 MB 512 MB 1 GB 2 GB removable type FAT12 and FAT16 format corresponding SDHC Memory Card 4 GB removable type FAT32 format corresponding HDD 30 GB 2 fixed type Compression MPEG 2 Recording mode and transfer rate XP 10 Mbps VBR SP 5 Mbps VBR LP 2 5 Mbps ...

Page 108: ...2 and FAT16 format corresponding SDHC Memory Card 4 GB removable type FAT32 format corresponding HDD 30 GB fixed type Compression JPEG Design rule for Camera File system based on Exif 2 2 standard DPOF corresponding Picture size SDR H250 2048k1512 1920k1080 16 9 1280k960 640k480 SDR H20 640k480 640k360 16 9 Number of recordable pictures Refer to page 109 Power source Power consumption DC output AC...

Page 109: ...0 320 512 MB 310 490 410 640 1 GB 630 990 820 1290 2 GB 1280 2010 1670 2630 4 GB 2520 3950 3290 5170 Picture size 1280k960 640k480 Picture quality HDD 30 GB 47070 74890 99999 99999 SD 8 MB 7 12 37 75 16 MB 20 32 92 185 32 MB 45 73 200 410 64 MB 96 155 430 850 128 MB 185 300 820 1640 256 MB 390 620 1710 3410 512 MB 770 1230 3390 6780 1 GB 1550 2470 6790 13580 2 GB 3160 5030 13820 27640 4 GB 6200 98...

Page 110: ... the number of recordable still pictures will become smaller Picture size 640k480 640k360 Picture quality HDD 30 GB 99999 99999 99999 99999 SD 8 MB 37 75 37 75 16 MB 92 185 92 185 32 MB 200 410 200 410 64 MB 430 850 430 850 128 MB 820 1640 820 1640 256 MB 1710 3410 1710 3410 512 MB 3390 6780 3390 6780 1 GB 6790 13580 6790 13580 2 GB 13820 27640 13820 27640 4 GB 27150 54290 27150 54290 0 3M 0 2 LSQ...

Page 111: ...111 LSQT1214 LSQT1214_GN book 111 ページ 2007年2月8日 木曜日 午後8時50分 ...

Page 112: ...LSQT1214 A F0207Td0 4000 A A Matsushita Electric Industrial Co Ltd Web site http panasonic net LSQT1214_GN book 112 ページ 2007年2月8日 木曜日 午後8時50分 ...

Reviews: