9
Before use
RQT5717
1
2
3
4
A
B
C
D
DIMMER
4
/REW
g
CLOCK/
TIMER
CLOCK/
TIMER
3
/FF
f
DISPLAY
–DEMO
1
2
3
4
5
6
7
9
0
10
CANCEL
AUTO OFF SLEEP
8
PROGRAM
TUNE MODE
PLAY MODE
VOLUME
DISPLAY
DIMMER
MUTING
SOUND
VIRTUALIZER
REV MODE
SELECTOR
TAPE
TUNER
CD
CLOCK
TIMER
PLAY
REC
REW
CLEAR
FF
BASS
TREBLE
2
4
3
DIMMER
1
VOLUME
DISPLAY
DIMMER
MUTING
SOUND
VIRTUALIZER
DISPLAY,
–DEMO
MUTING
VOLUME
DISPLAY
DIMMER
MUTING
SOUND
VIRTUALIZER
A
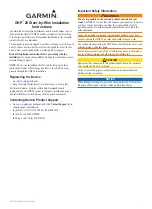
Setting the time
by remote control only
This is a 12-hour clock.
The example shows how to set the clock for 6:30 pm
1
Press [
y
y
y
y
y
] to turn the unit on.
2
Press [CLOCK/
TIMER] to display
“CLOCK”.
Every time you press the button:
CLOCK
PLAY
REC
Original display
3
Within 7 seconds
Press [
g
,
4
4
4
4
4
/REW] or [
f
,
3
3
3
3
3
/FF] to
set the time.
Press and hold to change the time faster.
4
Press [CLOCK / TIMER].
The time is set and the original display is restored.
Displaying the clock.
When the unit is ON:
Press [DISPLAY/– DEMO].
To cancel
Press [DISPLAY/–DEMO] again.
Note
The clock may lose or gain some time over a period. Readjust if
necessary.
Convenient Functions
B
To dim the display panel
by remote control only
Use this when you are going to sleep or any other time you would
prefer the panel to be dimmer.
Press [DIMMER].
The display panel dims and side panel indicators, except for the [AC
IN] indicator, go out.
To cancel
Press [DIMMER] again.
C
To mute the volume
by remote control only
This feature is convenient when you have a telephone call, etc.
Press [MUTING].
Press the button again to cancel. (“MUTING” goes out.)
Muting can also be cancelled by lowering the volume all the way (--
dB).
When the system is turned off, the muting operation will be
automatically cancelled.
D
Turning the demo function off
If the clock has not been set, a demonstration of the display is shown
when the unit is switched to standby.
This function is set to on at the time of purchase.
Press and hold [DISPLAY, –DEMO] until “NO DEMO” is
displayed.
The display changes each time the button is held down.
NO DEMO (off)
↔
DEMO (on)
e4-9
1/17/01, 6:22 PM
9