background image

21

Recording operations

RQT5539

Before recording (Deck 2 only)

Types of tapes which can be recorded correctly

The unit automatically identifies the type of tape.

NORMAL POSITION/TYPE I

HIGH POSITION/TYPE II

METAL POSITION/TYPE IV

Metal position tapes can be used, but the unit will not be able to
record or erase them correctly.

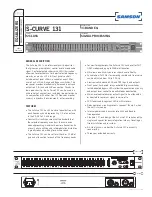
To record from the beginning of the tape 

A

You cannot record on the leader part of the tape. Before recording,
wind the tape past the leader to a point where recording can start
immediately.

How volume, sound quality/field affect recording

The tape you are recording is not affected whatsoever by changes in
volume, sound quality/field.

To erase a recorded sound

1. Press [TAPE, DECK 1/2].
2. Insert the recorded tape into deck 2.
3. Press [REV MODE] to select reverse mode.
4. Press [

a     

REC/STOP].

Notes

You cannot open deck 1 while recording.

You cannot fast-forward or rewind one deck while recording with
the other.

1

2

3

4

1

2
4

3

2

A

Recording part

Leader tape (no recording
can be made)

Tape-to-tape recording

The recording level will be recorded as it is on the tape being played
back.

1

Press [TAPE, DECK 1/2].

2

Press [

c

 OPEN] on both decks and insert the tapes.

For playback: Into deck 1
For recording: Into deck 2
Close the holders by hand.
Tape direction is automatically set to “

3

”.

3

Press [REV MODE] to select the reverse mode.

Every time you press the button:

:One side is recorded, then recording stops

automatically.

,

:Both sides (front side 

 reverse side) are recorded,

then recording stops automatically.

4

Press [TAPE EDIT] to start recording.

If you selected “

” in step 

3

, the direction will

automatically change to “

” when recording starts.

To stop recording
Press [

L

].

Both decks will stop.

To start recording on the reverse side
Load a tape and change the tape direction as follows:
1. Press [TAPE, DECK 1/2] and select tape deck 2.
2. Press [

/

] and immediately thereafter [

L

]. The tape direction will

be shown as “

4

”.

To record from a specific point on a tape
Before recording, advance the tape to the point from where you want
to start recording.

Tape direction of the tape you are recording
onto

Summary of Contents for SCAK14 - MINI HES W/CD-PLAYER

Page 1: ...539 P P CD Stereo System Operating Instructions Model No SC AK14 Before connecting operating or adjusting this product please read these instructions completely Please keep this manual for future reference ...

Page 2: ...n to special CDs and tracks CD Manager function 18 Cassette deck operations Listening to tapes 19 Concerning cassette tapes 20 The model number and serial number of this product can be found on either the back or the bottom of the unit Please note them in the space provided below and keep for future reference MODEL NUMBER SERIAL NUMBER User memo DATE OF PURCHASE DEALER NAME DEALER ADDRESS TELEPHON...

Page 3: ...ing guide 30 Maintenance 31 Specifications Back Cover Product service Back Cover CAUTION This equipment has been tested and found to comply with the limits for a Class B digital device pursuant to Part 15 of the FCC Rules These limits are designed to provide reasonable protection against harmful interference in a residential installation This equipment generates uses and can radiate radio frequenc...

Page 4: ...inside this unit it may not operate properly To correct this problem turn on the power and wait about one hour for the moisture to evaporate Placement 1 Ventilation The unit should be situated so that its location or position does not interfere with its proper ventilation Allow 10 cm 4 clearance from the rear of the unit 2 Foreign Material Care should be taken so that objects do not fall into and ...

Page 5: ...nsor and end of the remote control unit free from dust If this system is installed in a rack with glass doors the glass doors thickness or color might make it necessary to use the remote control a shorter distance from the system To prevent damage Never place heavy items on top of the unit Do not disassemble or reconstruct the unit Do not spill water or other liquids into the unit Remote control s...

Page 6: ...of the speaker cables to the terminal lever of the same color Caution Use only the supplied speakers The combination of the main unit and speakers provide the best sound Using other speakers can damage the unit and sound quality will be negatively affected To prevent damage to circuitry never short circuit positive and negative speaker wires Caution Use the speakers only with the re commended syst...

Page 7: ...he outer vinyl insulator 2 Twist the shield braid 3 Expose the core wire Note An outdoor antenna should be installed by a qualified technician only AM outdoor antenna B Connect the outdoor antenna without removing the AM loop antenna Run 5 to 12 m of vinyl covered wire horizontally along a window or other convenient location Note When the unit is not in use disconnect the outdoor antenna to preven...

Page 8: ...ette holder 19 8 Disc direct play open close buttons and indicators CD 1 CD 5 c 15 9 CD manager button CD MANAGER 18 24 Random play button RANDOM 16 Disc tray Display select demonstration button DISP DEMO 10 11 V BASS on off button V BASS 25 Volume control VOLUME 13 3D AI EQ button 3D AI EQ 26 Headphone jack PHONES 29 Deck 2 cassette holder 19 Center console B No Name Ref page Tape deck select but...

Page 9: ...17 Tape deck select button TAPE 19 CD button CD 18 EQ select button EQ 25 3D AI EQ select button 3D AI 26 V BASS on off button V BASS 25 Reverse side playback preset channel select button 3 13 19 Volume buttons VOLUME 13 _ Sleep button SLEEP 29 Muting button MUTING 11 Disc button DISC 16 Random button RANDOM 16 Repeat button REPEAT 16 AUX button AUX 29 Tuner band select button TUNER 12 V Skip sear...

Page 10: ...each time the button is pressed NORMAL off ECO on The eco mode can be turned on if the unit is in standby but it cannot be turned off Conserving Power The unit consumes 0 25W even when it is turned off with f 7 POWER or Auto off function and ECO mode is turned on To save power when the unit is not to be used for a long time unplug it from the household AC outlet Remember to reset the radio station...

Page 11: ... At ECO mode on to display the time when system is OFF Press DISP DEMO A The time will be displayed for about 5 seconds and then the display will return to whatever was previously displayed Convenient functions Switching displays A Press DISP DEMO to select the desired spectrum analyzer Every time you press the button Normal Peak hold Aurora OFF Wiper To mute the volume B by remote control only Th...

Page 12: ...tomatically When finished the radio will tune in the last station memorized If auto presetting is not possible because radio signals are weak or for some other reasons do the following Presetting only your favorite stations Preset the stations one at a time 1 Perform step 1 above Then press f MEMORY MEMO flashes and select a station with TUNE TIME ADJ 1 1 1 1 1 or 2 2 2 2 2 2 While MEMO is flashin...

Page 13: ...ng To stop auto tuning Press either TUNE TIME ADJ 1 1 1 1 1 or 2 2 2 2 2 again If noise is excessive in the FM stereo mode A Press g FM MODE BP MONO will light up Sound will be produced in monaural but this also reduces noise Press the button again to cancel MONO will go out Normally you ll want to listen in stereo so leave MONO off This way you can listen to stereo broadcasts in stereo and monaur...

Page 14: ...hinner static elec tricity prevention liquids or any other solvent Do not attach labels or stickers to CDs Do not use CDs with exposed adhesive from tape or left over peeled off stickers Do not use scratch proof protectors or covers other than those specified for use with this system Do not use CDs printed with label printers available on the market Storage precautions Be sure to store CDs in thei...

Page 15: ...the volume level To stop the disc play A Press L When appears on the display B It indicates there are 13 or more tracks on the disc in the playing position Disc indicators The disc indicators light whenever the tray is in the playing position whether it is loaded or not What is meant by final disc For example if play starts from disc 4 disc 3 will be the final disc Order of progression Disc 4 5 1 ...

Page 16: ...EAT once again To repeat your favorite tracks 1 Program the tracks you want perform steps 1 6 on page 17 2 Press REPEAT and make sure is displayed 3 Press J Playback will start To repeat just one track Set the 1 TRACK mode page 18 press REPEAT before or during playback and make sure is displayed Random play Press RANDOM B Every time you press the button 1 DISC ALL DISC Previous display To random p...

Page 17: ... of programmed tracks is limited to 24 No further tracks can be programmed You can do the following during program mode B Check program contents Press g or f Every time you press one of the buttons the track and program No are shown on the display Add to the program Repeat steps 3 through 5 Cancel entries From the last Press CANCEL programmed track A specified track Select the track with g or only...

Page 18: ... track is played 1 DISC The tracks on only one particular disc are played 1 ALL The same track numbers on each of the CDs are played in succession NORMAL The original display is restored in about 3 seconds 3 Press CD 1 CD 5 to select the disc you want Note This step is not required if 1 ALL was selected in step 2 4 Press g or f f f f f to select the desired track Note This step is not required if ...

Page 19: ...EV MODE to select the reverse mode Every time you press the button One side is played then playback stops automatically Both sides front side reverse side are played one time each then playback stops automatically Both sides are played 8 times each then playback stops automatically Press or to start playback The forward side front side will play The reverse side will play 5 Adjust the volume level...

Page 20: ...es Cassette tapes exceeding 100 minutes Tapes are made of a thin film material Do not repeatedly advance and stop the tape fast forward it or rewind it Endless tapes For this unit it is recommended to use tapes which are appropriate to the auto reverse mechanism Always read the instructions provided with your tapes Tape slack B Tape slack may cause the tape to break Erasure prevention C Use a scre...

Page 21: ... 2 4 3 2 A Recording part Leader tape no recording can be made Tape to tape recording The recording level will be recorded as it is on the tape being played back 1 Press TAPE DECK 1 2 2 Press c OPEN on both decks and insert the tapes For playback Into deck 1 For recording Into deck 2 Close the holders by hand Tape direction is automatically set to 3 3 Press REV MODE to select the reverse mode Ever...

Page 22: ...ecording on the reverse side Load a tape and change the tape direction as follows 1 Press TAPE DECK 1 2 and select tape deck 2 2 Press and immediately thereafter L The tape direction will be shown as 4 To record from a specific point on a tape Before recording advance the tape to the point from where you want to start recording To cut an unnecessary part while recording 1 Press a REC STOP during t...

Page 23: ... starts The recording will proceed from the first track on the selected CD and will continue on through the last track of the final disc page 15 The tape deck stops automatically when the CD is finished To stop recording To add a 4 second silent interval before stopping Press L The CD will stop automatically too To stop recording without a silent interval Press a REC STOP The CD will stop automati...

Page 24: ...e button 1 TRACK NORMAL 1 DISC 1 ALL 1 TRACK Only one particular track is recorded 1 DISC The tracks on only one particular disc are recorded 1 ALL The same track numbers on each of the CDs are recorded in succession NORMAL The original display is restored in about 3 seconds 3 Press CD 1 CD 5 to select the disc you want Note This step is not required if 1 ALL was selected in step 2 4 Press g g g g...

Page 25: ...reverberations heard at a disco 5 LIVE sound field Select this to make vocals more alive 6 HALL sound field Select this to add an expansiveness to the sound to produce the atmosphere of a great concert hall 7 MANUAL see page 26 8 AI EQ see page 26 The original display is restored on the display panel in about 5 seconds To release the equalizer Dial SOUND EQ to display FLAT When using the remote co...

Page 26: ...Dial SOUND EQ to display FLAT Notes The sound quality setting is stored automatically It is recalled when MANUAL is next selected All recordings are performed at the flat setting even if an alternative sound quality setting has been selected Varying the sound quality with the acoustic image Al equalizer The Al equalizer uses the SOFT SHARP HEAVY and LIGHT sound quality coordinates to achieve subtl...

Page 27: ... record timer Setting the start and finish times Within 8 seconds or so 1 Press TUNE TIME ADJ 3 or 4 to select the starting time 2 Press CLOCK TIMER 1 Press TUNE TIME ADJ 3 or 4 to select the finishing time 2 Press CLOCK TIMER The start and finish times are now set Turning the timer on Press rPLAY rREC Every time you press the button REC PLAY OFF rPLAY to turn the play timer on rREC to turn the re...

Page 28: ...sired source 2 Reset the Disc numbers and reverse mode if you have changed any of them confirm that a Disc or cassette is inserted then press f I POWER to put the unit on standby Turning the timer ON OFF One of the timers is on when the rPLAY rREC indicator is lit When the unit is on or off and in NORMAL mode you can confirm which is on by checking which indicator is on the display When the unit i...

Page 29: ...w the remaining time then press SLEEP to select the desired time Notes The sleep timer turns OFF automatically the moment you attempt to edit record a CD using CD Manager function The sleep timer can be used in combination with the play record timer The sleep timer always has priority Be sure not to overlap timer settings Using an external unit B Listening to an external source See page 7 for exte...

Page 30: ... the speaker cords so that they are not shorted Then switch on the power ERROR message appears Incorrect operation has been done Operate the unit correctly by following the on the display operating instructions appears on the You plugged the power cord in for the Set the time display first time There was a power failure recently F61 appears on the Check if the speaker cords have shorted If they ar...

Page 31: ...ondensation inside the CD Wait for 60 minutes before using the CD changer player A certain music passage The disc is dirty Wipe the disc with a soft cloth can t be played correctly TAKE OUT DISC appears There was a power failure or the power cord 1 Press f 7 POWER to switch on the on the display was disconnected from the household AC power The tray will open outlet 2 If there is a CD in the tray r...

Page 32: ...verter MASH 1 bit DAC SPEAKER SECTION Type 2 way speaker system Speaker s Woofer 12cm 423 32 cone type Tweeter 6cm 23 8 cone type Impedance 6Ω Input power 100W Music Output sound pressure level 85dB W 1 0 m Cross over frequency 5kHz Frequency range 45Hz 22kHz 16dB 55Hz 20kHz 10dB Dimensions WxHxD 210 x 330 x 257 mm 89 32 x 13 x 101 8 Mass 3 0kg 6 6 lb GENERAL Power supply AC 120V 60 Hz Power consu...

Reviews: