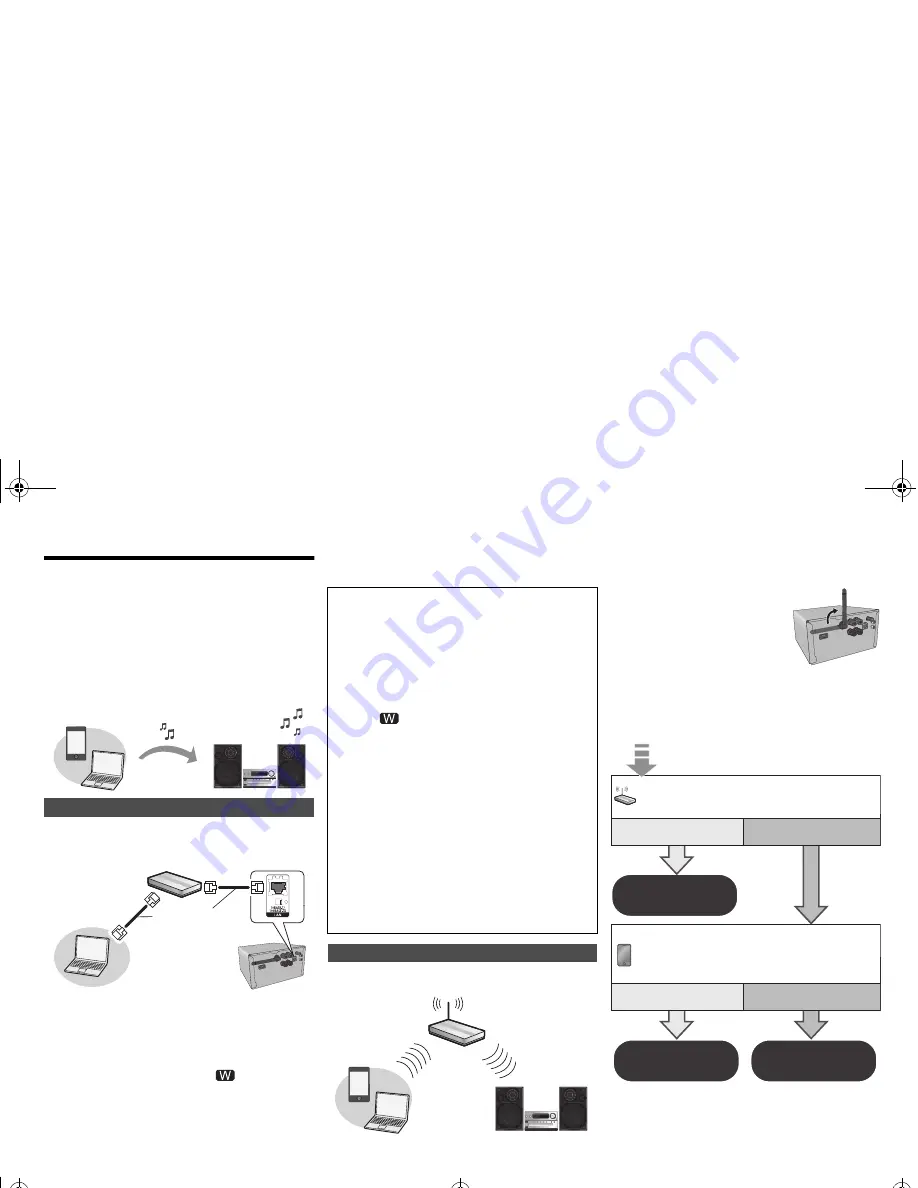
Panasonic SC-PMX9DB Operating Instructions Manual Download Page 6

VQ

T4

Z

1

9

6

Network settings

You can stream music from an iOS device (iPhone, iPod, 

iPad), an Android™ device or a Mac/PC to this system’s 

speakers by using the AirPlay or DLNA feature.

To use these features, this system must join the same 

network as the AirPlay compatible device (

>

9) or the 

DLNA compatible device.

• It is also possible to use AirPlay without a network router. 

(

>

10, “Directly streaming to this system (AirPlay)”)

• Switching between a wired LAN connection and a wireless 

LAN connection may cause the connection settings to be 

initialized. In that case, make the settings again.

• For a stable connection to the network, a wired LAN 

connection is recommended.

Normally, just connecting a LAN cable will complete 

the setup. 

1

Connect the main unit to a broadband router, etc. 
using LAN cable while the AC mains lead is 
disconnected.

2

Connect the AC mains lead to the main unit and 
turn this system on.

This unit is ready for use when “

” is indicated on 

the display.

• The LAN cable must be connected or disconnected 

while the AC mains lead is disconnected. 

• Use category 5 or above straight LAN cables (STP) 

when connecting to peripheral devices.

• Inserting any cable other than a LAN cable in the LAN 

port can damage the unit.

• When a LAN cable is connected, wireless settings will 

be cancelled.

This system has built-in Wi-Fi

®

 and can be connected to 

a wireless router.

Preparation

• Place this system as close to the wireless network 

router as possible.

• Disconnect the LAN cable.
• Point the antenna on the rear of 

the main unit up as shown in the 

figure.

• Do not perform the following: 

- Tilting the antenna forward or 

backwards when it is pointing up

- Applying too much force to the 

antenna

- Carrying this unit by holding the antenna

1

Turn this system on.

2

Follow the chart below to choose the network 
setting method.

Wired LAN connection

LAN Cable

(not supplied)

Broadband router, etc.

e.g.,

You can perform network-related settings individually.

j

If your home wireless network has been configured to 
use specific IP Addresses, Subnet Mask, Default 
Gateway, Primary DNS, etc.

j

If you want to change the name of this system that is 
displayed as the AirPlay speakers or DLNA renderer.

1

Connect the main unit directly to your computer using 
LAN cable while the AC mains lead is disconnected.

2

Connect the AC mains lead to the main unit and turn 
this system on.

3

After “

” is indicated on the display, check the IP 

address for this unit. (

>

15, “IP/MAC Address”)

4

Press [SETUP] on the remote control repeatedly to 
select “Net Setup” and then press [OK].

5

Press [SETUP] on the remote control repeatedly to 
select “Manual” and then press [OK].

6

When “Setting” blinks on the display, start an Internet 
browser on your computer and then type the IP 
address for this unit checked in step 3 into the address 
field and display the setup screen.*

7

Select and input the details.

8

Select “JOIN” to apply the settings.

9

The settings are completed when “Success” is 
displayed.

10

Turn off this unit and then disconnect the AC mains lead.

11

Perform “Wired LAN connection”. (

>

left)

* It may take a few minutes until the setup screen is 

available to be displayed on the browser depending on 

the environment.In that case, reload the browser.

Wireless LAN connection

Wireless router, etc.

e.g.,

Does your wireless network router support 

WPS?

Yes

l

7,

“Method 1”

l

7,

“Method 2”

l

7,

“Method 3”

No / Do not know

Yes

No

Are you using an

iPod touch/iPhone/iPad?

Is the iOS version 5.0 or later?

SC-PMX9-VQT4Z19.book  6 ページ  2013年3月21日 木曜日 午後4時16分

Summary of Contents for SC-PMX9DB

Page 1: ...t major credit and debit cards accepted All enquiries transactions and distribution facilities are provided directly by Panasonic UK It couldn t be simpler Also available through our Internet is direct shopping for a wide range of finished products Take a browse on our website for further details Operating Instructions CD Stereo System Model No SC PMX9DB Table of contents Safety precautions 2 Supp...

Page 2: ...ervice marks or certification marks of the Digital Living Network Alliance The Wi Fi CERTIFIED Logo is a certification mark of the Wi Fi Alliance The Wi Fi Protected Setup Mark is a mark of the Wi Fi Alliance Wi Fi Wi Fi Protected Setup WPA and WPA2 are marks or registered marks of the Wi Fi Alliance MPEG Layer 3 audio coding technology licensed from Fraunhofer IIS and Thomson The Bluetooth word m...

Page 3: ...onnect the cable with a red line to the red terminal r 3 Connect the AC mains lead Do not use an AC mains lead with other equipment Conserving power The system consumes approximately 0 4 W when it is in standby mode Disconnect the power supply if you do not use the system Some settings will be lost after you disconnect the system You have to set them again You can connect a VCR DVD player etc Note...

Page 4: ...content information 9 Clock and timer operation 10 Set the programme function 11 Adjust the volume of the system 12 Mute the sound of the system Press the button again to cancel MUTE is also cancelled when you adjust the volume or when you switch off the system 13 Set the play menu item 14 Set the radio menu item 15 Select the option 16 Enter setup menu 17 iPod_Dock for iPod iPhone 18 Headphones j...

Page 5: ...uctions USB devices that support bulk only transfer Note Files are defined as tracks and folders are defined as albums Track must have the extension mp3 MP3 flac or FLAC This system can access up to 255 albums including root folder 2500 tracks 999 tracks in one album CBI Control Bulk Interrupt is not supported Some files can fail to work because of the sector size NTFS file system is not supported...

Page 6: ...ng up Applying too much force to the antenna Carrying this unit by holding the antenna 1 Turn this system on 2 Follow the chart below to choose the network setting method Wired LAN connection LAN Cable not supplied Broadband router etc e g You can perform network related settings individually jIf your home wireless network has been configured to use specific IP Addresses Subnet Mask Default Gatewa...

Page 7: ... home wireless network 3 Connect the iPhone to the main unit 4 Press SETUP on the remote control repeatedly to select Net Setup and then press OK With iPod is indicated on the display 5 Unlock your iPhone and then press OK on the remote control Connecting Wi Fi is indicated on the display If Not Supported or Set Wi Fi is displayed check that the iPhone is connected to the wireless network and try ...

Page 8: ... device to this system s wireless network named 00 Setup _ _ _ _ _ _ _ stands for a digit that is unique to each set Make sure that DHCP is enabled for the network setting on your compatible device 4 Start the Internet browser on your compatible device and type http 192 168 1 12 into the URL address field and display the page This system s setup window is displayed Examples of Internet browsers iO...

Page 9: ...ay will not work when playing back videos on iTunes 1 _ stands for a digit that is unique to each set 2 The name that is displayed for this system can be changed from the Edit STEREO SYSTEM name settings left Advanced network settings as of January 2013 Advanced network settings Alternative settings Instead of steps 5 and 6 Select Manual settings 1 Type your home wireless network name into the Net...

Page 10: ...ssword After changing this system s network password if you are not prompted to change the password on the other devices the following changes are required iOS device iPod touch iPhone iPad 1 Before choosing this system s network 1 Select located beside this system s wireless network name 2 Select Forget this Network and then select Forget 3 Select this system s wireless network and enter the new ...

Page 11: ...atedly to select Input Level 2 Press 2 1 to select the level and then press OK Level 0 Level i1 Level i2 J Note Select Level 0 if the sound is distorted 1 While a Bluetooth device is connected Press PLAY MENU to select Disconnect 2 Press 2 1 to select OK Yes and then press OK About Bluetooth Frequency band used This system uses the 2 4 GHz frequency band Certification of this device This system co...

Page 12: ...CD CD audio in CD DA format and a CD that contains MP3 files iPod Compatible iPod iPhone iPad USB USB devices containing MP3 FLAC files AirPlay When connected to an AirPlay compatible device 9 Bluetooth Connected Bluetooth device Basic play CD iPod USB AirPlay Bluetooth Play Press 1 Stop Press USB A track being played back is memorised and Resume is displayed The playback position returns to the b...

Page 13: ...edly to select Manual Scan 2 Press 2 1 to select a frequency block to scan and then press OK 1 Press 6 or 5 to select a station 2 Press PROGRAM 3 Press the numeric buttons to select a preset number Do steps 1 through 3 again to preset more stations Note A station previously stored is overwritten when another station is stored in the same preset number You cannot preset a station when the station i...

Page 14: ...e To check the settings Press CLOCK TIMER repeatedly to select TIMER Adjust Note The timer starts at a low volume and increases gradually to the preset level The timer comes on at the set time every day if the timer is on If you switch off the system and switch on again while a timer is in operation the timer will not stop at the end time Sound effects 1 Press SOUND to select a sound effect 2 Pres...

Page 15: ...stem if the indication is 2 or 1 and see if the connection improves If Level 0 is displayed this system cannot establish a link with the wireless network router 17 This function does not work when D Connect is set to On The wireless LAN function can be enabled or disabled 1 Press SETUP repeatedly to select Wireless LAN and then press OK 2 Press 2 1 to select On or Off and then press OK The factory...

Page 16: ...as been replaced Try pairing the device again This system might be connected to a different device Disconnect the other device and try pairing the device again The device is connected but audio cannot be heard through this system For some built in Bluetooth devices you have to set the audio output to SC PMX9 manually Read the operating instructions for the device for details The sound is interrupt...

Page 17: ... network router No Connect This system cannot connect to the network Check the network connection 6 No Device The iPod iPhone iPad or USB device is not connected Examine the connection No Disc You have not put in a disc or put in a disc that the system cannot play No Memory There are no preset DAB DAB stations to select Preset some channels No Play Examine the content You can only play supported f...

Page 18: ... kg Operating temperature range 0 C to 40 C Operating humidity range 35 to 80 RH no condensation Note Specifications are subject to change without notice Mass and dimensions are approximate Total harmonic distortion is measured by the digital spectrum analyzer FLAC Decoder Copyright C 2000 2001 2002 2003 2004 2005 2006 2007 Josh Coalson Redistribution and use in source and binary forms with or wit...

Page 19: ...c products come with consumer guarantees that cannot be excluded under the Australian Consumer Law If there is a major failure with the product you can reject the product and elect to have a refund or to have the product replaced or if you wish you may elect to keep the goods and be compensated for the drop in value of the goods You are also entitled to have the product repaired or replaced if the...

Page 20: ...e cover can be purchased from your local dealer Before use Remove the connector cover How to replace the fuse The location of the fuse differ according to the type of AC mains plug figures A and B Confirm the AC mains plug fitted and follow the instructions below Illustrations may differ from actual AC mains plug 1 Open the fuse cover with a screwdriver 2 Replace the fuse and close or attach the f...

Reviews: