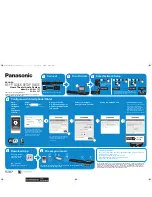
background image

6

TQBM0479

1

AC IN (

) terminal (

11)

2

HDMI AV OUT (TV (ARC)) terminal (ARC 
compatible) (

8)

3

HDMI AV IN (HDMI 2) terminal (

10)

4

HDMI AV IN (HDMI 1) terminal (

10)

5

LAN terminal (

17)

6

OPTICAL DIGITAL AUDIO IN (TV) terminal 
(

8)

7

Ir SYSTEM terminal (

10)

8

[


C

I] Active subwoofer on/off button 

(

16)

9

[I/D SET] I/D SET button

This is only used when the main unit is not paired with 
the active subwoofer. (

29)

10 Ventilation holes

The symbols on this product represent the following.

This system (Others)

1

8

9

10

2
3
4

1

5
6

7

Main unit
(Bottom)

Active subwoofer

(Rear)

AC

Class II equipment (The construction of the product is 

double-insulated.)

SC-HTB900-EGEBGN-TQBM0479_eng.book  6 ページ  2019年4月16日 火曜日 午後7時58分

Summary of Contents for SC-HTB900

Page 1: ... suffix EB denotes UK model Included Installation Instructions The installation work should be done by a qualified installation specialist 12 to 15 Before commencing work carefully read these installation instructions and the operating instructions to ensure that installation is performed correctly Please keep these instructions You may need them when maintaining or moving this system SC HTB900 EG...

Page 2: ... direct sunlight high temperatures high humidity and excessive vibration Button type battery Lithium battery Danger of explosion if battery is incorrectly replaced Replace only with the type recommended by the manufacturer Insert with poles aligned Mishandling of batteries can cause electrolyte leakage and may cause a fire Remove the battery if you do not intend to use the remote control for a lon...

Page 3: ...aking apart or modifying the unit jRemoving specification indications Restrictions of use Wireless transmission and or usage with all Bluetooth equipped devices is not guaranteed All devices must conform to standards set by Bluetooth SIG Inc Depending on the specifications and settings of a device it can fail to connect or some operations can be different This system supports Bluetooth security fe...

Page 4: ...ds from other equipment with this system This system SC HTB900 Accessories 1 Remote control with a battery 7 N2QAYC000121 1 IR Blaster 10 K2ZZ02C00007 2 Wall mount brackets 14 TUWX2111 2 AC mains lead 11 For the United Kingdom and Ireland K2CT2YY00089 For Continental Europe K2CQ2YY00164 For Australia and New Zealand K2CJ2YY00123 2 Screws 14 XYN5 J14FJK About descriptions in these operating instruc...

Page 5: ...n 6 Remote control signal sensor 7 7 Display 8 Indicator This flashes 2 times when playback is started or when the power is turned on from the app 9 WIRELESS LINK indicator 16 These switches work just by touching the marks Each time you touch the switch there will be a beep sound The beep sound setting can be changed 22 Do not place objects in front of this system Do not place objects on the top s...

Page 6: ...I Active subwoofer on off button 16 9 I D SET I D SET button This is only used when the main unit is not paired with the active subwoofer 29 10 Ventilation holes The symbols on this product represent the following This system Others 1 8 9 10 2 3 4 1 5 6 7 Main unit Bottom Active subwoofer Rear AC Class II equipment The construction of the product is double insulated SC HTB900 EGEBGN TQBM0479_eng b...

Page 7: ...tion Before using for the first time Remove the insulation sheet A Dispose of the insulation sheet responsibly after removing it To replace a button type battery Battery type CR2025 Lithium battery Set the button type battery with its i mark facing upward About remote control signal sensor The remote control signal sensor is located on the main unit Use the remote control within the correct operat...

Page 8: ... TV Verify if the TV s HDMI terminal is labelled HDMI ARC Labelled HDMI ARC HDMI IN ARC TV Be sure to connect to the TV s ARC compatible terminal Refer to the operating instructions for the TV Not Labelled HDMI ARC HDMI IN OPTICAL OUT TV What is ARC ARC is an abbreviation of Audio Return Channel also known as HDMI ARC It refers to one of the HDMI functions When you connect the main unit to the ter...

Page 9: ...ts HDR10 Refer to the operating instructions of the supporting device for details If you connect this system and are then unable to view Netflix use the following connection VIERA Link does not work when you use this connection 24 HDMI AUDIO OUT HDMI VIDEO OUT HDMI IN ARC HDMI IN TV Player etc supporting HDR10 A HDMI cable If this terminal does not support ARC also use an optical digital audio cab...

Page 10: ...IR Blaster except the supplied one 1 Connect the jack plug to the main unit s Ir SYSTEM terminal A IR Blaster supplied B Adhesive tape supplied 2 Place the infrared emitter in sight of the TV s remote control signal sensor Placement example On the rear of the main unit C TV remote control signal sensor D Infrared emitter E Adhesive tape supplied Connection from an HDMI compatible device Refer to t...

Page 11: ...e damaged and exposed adhesive may remain Once you have confirmed the TV is operating correctly secure it by attaching the adhesive tape When the TV receives signals from both its remote control and the IR Blaster their signals may interfere with each other making it impossible for you to operate the TV Try using the TV s remote control from a different angle If the TV remote control does not work...

Page 12: ...and or the speaker and may result in the risk of fire Consult a qualified service person if damage has occurred or if you experience a sudden change in performance Do not attempt to attach the main unit to a wall using methods other than those described in this manual Do not hold the main unit in one hand to avoid injury you may drop the main unit when carrying it To prevent damage or scratches la...

Page 13: ... unit in a rack or on a table A Cord If the cord cannot be threaded through the holes try bending the cord in 2 locations about 5 mm apart from the tip at an angle of 45o as illustrated above B Screw eye Attach at a position capable of supporting over 60 kg Depending on the placement of the main unit the screwing position of the screw eye may differ When placing the main unit in front of the TV Th...

Page 14: ...d accessories Additionally required accessories commercially available Screws for wall mounting k 2 Fall prevention cord k 2 Screw eyes to attach the fall prevention cord k 2 Use a cord that is capable of supporting over 60 kg with a diameter of about 1 5 mm Lay the unit on a blanket or soft cloth for assembly 1 Perform steps 1 in When placing the main unit in a rack or on a table 13 2 Attach the ...

Page 15: ... other Front view semi transparent image 4 Fit the main unit securely onto the screw s 5 Secure the cord to the wall Make sure that the slack of the cord is minimal C At least 30 mm D 4 0 mm E 7 0 mm to 9 4 mm F Wall or pillar G 2 5 mm to 4 5 mm H 700 mm I 175 mm J 175 mm K 8 mm L 89 mm M Wall mounting hole DO DO NOT Move the speaker so that the screw is in this position In this position the speak...

Page 16: ...t The wireless link will be activated when the main unit and the active subwoofer are both turned on Step 4 Network settings You can stream online music services To use these features this unit must join the same internet connected network as the device Please update the system s firmware after the network settings are complete 23 Firmware update Choose a network setting method from the following ...

Page 17: ... set stands for characters unique to each set This system s name can be changed with the app Google Home above You can check your network information SSID MAC address and IP address from the Google Home app or the setup menu of this system To check on this system refer to NET INFO 23 Some items on the Google Home app are irrelevant to this system 1 Disconnect the AC mains lead 2 Connect the main u...

Page 18: ...pment connected to the HDMI AV IN terminal to switch audio video to the TV switch input to the TV tuner If VIERA Link HDMI 24 is not enabled also switch the input of this unit to TV When other Panasonic devices respond to this system s remote control change the remote control code on this system and the remote control Preparation Turn off all other Panasonic products Turn on the main unit Aim the ...

Page 19: ...enabled app and tap the Cast icon 4 Select this system or group which this system is included CASTING will be indicated on the main unit s display Use the Google Home app to group speakers when streaming online music to other compatible speakers 5 Select and play the desired music on your Chromecast enabled app Streaming online music Not all music streaming services are available in all countries ...

Page 20: ...cted device will be indicated on the display for a few seconds If you register more than 8 devices ones that have not been connected for a long period of time may be deleted from the list of registered devices In that case pair with the deleted devices again 1 Press PAIRING to select Bluetooth mode 2 After confirming that BLUETOOTH READY is indicated on the display select Panasonic HTB900 from the...

Page 21: ...oices etc Of the levels LEVEL 1 to LEVEL 4 the effect increases the higher the level number If the sound becomes unnatural select OFF DTS X DIALOG CONTROL 2 You can change the level of dialogue clarity when you want to emphasise people s voices etc This has an effect only when playing back DTS X content Of the levels LEVEL 0 to LEVEL 6 the effect increases the higher the level number DUAL AUDIO 2 ...

Page 22: ...s for about 5 seconds if operations are performed on the main unit or with the remote control While DISPLAY OFF is set a part of the display lights if the display is off but the main unit is on BEEP A beep sounds when you touch the switch on the main unit or when you turn the unit on off This works during muting as well AUTO OFF The main unit automatically is turned off if there is no audio input ...

Page 23: ... and the network name SSID of this system IP ADDRESS SSID MAC ADDRESS Characters that cannot be displayed are replaced with RESET This restores the settings to the factory presets For details refer to To return to the factory preset 26 F W VERSION You can check the firmware version Press 4 3 to select FIRMWARE or CHROMECAST BUILT IN and then press OK When you select FIRMWARE the version of the ins...

Page 24: ...I Control operations on the connected equipment e g TV 3 For the optimal HDAVI Control operations change the following settings on the connected TV 1 Set the default speaker settings to this system 2 Set the speaker selection settings to this system 4 Turn on all HDAVI Control compatible equipment and select the TV s input for this system so that the HDAVI Control function works properly 5 If a de...

Page 25: ...ll automatically be output from this system if the TV is compatible to VIERA Link HDAVI Control 4 or later TV TV speakers are active The volume of this system is set to its minimum Automatic input switching When the following operations are performed the main unit will automatically change the input to the corresponding source jWhen play starts on an HDMI connected device 3 jWhen the TV input or t...

Page 26: ...VIERA Link HDAVI Control 4 or later Please read the operating instructions for the TV for details about its power save feature 24 The switches on the main unit do not work Í I VOL j VOL i INPUT and on the main unit are touch keys Touch the switches with your finger They may not work if operated with your fingernails or hands wearing gloves Colour irregularities on a CRT TV If colour irregularities...

Page 27: ...rn VIERA Link off 23 When the main unit is turned on or off audio and video are temporarily disabled When the main unit is turned on or off it is normal for the audio and video to be temporarily disabled This is not a malfunction This can occur when the device it is connected to via HDMI does not support Panasonic s VIERA Link feature HDAVI Control 3 or later The images from this system do not app...

Page 28: ...ned on VOL LIMITATION is on If the main unit is turned off with the volume setting in the greater half above 50 the main unit will automatically lower the volume to the middle 50 when the main unit is turned on 22 The dialogue is too persistent or the dialogue does not sound natural This system has a function to make the dialogue stand out when the volume is low 21 The sound lags behind the image ...

Page 29: ...ices are simultaneously using the same network as this system try turning off the other devices or reducing their network usage Reconnect the devices to the network Turn off and then on the wireless router Try a wired LAN connection 17 Restart the app No power Ensure the AC mains lead of the active subwoofer is connected properly After turning the subwoofer on it immediately turns off Unplug the A...

Page 30: ...e download has failed Press OK to exit Please try again later FAIL Setting has failed Read the instructions and try again LINKING This system is trying to connect to the last connected Bluetooth device when BLUETOOTH is selected This system is communicating with the wireless router to complete the network settings Depending on the wireless router this process may take a few minutes Try moving this...

Page 31: ...HDAVI ControlTM is a trademark of Panasonic Corporation The Bluetooth word mark and logos are registered trademarks owned by Bluetooth SIG Inc and any use of such marks by Panasonic Corporation is under license Other trademarks and trade names are those of their respective owners Google Google Home Chromecast built in and other related marks and logos are trademarks of Google LLC The Wi Fi CERTIFI...

Page 32: ...s Woofer 6 5 cm x 2 ch Cone type Tweeter 1 6 cm x 1 ch Dome Type FRONT SPEAKER C Built in Main set Type 1 way 2 speaker Closed Speaker Unit s Fullrange 6 5 cm x 2 ch Cone type SUBWOOFER Type 1 way 1 speaker Bass reflex Speaker Unit s Sub woofer 16 cm x 1 Cone type GENERAL Power consumption Main unit 40 W Active subwoofer 48 W Standby Main unit 0 3 W Network Standby Off 1 2 0 W Network Standby On w...

Page 33: ...Digital Dolby TrueHD Dolby Digital Plus Dolby Atmos DTS DTS ES Discrete 6 1 DTS ES Matrix 6 1 DTS 96 24 DTS HD High Resolution Audio DTS HD Master Audio DTS Express DTS X HDMI AV input TV ARC LPCM 2 ch Dolby Digital Dolby Digital Plus Dolby Atmos Dolby Digital Plus DTS DTS ES Discrete 6 1 DTS ES Matrix 6 1 DTS 96 24 Optical digital input LPCM 2 ch Dolby Digital DTS DTS ES Discrete 6 1 DTS ES Matri...

Page 34: ... 15 5 35 GHz está restrita a operações no interior apenas nos seguintes países Magyar Megfelelőségi Nyilatkozat DoC Ezennel a Panasonic Corporation kijelenti hogy a jelen termék kielégíti az 2014 53 EU Irányelv létfontosságú követelményeit és más vonatkozó rendelkezéseit A vásárlók letölthetik az RE termékek eredeti DoC másolatát a DoC szerverünkről http www ptc panasonic eu A hivatalos képviselő ...

Page 35: ...35 GHz šį gaminį galima naudoti tik patalpose toliau išvardytose šalyse Typ bezdrôtového pripojenia Frekvenčné pásmo Maximálny výkon dBm e i r p WLAN The main unit 2412 2472 MHz 5180 5320 MHz 5500 5700 MHz 20 dBm 20 dBm 20 dBm Bluetooth The main unit 2402 2480 MHz 10 dBm 2 4 GHzWireless System The main unit and the active subwoofer 2401 35 2479 35 MHz 10 dBm Juhtmevaba seadme tüüp Sagedusriba Maks...

Page 36: ... за експлоатация на закрито единствено в следните държави Român Declaraţie de Conformitate DoC Panasonic Corporation declară prin prezenta că acest produs este conform cu cerinţele esenţiale şi alte prevederi relevante ale Directivei 2014 53 UE Clienţii pot descărca o copie a DoC ului original al produselor noastre RE de la adressa noastră DoC din Internet http www ptc panasonic eu Contactaţi Repr...

Page 37: ...il med aviser duker gardiner eller lignende Vrsta bežične mreže Frekvencijski pojas Maksimalna snaga dBm e i r p WLAN The main unit 2412 2472 MHz 5180 5320 MHz 5500 5700 MHz 20 dBm 20 dBm 20 dBm Bluetooth The main unit 2402 2480 MHz 10 dBm 2 4 GHzWireless System The main unit and the active subwoofer 2401 35 2479 35 MHz 10 dBm Kablosuz türü Frekans bandı Maksimum güç dBm e i r p WLAN The main unit...

Page 38: ...A connec on setup related problems b Access fees and or charges incurred for internet connec on c Incompa ble so ware or so ware not specifically s pulated in the product opera ons manual and d Any indirect or consequen al costs associated with the incorrect use or misuse of the hardware its connec on to the internet or any other device To claim warranty service when required you should Contact Pan...

Page 39: ...Reference 39 TQBM0479 SC HTB900 EGEBGN TQBM0479_eng book 39 ページ 2019年4月16日 火曜日 午後7時58分 ...

Page 40: ...support on your product please visit our website www panasonic co uk Direct Sales at Panasonic UK Order accessory and consumable items for your product with ease and confidence by phoning our Customer Communications Centre Monday Friday 9 00 am 5 00 pm Excluding public holidays Or go on line through our Internet Accessory ordering application at www pas europe com Most major credit and debit cards...

Reviews: