background image

17

RQT7436

Us

in

g na

vigat

ion men

u

s

[WMA]


[MP3]


[JPEG]

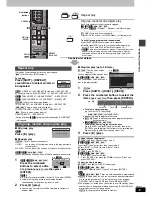
1

While stopped

Press [TOP MENU].

2

Press [

3 4 2 1

] to select the item 

following the on-screen instructions. 

To change the menu background

Press [DISPLAY].
The background changes to the one recorded on the disc.

To exit the screen

Press [

].

Selecting from the list

1

During play

Press [MENU].

2

Press [

2

] then 

[

3 4

] to switch 

among Playlist, 
Group and Content 
lists.

3

Press [

1

] then [

3 4

] to select an item 

and press [ENTER].

Press [SHIFT]

i

[PAGE] to skip 10 lines at a time.

To exit the screen

Press [MENU].

[RAM]

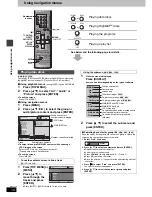
1

Press [DIRECT NAVIGATOR].

Titles appear only if you 

have entered them

.

You cannot change 

program and disc titles.

2

Press [

3 4

] or the 

numbered buttons 
to select the 
program.

Press [SHIFT]

i

[PAGE] to skip 5 lines at a time.

To select a 2-digit number

e.g. 23: [

S

10] 

 [2] 

 [3]

Press [

1

] to show the contents of the program and the disc.

3

Press [ENTER].

To exit the screen

Press [DIRECT NAVIGATOR].

[RAM]

(Only when the disc contains a play list)

1

Press [PLAY LIST].

2

Press [

3 4

] or the 

numbered buttons 
to select the play 
list.

Press [SHIFT]

i

[PAGE] to 

skip 10 lines at a time.

To select a 2-digit number

e.g. 23: [

S

10] 

 [2] 

 [3]

3

Press [ENTER].

To exit the screen

Press [PLAY LIST]

.

Tips for making WMA/MP3 and JPEG discs (For CD-R, CD-RW)

Discs must conform to ISO9660 level 1 or 2 (except for extended 
formats).

This unit is compatible with multi-session but if there are a lot of 
sessions it takes more time for play to start. Keep the number of 
sessions to a minimum to avoid this.

Naming folders and files

At the time of recording, prefix folder 
and file names with 3-digit numbers in 
the order you want to play them (this 
may not work at times).
Files must have the extension:
“.WMA” or “.wma”
“.MP3” or “.mp3”
“.JPG”, “.jpg”, “.JPEG” or “.jpeg”

[WMA]

You cannot play WMA files that are copy protected.

[MP3]

This unit is not compatible with ID3 tags.

Compatible sampling rate: 8, 11.02, 12, 16, 22.05, 24, 32, 44.1 
and 48 kHz

[JPEG]

To view JPEG files on this unit:
– Take them on a digital camera that meets the DCF Standard 

(Design rule for Camera File system) Version 1.0. Some digital 
cameras have functions that are not supported by the DCF 
Standard Version 1.0 like automatic picture rotation which may 
render a picture un-viewable.

– Do not alter the files in any way or save them under a different 

name.

This unit cannot display moving pictures, MOTION JPEG and other 
such formats, still pictures other than JPEG (e.g. TIFF) or play 
associated sound.

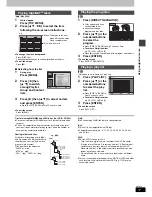
Playing HighMAT

TM

 discs

2


Prev

3

Return


Next

1

New Playlist Item Long Name Display Te

PAG E     1 / 3

M e n u 1

M e n u 2

M e n u 3

P l ay   l i s t 1

P l ay   l i s t 2

P l ay   l i s t 3

Menu: Takes you to the next 

menu which shows play 
lists or another menu

Play list: play starts

e.g.

P l a y l i s t

Playlist

Group

Content

All  By  Artist

ENTER

RETURN

to  play

to  select

to  exit

0

9

Content  title  

No.

1

Few times in summer

Less and less

And when I was born

Quatre gymnopedies

You've made me sad

I can't quit him

Evening glory

Wheeling spin

Velvet Cuppermine

Ziggy starfish

2

3

4

5

6

7

8

9

10

Playing the programs 

Playing a play list

Direct Navigator

11/ 1(WED)

0:05

Monday feature

1

1/  1 (MON)

1:05

Auto action

2

2/  2 (TUE)

2:21

Cinema

3

3/  3 (WED)

3:37

Music

4

4/10(THU)

11:05

Baseball

5

Date

No.

On

T i t l e

Contents

ENTER

RETURN

to  select  and  press

to  exit

0

9

11/1

0:00:01

City Penguin

1

1/ 1

0:01:20

Ashley at Prom

2

2/ 2

1:10:04

Formula one

3

3/ 3

0:10:20

Soccer

4

4/10

0:00:01

Baseball

5

Date

No.

Length

T i t l e

P l a y l i s t

ENTER

RETURN

to  select  and  press

to  exit

4/11

0:00:01

City Penguin

6

4/ 15

0:01:10

Ashley at Prom

7

4/ 17

0:13:22

Formula one

8

4/ 20

0:05:30

Soccer

9

4/22

0:07:29

Baseball

10

0

9

002 group

001

001 group

001 track.mp3
002 track.mp3
003 track.mp3

003 group

001 track.mp3
002 track.mp3
003 track.mp3

001 track.mp3
002 track.mp3
003 track.mp3
004 track.mp3

e.g. 

[MP3]

root

Summary of Contents for SC-HT928

Page 1: ... discs Playing HighMATTM discs Playing the programs Playing a play list Using on screen menus 18 Changing the player settings 20 The radio 22 Automatic presetting Selecting the preset channels Manual tuning RDS broadcasting Optional antenna connections Sound field and sound quality 24 26 Sound Field Control Super Surround Center Focus Dolby Pro Logic II Multi Rear Surround MRS Virtual Rear Surroun...

Page 2: ...IQUIDS SUCH AS VASES SHALL BE PLACED ON THE APPARATUS CAUTION DO NOT INSTALL OR PLACE THIS UNIT IN A BOOKCASE BUILT IN CABINET OR IN ANOTHER CONFINED SPACE ENSURE THE UNIT IS WELL VENTILATED TO PREVENT RISK OF ELECTRIC SHOCK OR FIRE HAZARD DUE TO OVERHEATING ENSURE THAT CURTAINS AND ANY OTHER MATERIALS DO NOT OBSTRUCT THE VENTILATION VENTS DO NOT OBSTRUCT THE UNIT S VENTILATION OPENINGS WITH NEWSP...

Page 3: ...is coloured Brown must be connected to the terminal which is marked with the letter L or coloured Brown or Red WARNING DO NOT CONNECT EITHER WIRE TO THE EARTH TERMINAL WHICH IS MARKED WITH THE LETTER E BY THE EARTH SYMBOL Ó OR COLOURED GREEN OR GREEN YELLOW THIS PLUG IS NOT WATERPROOF KEEP DRY Before use Remove the connector cover How to replace the fuse The location of the fuse differ according t...

Page 4: ... and bottom screws alternately until fully tightened You can also attach to the upper rear of the speaker The height of the speaker is indicated in the diagram page 5 when attaching plate A to the upper rear or lower rear of the speaker 3 Place the pipe on plate A and attach plate B 4 Secure the plate with the same screw removed in procedure 1 Make sure you have all the indicated components before...

Page 5: ...ion so the center positions of both are approximately the same 1 160 mm Speaker Pipe Base 750 mm 818 mm 575 mm 704 mm Stopper screw Do not remove You can adjust within this range Attach to lower rear of speaker Attach to upper rear of speaker Stopper screw Screw to stop mounting plate from moving or sliding below this point 1 Loosen the attached speaker mounting plate screw until the attached spea...

Page 6: ...it on or off Do not use a front speaker as a surround speaker or vice versa Verify the type of speaker with the label on the rear of the speaker How you set up your speakers can affect the bass and the sound field Note the following points Place speakers on flat secure bases Placing speakers too close to floors walls and corners can result in excessive bass Cover walls and windows with thick curta...

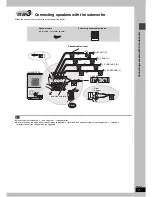
Page 7: ...positive copper wires to positive i terminals and negative silver wires to negative j terminals Incorrect connection can damage the speakers STEP3 Connecting speakers with the subwoofer 1 2 3 4 5 Sheet of speaker cable stickers Speaker cable 4 m cable For center speaker SUBWOOFER Insert the wire fully Speaker cable sticker 2 FRONT R 1 FRONT L 4 SURROUND R 3 SURROUND L 5 CENTER Copper Silver Click ...

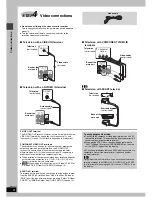
Page 8: ...re quality you can change the video signal output from the SCART AV terminal from Video to either S Video or RGB to suit the type of television you are using Select S Video Y PB PR or RGB No Output from QUICK SETUP page 10 Video cable STEP4 Video connections COMPONENT S VIDEO OUT VIDEO OUT VIDEO OUT PB PR Y 480P 480I VIDEO IN Television not included Back of the main unit Video cable included COMPO...

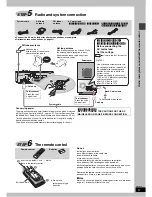
Page 9: ...rica Saudi Arabia and Kuwait Before connecting the AC mains lead Set the voltage Use a flat head screwdriver to turn the voltage selector on the back of the subwoofer to the appropriate position for the area in which this system is used If the power supply in your area is 115 V or 120 V please set the voltage selector as follows For 115 V Set to 110 V For 120 V Set to 127 V AC mains lead Conservin...

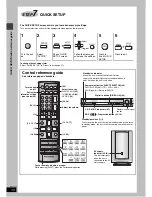
Page 10: ... C FOCUS SUPER SRND MIX 2CH PL 26 24 24 24 26 26 27 14 14 20 27 13 12 14 15 25 14 14 AV EFFECT CD MODE QUICKREPLAY SUBTITLE 13 25 1 2 3 4 5 V R S M R S C S M PROGRESSIVE FM MODE MEMORY VOLUME DISCEXCHANGE DISCSKIP PHONES DOWN UP 5 DISC SELECTOR INPUT SELECTOR I DIGITAL IN CD MODE TUNE MODE TUNING OPEN CLOSE Turn the unit on off 12 13 13 16 17 To use functions labeled in orange While pressing SHIFT...

Page 11: ...ity prevention liquids or any other solvent Do not use scratch proof protectors or covers Do not use the following discs Discs with exposed adhesive from removed stickers or labels rented discs etc Discs that are badly warped or cracked Irregularly shaped discs such as heart shapes Disc Logo Indication used in operating instructions Remarks DVD RAM RAM Recorded using Version 1 1 of the Video Recor...

Page 12: ...n the disc finishes playing If the next disc doesn t start playing select the disc page 13 Disc selection 6 Adjust the volume Disc select buttons indicators 2 Select DVD CD Stop PROGRESSIVE DISC SKIP Numbered buttons Progressive video Main unit only Stop The position is memorized while RESUME is on the display Press 1 play to resume DVD V To review the previous chapters page 14 Position memory Pre...

Page 13: ...U FL DISPLAY SUBTITLE DISC 1 5 SHIFT 1 2 3 4 5 V R S M R S C S M PROGRESSIVE FM MODE MEMORY VOLUME DISCEXCHANGE DISCSKIP PHONES DOWN UP 5 DISC SELECTOR INPUT SELECTOR I DIGITAL IN CD MODE TUNE MODE TUNING OPEN CLOSE CD MODE OPEN CLOSE DISC EXCHANGE DISC SKIP 5 DISC SELECTOR TOP MENU MENU RETURN RETURN FL DISPLAY SUBTITLE 1 2 3 4 5 DISC 1 DISC 2 DISC 3 DISC 4 DISC 5 SHIFT r DISCSKIP Changing the ot...

Page 14: ...d the disc s instructions for details DVD V with multiple subtitles VCD SVCD only RAM On Off only Press SUBTITLE several times to select the subtitle language To clear display the subtitles Press 2 1 to select On or Off Only when the elapsed play time can be displayed Press QUICK REPLAY to skip back a few seconds DVD A During play or while paused Press SHIFT i PAGE The page changes each time you d...

Page 15: ...ect an item then repeat step 2 Press SHIFT PAGE to skip 8 lines at a time To clear an item VCD CD Press CANCEL DVD A DVD V WMA MP3 JPEG 1 Press 3 4 to select an item 2 Press CANCEL or press 3 4 2 1 to select Clear and press ENTER To clear the whole program VCD CD Press so CLEAR is displayed DVD A DVD V WMA MP3 JPEG Press 3 4 2 1 to select Clear all and press ENTER Note DVD V WMA MP3 JPEG Times are...

Page 16: ...To use the contents screen to find a track CD CD text only Navigation Menu DISPLAY RETURN to display the sub menu Group 005 023 Content 0001 0004 to exit Perfume 001 Brazilian 002 Chinese 003 Czech 004 Hungarian 005 Japanese 006 Mexican 007 Philippine 008 Swedish 009 Piano 010 Vocal 001 Lady Starfish 002 Metal Glue 003 Life on Jupiter 004 Starperson 001 My favorite1 002 My favorite2 5 JPEG 002 My ...

Page 17: ... is not compatible with ID3 tags Compatible sampling rate 8 11 02 12 16 22 05 24 32 44 1 and 48 kHz JPEG To view JPEG files on this unit Take them on a digital camera that meets the DCF Standard Design rule for Camera File system Version 1 0 Some digital cameras have functions that are not supported by the DCF Standard Version 1 0 like automatic picture rotation which may render a picture un viewa...

Page 18: ... Picture To switch still pictures Thumbnail To show thumbnail images Subtitle page 14 Marker VR RAM To recall a marker recorded on DVD Video recorders To recall a marker 3 4 ENTER Angle with multiple angles To select the angle Rotate Picture To rotate picture Slideshow To turn on off slideshow To change the slideshow timing 0 30 sec Other Settings Current playback item Press 3 4 to select the elap...

Page 19: ... of these discs this feature reproduces the frequencies lost during recording to give you a sound closer to the original WMA MP3 Disc recording is other than 8 kHz 16 kHz 32 kHz This feature reproduces the higher frequencies lost during recording to give you a sound closer to the original 1 2 3 Off DVD A DVD V CD LPCM PPCM 1 High tempo e g pop and rock 2 Various tempos e g jazz 3 Low tempo e g cla...

Page 20: ...rom QUICK SETUP also changes this setting English Language options 1 Other 3 Ratings Set a ratings level to limit DVD Video play Follow the on screen instructions Setting ratings When level 8 is selected 8 No Limit 1 to 7 0 Lock All To prevent play of discs without ratings levels Changing ratings When level 0 7 is selected Unlock Player Change Password Change Level Temporary Unlock TV Aspect Choos...

Page 21: ...d the highest sound level Convenient for late night viewing Only works with Dolby Digital Audio during Search On Off Speaker Setting below Set the delay time for your center and surround speakers Center 0 0 1 0 2 0 3 0 4 0 5 0 ms Surround L R 0 0 5 0 10 0 15 0 ms Menu Language 5 English 6 English Français Deutsch Italiano Español Português Svenska Nederlands On Screen Messages On Off FL Dimmer Bri...

Page 22: ... in FM Main unit only Press FM MODE to display MONO Press FM MODE again to cancel the mode The mode is also canceled when you change the frequency VOLUME 1 2 3 4 5 6 7 8 0 9 CH CANCEL SKIP SLOW SEARCH MENU ENTER DIRECT NAVIGATOR TOP MENU RETURN DISPLAY AV SYSTEM VCR TV TV AV TUNER BAND DIGITAL AUX DVD CD DISC 1 DISC 2 DISC 3 DISC 4 DISC 5 S10 PLAY LIST TV VOL TV VOL SUBWOOFER LEVEL SFC C FOCUS SUP...

Page 23: ...ext data transmitted by the radio data system RDS available in some areas If the station you are listening to is transmitting RDS signals RDS will light up on the display Press RDS to display the text data Each time you press the button PS PTY Frequency display M O R M Middle of the road music Note RDS displays may not be available if reception is poor Use outdoor antennas if radio reception is po...

Page 24: ...TER FOCUS ON CENTER FOCUS OFF This does not work when Super Surround is turned on This will also work when Dolby Pro Logic II is turned on Dolby Pro Logic II is an advanced decoder that derives 5 channel surround Left and Right Front Center Left and Right Surround from any stereo program material whether or not it has been specifically Dolby Surround encoded Press ÎPLII Each time you press the but...

Page 25: ...s no output from SW subwoofer channel To adjust speaker level during play Effective when playing multi channel audio or when Dolby Pro Logic II is on 1 Press CH SELECT to select the speaker L C R RS LS SW SW Subwoofer You can adjust SW only if the disc includes a subwoofer channel SW does not appear on the display and is not adjustable when Dolby Pro Logic II is turned on S appears instead of RS a...

Page 26: ... recall the sound setting for the disc Down mixing Down mixes multi channel signals to 2 channels Subwoofer level Adjusts the amount of bass Custom Sound Memory Stores up to 30 sound settings one setting per disc VOLUME 1 2 3 4 5 6 7 8 0 9 CH CANCEL SKIP SLOW SEARCH MENU ENTER DIRECT NAVIGATOR TOP MENU RETURN DISPLAY AV SYSTEM VCR TV TV AV TUNER BAND DIGITAL AUX DVD CD DISC 1 DISC 2 DISC 3 DISC 4 ...

Page 27: ...ring damage Sleep timer Turns the unit off after a set time Muting VOLUME 1 2 3 4 5 6 7 8 0 9 CH CANCEL SKIP SLOW SEARCH MENU ENTER DIRECT NAVIGATOR TOP MENU RETURN DISPLAY AV SYSTEM VCR TV TV AV TUNER BAND DIGITAL AUX DVD CD DISC 1 DISC 2 DISC 3 DISC 4 DISC 5 S10 PLAY LIST TV VOL TV VOL SUBWOOFER LEVEL SFC C FOCUS SUPER SRND MIX 2CH PL SLEEP C S M POSITION MEMORY ZOOM AUDIO SETUP MUTING FL DISPLA...

Page 28: ...recorder Select VIDEO 2 input on your television in this example To play sound from a video cassette recorder Already connected page 8 To record discs radio broadcast etc to a tape deck Audio cable not included Video cable not included Signal flow Optical digital audio cable not included Do not bend sharply when connecting VOLUME 1 2 3 4 5 6 7 8 0 9 CH CANCEL SKIP SLOW SEARCH MENU ENTER DIRECT NAV...

Page 29: ...ite broadcasts Refer to your satellite receiver s operating instructions for details Press SHIFT DIGITAL to select D IN Digital In as the source Main unit Press DIGITAL IN Operating the television and the video cassette recorder Television Video cassette recorder Changing the remote control code Operating the tape deck or satellite receiver Listening to the tape deck Recording to the tape deck Lis...

Page 30: ...h voltage power sources This can overload the unit and cause a fire Do not use a DC power source Check the source carefully when setting the unit up on a ship or other places where DC is used Ensure the AC mains lead is connected correctly and not damaged Poor connection and lead damage can cause fire or electric shock Do not pull bend or place heavy items on the lead Grasp the plug firmly when un...

Page 31: ...yer 3 audio decoding technology licensed from Fraunhofer IIS and Thomson multimedia Manufactured under license from Dolby Laboratories Dolby Pro Logic and the double D symbol are trademarks of Dolby Laboratories DTS and DTS Digital Surround are registered trademarks of Digital Theater Systems Inc This product incorporates copyright protection technology that is protected by method claims of certai...

Page 32: ...atible 5 CD Audio CD DA 6 Video CD 7 SVCD Conforming to IEC62107 8 CD R RW CD DA Video CD SVCD MP3 WMA JPEG formatted disc 9 MP3 WMA 1 Compatible compression rate MP3 between 32 kbps and 320 kbps WMA between 48 kbps and 320 kbps 10 JPEG 1 Exif Ver 2 1 JPEG Baseline files Picture resolution between 320k240 and 6144k4096 pixels sub sampling is 4 2 2 or 4 2 0 11 HighMAT Level 2 Audio and Image 1The t...

Page 33: ...s over frequency 5 kHz Frequency range 89 Hz 41 kHz j16 dB 100 Hz 40 kHz j10 dB Dimensions WtHtD 250k1160 Max 704 Min k247 mm Speaker height adjustment range 1160 575 mm However the height of the stand is fixed at 704 mm Mass 3 6 kg Center speaker SB PC920 Type 2 way 3 speaker system Bass reflex Speaker unit s Impedance 4 1 Woofer 6 5 cm Cone type 2 Woofer 6 5 cm Cone type 3 Tweeter 6 cm Ring shap...

Page 34: ... default values It takes time before play starts MP3 Play may take time to begin when an MP3 track has still picture data Even after the track starts the correct play time will not be displayed This is normal Folders deeper than the eighth layer on a data CD are not displayed correctly WMA MP3 JPEG Folders deeper than the eighth layer are displayed as the eighth layer A menu screen appears during ...

Page 35: ...ould be corrected if you use interlace output 19 Pictures not in progressive output When playing NTSC discs press PROGRESSIVE on the main unit so PROG is displayed Or select 480P in Video Output Mode in Picture Menu If the unit is connected to the television through VIDEO OUT S VIDEO and SCART output will be interlace 12 19 8 Noise is heard ST flickers or doesn t light Sound is distorted Adjust th...

Page 36: ...Matsushita Electric Industrial Co Ltd p Web Site http www panasonic co jp global RQT7436 B F0304YM0 ...

Reviews: