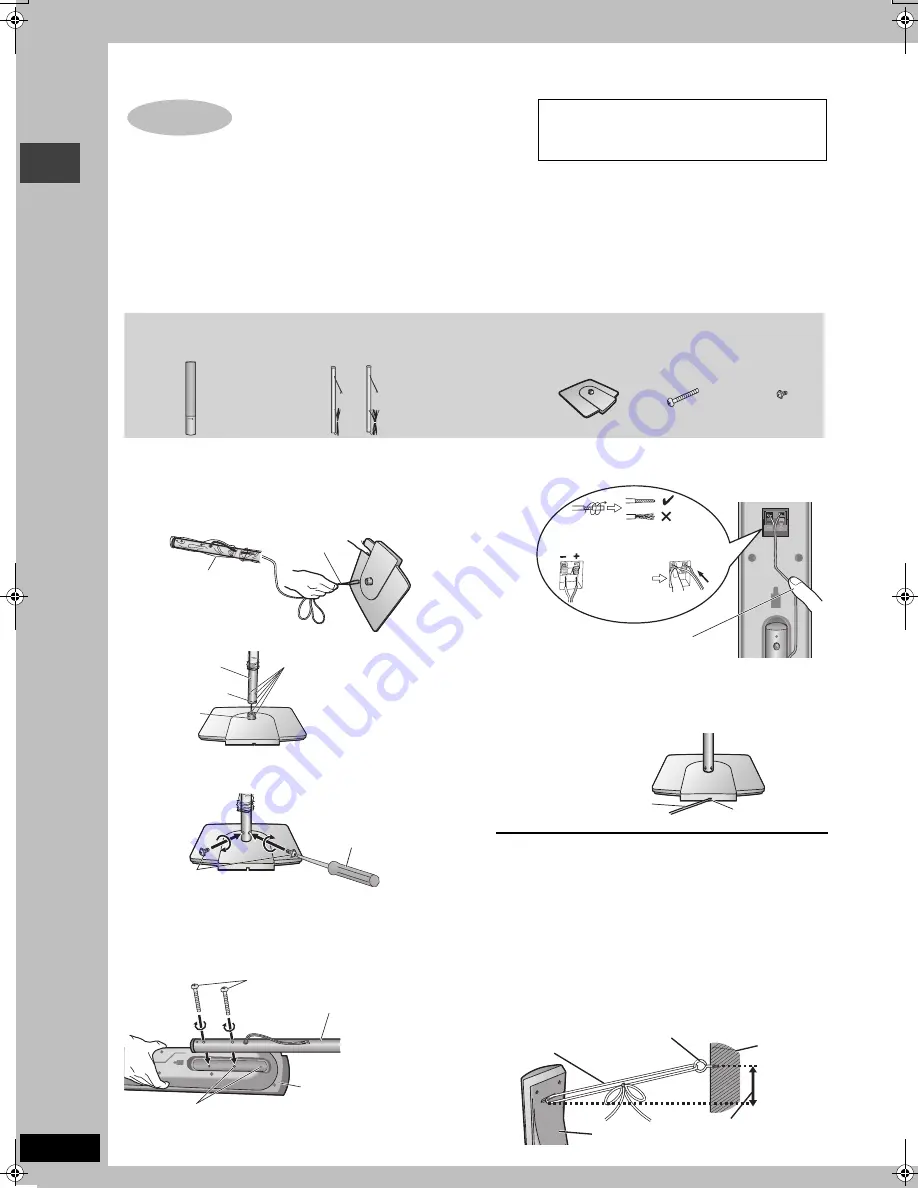
background image

4

RQT7991

Simple setup

Preparation

To prevent damage or scratches, lay down a soft cloth and perform assembly on it.

For assembly, use a Phillips-head screwdriver.

Make sure you have all the indicated components before starting assembly, setup, and connection.

There is no difference between the right and left speakers and pipes.

[Note]

To prevent the speaker cables from being pulled out of the pipes, leave the plastic wrap on the pipes while assembling the speaker stands.

The front and surround speaker pairs as well as the pipe pairs are different.
–Check the label on the rear of the speaker before attaching the pipe (

page 5).

–The pipe with the shorter cable is for the front speaker.

1

Assemble the speaker stands.

1

Thread the speaker cable through the base.

For quicker threading, loosely fold the cable in half (do not 
crease), pass the folded portion through the hole, and then pull 
the rest of the cable through the base.

2

Insert the pipe.

3

Secure the pipe to the base.

Ensure the screws are securely fastened.

2

Attach the stands to the speakers.

Ensure the stand is fastened on straight by gradually tightening the 
top and bottom screws alternately until fully tightened.

You can also attach to the lower rear of the speaker.

The height of the speaker can be changed when attaching the 
stand to the upper rear or lower rear of the speaker.

3

Connect the speaker cables.

4

Secure the speaker cables to the bases.

Preventing the speakers from falling over 

Preparation

Attach screw eyes (not included) to secure the speakers to the wall 
(

diagram below).

You will need to obtain the appropriate screw eyes to match the 
walls or pillars to which they are going to be fastened.

Consult a qualified housing contractor concerning the 
appropriate procedure when attaching to a concrete wall or a 
surface that may not have strong enough support. Improper 
attachment may result in damage to the wall or speakers.

1

Thread the string (not included) through the slot on the 
rear of the speaker to prevent it from falling over.

2

Loop the string through the screw eye and tie tightly.

STEP

1

The supplied stands are specially designed for 
attachment to Panasonic SB-FS930 front speakers 
or SB-FS880 surround speakers. Use only as 
indicated in this setup.

Front and surround 
speaker assembly

2 Front and 2 Surround


speakers

4 Bases

8 Long screws

8 Short screws

Pipes

2

k

pipes with short cable: For front speakers

2

k

pipes with long cable: For surround speakers

Cable

Base

Leave the excess speaker 
cable for connecting later.

Plastic wrap

Insert the pipe while gently 
pulling on the speaker cable.

Match the groove and these 
holes with the base when you 
insert the pipe.

Pipe support

Pipe

Base

Groove

Short screws

Phillips-head 
screwdriver

(not included)

Before proceeding to the next step, please remove the plastic 
wrap from the pipe.

Speaker

Long screws

Pipe

Twist off the vinyl ends of the 
speaker cables.

Rear of the speaker

_

:

 Copper

`

:


Silver

Push!

If there is any excess speaker cable, thread the speaker cable 
into the opening near the top of the pipe while pulling the speaker 
cable from the bottom of the base.

Press the speaker cable into the 
groove.

Rear side 
of base

Press the speaker cable into 
the base cover groove as far 
as possible.

Cable

Groove

String

 (not included)

Wall

Screw eye

 (not included)

Rear of the speaker

Approx. 150 mm

Fr

o

n

a

n

d surr

ound

 speak

er asse

mb

ly

HT880W_En.book  Page 4  Tuesday, February 15, 2005  1:28 AM

Summary of Contents for SC-HT880W

Page 1: ...s manual for future reference Region Number The United Kingdom 2 Australia and N Z 4 4 ALL 4 5 2 Note EB on the packaging indicates the United Kingdom Advanced progressive scan Provides a smoother and sharper image 7 page Digital Transmitter and Receiver Set your surround sound free 9 page Compatible with a variety of media formats DVD RAM DVD Audio DVD Video and more 11 page High performance soun...

Page 2: ... are of the model for Australia and N Z Operations in these instructions are described mainly with the remote control but you can perform the operations on the main unit if the controls are the same System SC HT880W Main unit SA HT880W Front speakers SB FS930 Center speaker SB PC930 Surround speakers SB FS880 Active subwoofer SB WA880 Digital transmitter SH FX50T Digital receiver SE FX50 CAUTION T...

Page 3: ...fuse cover Safety precautions 2 Caution for AC Mains Lead 3 Control reference guide 10 Discs that can be played 11 Disc handling 11 Convenient functions 14 Displaying current playback condition QUICK OSD Reviewing titles to play ADVANCED DISC REVIEW Quick replay Skipping 30 seconds forward Changing the zoom ratio Changing soundtracks Changing subtitles Angle selection and Still picture rotation ad...

Page 4: ... appropriate screw eyes to match the walls or pillars to which they are going to be fastened Consult a qualified housing contractor concerning the appropriate procedure when attaching to a concrete wall or a surface that may not have strong enough support Improper attachment may result in damage to the wall or speakers 1Thread the string not included through the slot on the rear of the speaker to ...

Page 5: ...L R CENTER ACTIVE SUBWOOFER Do not use a front speaker as a surround speaker or vice versa Verify the type of speaker with the label on the rear of the front speaker Speaker labels DIGITAL RECEIVER How you set up your speakers can affect the bass and the sound field Note the following points Place speakers on flat secure bases Placing speakers too close to floors walls and corners can result in ex...

Page 6: ...kers with the subwoofer and the digital receiver Click Sheet of speaker cable stickers Speaker cable sticker 2 FRONT R 1 FRONT L 5 CENTER ACTIVE SUBWOOFER Insert the wire fully Click Speaker cable For center speaker Copper Silver AC mains lead The United Kingdom Australia and N Z Front and center speaker connection Connect the surround speaker cables here only if you do not intend to use the digit...

Page 7: ...ect Video YPbPr or S Video YPbPr from QUICK SETUP page 9 If RGB No Output is selected the RGB signal is output from the SCART AV terminal but no signal is output from the component video output terminals STEP4 Video connections COMPONENTVIDEOOUT COMPONENTVIDEOOUT PB PR Y S VIDEO S VIDEO OUT OUT VIDEO VIDEO OUT OUT VIDEO IN NTSC 480p 480i PAL 576p 576i NTSC 480p 480i PAL 576p 576i Back of the main ...

Page 8: ...ins lead after all other connections are complete Optional antenna connections page 23 AM loop antenna Stand the antenna up on its base Place the antenna where reception is best Keep loose antenna cable away from other wires and cables Catch up Click System cable AM loop antenna FM indoor antenna AC mains lead FM indoor antenna Affix this end of the antenna where reception is best The United Kingd...

Page 9: ... SKIP SUBTITLE AUDIO PLAY SPEED QUICK REPLAY SLEEP QUICK OSD ADVANCED DISC REVIEW FL DISPLAY REPEAT SHIFT ANGLE PAGE GROUP AV SYSTEM DVD CD PLAY LIST TV VOL TV VOL ENTER 1 2 6 9 4 5 7 8 CANCEL 0 S10 3 AUX SETUP RETURN SHIFT DVD CD 3 4 2 1 ENTER 1 Turn on the main unit 2 Select DVD CD 3 Show the QUICK SETUP screen 4 Follow the messages and make the settings 5 Press to finish QUICK SETUP 6 Press to ...

Page 10: ... tray 12 PHONES Connect headphones 28 VOLUME Turn up down the volume 12 PROGRESSIVE Enjoy progressive video 12 RDS The United Kingdom only Display RDS text data 23 H BASS Turn the bass sound enhancement on off 25 H BASS indicator 4 5 X TUNING W Skipping or slow search play 12 Select the radio stations 22 Standby on switch Í I Press to switch the unit from on to standby mode or vice versa In standb...

Page 11: ...tc Discs that are badly warped or cracked Irregularly shaped discs such as heart shapes Disc Logo Indication in these operating instructions Remarks DVD RAM RAM Recorded with devices using Version 1 1 of the Video Recording Format a unified video recording standard such as DVD video recorders DVD video cameras personal computers etc JPEG Recorded using the DCF Design rule for Camera File system st...

Page 12: ...SE OPEN CLOSE VOLUME DOWN UP INPUT SELECTOR Press to skip Press and hold to search during play slow motion during pause Motion picture part Press 1 play to start normal play 6 Adjust the volume 5 Start play The tray is automatically closed 3 Open the disc tray Stop 2 Select DVD CD 1 Turn the main unit on 4 Load the disc Load double sided discs so the label for the side you want to play is facing u...

Page 13: ... MENU TOP MENU RETURN SUBTITLE AUDIO FL DISPLAY ANGLE PAGE GROUP 1 2 6 5 CANCEL 3 4 2 1 ENTER SHIFT Numbered buttons SKIP ENTER SLOW SEARCH ENTER ENTER Select Register Enter number RAM DVD A DVD V VCD CD e g To select 12 S10 1 2 VCD with playback control Press to cancel the PBC function and then press the numbered buttons WMA MP3 JPEG e g To select 123 1 2 3 ENTER Press CANCEL to cancel the number...

Page 14: ... use this button to select L R or LR DVD V Karaoke discs Press 2 1 to select On or Off for vocals Read the disc s instructions for details Signal type data LPCM PPCM ÎDigital DTS MPEG Signal type kHz Sampling frequency bit ch Number of channels Displaying current playback condition QUICK OSD Reviewing titles to play ADVANCED DISC REVIEW Quick replay VOLUME CH SKIP SLOW SEARCH MENU DIRECT NAVIGATOR...

Page 15: ...elect Play as Data Disc in Other Menu page 19 DVD A Some discs contain bonus groups If a password screen appears after selecting a group enter the password with the numbered buttons to play the bonus group Refer also to the disc s jacket DVD A Press 1 play 1 Press the numbered buttons to select the items WMA MP3 JPEG then press ENTER Repeat this step to program other items To select a 2 digit numb...

Page 16: ...NS to show the playback condition and current position To exit the screen Press TOP MENU or MENU Playing data discs Playing items in order Playback Menu Playing from the selected item Navigation Menu VOLUME CH SKIP SLOW SEARCH MENU DIRECT NAVIGATOR TOP MENU RETURN FUNCTIONS SUBWOOFER LEVEL SUPER SRND H BASS C FOCUS SFC PLAY MODE TEST CH SELECT SETUP MUTING MIX 2CH PL ZOOM MANUAL SKIP SUBTITLE AUDI...

Page 17: ...rotected This unit does not support Multiple Bit Rate MBR MP3 This unit does not support ID3 tags Compatible sampling rates 8 11 02 12 16 22 05 24 32 44 1 and 48 kHz JPEG To view JPEG files on this unit Take them on a digital camera that meets the DCF Standard Design rule for Camera File system Version 1 0 Some digital cameras have functions that are not supported by the DCF Standard Version 1 0 l...

Page 18: ...IONS Items shown differ depending on the type of disc Main menu Program Group Title Chapter Track Playlist Content To start from a specific item Time Except iR iRW To skip incrementally or decrementally Time Slip for play only 1 Press ENTER twice to show the Time Slip indicator 2 Press 3 4 to select the time and press ENTER Press and hold 3 4 to alter faster To start from a specific time Time Sear...

Page 19: ...video content is distorted When you play NTSC discs Auto1 normal Detects 24 frame per second film content and appropriately converts it Auto2 Compatible with 30 frame per second film content in addition to 24 frame per second film content Video Select when using Auto1 or Auto2 and the video content is distorted Dolby Pro Logic II page 24 Dolby Pro Logic II Dialogue Enhancer To make the dialogue in...

Page 20: ... Select the tab 3 Select the item 4 Make the settings 5 Press to exit SHIFT SETUP MUTING ENTER Select Go right ENTER Select Register ENTER 1 2 6 9 4 5 7 8 0 S10 3 Select Register SHIFT SETUP MUTING QUICK SETUP enables successive settings of the items in the shaded area Audio Choose the audio language English Language options 1 Original 2 Other 3 Subtitle Choose the subtitle language Automatic 4 En...

Page 21: ...lurred NTSC Disc Output Choose PAL 60 or NTSC output when playing NTSC discs page 11 Video systems PAL60 When connected to a PAL television NTSC When connected to an NTSC television Dynamic Range Compression Off On Adjusts for clarity even when the volume is low by compressing the range of the lowest sound level and the highest sound level Convenient for late night viewing Only works with Dolby Di...

Page 22: ...o the radio broadcast Press ENTER 2 While the frequency and PGM are flashing on the display Press the numbered buttons to select a channel Alternatively press W CH X then press ENTER To select a 2 digit number e g 12 S10 1 2 The station occupying a channel is erased if another station is preset to that channel Automatic presetting VOLUME CH SKIP SLOW SEARCH MENU DIRECT NAVIGATOR TOP MENU RETURN FU...

Page 23: ...UNTRY AFFAIRS POP M CHILDREN NATIONAL INFO ROCK M SOCIAL A OLDIES SPORT M O R M RELIGION FOLK M EDUCATE LIGHT M PHONE IN DOCUMENT DRAMA CLASSICS TRAVEL TEST CULTURE OTHER M LEISURE ALARM SCIENCE WEATHER JAZZ Optional antenna connections TV TV AUDIO AUDIO IN IN VCR VCR AUDIO AUDIO IN IN FM ANT FM ANT AM ANT AM ANT 75 75 LOOP LOOP EXT EXT COMPONENTVIDEOOUT COMPONENTVIDEOOUT PROGRESSIV PROGRESSIVE IN...

Page 24: ...n Super Surround is turned on This also works when Dolby Pro Logic II is turned on Dolby Pro Logic II is an advanced decoder that derives 5 channel surround Left and Right Front Center Left and Right Surround from any stereo program material whether or not it has been specifically Dolby Surround encoded Press ÎPLII Each time you press the button MOVIE Movie software recorded in Dolby Surround MUSI...

Page 25: ...ess VOLUME r or s to set the volume level normally used for listening 3 Press 3 increase or 4 decrease to adjust the speaker level for each speaker C RS LS 6 dB to i6 dB L R Only the balance is adjustable To adjust the balance of the front speakers While outputting the test signal press 2 1 Adjust the speaker level to the same level as the front speakers To stop the test signal Press SHIFT i TEST ...

Page 26: ...ENTVIDEOOUT COMPONENTVIDEOOUT NTSC 480p 480i PAL 576p 576i NTSC 480p 480i PAL 576p 576i PB Y PR S VIDEO S VIDEO OUT OUT VIDEO VIDEO OUT OUT A AV REC REC OUT OUT AUDIO OUT R L VIDEO IN 2 1 PLAY OUT REC IN R L R L VIDEO OUT AUDIO OUT R L DIGITAL TRANSMITTER Television not included Video cassette recorder not included To show video from the video cassette recorder Select VIDEO 2 input on your televis...

Page 27: ...ND to select FM or AM 2 Start recording and play Press AUX to select AUX as the source Operating the television and the video cassette recorder Television Video cassette recorder Changing the remote control code Operating the tape deck Recording to the tape deck Listening to the tape deck PANASONIC 01 29 30 31 AKAI 07 11 28 36 37 ALBA 05 11 12 BAUR 32 BLAUPUNKT 28 36 BRANDT 26 41 BUSH 02 05 10 11 ...

Page 28: ...matically switched to stereo 2 channel Note Avoid listening for prolonged periods of time to prevent hearing damage Sleep timer VOLUME CH SKIP SLOW SEARCH MENU DIRECT NAVIGATOR TOP MENU RETURN FUNCTIONS VCR AUX TV TUNER BAND TV AV SUBWOOFER LEVEL SUPER SRND H BASS C FOCUS SFC PLAY MODE TEST CH SELECT SETUP MUTING MIX 2CH PL ZOOM MANUAL SKIP SUBTITLE AUDIO PLAY SPEED QUICK REPLAY ADVANCED DISC REVI...

Page 29: ...ecommended for wall mounted front or surround speakers You can also remove the speaker cables from the pipes supplied with this system Fitting speaker stands not included Center speaker only Ensure the stands meet these conditions before purchasing them Note the diameter and length of the screws and the distance between screws as shown in the diagram The stands must be able to support over 10 kg T...

Page 30: ...ty is lower I P B MPEG 2 the video compression standard adopted for use with DVD Video codes frames using these 3 picture types I Intra coded picture This picture has the best quality and is the best to use when adjusting the picture P Predictive coded picture This picture is calculated based on past I or P pictures B Bidirectionally predictive coded picture This picture is calculated by comparing...

Page 31: ...75 Urdu 8582 Uzbek 8590 Vietnamese 8673 Volapük 8679 Welsh 6789 Wolof 8779 Xhosa 8872 Yiddish 7473 Yoruba 8979 Zulu 9085 Windows Media and the Windows logo are trademarks or registered trademarks of Microsoft Corporation in the United States and or other countries WMA is a compression format developed by Microsoft Corporation It achieves the same sound quality as MP3 with a file size that is small...

Page 32: ...0 Hz 20 kHz 2 S N ratio CD Audio 95 dB 3 Dynamic range DVD linear audio 95 dB CD Audio 93 dB 4 Total harmonic distortion CD Audio 0 005 VIDEO SECTION Video system Signal system PAL625 50 PAL525 60 NTSC Composite video output Output level 1 Vp p 75 Terminal Pin jack 1 system The United Kingdom Scart jack 1 system S video output Y output level 1 Vp p 75 C output level PAL 0 3 Vp p 75 NTSC 0 286 Vp p...

Page 33: ... supply AC 230j240 V 50 Hz Power consumption Digital transmitter 0 3 W Digital receiver 35 W Dimensions WtHtD Digital transmitter 97 mmk47 5 mmk8 5 mm Digital receiver 103 mmk215 mmk178 mm Mass Digital transmitter 0 03 kg Digital receiver 2 3 kg Wireless module Frequency range 2 402j2 480 GHz No of channels 79 Bandwidth Channel 1 MHz RF Output Power 13 dBm Max RF Output Impedance 50 Type of Emissi...

Page 34: ...displayed correctly WMA MP3 JPEG Folders deeper than the eighth layer are displayed as the eighth layer A menu screen appears during skip or search VCD This is normal for Video CD s Playback control menu doesn t appear VCD with playback control Press twice and then press 1 play The program and random play functions do not work DVD V These functions do not work with some DVD Videos Programmed items...

Page 35: ...storted Adjust the position of the FM or AM antenna Use an outdoor antenna 23 A beat sound is heard Turn the television off or move it away from the unit A low hum is heard during AM broadcasts Separate the antenna from other cables Cannot operate the TV Press TV first to operate the television Check the remote control code for the TV manufacturer 27 Wireless link indicator does not light Check th...

Page 36: ...ase check and identify the supplied accessories Use numbers indicated in parentheses when asking for replacement parts Product numbers correct as of February 2005 These may be subject to change Declaration of Conformity DoC Hereby Panasonic AVC Networks Singapore Pte Ltd PAVCSG declares that this product is in compliance with the essential requirements and other relevant provisions of Directive 19...

Reviews: