background image

E

N

G

L

IS

H

ENGLISH

RQTX1317

5

5

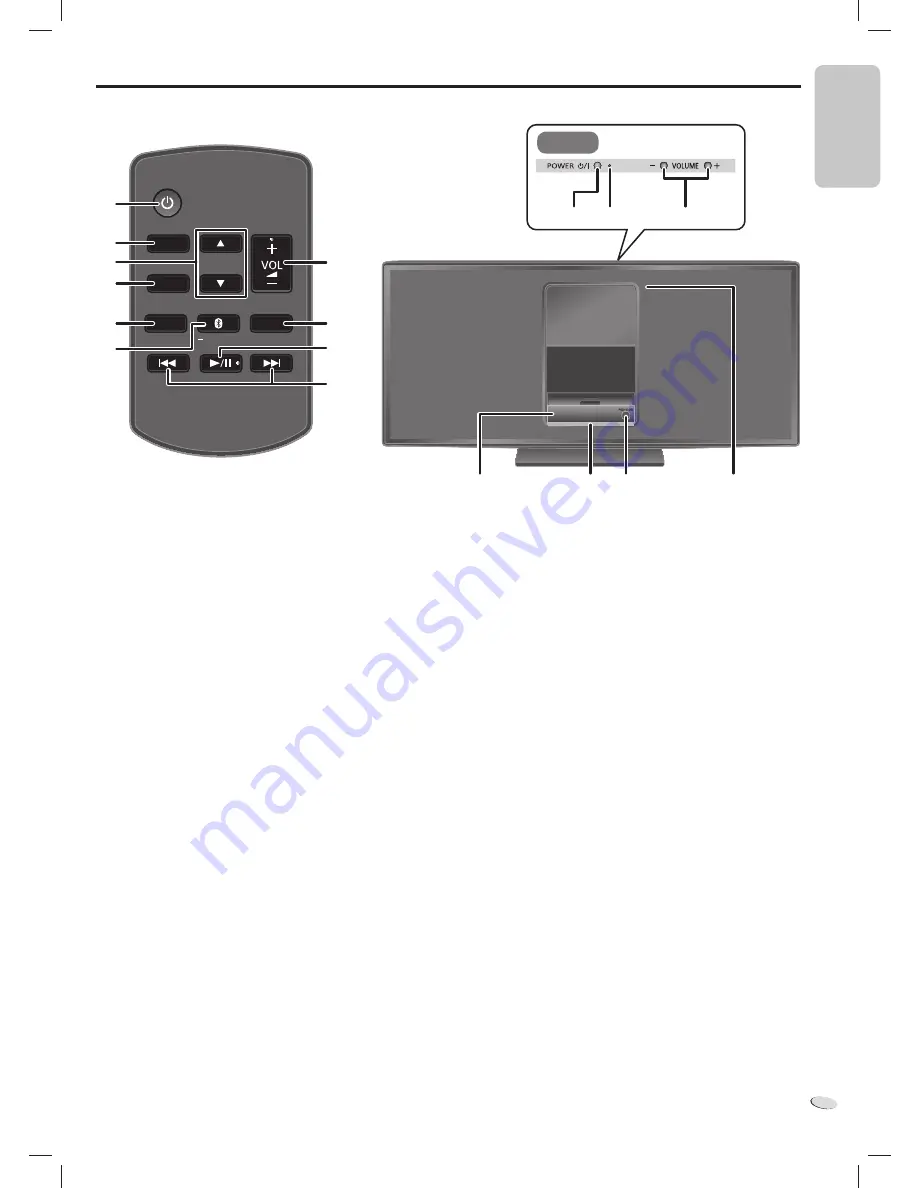
Overview of controls

Standby/on switch [

`

], [

1

, POWER]

 (

Z

 9)

Press to switch the unit from on to standby mode or vice versa.
In standby mode, the unit is still consuming a small amount of 
power.

View the iPod or iPhone menu (

Z

 6)

Select an item (

Z

 6)

Confirm a selection (

Z

 6)

Set or cancel the auto off function (

Z

 8)

Select iPod, Internet radio, Bluetooth or AUX mode

Start Bluetooth pairing mode (

Z

 7)

Select Bluetooth link mode (

Z

 7)

Adjust the audio input level in AUX mode (

Z

 8)

Adjust the volume of the system

Mute the sound of the system

Press the button again to cancel.
“MUTE” is also canceled when you adjust the volume or when you 
switch off the system.
Change the remote control code (

Z

 4)

MUTE

SELECTOR

iPod MENU

OK

LINK MODE

PAIRING

B

D

C

E

F

A

G

H

I

J

Start or pause playback

Skip or search track

Power indicator
On : The system is on
Off : The system is in standby mode

iPod or iPhone dock

Status indicator

Green 

: iPod mode

Blue 

: Bluetooth mode

Light blue : Set or cancel the auto off function
Off 

: AUX mode

The green status indicator blinks 

each 

time 

a

 remote control 

button

 is 

pressed.

[PUSH CLOSE] 

(

Z

 6)

Press while closing the dock.

Remote control sensor

Point the remote control at the remote control sensor, away from 
obstacles, at a maximum range of 7 m (23 feet) directly in front of 
the main unit.

A

K

G

L

M

N

O

Top view

HC05_PC_us.indd   5

HC05_PC_us.indd   5

1/5/2011   12:16:54 PM

1/5/2011   12:16:54 PM

Summary of Contents for SC-HC05

Page 1: ......

Page 2: ...S UNIT IN A BOOKCASE BUILT IN CABINET OR IN ANOTHER CONFINED SPACE ENSURE THE UNIT IS WELL VENTILATED TO PREVENT RISK OF ELECTRIC SHOCK OR FIRE HAZARD DUE TO OVERHEATING ENSURE THAT CURTAINS AND ANY OTHER MATERIALS DO NOT OBSTRUCT THE VENTILATION VENTS WARNING TO REDUCE THE RISK OF FIRE ELECTRIC SHOCK OR PRODUCT DAMAGE DO NOT EXPOSE THIS APPARATUS TO RAIN MOISTURE DRIPPING OR SPLASHING AND THAT NO...

Page 3: ...er hazards 4 Safety check After repairs or service ask the servicer to perform safety checks to confirm that the unit is in proper working condition Product information For product information or assistance with product operation Contact the Panasonic Canada Inc Customer Care Centre at 1 800 561 5505 or visit the web site www panasonic ca or an authorized Servicentre closest to you Maintenance To ...

Page 4: ...oroughly with water and then consult a doctor Insulation sheet Stopper Connect the AC power supply cord Rear view Use the included AC power supply cord with this system only Do not use an AC power supply cord from other equipment Conserving power The system consumes approximately 0 05 W when it is in standby mode Disconnect the power supply if you do not use the system Some settings will be lost a...

Page 5: ...led when you adjust the volume or when you switch off the system Change the remote control code Z 4 MUTE SELECTOR iPod MENU OK LINK MODE PAIRING B D C E F A G H I J I Start or pause playback J Skip or search track K Power indicator On The system is on Off The system is in standby mode L iPod or iPhone dock M Status indicator Green iPod mode Blue Bluetooth mode Light blue Set or cancel the auto off...

Page 6: ...tion 8GB 16GB 32GB iPod nano 3rd generation video 4GB 8GB iPod classic 80GB iPod nano 2nd generation aluminum 2GB 4GB 8GB iPod 5th generation video 60GB 80GB iPod 5th generation video 30GB iPod nano 1st generation 1GB 2GB 4GB iPhone 4 16GB 32GB iPhone 3GS 8GB 16GB 32GB iPhone 3G 8GB 16GB iPhone 4GB 8GB 16GB Compatibility depends on the software version of your iPod or iPhone Note The display on th...

Page 7: ...e connects with this system automatically after pairing is complete Note A device must be paired to connect This system can only connect to one device at a time A device stays connected even if the system is switched to iPod or AUX mode Pairing with additional devices 1 Press SELECTOR to select Bluetooth mode 2 Press and hold PAIRING 3 Access the Bluetooth menu of the device and search for SC HC05...

Page 8: ...frequency band Certification This system conforms to frequency restrictions and has received certification based on frequency laws Thus a wireless permit is not necessary The actions below are punishable by law Taking apart or modifying the main unit Removing specification indications from the bottom of this main unit Restrictions of use Wireless transmission and or usage with all Bluetooth equipp...

Page 9: ...ces you have to set the audio output to SC HC05 manually Read the operating instructions of the device for details Sound from the device is broken The device is out of the 10 m 33 feet communication range Move the device nearer to the system Remove any obstacle between the system and the device Switch off any wireless LAN device Select MODE 1 for stable communication Memory reset Initialization Wh...

Page 10: ...use abuse neglect mishandling misapplication alteration faulty installation set up adjustments misadjustment of consumer controls improper maintenance power line surge lightning damage modification introduction of sand humidity or liquids commercial use such as hotel office restaurant or other business or rental use of the product or service by anyone other than an Authorized Servicer or damage th...

Reviews: