RQT7834
13
Remote control only
Press [PRESET EQ] to select a setting.
Every time you press the button:
HEAVY
SOFT
CLEAR
EQ-OFF
(cancelled)
DISCO
LIVE
HALL
HEAVY (sound quality)
: Adds punch to rock
SOFT (sound quality)
: For background music
CLEAR (sound quality)
: Clarifies higher sounds
DISCO (sound field)
: Produces sound with the same kind of
lengthy reverberations heard at a disco
LIVE (sound field)
: Makes vocals more alive
HALL (sound field)
: Adds an expansiveness to the sound to
produce the atmosphere of a great concert
hall
Note
You cannot use PRESET EQ together with H.BASS.
Enhancing the bass sound
You can enhance low-frequency sound so that heavy bass sound can
be heard clearly, even if the acoustics of your room are not optimal.
Press [H.BASS].
The button light comes on.
Press the button again to cancel.
The button light goes out.
Sound quality/sound field
Using the built-in sound quality/sound
field settings
Boosting the subwoofer
Press [SUBWOOFER].
Remote control: Press [SHIFT] + [S.WOOFER].
The button light comes on.
Each time you press the button:
MID (medium)
MAX (high)
Light off (off)
To cancel
Press [SUBWOOFER] to turn the light off.
Remote control: Press [SHIFT] + [S.WOOFER].
Note
You cannot use this function when headphones are connected.
Other functions
Auto-off function
Remote control only
When disc or tape is selected as the source
To save power, the unit turns off if it is left unused for ten minutes.
This function does not work if the source is tuner or AUX.
Press [SHIFT] + [AUTO OFF].
“AUTO OFF” is shown on the display.
The setting is maintained even if the unit is turned off.
If you select tuner or AUX as the source, “AUTO OFF” goes out. It
comes on again when you select disc or tape.
To cancel
Press [SHIFT] + [AUTO OFF] again.
Convenient functions
To dim the display panel
Remote control only
Press [DIMMER].
The display is dimmed and the indicators are turned off.
(The AC supply indicator remains on.)
Press [DIMMER] again to restore the display.
Switching displays
Press [DISP, –DEMO] to select the desired display mode.
Every time you press the button:
To mute the volume
Remote control only
Press [MUTING].
Press the button again to cancel.
“MUTING” goes out.
To cancel from the unit, turn [VOLUME] to minimum (--dB), then raise
it to the required level.
Muting is also cancelled when the unit is turned off.
Normal
(off)
Peak hold
Reflection
Using an external unit
(See above for external unit connection.)
1.
Press [AUX].
The unit comes on.
2.
For listening:
Proceed to step 3.
For recording:
Press [
a
, REC] (recording starts).
3.
Start playback from the external source. (For details, refer to the
external unit’s instruction manual.)
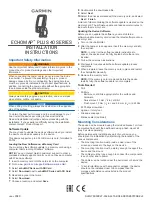
External unit connections
•
An analog player with a built-in phono equalizer can be connected.
•
For details, refer to the instruction manual of the units which are to
be connected.
•
When units other than those described above are to be connected,
please consult your audio dealer.
Analog player
(not included)
Rear panel of
this unit
(L)
(R)
R
L
Using headphones (not included)
Reduce the volume level and connect the headphones.
Plug type: 3.5 mm (
1
/
8
˝) stereo
Note
Avoid listening for prolonged periods of time to prevent hearing damage.