background image

RQT6924

22

Disc operations

Using GUI (Graphical User Interface) screens

[RAM] [DVD-A] [DVD-V]

[VCD]

 [CD]

]

[WMA] [MP3] [JPEG]

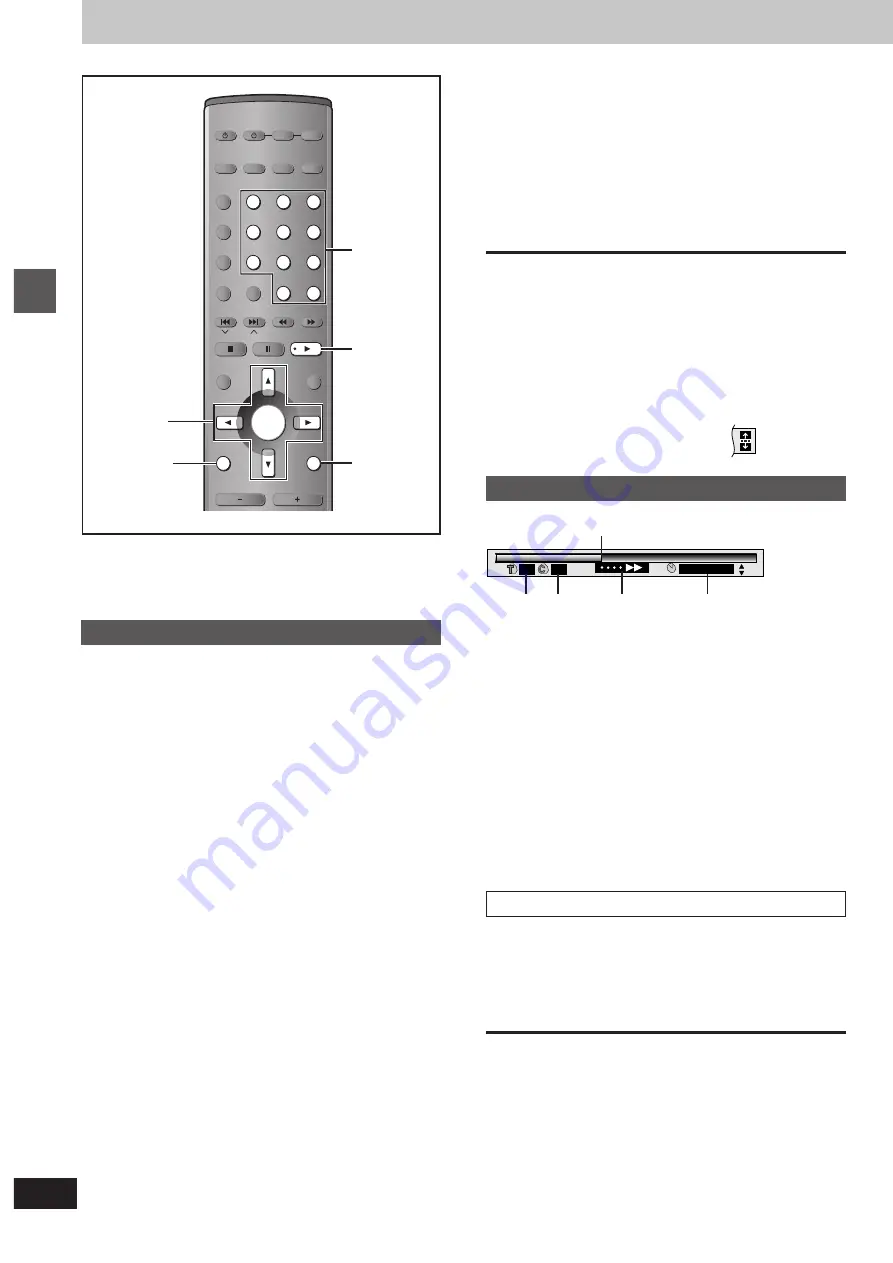
GUI screens are menus that contain information about the disc or
unit. These menus allow you to perform operations by changing this
information.

Common procedures

1

Press [DISPLAY].

Each time you press the button:

[>

Disc information (

 page 23)

l

;

l

Progress indicator (

 right)

l

;

l

Unit information (

 page 23)

l

;

{=

Original display

2

[Unit\information\only]

While the leftmost icon is highlighted

Press [

3

4

] to select the menu.

Each time you press the button:

[>

Play menu

l ;:

l

Display menu

l ;:

l

Audio menu

l ;:

{>

Picture menu

3

Press [

2

1

] to select the item.

4

Press [

3

4

] to select the setting.

Items with “

3

” or “

4

” above and below can be changed by

[

3

4

].

Press [ENTER] if the setting does not change after pressing
[

3

4

].

Some items require different operations. Read the explana-
tions on the following pages.

For your reference

Depending on the condition of the unit (playing, stopped, etc.) and
the type of software you are playing, there are some items that you
cannot select or change.

When numbers are displayed (e.g. title No.), the numbered buttons
are also effective for setting. After entering the numbers, press
[ENTER] to register the setting.

To clear the menus

Press [RETURN] until the menus disappear.

 To change the position of the icons

1 Press [

2

1

] to select the rightmost icon.

2 Press [

3

4

] to move the icons.

(There are 5 positions.)

Progress indicator

Indicates how far you have played through an item.
Example 

[DVD-V]

1

 Current position 

[RAM] [DVD-A] [DVD-V]


[VCD]

[

[CD]


[WMA]

[

[MP3]

2

 PG: Program number 

[RAM]

PL: Play list number 

[RAM]

T:

Title number 

[DVD-V]

Track number 

[VCD]

[

[CD]

G: Group number 

[DVD-A]


[WMA]

[

[MP3] [JPEG]

3

 T: Track number in group 

[DVD-A]


[WMA]

[

[MP3]

C: Chapter number 

[DVD-V]

4

 Condition - play, pause, or slow/search

[RAM] [DVD-A] [DVD-V] 

[VCD]


[CD] [WMA]

[

[MP3]

Play speed (

 below)

5

 Changing the time display 

[RAM]


[DVD-A] [DVD-V] 

[VCD]


[CD]

Press [

3

4

] to show the elapsed play time or remaining time for

the program, play list, track or title (or chapter during program and
random play).

Elapsed play time 

[WMA]

[

[MP3]

(display only, cannot be changed)

Changing play speed

[DVD-V]

 (Dolby Digital only)

You can slow down or speed up play.

During play

Press [

2

] (slower) or [

1

] (faster).

There are five speeds:

k

0.8

()

k

0.9

()

k

1.0 (normal speed)

()

k

1.2

()

k

1.4

After you change the speed, output is in stereo.
Sound is stereo as long as “

k

1.0” is orange.

To return to normal play (surround sound), press [

1

] (play) or

[ENTER].
Normal play is also restored when you return the speed to 

k

1.0 and

clear the progress indicator.

AV SYSTEM

SLEEP

GROUP

REPEAT/

MIX 2CH

PLAY MODE/

P.MEMORY CANCEL

SKIP

CH

TOP MENU

DISPLAY

VOLUME

SUBWOOFER

RETURN

TV VOL 

s

TV VOL 

r

DIRECT

NAVIGATOR

PLAY LIST

MENU

SLOW/SEARCH

S

10/-

/

--

1

2

3

4

5

6

7

8

0

9

TV/AV

TUNER

DVD

TV

VCR

BAND

CD

AUX

EXT

ENTER

DOUBLE

RE-MASTER

3

4

2

1


ENTER

DISPLAY

RETURN

1


Numbered
buttons

2

3

4

5

1

2

2

1 : 46 : 50

All manuals and user guides at all-guides.com

Summary of Contents for SA-DT310

Page 1: ...r is 2 The player will play DVD Video marked with labels containing 2 or ALL Example The region number of this player is 3 The player will play DVD Video marked with labels containing 3 or ALL Example The region number of this player is 4 The player will play DVD Video marked with labels containing 4 or ALL Example The region number of this player is 5 The player will play DVD Video marked with la...

Page 2: ...T ADVARSEL DETTE PRODUKTET ANVENDER EN LASER BETJENING AV KONTROLLER JUSTERINGER ELLER ANDRE INNGREP ENN DE SOM ER BESKREVET I DENNE BRUKSANVIS NING KAN FØRE TIL FARLIG BESTRÅLING DEKSLER MÅ IKKE ÅPNES OG FORSØK ALDRI Å REPARERE APPARATET PÅ EGENHÅND ALT SERVICE OG REPARASJON SARBEID MÅ UTFØRES AV KVALIFISERT PERSONELL NORSK THIS UNIT IS INTENDED FOR USE IN TROPICAL CLIMATES THIS UNIT IS INTENDED ...

Page 3: ...nections 36 Reference Safety precautions Glossary 37 Maintenance 37 Troubleshooting guide 38 Specifications DIN 45 500 Back cover 1 Remote control 2 Batteries For the United Kingdom Continental Europe and Russia EUR7623010 For others EUR7623020 1 AC mains lead For the United Kingdom For Australia and N Z REZ1496 RJA0035 2X 1 AM loop antenna 1 FM indoor antenna N1DAAAA00003 RSA0007 1 Video cable 1 ...

Page 4: ... oured markings identifying the terminals in your plug proceed as follows The wire which is coloured Blue must be connected to the terminal which is marked with the letter N or col oured Black or Blue The wire which is coloured Brown must be connected to the terminal which is marked with the letter L or col oured Brown or Red WARNING DO NOT CONNECT EITHER WIRE TO THE EARTH TERMINAL WHICH IS MARKED...

Page 5: ...e PAL and NTSC video systems To view PAL or NTSC however your television must match the system used on the disc PAL discs cannot be correctly viewed on an NTSC television NTSC can be correctly viewed on a PAL television by converting the video signal to PAL 60 page 31 Video NTSC Disc Output HighMAT discs This unit is compatible with HighMAT discs containing WMA MP3 and or JPEG files To clean discs...

Page 6: ...e following points Place speakers on flat secure bases Placing speakers too close to floors walls and corners can re sult in excessive bass Cover walls and windows with thick cur tain Main unit Keep your speakers at least 10 mm away from the system for proper ventilation Center speaker You can also put this speaker directly under the television Vibration caused by the center speaker can disrupt th...

Page 7: ...to the slots provided From the side From the rear FRONT R FRONT L CENTER SURROUND R SUBWOOFER SURROUND L Push the lever in the direction indicated by the arrow insert the wire then release the lever Silver Copper Silver HF High Frequency LF Low Frequency Copper r Silver s Connect center surround L and subwoofer in the same way To prevent damage to circuitry never short circuit positive r and negat...

Page 8: ...a more vivid picture than the VIDEO OUT terminal by separating the chrominance C and luminance Y signals Actual results depend on the television VIDEO OUT OPT IN TV AUX VCR EXT IN OUT AUDIO L R DIGITAL OUT S VIDEO OUT A B Television s S VIDEO IN terminal Connecting a television with COMPONENT VIDEO terminal Video cable included Video cable not included S Video cable not included Connecting a telev...

Page 9: ... where reception is best AM loop antenna Stand the antenna up on its base Keep loose antenna cord away from other wires and cords To household mains socket AC mains lead R6 AA UM 3 1 2 3 3 Click For the United Kingdom only BE SURE TO READ THE CAUTION FOR THE AC MAINS LEAD ON PAGE 4 BEFORE CONNECTION For Australia and N Z AC mains lead AM loop antenna FM indoor antenna Remote control Batteries Do n...

Page 10: ...t over 5 kg The stands must be stable even if the speakers are in a high posi tion Notes on speaker use You can damage your speakers and shorten their useful life if you play sound at high levels over extended periods Reduce the volume in the following cases to avoid damage When playing distorted sound When the speakers are receiving howling from a record player noise from FM broadcasts or continu...

Page 11: ... SFC SUBWOOFER LEVEL CH SELECT TEST DELAY TIME RETURN TV VOL s TV VOL r DIRECT NAVIGATOR PLAY LIST MENU SLOW SEARCH S10 1 2 3 4 5 6 7 8 0 9 TV AV TUNER TV VCR BAND AUX EXT ENTER PL RDS DOUBLE RE MASTER RETURN 3 7 4 5 6 7 1 2 CD DVD FM MODE SETUP SELECT SETUP QUICK SETUP Select the menu language ENTER RETURN English Français Español Deutsch Italiano Português Svenska Nederlands To return to the pre...

Page 12: ...to operate a Panasonic television or video cassette recorder page 35 C TV AV button TV AV 35 D Numbered buttons 1 9 0 S10 14 E Slow Search buttons 6 5 SLOW SEARCH 14 25 F Menu Play list button MENU PLAY LIST 14 19 G Return TV volume up button RETURN TV VOL r r r r r 11 35 H Sound field sound quality button 27 29 Main unit 1 Standby on switch Í I 11 Press to switch the unit from on to standby mode ...

Page 13: ... TOP MENU DISPLAY VOLUME MUTING FL DISPLAY AUDIO ONLY C FOCUS C S M SFC SUBWOOFER LEVEL FM MODE SETUP CH SELECT TEST DELAY TIME RETURN TV VOL s TV VOL r DIRECT NAVIGATOR PLAY LIST MENU SLOW SEARCH S10 1 2 3 4 5 6 7 8 0 9 TV AV TUNER TV VCR BAND AUX EXT ENTER PL RDS DOUBLE RE MASTER 1 3 4 PROGRESSIVE SA DT310 SELECT DIGITAL INPUT Í I AV CONTROL RECEIVER DOWN UP VOLUME Ë 4 DIGITAL INPUT indicator DV...

Page 14: ...ss ENTER to confirm your selection To return to the menu screen DVD A DVD V TOP MENU Shows the first menu screen DVD V MENU Shows the menu screen VCD RETURN Shows the menu screen Note The disc continues to rotate while the menu is displayed even after you finish playing an item Press when you finish to preserve the unit s motor and your television screen When playing Video CDs with playback contro...

Page 15: ...A B Repeat and 1Press ENTER at the starting point A 2Press ENTER at the finishing point B A B repeat starts To return to the normal play Press ENTER again To clear the menus Press RETURN until the menu disappears Selecting groups to play DVD A WMA MP3 JPEG 1 For the United Kingdom Continental Europe and Russia Press GROUP For Southeast Asia Australia and N Z Press and hold W W W W W 9 GROUP 2 Pres...

Page 16: ...t Clear all with 3 4 2 1 and press ENTER Note DVD V WMA MP3 Times are not displayed while programming The program is cleared when you switch the unit to standby open the disc tray select another source or exit the program mode by pressing PLAY MODE Random play 1 Press the numbered buttons to select a title or a group DVD A You can select more than one group To enter all groups select All using 2 1...

Page 17: ... Stereo surround left right 1 Center 2 Front leftiFront right 3 Front leftiFront rightiCenter Example 3 2 1ch Subtitles DVD A Motion picture parts only DVD V Discs with multiple subtitle languages You can change the subtitle language and turn the subtitles on and off RAM You can turn the subtitles on and off 1 During play Press DISPLAY until the disc information screen is displayed 2 Press 2 1 to ...

Page 18: ...andby change the source or open the disc tray Variable Zoom function RAM DVD V VCD DVD A Motion picture parts only Change the zoom ratio so the picture expands to the optimum size to fill the screen Preparation Change the setting TV Aspect to suit your television page 31 1 During play Press DISPLAY until the unit information screen is displayed page 24 2 Press 3 4 to select the display menu 3 Pres...

Page 19: ...AY LIST PLAYLIST No Date Length Title 1 2 3 4 0 46 35 0 09 15 0 12 32 0 07 30 SELECT ENTER RETURN 10 17 10 24 11 29 12 22 SELECT NUMBER 0 9 5 0 10 30 12 25 0 02 45 12 29 6 7 8 9 10 12 29 12 30 12 30 12 31 0 09 15 0 12 32 0 07 30 0 10 30 RAM Selecting a program to play DIRECT NAVIGATOR Use the program list to find programs to play 1 Press DIRECT NAVIGATOR 2 Press 3 4 to select the program The selec...

Page 20: ...GROUP REPEAT MIX 2CH PLAY MODE P MEMORY CANCEL SKIP CH TOP MENU DISPLAY VOLUME SUBWOOFER RETURN TV VOL s TV VOL r DIRECT NAVIGATOR PLAY LIST MENU SLOW SEARCH S10 1 2 3 4 5 6 7 8 0 9 TV AV TUNER DVD TV VCR BAND CD AUX EXT ENTER DOUBLE RE MASTER 3 4 2 1 ENTER TOP MENU RETURN MENU SKIP 9 DISPLAY Numbered buttons JPEG Album display 001 Both Ends Freezing 002 Lady Starfish 003 Life on Jupiter 004 Metal...

Page 21: ... this Naming folders and files At the time of recording give folders and file names with 3 digit prefixes in the order you want to play them this may not work at times Playing HighMAT discs A menu appears after you insert the disc Press 3 4 2 1 to select then press ENTER When you press ENTER To return to the menu screen Press TOP MENU To return to the menu above the current one Press RETURN To cha...

Page 22: ...tmost icon 2 Press 3 4 to move the icons There are 5 positions Progress indicator Indicates how far you have played through an item Example DVD V 1 Current position RAM DVD A DVD V VCD CD WMA MP3 2 PG Program number RAM PL Play list number RAM T Title number DVD V Track number VCD CD G Group number DVD A WMA MP3 JPEG 3 T Track number in group DVD A WMA MP3 C Chapter number DVD V 4 Condition play p...

Page 23: ...e for the group DVD A or l disc VCD CD l Remaining time for the program play list title or track Soundtrack language DVD A DVD V page 17 Subtitle language DVD A DVD V page 17 Subtitles on off RAM DVD A DVD V Track information on off WMA MP3 CD CD text only Picture information JPEG Full Group title picture title file size picture size date of shooting and camera model used Date Date of shooting onl...

Page 24: ...k NR 0 to i3 Smoothes block noise Mosquito NR 0 to i3 Reduces the smudging that appears around contrasting sections of the picture 4 5 6 7 U 1 Display menu For Southeast Asia Australia and N Z 4 3 Aspect RAM DVD A DVD V VCD JPEG Select how to show images made for 4 3 aspect screens on a 16 9 aspect television Normal laterally stretches images made for a 4 3 screen Auto expands suitable 4 3 letterb...

Page 25: ...cyl step For Southeast Asia Main unit only The step is factory set to 9 kHz but you can change it to receive broadcasts allocated 10 kHz steps 1 Press SELECT to select AM 2 Press and hold SELECT After a few seconds the display changes to show the current minimum frequency Continue to hold the button down The minimum frequency changes and the step is changed To return to the original step repeat th...

Page 26: ...BWOOFER LEVEL FM MODE SETUP CH SELECT TEST DELAY TIME RETURN TV VOL s TV VOL r DIRECT NAVIGATOR PLAY LIST MENU SLOW SEARCH S10 1 2 3 4 5 6 7 8 0 9 TV AV DVD TV VCR CD AUX EXT ENTER PL RDS DOUBLE RE MASTER SKIP 9 X W CH TUNER BAND RDS Selecting channels 1 Press TUNER to select FM or AM 2 Press the numbered buttons or X X X X X CH or 9 CHW W W W W to select the channel To select a 2 digit number Exa...

Page 27: ...eakers where you would normally be sitting and listening L R below Preparation Press DVD 1 While stopped Press TEST to output a test signal Lch Front left Cch Center Rch Front right RSch Right surround LSch Left surround 2 Press VOLUME r or s to set the volume level normally used for listening 3 Press 3 to increase or 4 to decrease C RS LS j6 dB to i6 dB To stop the test signal press TEST again To...

Page 28: ...R Clarifies higher sounds SOFT For background music HALL Expands sound to make you feel like you were in a hall MANUAL below FLAT Canceled no effect is added factory preset In MANUAL You can select LOW MID or HIGH and then adjust them in a range between 3 and i3 1 Press and hold SFC until the setting appears 2 Press 2 1 to select LOW MID or HIGH 3 Press 3 4 to choose a level between 3 and i3 Repea...

Page 29: ...R indicator on the DVD CD player lights up Each time you press the button This doesn t work if input is DVD OPT1 SUB W 1 SUB W OFF ONLY AUDIO To enjoy even higher quality sound AUDIO ONLY RAM DVD A DVD V VCD CD WMA MP3 You can enjoy higher quality audio by stopping the video signal Press AUDIO ONLY AUDIO ONLY is canceled if you press AUDIO ONLY again or turn the unit off Note Video signals are out...

Page 30: ...ing for prolonged periods of time to prevent hearing damage Muting the volume Press MUTING Volume is reduced to minimum To cancel Press MUTING again or reduce the volume to minimum dB then raise it to the required level Muting is also canceled when you switch the unit to standby Turning off the display The display is turned off for better television viewing Press FL DISPLAY To cancel press FL DISP...

Page 31: ... 1 English Français Deutsch Italiano Español 1 Português Svenska Nederlands 2 English On Off Enable Play HighMAT discs as HighMAT discs Disable Play HighMAT discs as regular WMA MP3 JPEG discs Audio MP3 WMA Stills JPEG Off DVD Audio are played as DVD Audio On DVD Video contents found on DVD Audio can be played Yes Menu language Audio language Subtitle language TV type TV aspect No Items Audio Choo...

Page 32: ... to the previous screen Press RETURN When you are finished Press SETUP Disc Audio Subtitle Menus Ratings English English Automatic Level 8 SETUP SELECT ENTER RETURN TAB Numbered buttons Others CANCEL DVD RETURN SETUP AV SYSTEM SLEEP GROUP REPEAT MIX 2CH PLAY MODE P MEMORY CANCEL SKIP CH TOP MENU DISPLAY VOLUME MUTING FL DISPLAY AUDIO ONLY C FOCUS C S M SFC SUBWOOFER LEVEL FM MODE SETUP CH SELECT T...

Page 33: ...ric 6577 Arabic 6582 Armenian 7289 Assamese 6583 Aymara 6588 Azerbaijani 6590 Bashkir 6665 Basque 6985 Bengali Bangla 6678 Bhutani 6890 Bihari 6672 Breton 6682 Bulgarian 6671 Burmese 7789 Byelorussian 6669 Cambodian 7577 Catalan 6765 Chinese 9072 Corsican 6779 Croatian 7282 Czech 6783 Danish 6865 Dutch 7876 English 6978 Esperanto 6979 Estonian 6984 Faroese 7079 Fiji 7074 Finnish 7073 French 7082 F...

Page 34: ...ceiver Already connnected To play sound from a video cassette recorder To show the video from the video cassette recorder Select VIDEO 2 input on your television in this example Television Video cassette recorder To play sound from your television Reduce the volume on the television to minimum and control the volume on this unit To play surround signals from a digital receiver To record discs the ...

Page 35: ...ARCH 6 5 SKIP 9 AUDIOONLY AV SYSTEM SLEEP GROUP REPEAT MIX 2CH PLAY MODE P MEMORY CANCEL SKIP CH TOP MENU DISPLAY VOLUME MUTING FL DISPLAY AUDIO ONLY C FOCUS C S M SFC SUBWOOFER LEVEL FM MODE SETUP CH SELECT TEST DELAY TIME RETURN TV VOL s TV VOL r DIRECT NAVIGATOR PLAY LIST MENU SLOW SEARCH S10 1 2 3 4 5 6 7 8 0 9 TV AV ENTER PL RDS DOUBLE RE MASTER VCR AV SYSTEM TV AV TV TV VOL r TV VOL s 1 X W ...

Page 36: ...a when the unit is not in use Do not use the outdoor antenna during an electrical storm FM outdoor antenna Using a television antenna Disconnect the FM indoor antenna The antenna should be installed by a competent technician AM outdoor antenna AM loop antenna FM outdoor antenna 75 coaxial cable not included Optional antenna connections For the United Kingdom only Use the antenna plug adaptor inclu...

Page 37: ...d future I and P pictures so it has the lowest volume of information Linear PCM pulse code modulation These are uncompressed digital signals similar to those found on CDs Playback control PBC If a Video CD has playback control you can select scenes and information with menus Glossary Safety precautions Placement Set the unit up on an even surface away from direct sunlight high temperatures high hu...

Page 38: ...d as the eighth layer While stopped and DVD is the source press and hold on the unit and S10 on the remote control for about 3 seconds until Initialized disappears from the television Turn the unit off and on again All settings will return to the default values Reload the disc for the setting to be effective Press to open the tray then press 1 play to start play The unit may not operate properly i...

Page 39: ...s for a number Noise is heard ST flickers or doesn t light Sound is distorted A beat sound is heard A low hum is heard during AM broadcasts The correct AM frequency can t be tuned in Some distortion is normal during SEARCH The screen may be disrupted briefly when you turn on and off the AUDIO ONLY feature M Check the connection 8 Make sure the television is on Ensure the television s video input s...

Page 40: ...farlig stråling sendes ut GENERAL Dimensions WkHkD 197k70 9k346 mm Mass 2 0 kg FRONT SPEAKER Type 2 way 2 speaker Closed Speaker s Woofer 12 cm cone type Tweeter 2 5 cm semi dome type Impedance 6 Input power 60 W Music Sound pressure level 81 dB W 1 0 m Crossover frequency 4 5 kHz Frequency range 40 Hz 50 kHz j16 dB 50 Hz 45 kHz j10 dB Dimensions Wk k k k kHk k k k kD 161k289k283 mm Mass 3 3 kg CE...

Reviews: