background image

3

8
9

10

11
12
13

2

6

5

1
2

3

4

7

The product illustrations may differ from 

the actual product.

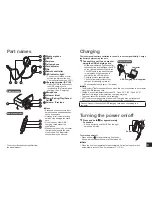
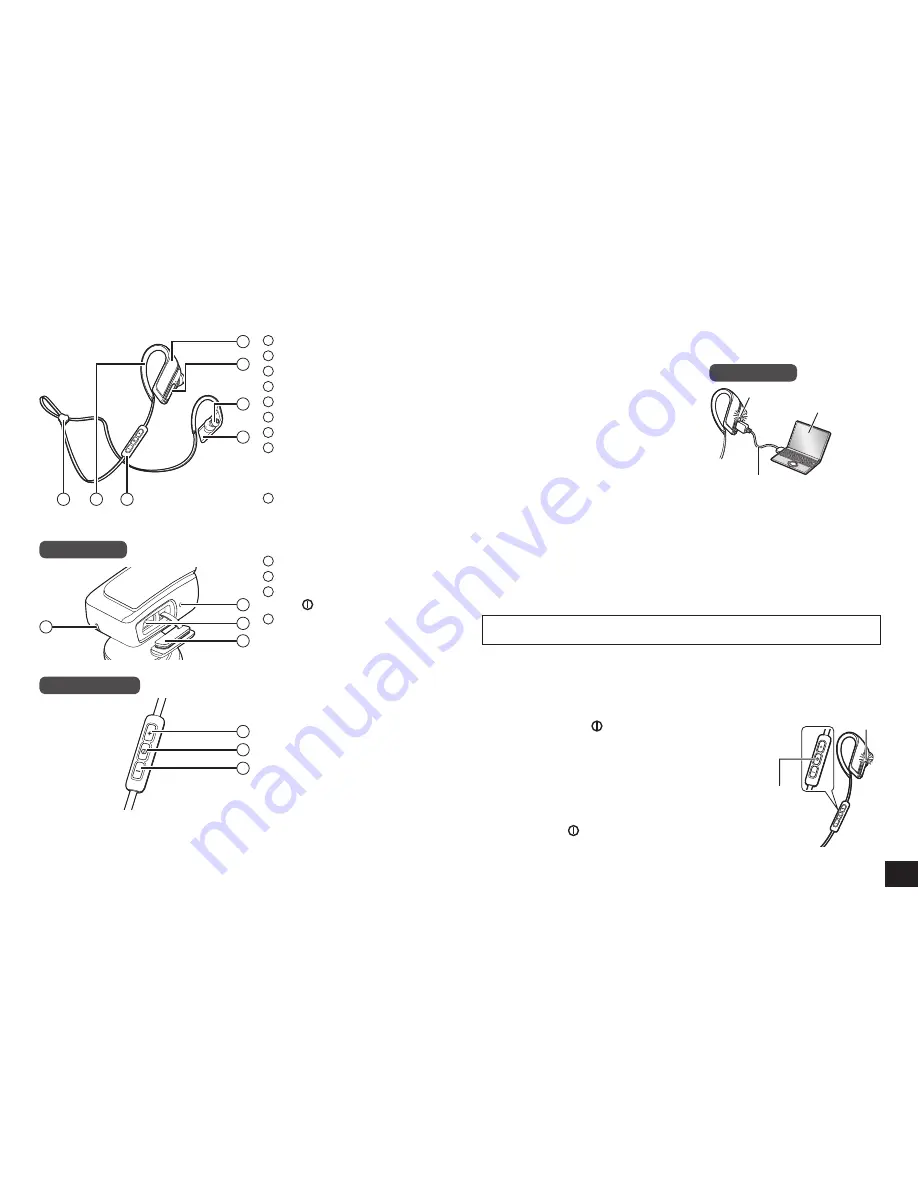
Part names

1

Right earphone

2

USB lid

3

Earpiece

4

Left earphone

5

Cord adjuster

6

Clip

7

Remote controller

8

LED indicator light*

 •The number of blinks or color 

notifies the status of the unit.  

(* hereafter referred to as “LED”)

9

Charging terminal (DC IN)

 •Open the USB lid and connect 

the USB charging cord 

(supplied) to this terminal when 

charging. (See “Charging”)

10

Microphone

11

/Next

12

Power/Pairing/Play/Pause/

Call 

13

Volume –/Previous


Note

 •Excessive sound pressure from 

earphones and headphones can 

cause hearing loss.

 •Listening at full volume for long 

periods may damage the user’s 

ears.

 •Do not use any other USB 

charging cords except the 

supplied one.

 •When using the unit, do not cover 

the right housing with the palm 

of your hand. The Bluetooth

®


connection may be blocked.

Remote controller

The rechargeable battery (installed in the unit) is not charged initially. Charge 

the battery before using the unit.

1

Connect this unit to a computer 

using the USB charging cord

 •Within approximately 3 seconds after 

the connection is established, the LED 

on the right earphone will light in red.

 •The LED lights in red when charging 

is in progress. When charging is 

completed, the LED will go out.

 •Charging will take approximately 

1.5 hours from empty state to fully 

charged. (Quick charging time for 

70 minutes operation: Approx. 15 minutes)

Right earphone

Computer

LED

USB charging cord (supplied)


Note

 •The Bluetooth

®

 feature cannot be used when this unit is connected to a computer 

using the USB charging cord.

 •Charge in a room temperature between 10 °C and 35 °C (50 ºF and 95 ºF). 

Outside of this range of temperatures, charging may stop.

 •The power cannot be turned on while charging.

 •If PC used for charging enters “sleep mode”, charging may not take place.

 •Do not use any other USB charging cords except the supplied one.

Caution: Use only the supplied USB charging cord when connecting to a 

computer.

Charging

Preparation

1

Press and hold   for approximately 

3 seconds

 •A beep will sound and the LED on the right 

earphone will blink.

Power

LED

To turn the power off

 •Press and hold   for approximately 3 seconds.  

A beep will sound and the power will be turned off.


Note

 •When the unit is not operated for approximately 5 minutes, the power will 

automatically turn off. (See “Auto power off” (→ P. 6))

Turning the power on/off

Right earphone

Summary of Contents for RP-BTS30

Page 1: ...sh support Pour toute question visitez www panasonic ca french support For U S A only Pour les É U seulement The warranty can be found on Basic Owner s Manual Register online at www panasonic com register U S customers only For Canada only Pour le Canada seulement The warranty can be found on Basic Owner s Manual La garantie se trouve dans le Manuel d utilisation Fonctions de base ...

Page 2: ...d with wet hands or when water droplets are on this unit Doing so may cause malfunction such as terminal rusting with the water droplets Do not connect and use a USB charging cord Do not pour soap water or detergent or immerse in water Remove any hair lint sand dust etc that may be attached to the rubber seal on the USB lid before closing Leaving the device with water droplets in a cold region may...

Page 3: ...after the connection is established the LED on the right earphone will light in red The LED lights in red when charging is in progress When charging is completed the LED will go out Charging will take approximately 1 5 hours from empty state to fully charged Quick charging time for 70 minutes operation Approx 15 minutes Right earphone Computer LED USB charging cord supplied Note The Bluetooth feat...

Page 4: ... it will search for the previously setup Bluetooth device and automatically start connecting to it First the LED on the right earphone lights in blue and repeats on and off When the connection is established blinking pattern will change Connect a different Bluetooth device Disable the Bluetooth feature on the previously connected device Check that the unit is turned off Press and hold for approxim...

Page 5: ...increased to near maximum level music may sound distorted Decrease the volume until the distortion is cleared Remote controlling You can control the Bluetooth device using the unit Depending on Bluetooth devices some functions below do not work or work differently via operation of the unit Operation example Play Pause Call Press Play Pause Call Press twice quickly Reject the incoming call Switch t...

Page 6: ...om the unit HFP only Press twice quickly on the unit The calling device will be switched between the Bluetooth enabled phone and the unit Other Useful functions Resetting the unit This unit can be reset when all operations are rejected To reset the unit connect the unit to a computer using the USB charging cord All the previous operations will be canceled The pairing device information will not be...

Page 7: ...s located too close to other Bluetooth devices or the devices that use the 2 4 GHz band This unit may not function properly if radio waves from a nearby broadcasting station etc is too strong Intended usage This unit is for normal general use only Do not use this system near an equipment or in an environment that is sensitive to radio frequency interference example airports hospitals laboratories ...

Page 8: ...its are designed to provide reasonable protection against harmful interference in a residential installation This equipment generates uses and can radiate radio frequency energy and if not installed and used in accordance with the instructions may cause harmful interference to radio communications However there is no guarantee that interference will not occur in a particular installation If this e...

Page 9: ...ed The power cannot be turned on during charging P 3 Troubleshooting guide Bluetooth device connection The device cannot be connected Delete the pairing information for this unit from the Bluetooth device then pair them again P 4 Sound and audio volume No sound Make sure that the unit and the Bluetooth device are connected correctly P 4 Check if music is playing on the Bluetooth device Make sure t...

Page 10: ...ations are subject to change without notice Specifications Useful information Customer Service Customer Service Directory Obtain products information and operative assistant localize the closer distributor or Service Center buy spare parts and accessories by our Web Site to Latin American COUNTRY WEB SITE CONTACT CENTER Panama www panasonic com pa soporte 800 7262 Colombia www panasonic com co sop...

Page 11: ...se loss of eyesight Wash the eye with water immediately without rubbing it and then consult a doctor Fluid getting on your body or clothes may cause inflammation of the skin or injury Sufficiently rinse with clean water and then consult a doctor A lithium ion polymer rechargeable battery is built in to the left earphone Please discard according to local regulations When disposing this product disa...

Page 12: ...Panasonic Corporation 2016 Panasonic Canada Inc 5770 Ambler Drive Mississauga Ontario L4W 2T3 www panasonic com Panasonic Corporation of North America Two Riverfront Plaza Newark NJ 07102 5490 http www panasonic com En ...

Reviews:

Related manuals for RP-BTS30