background image

4

For assistance, please call : 1-800-211-PANA(7262) or send e-mail to : [email protected]

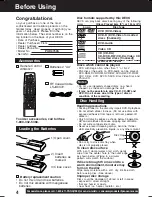
Congratulations

on your purchase of one of the most
sophisticated and reliable products on the
market today. Used properly, it will bring you
years of enjoyment. Please fill in the
information below. The serial number is on the
tag located on the back of your DECK.

Before Using

Accessories

• Date of Purchase
• Dealer Purchased From
• Dealer Address
• Dealer Phone No.
• Model No.                   

PV-D4753S

• Serial No.

To order accessories, call toll free
1-800-332-5368.

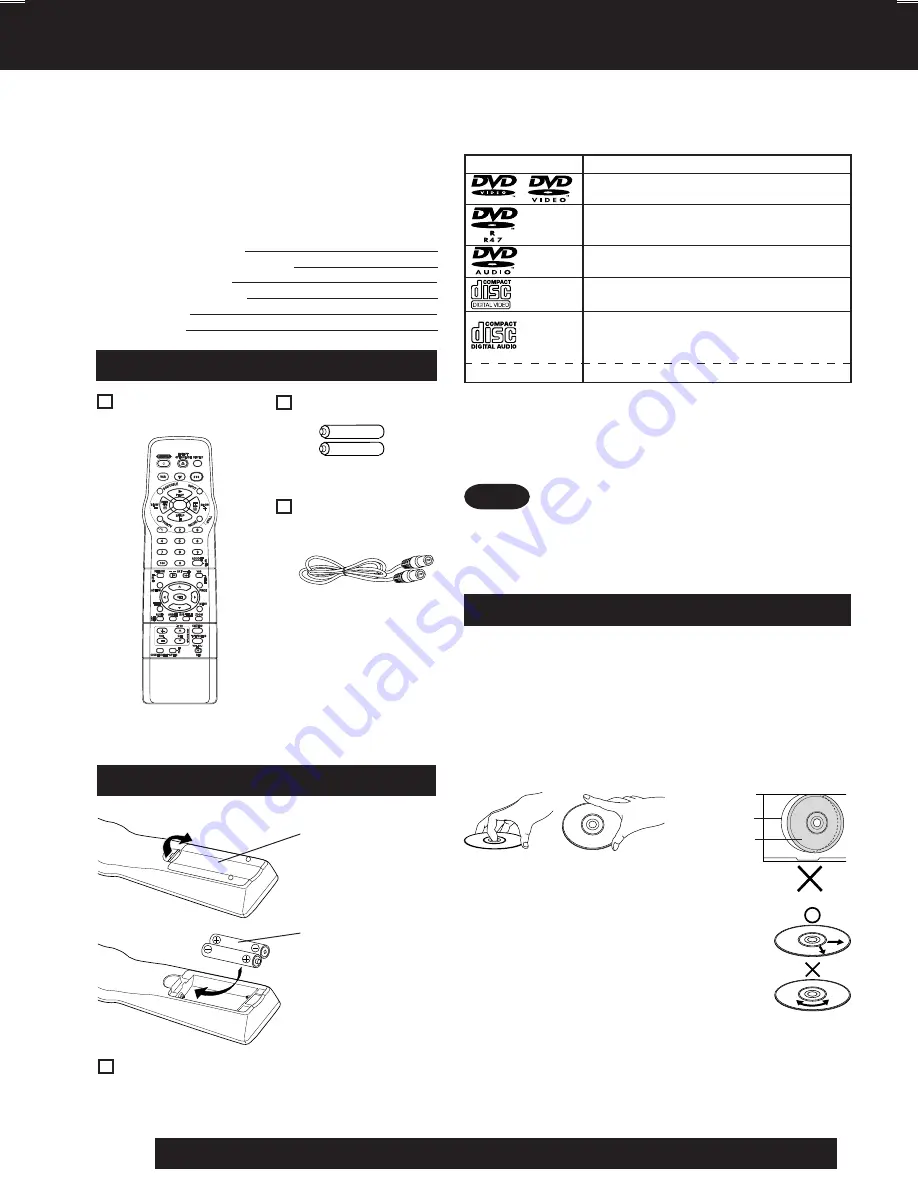
RF Coaxial Cable
LSJA0372

Batteries 2 “AA”

Remote Control

LSSQ0377

Loading the Batteries

     Battery replacement caution

• Do not mix old and new batteries.
• Do not mix alkaline with manganese

batteries.

1) Open cover.

3) Close cover.

2) Insert

batteries as
marked.

Disc formats supported by this DECK

DECK can play back discs bearing any of the following
marks:

Discs which cannot be played

• DVD with Region No. other than “1” or “ALL”
• PAL discs (the audio on DVD-Audio can be played),

DVD-RAM, DVD-ROM, DVD-RW, DVD+RW, CD-ROM,
CDV, CD-G, CVD, SVCD, SACD, Divx Video Disc and
Photo-CD

[Discs Played 8cm (3") or 12cm (5")]

DVD (DVD-Video)

Video CD

CD (CD-DA)
CD-R/CD-RW (CD-DA,Video CD
formatted discs [finalized])
WMA, MP3, JPEG

DVD-Audio

Logo

Disc type

DVD-R (DVD-Video formatted
discs [finalized])

If disc is brought from a cold to a

warm environment, moisture may
form on the disc

Wipe away moisture with a soft, dry, lint-free cloth
before using disc. (See above.)

Improper disc storage

Discs could be damaged if stored or left in areas:
• exposed to direct sunlight.
• that are humid or dusty.
• near heat (i.e. heater, radiator, etc.).

Disc Handling

To clean disc surface

With a soft, damp (water only) cloth, gently
wipe from the center hole to the outer edge
as shown below. (Wiping in a circular
pattern will scratch the surface.)

Handling precautions

• Sticking a label on the disc may impair DVD-R playback.
• Do not attach sticker to discs. (Do not use discs with

exposed adhesive from tape or left over peeled-off
stickers.)

• Only hold disc by edges as shown below. Fingerprints,

dirt and scratches can cause skipping and distortion.

• Do not write on label side of disc.
• Never use record cleaning sprays, benzine, thinner,

static electricity prevention liquids, or any other solvent.

• Do not try to close disc tray when

disc is not properly placed.

Notes

• Do not use irregularly shaped discs (e.g. heart-

shaped), as these can damage the unit.

• It may not be possible to play CD-R, CD-RW and

DVD-R in all cases due to the type of disc or
condition of the recording.

Disc tray

Disc

D4753S P1-25.p65

2003/03/13, 11:32

4

Summary of Contents for PVD4753S - DVD/VCR DECK

Page 1: ...pages 12 to 17 Please read these instructions carefully before attempting to connect operate or adjust this product Please save this manual Spanish Quick Use Guide is included Gu a para r pida consul...

Page 2: ...ning storm whether indoors or outdoors or before leaving the unit unused for extended periods of time disconnect all equipment from the power source as well as the antenna and cable system 4 WHEN THE...

Page 3: ...UCT HOWEVER THIS UNIT USES A VISIBLE LASER BEAM WHICH COULD CAUSE HAZARDOUS RADIATION EXPOSURE IF DIRECTED BE SURE TO OPERATE THE UNIT CORRECTLY AS INSTRUCTED WHEN THIS UNIT IS PLUGGED TO THE WALL OUT...

Page 4: ...W CD DA Video CD formatted discs finalized WMA MP3 JPEG DVD Audio Logo Disc type DVD R DVD Video formatted discs finalized If disc is brought from a cold to a warm environment moisture may form on the...

Page 5: ...tion Displays 55 Before Requesting Service 56 57 Limited Warranty 58 59 Customer Services Directory 59 Spanish Espa ol Quick Use Guide 60 65 Index 66 67 DVD VCR Important Safeguards and Precautions 2...

Page 6: ...4 Hours LP Long Play 3 Hours 6 Hours 8 Hours SLP SuperLongPlay Type of Video Cassette Tape Speed Setting T160 T120 T60 Use a soft cloth or dusting attachment of a vacuum cleaner to remove dust from t...

Page 7: ...lights on DECK when a scene recorded at different angles is detected Chapter Number Titles are subdivided into numbered sections You can quickly search for a favorite scene using these numbers DVD A...

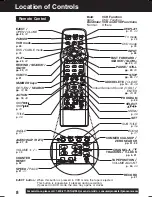
Page 8: ...ode p 28 SPEED PAGE p 21 41 NUMBER keys TV mode p 28 TAPE POSITION VOLUME ADJUST p 34 40 EJECT OPEN CLOSE pp 20 22 ACTION pp 18 49 PAUSE STILL pp 20 23 COUNTER RESET p 32 PROGRAM p 24 RECORD p 21 ADD...

Page 9: ...LAY p 22 If the disc cannot be removed First unplug DECK Then prepare a rigid wire e g an extended paper clip and applying moderate force insert it straight into the hole at the base of the tray The t...

Page 10: ...re not available when using Component Video Output and S VIDEO OUT Please set TV to either RF INPUT or VIDEO INPUT and then press PROG Video Output Audio Out 1 Audio Out 2 Component Video Output S VID...

Page 11: ...up when DECK is set for Timer Recording or when One Touch Recording OTR is used Flashes when Timer Recording is set but a tape has not been inserted into DECK and when a power interruption occurs dur...

Page 12: ...TV is not stereo by connecting a stereo amplifier to DECK IN FROM ANT OUT TO TV AUDIO IN1 OUT DVD VCR DECK VHF UHF R L VIDEO VHF UHF VIDEO IN AUDIO IN R L TV AV CABLE not supplied 2 Connect DECK to T...

Page 13: ...INPUT connect to COMPONENT VIDEO OUT If your TV does not have COMPONENT VIDEO INPUT but has S VIDEO INPUT connect to S VIDEO OUT When in DVD mode set your TV to either COMPONENT VIDEO IN or S VIDEO I...

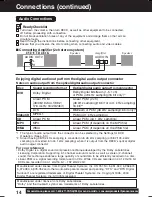
Page 14: ...recorded in 44 1 kHz 16 bit DVDs are recorded in 44 1 kHz 16 bit 192 kHz 24 bit Disc DVD VideoCD CD MP3 WMA Sound recording format Dolby Digital Linear PCM 48 96 192 44 1 88 2 176 4 kHz 16 20 24bit D...

Page 15: ...1 ch Surround system A Digital connection DECK OPTICAL Digital Audio Output Connector When DVDs recorded in Dolby Digital or DTS are played Dolby Digital bitstream or DTS bitstream is output from the...

Page 16: ...Plug DECK Power Cord into AC wall outlet DECK comes on and auto channel and clock set starts If screen below does not appear check DECK TV connection and if TV is tuned to channel 3 try switching it t...

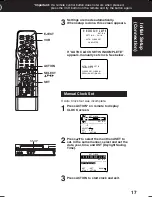
Page 17: ...If Auto Clock Set was incomplete Press ACTION on remote to display CLOCK screen Press to select the month and SET to set In the same manner select and set the date year time and DST Daylight Saving T...

Page 18: ...L T I ME ZONE ADJUST 0 SELECT SET SET EXIT ACT I ON SET CLOCK DST ON 6 8 2003 SUN 12 00PM SELECT HOUR OUR SET CLOCK SELECT SET SET BACK EXIT ACT I ON 1 Press to select SET UP CHANNEL and press SET 1 P...

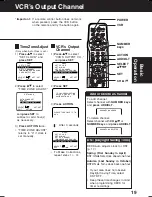
Page 19: ...r recordings 1 Press to select SET CLOCK and press SET and press SET to subtract or add hour s as necessary Important If a remote control button does not work when pressed press the VCR button on the...

Page 20: ...below SLP Approx 21X Approx 9X LP Approx 9X Approx 7X SP Approx 7X Approx 3X If at 21X 9X or 7X speed the picture is interrupted change speed to 9X 7X or 3X Still Freeze Picture Press PAUSE STILL Pre...

Page 21: ...ion Display Important If a remote control button does not work when pressed press the VCR button on the remote and try the button again Record on a Tape Remove loose or peeling labels from tapes to pr...

Page 22: ...is used and TITLE MENU appears go to step 5 You may also close tray by pressing OPEN CLOSE Data reading time differs with each disc Using NUMBER keys starts playing automatically The number of availa...

Page 23: ...hen appears on the screen while a button is being operated it means that the corresponding operation is prohibited by DECK or the disc DECK memorizes the point where STOP is pressed STOP is displayed...

Page 24: ...T See selection order left SE SELECT START DATE 13 SUN TODAY DATE START STOP CH SLP SELECT SET SET END PROG DT START STOP CH SPD 13 10 00P 12 00P 02 SP CANCEL ADD DLT SELECT 1 8 ENTER SET EXIT PROG Re...

Page 25: ...nd the programming Hold down STOP in VCR mode for a few seconds to cancel the Timer Recording The TIMER Indicator goes out on Multi Function Display Any future daily or weekly recording will be perfor...

Page 26: ...wing are possible audio broadcast types and on screen displays The signal being received is indicated with an mark while the selected audio mode is indicated with an arrow Receivable Broadcast Types M...

Page 27: ...lume level may differ Arrow indicates selection Refer to Receivable Broadcast Types on p 26 Arrow indicates selection Select HIFI L R or HIFI L or HIFI R to listen to stereo recordings in stereo sound...

Page 28: ...by the manufacturer listed If you get no response your particular unit cannot be controlled There are NO additional codes for the products listed If your product is not listed then the remote is not...

Page 29: ...65 66 67 68 120 106 121 122 115 117 118 124 Jasco 30 04 124 Macom 31 Magnavox 26 112 Matsushita 17 16 08 87 109 Movietime 32 39 42 44 126 38 40 Maestro 74 35 NEC 40 19 38 32 NSC 40 19 38 32 Novavision...

Page 30: ...tape position Press SEARCH button FF INDEX End Point Program 2 Program 1 the current tape position Press SEARCH button INDEX INDEX BLANK BLANK FF End Point Program 2 Program 1 the current tape positi...

Page 31: ...ds skips over 1 3 minutes of recorded tape 1Press CM ZERO in Play mode PLAY 1st Press 2nd Press 3rd Press 1 min Skip 2 min Skip 3 min Skip Important If a remote control button does not work when press...

Page 32: ...NG ON AUTO SHUT OFF OFF AUTO VCR TV OFF SELECT SET SET END ACT I ON SET UP VCR Note For repeat play in DVD mode see page 44 REW 12 30AM CH 02 0 30 30 SP STOP 12 31AM CH 02 0 00 00 SP SELECT EXIT ACTI...

Page 33: ...eful for households with small children VCR Lock Feature VCR LOCK ACTIVATED VCR LOCK OFF VCR Lock cancels in 24 hours if clock is set To turn off repeat above To turn on hold down REC on DECK in Stop...

Page 34: ...To find out the present tape position and amount of tape remaining Tape position is displayed for VHS C type Cassettes tapes under 30 minute long and some other tapes but the position is not correct...

Page 35: ...ings Connection Press STOP to stop dubbing Press PLAY then PAUSE STILL immediately to enter PLAY PAUSE mode The operation of steps 4 and 5 must be done on the playing and recording VCRs at the same ti...

Page 36: ...THA Chinese Korean Malay Vietnamese Thai Other Subtitle language Audio sound track language Change the No by pressing and press SET Ready Checklist Please read Basic DVD Operation on page 22 You can c...

Page 37: ...ct as shown below and press or to set DVD only Number of angle being played back You can enlarge specific portions of a picture and select the zoom ratio using the ZOOM button during DVD playback Pres...

Page 38: ...show basic steps for using the menu 1 2 Press MENU in Play mode to display DVD MENU Press or NUMBER keys to select an item and press SET or PLAY to perform DVD Menu DVD only 2 Press or NUMBER keys to...

Page 39: ...ISC PROGRAM 1 6 11 16 5 8 2 7 12 17 15 6 3 8 13 18 1 13 4 9 14 19 3 2 5 10 15 20 2 CLEAR LAST CLEAR ALL START Notes Program Repeat Play Video CD CD only 4 Press SET to enter Select mode Cursor move to...

Page 40: ...STOP CLEAR ACTION SET VOLUME ADJUST DISPLAY NUMBER keys PAGE ON is set When a DVD is played back the average volume is increased OFF is set The volume level recorded on the disc is played back just a...

Page 41: ...1 playback begins If a mistake is made the secret code enter screen is redisplayed If the proper secret code is already entered Bonus Group tracks can be selected Secret code enter screen is skipped...

Page 42: ...is not on the disc the entry will have no effect Re enter the correct number For more details refer to the disc operation information To return to normal screen press CLEAR or DISPLAY repeatedly 2 Pre...

Page 43: ...ect the elapsed playing time xx xx xx and press SET Change the elapsed time by pressing NUMBER keys Hours Minutes Seconds are entered in order If the time entered is not on the disc the entry will hav...

Page 44: ...TRACK GROUP OFF Video CD CD TRACK DISC OFF PROGRAM PLAY program play RANDOM PLAY random play normal play SELECT SET SET END DISPLAY PLAY REPEAT REPEAT CHAPTER 1 SET SET END DISPLAY PLAY REPEAT REPEAT...

Page 45: ...ss SET or PLAY to start playback a b c d Press OPEN CLOSE to eject the disc The MP3 WMA JPEG MENU is closed automatically Press STOP to stop play Do steps 1 3 on left Copyright protected files and fil...

Page 46: ...DVD MAIN MENU 2 During JPEG Playback Cancel slide show Press STOP to return the MP3 WMA JPEG MENU See p 45 Still picture Press STILL only SLIDE Press PLAY to release Forward Reverse File Skip Press S...

Page 47: ...change display as below Press STOP to return the MP3 WMA JPEG MENU During JPEG Playback You can rotate a JPEG picture using the ANGLE button on the remote during JPEG Playback screen The JPEG picture...

Page 48: ...DO YOU WANT TO CHANGE THE LIMIT YES NO Discs not encoded with rating level will play even if the jacket states it is for mature audiences For these discs the DVD Lock Ratings will not work Caution 4...

Page 49: ...disc can be set If the language not offered is set the original disc language will be selected AUDIO OUTPUT See p 50 You can set the audio output that comes from the digital audio output terminal STI...

Page 50: ...doesn t have a built in Dolby Digital decoder dts selections Bitstream DTS bitstream is output Factory preset PCM When you have connected a amplifier that doesn t have a built in DTS decoder DRC Dyna...

Page 51: ...SPEAKER SIZE and press SET to display SPEAKER SIZE screen Press to select an item and press SET repeatedly See below table 3 2 DVD Operation SET ACTION SELECT SPEAKER SETUP SELECT SET SET END ACTION S...

Page 52: ...y See below Menu item SUBWOOFER SURROUND L SURROUND R CENTER Remark Setting 6dB 6dB 0dB factory preset Adjust so that the center speaker volume is virtually the same level 6dB 6dB as the front speaker...

Page 53: ...h to the next speaker The speaker name from which the TEST SIGNAL is currently being output is displayed Example TEST SIGNAL CENTER OUTPUT BALANCE SELECT SET SET END ACTION CENTER 0dB SURROUND R 0dB S...

Page 54: ...7865 Nauru 7869 Nepali 7876 Dutch 7879 Norwegian 7982 Oriya 8065 Panjabi 8076 Polish 8083 Pashto Pushto 8084 Portuguese 8185 Quechua 8277 Rhaeto Romance 8279 Romanian 8285 Russian 8365 Sanskrit 8368...

Page 55: ...is not in Stop mode or a cassette with record tab is not inserted 2 minutes before a Timer Recording is about to begin If you press REC on the remote control or DECK and a cassette is inserted with no...

Page 56: ...is set to current time and date Make sure Cable DSS box if used is left on and tuned to channel to be recorded Set recording start stop times correctly p 24 Timer recording may not be performed or co...

Page 57: ...is not the one selected at the initial settings No subtitles Alternative audio soundtrack or subtitle language cannot be selected Angle cannot be changed Correction This DECK cannot play discs other t...

Page 58: ...One 1 Year except CRT CRT Two 2 Years Ten 10 Days Five 5 Days Ninety 90 Days Contact Number 1 800 211 PANA 7262 1 800 211 PANA 7262 1 800 211 PANA 7262 1 888 843 9788 1 800 211 PANA 7262 1 800 211 PA...

Page 59: ...WARRANTY OF MERCHANTABILITY ARE LIMITED TO THE PERIOD OF THE LIMITED WARRANTY Some states do not allow the exclusion or limitation of incidental or consequential damages or limitations on how long an...

Page 60: ...rea hay un canal de Public Broadcast Station PBS ajuste su convertidor al canal PBS de su area Si est usando un receptor DSS este debe estar apagado AJUSTE MANUAL DEL RELOJ Si la fijaci n ha sido inco...

Page 61: ...tte SP LP SLP Presione PROG para finalizar PROGRAM Presione para seleccionar un n mero que no est usando para ingresar mas programas y presione SET para ajustar Luego repita el paso 2 O Presione nueva...

Page 62: ...vie e mail a consumerproducts panasonic com Presione POWER en el control remoto o el aparato Presione DVD para seleccionar el modo DVD 1 Presione OPEN CLOSE 2 Ponga un disco en la bandeja de disco Suj...

Page 63: ...PO o CUADRO fijo para prevenir inestabilidad o para permitir ver textos peque os o patrones finos claramente en el modo de imagen fija TV PREFERENCIA Para seleccionar cuando el material del v deo es p...

Page 64: ...antelaejecuci n Salto de pista hacia adelante hacia atr s Presione SKIP o SKIP durante la ejecuci n JPEG B squeda siguiente anterior Presione SKIP o SKIP Inicie la muestra diapositiva Presione FF SLOW...

Page 65: ...y la existencia de los altavoces FRENTE GRANDE predeterminado en f brica PEQUE O CENTRO GRANDE predeterminado en f brica PEQUE O NINGUNO ENVOLVENTE GRANDE predeterminadoen f brica PEQUE O NINGUNO SUBW...

Page 66: ...6 17 INPUT button 8 35 L Limited Warranty 58 59 Location of Controls Remote DECK 8 10 MMulti Brand Control 28 29 O On Screen Displays VCR 11 One Touch Recording 21 P PAUSE STILL button Still Picture 8...

Page 67: ...cal Digital Audio Output 10 15 Output Balance Setup 52 P PAGE button Still Image Skip 8 41 PLAY button Play a Disc 8 22 Program Play For Video CD CD 39 PROGRESSIVE button 9 Progressive Scan 10 R Rando...

Page 68: ...Company Division of Matsushita Electric Corporation of America One Panasonic Way Secaucus New Jersey 07094 Panasonic Sales Company PSC Division of Matsushita Electric of Puerto Rico Inc Ave 65 de Infa...

Reviews: