background image

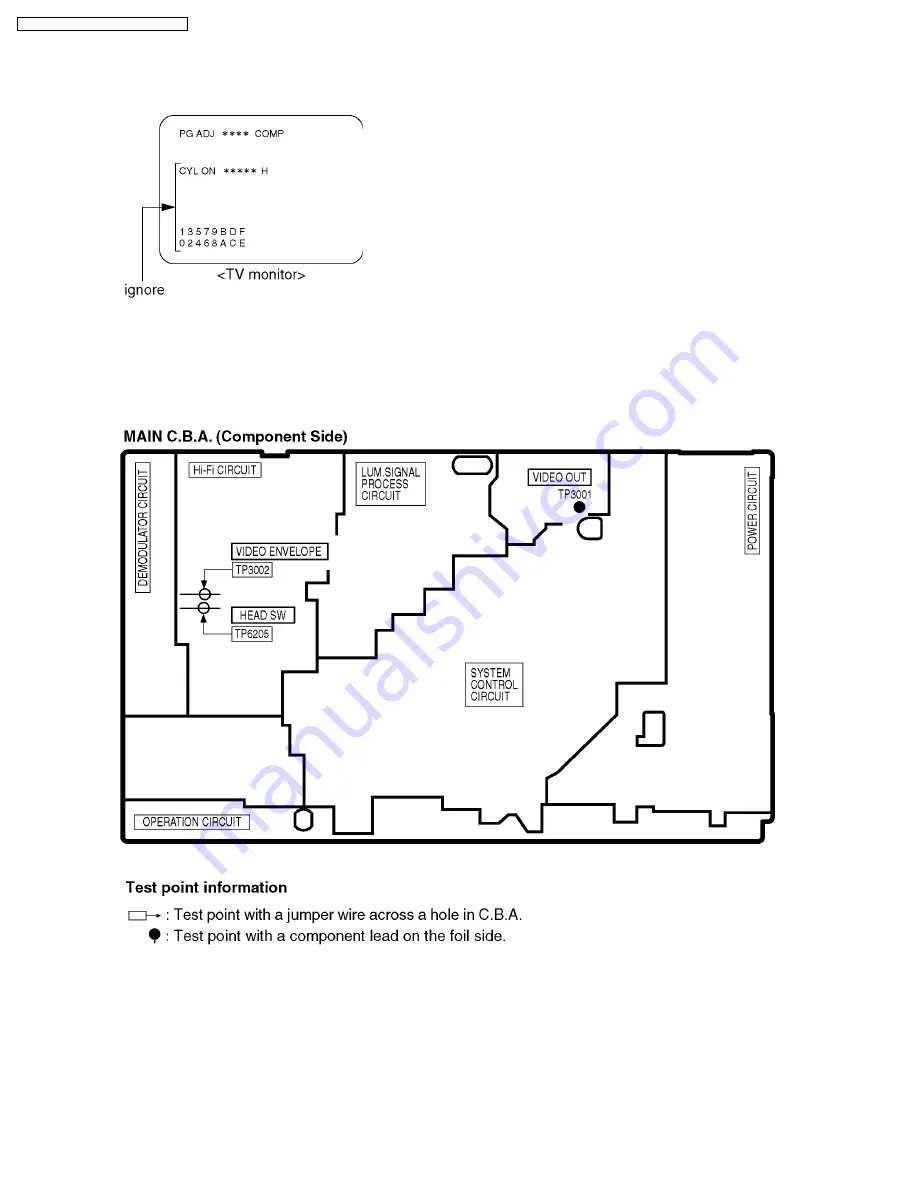
 5. After adjustment is completed, press REC button on the

remote. Then " COMP " will appear on the TV monitor and
adjusted value will be written to Memory IC (IC6004).

Fig.E4

 6. Press STOP button on the remote to release from EVR PG

SHIFTER ADJUSTMENT MODE.

6.3. TEST POINTS AND CONTROL LOCATION

16

PV-V4525S / PV-V4535S-K / PV-455S-K

Summary of Contents for PV-V4525S

Page 1: ...horized copying and distribution is a violation of law PV V4525S PV V4535S K PV 455S K Video Cassette Recorder For servicing the R4 Mechanism Chassis for PV Model Please refer to the R4 Mechanism Chas...

Page 2: ...4 SPECIAL NOTE 11 4 15 MODEL NO IDENTIFICATION MARK 11 5 DISASSEMBLY ASSEMBLY PROCEDURES 12 5 1 CABINET SECTION 12 5 2 MECHANISM SECTION 14 6 ADJUSTMENT PROCEDURES 15 6 1 MECHANICAL ADJUSTMENT 15 6 2...

Page 3: ...K 1 Unplug the AC cord and connect a jumper between the two prongs on the plug 2 Measure the resistance value with an ohmmeter between the jumpered AC plug and each exposed metallic cabinet part on th...

Page 4: ...antistatic ESD protected can generate electrical charge sufficient to damage ES devices 5 Do not use freon propelled chemicals These can generate electrical charges sufficient to damage ES devices 6 D...

Page 5: ...case of using high temperature soldering iron please be carefull not to heat too long Pb free solder will tend to splash when heated too high about 1100 F 600 C All products with the printed circuit b...

Page 6: ...CR in Shut off condition Fig 1 1 2 Fault code 4 digit number will be displayed in F I P as shown Fig 1 2 4 1 1 Explanation of I2 C bus transmission number The condition of I2 C bus transmission befor...

Page 7: ...4 1 3 Explanation of Error code number The detecting condition and movement of mechanism is displayed Fig 1 5 7 PV V4525S PV V4535S K PV 455S K...

Page 8: ...fter replacing the Cylinder Unit press COUNTER RESET button on remote controller in this mode Total elapsed Cylinder rotation time in hours will be cleared to 0 2 To release from Usage Screen Mode pre...

Page 9: ...emoving Cassette Up Ass y it can be confirmed without a cassette To enter Service Mode Press and hold FF and CH UP buttons on the VCR together over 5 seconds in power off condition The unit goes into...

Page 10: ...nd CH DOWN button on VCR together again 4 9 HOW TO RESET ALL VCR MEMORY FUNCTIONS To reset clear the select language channel auto set and set clock functions to their initial power on condition power...

Page 11: ...dents resulting in personal injury from electrical shocks It will also protect VCR from being damaged by accidental shorting that may occur during servicing Also when troubleshooting the above type of...

Page 12: ...der described in the Disassembly Flowchart shown below When reassembling use the reverse procedure CAUTION Disconnect AC plug before disassembly or assembly 5 DISASSEMBLY ASSEMBLY PROCEDURES 5 1 1 Dis...

Page 13: ...Fig D2 13 PV V4525S PV V4535S K PV 455S K...

Page 14: ...ure that all locking tabs are aligned properly Then press the Front Panel straight in Fig D3 3 Installation of Mechanism Chassis and Cassette Up Ass y onto Main C B A a Make sure the Mode Select SW on...

Page 15: ...Determine the Video Head Switching Point during Playback Symptom of Misadjustment May cause Head Switching Noise and or Vertical Jitter Test Point TP3001 Main C B A TP6205 Main C B A Specification T...

Page 16: ...ote Then COMP will appear on the TV monitor and adjusted value will be written to Memory IC IC6004 Fig E4 6 Press STOP button on the remote to release from EVR PG SHIFTER ADJUSTMENT MODE 6 3 TEST POIN...

Page 17: ...Diagrams Example 6 2V Zener Voltage 2 How to identify Connectors Each connector is labeled with a Connector No and Pin No Indicating what it is connected to in other words its counter part Use the int...

Page 18: ...58 FIP_OFF_L 59 NC 60 NC 61 TV_L VTR_H 62 NC 63 NC 64 NC 65 UNLOADING_H 66 PANE_CS 67 LOADING_H 68 MASTER_DATA_1 69 SLAVE_DATA_1 70 SCK_1 71 IIC CLK 72 IIC DATA 73 256Hz ROM COLE 74 CAP R F 75 TIMER_L...

Page 19: ...nal 39 12MHz OUT O Main clock 12MHz OSC output terminal 40 GND OSC Digital GND for OSC circuit 41 NC Not used 42 NC Not used 43 NC Not used 44 LC OSC IN I Input terminal of the LC Oscillation For OSD...

Page 20: ...C4005 10 16V C4606 10 16V C3007 22 6 3V C4000 10 16V C3040 47 6 3V C3050 47 6 3V C3052 3R3 50V C3064 2R2 50V C3065 4R7 25V C3075 PT C3081 4R7 25V C4098 3R3 50V C4082 33 16V C4096 2R2 50V C4094 47 6 3V...

Page 21: ...YNR PG AGC DET N L DE EMPH SQPB EQ Y LPF TRAP NC HP NC DEH N L EMPH ET LPF PC VIDEO AGC ATT 4dB ATT 10dB ATT 6dB ATT 10dB ATT 10dB 629 TRAP 6dBAMP C K NP CONV B D PILOT ERASE BPF PILOT ADD V AMP SQUE...

Page 22: ...309K SW6317 EVQ21309K STB NP GND DIN NP OSC NP NP VDD CLK VDD NP NP NP GND CH POWER CH REC IIC SERVICE FF PLAY REW STOP NONE NONE PT LED DRIVE LED DISPLAY PANEL 30 TO MI TO MI 31 32 TO MI 33 TO MI TO...

Page 23: ...0 31 32 33 34 35 36 37 38 39 40 41 42 43 44 45 46 47 48 49 50 51 52 53 54 55 56 57 58 59 60 61 62 63 64 10 16V C4233 10 16V C4234 33 6 3V C4237 47 6 3V C4240 2R2 50V C4244 10 16V C4218 10 16V C4217 33...

Page 24: ...F PNR LCH AGC GND PREAMP SWITCH VCC REC DC2 HIFI PLAY H NOISE DET PNR RCH BPF BPF LPF FM MODULATOR DEMODULATOR AGC SWITCH MUTE REC AGC ADJ GND VCC FSC MTS MUTE IIC BUS INTERFACE REC AUDIO SIGNAL PB AU...

Page 25: ...07 PT R1211 WA5 R1026 4R7 R1011 470 R1010 WA7 5 R1027 B1AZKD000001 IC1002 1 2 3 J1213 WA7 5 J1212 PT PT J1004 PT J1005 J1201 W22 5 WA5 J1209 J1203 WA5 WA10 J1002 WA10 J1001 PT J1211 J1210 WA5 WA5 J120...

Page 26: ...14 XTALO 15 XTALI 16 TP3 17 TEST2 18 Iref 19 ADDR2 20 VSSA2 21 VDEC 22 TEST1 25 SIF1 26 CRESET 27 VSSA3 28 VDDA3 29 SCL 30 SDA 31 SDO 32 WS 33 SCK 23 SIF2 24 Vref1 37 P1 38 MONOIN 39 EXTIR 40 EXTIL 4...

Page 27: ...VHF IN UHF VHF OUT PIN 18 Pins TUNER UHF VHF 8 Pins PIN LED DISPLAY PANEL 3 Pins PIN INFRARED RECEIVER UNIT VIDEO OUT VIDEO IN 1 AUDIO OUT L CH AUDIO IN 1 L CH AUDIO OUT R CH AUDIO IN 1 R CH VIDEO IN...

Page 28: ...4 4 7 4 7 IC6004 1 0 0 2 0 0 3 0 0 4 0 0 5 3 0 3 0 6 3 3 3 3 7 0 0 8 5 2 5 2 IC6005 1 5 2 5 2 2 5 2 5 2 3 0 0 4 5 5 2 5 2 6 IC6201 1 11 9 11 9 2 1 8 1 8 3 0 0 4 0 3 0 3 5 0 0 6 0 0 7 16 5 16 5 8 0 0 9...

Page 29: ...2 0 3 2 3 4 0 5 2 3 6 2 4 7 2 1 8 0 3 9 0 10 0 11 0 12 2 1 13 2 5 14 0 15 0 16 2 5 17 0 7 18 2 5 19 2 5 20 2 0 21 2 0 22 2 0 23 0 24 2 0 25 4 9 26 2 0 27 0 28 4 1 29 1 4 30 0 7 31 0 1 32 2 4 33 2 4 3...

Page 30: ...PV V4525S PV V4535S K PV 455S K 30...

Page 31: ...E B Q3200 C E B Q4259 Q4202 Q7001 C E B C E B C E B C E B Q1214 C E B Q6301 C E B Q6009 C E B Q6004 Q6005 Q6003 C E B Q1211 C E B R1018 1 3 5 4 4 5 3 1 1 3 6 4 1 3 5 4 C1024 C1025 C1014 R1021 C1026 C1...

Page 32: ...PV V4525S PV V4535S K PV 455S K 32...

Page 33: ...EO TO VIDEO SYSTEM CONTROL UNSW 6V TO AUDIO PRIMARY IC1001 FROM SYSTEM CONTROL IC6001 3 5 IC1203 1 5V SW REG IC1202 5V SW REG 1 3 5 TP1204 TP1205 TO TIMER DISPLAY SW 5V MTR TO SERVO CAPSTAN IC6201 13...

Page 34: ...HP NC TRAP NC PHASE COMPARATOR DEH NON LINEAR EMPHASIS 15 17 19 23 26 33 35 37 38 40 49 51 36 12 9 67 63 20 8 PEAKING FILTER L3012 C3012 S VHS PB H TO SYSTEM CONTROL SVHS SVHS R ATP R P P R EXT INT P...

Page 35: ...UDIO HSW FROM SYSTEM CONTROL 27 HIFI FSC FROM VIDEO 45 VCO F0 AUDIO IN2 L AUDIO IN2 R TP4202 TP4201 OUT L OUT R IN L IN R AUDIO OUT L AUDIO OUT R AUDIO IN1 L AUDIO IN1 R 3 5 JK3002 FRONT JACK JK3001 R...

Page 36: ...3 IC6003 S REEL SENSOR 5V SW6002 SAFETY TAB SW Q6007 SUPPLY PHOTO SENSOR D6001 SENSOR LED Q6006 TAKE UP PHOTO SENSOR 38 12MHz IN 39 12MHz OUT X6001 IIC CLOCK 34 2 OUT IC6005 RESET SW6322 CH UP CYLINDE...

Page 37: ...10 EXPLODED VIEWS 10 1 MECHANISM SECTION 37 PV V4525S PV V4535S K PV 455S K...

Page 38: ...10 2 CHASSIS FRAME AND CASING PARTS SECTION 38 PV V4525S PV V4535S K PV 455S K...

Page 39: ...10 3 PACKING PARTS AND ACCESSORIES SECTION 39 PV V4525S PV V4535S K PV 455S K...

Page 40: ...mechanical parts except the Cylinder Kit Ref No 1 and the Cassette Up Ass y Ref No 51 After replacing the Mechanical Chassis Sub Ass y be sure to perform TAPE INTERCHANGEABILITY ADJUSTMENT in Service...

Page 41: ...OVER 2 104 VYPS7170 FRONT PANEL ASS Y 2 Ref No Part No Part Name Description Remarks 105 LSGP0439 CASSETTE DOOR LID 2 106 LSMB0310 CASSETTE DOOR SPRING 2 110 LSGF0531 POWER BARRIER 2 111 VMX3115 MECHA...

Page 42: ...P Q6003 B1ABCF000106 TRANSISTOR SI NPN CHIP Ref No Part No Part Name Description Remarks Q6004 2SB0709A0L TRANSISTOR SI PNP CHIP Q6004 B1ADCC000004 TRANSISTOR SI PNP CHIP Q6004 B1ADCF000001 TRANSISTOR...

Page 43: ...W 47K R4217 ERJ3GEY0R00V MGF CHIP 1 16W 0 Ref No Part No Part Name Description Remarks R4219 ERJ3GEYJ822V MGF CHIP 1 16W 8 2K R4220 ERJ3GEYJ822V MGF CHIP 1 16W 8 2K R4224 ERJ3GEYJ822V MGF CHIP 1 16W 8...

Page 44: ...3A821KBP CERAMIC 1KV 820PF C1030 ECKATS103MF CERAMIC 250V 0 01UF Ref No Part No Part Name Description Remarks C1205 ECEA1CKA220 ELECTROLYTIC 16V 22UF C1206 F1H1C104A008 C CHIP 16V 0 1UF C1207 F1H1C104...

Page 45: ...C6108 ECEA0JKA101 ELECTROLYTIC 6 3V 100UF C6110 F1H1C104A008 C CHIP 16V 0 1UF C6111 F1H1C104A008 C CHIP 16V 0 1UF C6147 ECJ1VF1H103Z C CHIP 50V 0 01UF C6154 ECJ1VB1H333K C CHIP 50V 0 033UF C6156 ECJ1...

Page 46: ...K SWITCH PUSH SW6322 EVQ11A09K SWITCH PUSH SW6323 EVQ11A09K SWITCH PUSH SW6325 EVQ11A09K SWITCH PUSH SW6326 EVQ11A09K SWITCH PUSH SW6327 EVQ11A09K SWITCH PUSH FUSE PROTECTOR Ref No Part No Part Name D...

Reviews: