2-7
DISASSEMBLY/ASSEMBLY
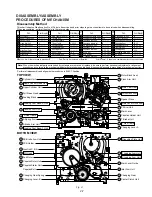
PROCEDURES OF MECHANISM
Fig. J1
TOP VIEW
Note: When the mechanical parts surrounded by rectangle are removed or replaced, be sure to perform necessary adjustment or alignment
procedures according to the mechanical adjustment procedures section and disassembly/assembly procedures of mechanism section.
BOTTOM VIEW
SS Brake Arm Unit
25
PCB Holder
29
Junction C.B.A.
26
39 FG Head
Sub Rotor
28
Capstan Rotor Unit
23
Capstan Stator Unit
27
Capstan Belt
Changing Gear Spring
33
Changing Lever-B
35
Grounding Plate Unit
30
38
T Loading Arm Unit
31 S Loading Arm Unit
20 Main Lever Guide
36 Idler Arm Unit
34 Changing Gear
32 Center Clutch Unit
Audio Control Head Unit
6
Cylinder Unit
1
Upper Cylinder Unit
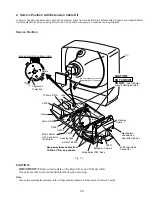
Perform all disassembly and alignments procedures in EJECT Position.
2
Full Erase Head
15
Loading Rack
37
Loading Post Base-S Unit
21
Tension Arm Unit
16
S Spring Arm
17
S Brake Arm Unit
19
S Reel Table
18
Loading Post Base-T Unit
22
5 Motor Block Ass'y
4 Pinch Arm Unit
7
Main Cam Gear
8
Drive Rack Arm
3 Opener Piece
11 Main Lever Drive Arm
10 P5 Arm Unit
9 Main Lever
24 Capstan Holder Unit
12 T Brake Unit
14 T Reel Table
13 Changing Lever A
Step/Loc. No.: Order of steps in procedure. Part : Part to be removed or installed. Prior Step(s) : Steps to be completed prior to the current step.
Disassembly Method
This chart indicates Step/Location No. of Parts to be serviced and prior steps to gain access items to be serviced when disassembling.
When reassembling, perform the step(s) in the reverse order.
Cylinder Unit
------------
------------
------------
3
------------
5
3, 4, 5
3, 4, 5, 7
------------
9
Upper Cylinder Unit
Opener Piece
Pinch Arm Unit
Motor Block Ass'y
Audio Control Head Unit
Main Cam Gear
Drive Rack Arm
Main Lever
P5 Arm Unit
Part
Prior Step(s)
Step
/Loc.
No.
Part
Prior Step(s)
Step
/Loc.
No.
Part
Prior Step(s)
Step
/Loc.
No.
Part
Prior Step(s)
Step
/Loc.
No.
1
2
3
4
5
6
7
8
9
10
Main Lever Drive Arm
3, 4, 5, 7, 8, 9
9
9
9, 12, 13
------------
------------
------------
16, 17
9, 16, 17, 18
9
T Brake Unit
Changing Lever A
T Reel Table
Full Erase Head
Tension Arm Unit
S Spring Arm
S Reel Table
S Brake Arm Unit
Main Lever Guide
11
12
13
14
15
16
17
18
19
20
Loading Post Base-S Unit 16
9, 20
------------
23
------------
------------
23, 25, 26
23, 25, 26, 27
23, 25, 26, 27
------------
Loading Post Base-T Unit
Capstan Rotor Unit
Capstan Holder Unit
SS Brake Arm Unit
Junction C.B.A.
Capstan Stator Unit
Sub Rotor
PCB Holder
T Loading Arm Unit
21
22
23
24
25
26
27
28
29
30
S Loading Arm Unit
30
------------
32
32, 33
32, 33, 34
32, 33, 34
9, 30
------------
------------
Center Clutch Unit
Changing Gear Spring
Changing Gear
Changing Lever-B
Idler Arm Unit
Loading Rack
Grounding Plate Unit
FG Head
31
32
33
34
35
36
37
38
39
Summary of Contents for PV-M1327
Page 5: ...1 3 ...
Page 6: ...1 4 ...
Page 7: ...1 5 ...
Page 8: ...1 6 ...
Page 54: ......
Page 55: ......
Page 56: ......
Page 57: ......
Page 58: ......
Page 59: ......
Page 60: ......
Page 61: ......
Page 62: ......
Page 63: ......
Page 64: ......
Page 65: ......
Page 66: ......
Page 67: ......
Page 68: ......
Page 69: ......
Page 70: ......
Page 71: ......
Page 72: ......
Page 73: ......
Page 74: ......
Page 75: ......
Page 76: ......
Page 77: ......
Page 78: ......
Page 79: ......
Page 80: ......
Page 81: ......
Page 82: ......
Page 83: ......
Page 84: ......
Page 85: ......
Page 86: ......
Page 87: ......
Page 88: ......
Page 89: ......
Page 90: ......
Page 91: ......
Page 92: ......
Page 93: ......
Page 94: ......
Page 95: ......
Page 96: ......
Page 97: ......
Page 98: ......
Page 99: ......
Page 100: ......
Page 101: ......
Page 102: ......
Page 103: ......
Page 104: ......
Page 105: ......
Page 106: ......
Page 107: ......
Page 108: ......
Page 109: ......
Page 110: ......
Page 111: ......
Page 112: ......
Page 113: ......
Page 114: ......
Page 143: ...Printed in Japan R ...

