background image

Others

62

LSQT0973

Others

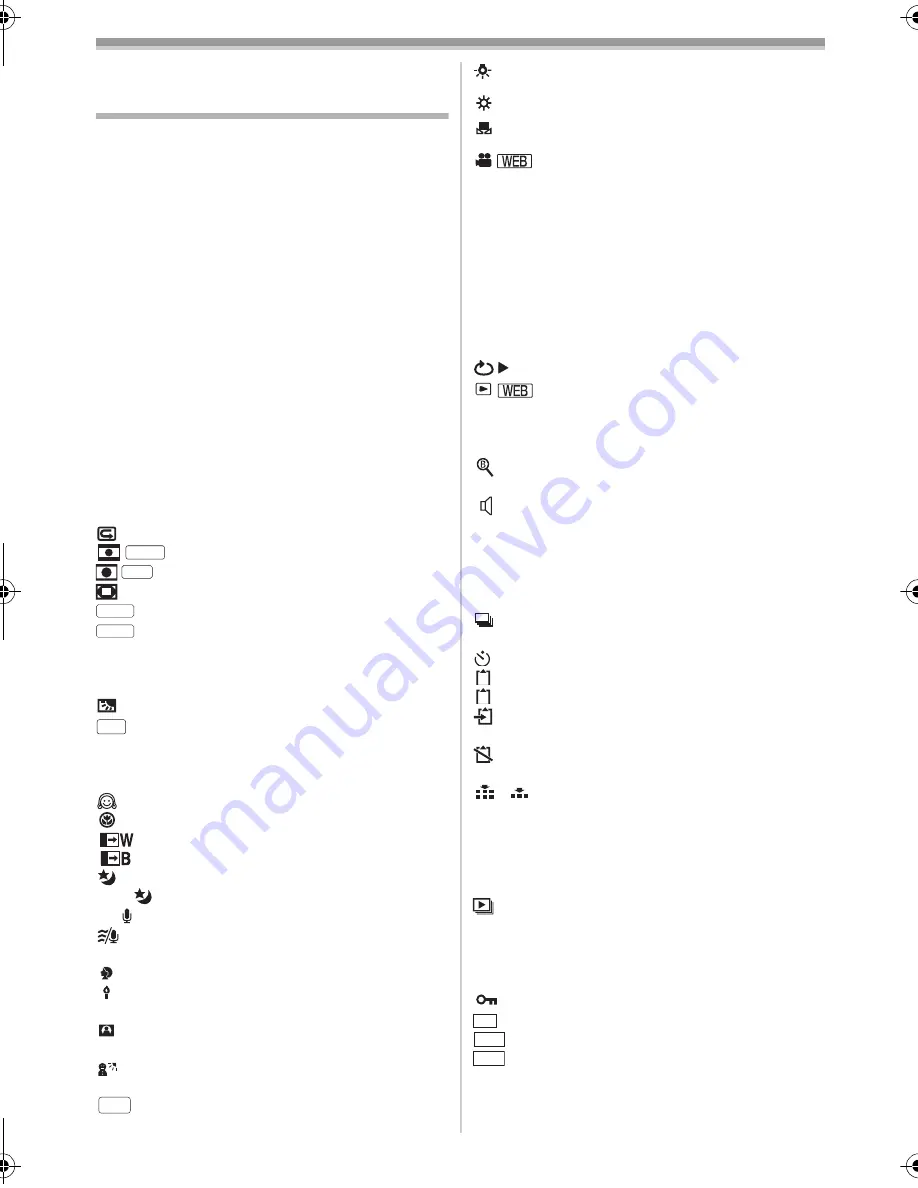
Indications

Various functions and the Camcorder status are 
shown on the screen.

Basic indications

r

:

Remaining battery power

0h00m00s00f: Time code
3:30:45PM:

Date/Time indication

Recording indications

R 0:45:

Remaining tape time

Remaining tape time is indicated in minutes. 
(When it reaches less than 3 minutes, the 
indication starts flashing.) 

SP:

Standard Play mode
(Recording speed mode) 

-26-

LP:

Long Play mode 
(Recording speed mode) 

-26-

¥

:

Recording 

-27-

;

 (Green):

Recording pause 

-27-

;

 (Green flash):

Standby mode

;

 (Red):

Fade out

:

Recording check 

-28-

:

Cinema mode 

-34-

:

wide mode 

-34-

:

Digital zoom 

-30-

:

Automatic mode 

-26-

:

Manual mode 

-36-

MF:

Manual focus 

-38-

5

k

:

Zoom magnification indication

-30-

:

Back light mode 

-32-

:

Image stabilizer 

-35-

1/500:

Shutter speed 

-38-

F2.4:

F number 

-38-

6dB:

Gain value 

-38-

:

Soft skin mode 

-33-

:

Tele macro 

-33-

:

Fade (White) 

-33-

:

Fade (Black) 

-33-

:

MagicPix function 

-32-

:

0 Lux MagicPix function 

-32-

:

Zoom microphone 

-31-

:

Wind noise reduction 

-34-

5

:

Sports mode (Scene mode) 

-36-

:

Portrait mode (Scene mode) 

-36-

:

Low light mode (Scene mode)

-36-

:

Spotlight mode (Scene mode) 

-36-

:

Surf & snow mode (Scene mode) 

-36-

:

Auto white balance 

-37-

:

Indoor mode (recording under 
incandescent lamp) 

-37-

:

Outdoor mode 

-37-

:

White balance adjustment mode 

-37-

:

WEB CAMERA mode (recording) 

-48-

Playback indications

¥

:

Recording underway

1

:

Playback 

-40-

;

:

Pause 

-40-

5

:

Fast-forward/Cue playback 

-40-

6

:

Rewind/Review playback 

-40-

D

/

E

:

Slow motion playback 

-40-

;1

/

2;

:

Frame-by-frame playback 

-40-

2

k5

:

Variable-speed search 

-41-

:

Repeat playback 

-40-

:

WEB CAMERA mode (playback) 

-48-

A.DUB

¥

:

Audio dubbing 

-47-

A.DUB

;

:

Audio dubbing pause 

-47-

:

Blank search 

-28-

12bit, 16bit:

Audio recording mode 

-60-

:

Volume adjustment 

-40-

Card

æ

:

Progressive photoshot mode 

-29-

±

 (White):

Shutter chance mark 

-29-

¥

 (Green):

Shutter chance mark 

-29-

:

RapidFire Consecutive Photoshot 
recording 

-35-

:

Self-Timer recording 

-34-

 (White):

Photoshot mode

 (Green):

While the card is being read

 (Red):

While photoshot recording is 
activated

 (Red):

Using the card that cannot be 
recognized

 (

):

Photoshot picture quality 

-30-

0:

Remaining number of photoshot 
pictures (When the remaining 
number of photoshot pictures 
reaches 0, the red indication 
flashes.) 

:

Slide show playback 

-42-

PictBridge:

PictBridge mode 

-48-

100-0001:

Folder/File display

No.00:

File number

1:

Number of DPOF Setting 

-44-

:

Lock setting 

-44-

:

[640

k

480] Image size

:

[1280

k

960] Image size

:

[1760

k

1320] Image size

CINEMA

WIDE

AUTO

MNL

EIS

0Lux

ZOOM

AWB

640

1280

1760

LSQT0973ENG.book  62 ページ  2006年1月30日 月曜日 午前11時40分

Summary of Contents for PV-GS180

Page 1: ...800 211 PANA 7262 or contact us via the web at http www panasonic com contactinfo For Canadian assistance please call 1 800 561 5505 or visit us at www panasonic ca Digital Video Camcorder Operating Instructions Model No PV GS180 Mini Before connecting operating or adjusting this product please read the instructions completely P PC ...

Page 2: ...nded that only cassette tapes that have been tested and inspected for use in Camcorders with the mark be used AC Adaptor The rating plate is on the underside of the AC Adaptor Ò Ò CAUTION RISK OF ELECTRIC SHOCK DO NOT OPEN CAUTION TO REDUCETHE RISK OF ELECTRIC SHOCK DO NOT REMOVE COVER OR BACK NO USER SERVICEABLE PARTS INSIDE REFER SERVICINGTO QUALIFIED SERVICE PERSONNEL This symbol warns the user...

Page 3: ...uter or peripheral devices Any changes or modifications not expressly approved by the party responsible for compliance could void the user s authority to operate this equipment CAUTION TO PREVENT FIRE OR SHOCK HAZARD AND ANNOYING INTERFERENCE USE THE RECOMMENDED ACCESSORIES ONLY CAUTION DANGER OF EXPLOSION IF BATTERY IS INCORRECTLY REPLACED REPLACE ONLY WITH THE SAME OR EQUIVALENT TYPE Since this ...

Page 4: ...et consult an electrician for replacement of the obsolete outlet 10 Protect the power cord from being walked on or pinched particularly at plugs convenience receptacles and the point where they exit from the apparatus 11 Only use attachments accessories specified by the manufacturer 12 Use only with the cart stand tripod bracket or the table specified by the manufacturer or sold with the apparatus...

Page 5: ...will not subject it to unnecessary movement avoid shaking and striking Your Camcorder contains a sensitive pick up device which could be damaged by improper handling or storage CARE TO CLEAN YOUR CAMCORDER Do not use strong or abrasive detergents when cleaning your Camcorder body TO PROTECT THE LENS Do not touch the surface of the lens with your hand Use a commercial Camcorder lens solution and le...

Page 6: ...ed the right to use the software including the information recorded or described on the CD ROM instruction manuals and any other media provided to Licensee collectively Software but all applicable rights to patents copyrights trademarks and trade secrets in the Software are not transferred to Licensee Article 2 Use by a Third Party Licensee may not use copy modify transfer or allow any third party...

Page 7: ... fitness for a particular purpose Further Matsushita does not warrant that the operation of the Software will be uninterrupted or error free Matsushita or any of its distributors or dealers will not be liable for any damage suffered by Licensee arising from or in connection with Licensee s use of the Software Article 7 Export Control Licensee agrees not to export or re export to any country the So...

Page 8: ...rd mode Check before recording 26 Recording on a tape 27 Recording still pictures on a card while recording image onto a tape 28 Check the recording 28 Blank search function 28 Recording still pictures onto a card Photoshot 29 Zoom in out function 30 Recording yourself 31 Quick start 31 Backlight compensation function 32 MagicPix functions 32 Soft skin mode 33 Tele macro function 33 Fade in fade o...

Page 9: ...r with a PC 49 Connecting Computer and Camcorder 50 Using as a Web camera 51 DV DATA Streaming Function 54 To disconnect USB cable safely 55 If you no longer need driver Uninstall 56 Notes 56 Menu Menu list 58 Menus related to taking pictures 60 Menus related to playback 60 Other menus 61 Others Indications 62 Warning alarm indications 63 Functions cannot be used simultaneously 64 Before requestin...

Page 10: ...ssette 3 Push the PUSH mark 1 in order to close the cassette holder 4 Only after the cassette holder is completely housed close the cassette cover ª Inserting removing a card 1 Open the LCD monitor and then open the card slot cover 2 Insert remove the card into from the card slot When inserting a card face the label side 1 towards you and push it straight in with one stroke as far as it goes When ...

Page 11: ...otoshot Set to Card Recording Mode 1 Press the PHOTO SHOT button ª Playing back tape Set to Tape Playback Mode 1 Operate with joystick 1 Playback Pause 6 Rewind Review playback Reverts to playback with the 1 icon 5 Fast forward Cue playback Reverts to playback with the 1 icon Stop ª Playing back card Set to Picture Playback Mode 1 Operate with joystick E Plays back the previous picture D Plays bac...

Page 12: ...terminal MIC A compatible plug in powered microphone can be used as an external microphone When the Camcorder is connected with AC Adaptor sometimes noise may be heard depending on microphone type In that case please switch to battery for power supply and noise will stop 8 USB terminal 48 9 Speaker 40 CAUTION This unit will operate on 110 120 220 240 V AC An AC plug adaptor may be required for vol...

Page 13: ...ver W T 30 Volume lever s VOLr 40 34 Photoshot button PHOTO SHOT 28 35 Accessory shoe Accessories such as a stereo microphone are attached here 36 Tripod receptacle This is a hole for attaching the Camcorder to optional tripod Please carefully read the operating instructions for how to attach the tripod to the Camcorder You cannot open the card slot cover when the tripod is used Insert the card fi...

Page 14: ... Attaching the lens cap Attach the lens cap to protect the surface of the lens 1 Run the end of the lens cap cord through the hole in the grip belt attachment part and run the lens cap through the lens cap cord When removed the lens cap can be attached to the lens cap fixture To attach or remove the lens cap hold both sides of the lens cap with the tips of your first 2 fingers The grip belt Adjust...

Page 15: ...usted from the menu If it is forcibly opened or rotated the Camcorder may be damaged or fail Check that the card slot cover is closed When the LCD monitor is rotated by 180o towards the lens when recording yourself the LCD monitor and the viewfinder will be simultaneously activated Using the viewfinder ª Extending the viewfinder 1 Pull out the viewfinder Extend it by pinching the extension knob an...

Page 16: ...y In a while the lamp will light up and normal charging will start When the battery temperature is excessively high or low the CHARGE lamp flashes and the charging time will be longer than normal ª Connecting to the AC outlet 1 Connect the AC cable to the AC adaptor and the AC jack 2 Connect the DC cable to the AC adaptor 3 Connect the DC cable to this product The output plug of the AC cable is no...

Page 17: ...is normal Along with the reduction of the battery capacity the display will change r s t u v If the battery discharges then u v will flash Inserting removing a cassette 1 Slide the OPEN EJECT lever and open the cassette cover When the cover is fully opened the cassette holder will come out 2 After the cassette holder is opened insert remove the cassette When inserting a cassette orient it as shown...

Page 18: ...ssette slide in the direction of the REC arrow Inserting removing a card Before inserting removing a card be sure to set the OFF ON switch to OFF If the card is inserted or removed with the power turned on this Camcorder may malfunction or the data recorded on the card may be lost 1 Open the LCD monitor and then open the card slot cover 2 Insert remove the card into from the card slot When inserti...

Page 19: ... is moved back you can perform those functions Turning the Camcorder on When the Camcorder is turned on with the lens cap fitted the automatic white balance adjustment may not function properly Please turn the Camcorder on after removing the lens cap ª How to turn on the power 1 While pressing the button 1 set the OFF ON switch to ON The status indicator lights up ª How to turn off the power 1 Whi...

Page 20: ...g mode AUTO MANUAL FOCUS switch is set to AUTO 2 Tape recording mode AUTO MANUAL FOCUS switch is set to MANUAL 3 Tape playback mode 4 Card recording mode AUTO MANUAL FOCUS switch is set to AUTO 1 Select by moving up 2 Select by moving down 3 Select by moving left 4 Select by moving right 5 Determine by pushing the center 3 Tele macro 33 4 Soft skin mode 33 2 Fade 33 1 Backlight compensation 32 3 M...

Page 21: ...ed Do not switch the mode dial when the menu is displayed 2 Move the joystick up or down in order to select the top menu 3 Move the joystick right or press it to set the selection 4 Move the joystick up or down in order to select the sub menu 5 Move the joystick right or press it to set the selection 6 Move the joystick up or down in order to select the item to be set 4 White balance Shutter speed...

Page 22: ...ASIC CLOCK SET YES 2 Move the joystick left or right in order to select the item to be set Then move the joystick up or down to set the desired value The year will change as follows 2000 2001 2089 2000 The 12 hour clock is used 3 Press the joystick to determine the setting The clock function starts at 00 seconds ª About date time The date and time function are driven by a built in lithium battery ...

Page 23: ...ase the brightness of the entire LCD monitor 1 Press the POWER LCD button The POWER LCD lamp lights up If the POWER LCD button is pressed the entire LCD monitor will become approx twice as bright as the normal Press this button again and the lamp will go off and the brightness will revert back to the original brightness This will not affect the images to be recorded If you turn on the Camcorder wh...

Page 24: ...ce between the remote control and the Camcorder Within approx 5 m 16 feet Angle Approx 10o up and 15o down left and right 10 14 17 15 16 11 12 13 1 Warning Danger of explosion if battery is incorrectly replaced Replace only with the same or equivalent type recommended by the equipment manufacturer Discard used batteries according to manufacturer s instructions Risk of fire explosion and burns Do n...

Page 25: ...ns down replace it with a new battery part number CR2025 The battery is normally expected to last about 1 year but it depends on operation frequency Keep the button type battery out of the reach of children If the remote control mode of the Camcorder and that of the remote control do not match with each other REMOTE will appear When the remote control is operated for the first time after the Camco...

Page 26: ...O MANUAL FOCUS switch to AUTO and color balance white balance and focusing will be adjusted automatically Auto white balance 72 Auto focusing 72 Color balance and focus may not be adjusted depending on light sources or scenes If so manually adjust the white balance and focus Scene mode setting 36 White balance setting 37 Shutter speed setting 38 Iris gain value setting 38 Focus setting 38 ª Record...

Page 27: ...ing tape time indication on the screen The remaining tape time is indicated in minutes When it reaches less than 3 minutes the indication starts flashing During a 15 seconds or shorter recording the remaining tape time indication may not be displayed or the remaining tape time may not be displayed correctly In some cases the remaining tape time indication may display remaining tape time that is 2 ...

Page 28: ... PHOTO SHOT button does not work if it is pressed halfway Check the recording The last image recorded is played back for 2 to 3 seconds After checking the Camcorder will be set to a recording pause Set to Tape Recording Mode 1 Press the joystick during the recording pause until the icon 1 appears 2 Move the joystick down to select the recording check icon Blank search function Searches for the las...

Page 29: ...ds and keep your arms stationary at your side so as not to shake the Camcorder You can record stable pictures without shaking by using a tripod and the remote control For the number of still pictures to be recorded on a card refer to 74 The sound cannot be recorded While data is being recorded on a card do not operate the mode dial When the access lamp is lit do not insert or remove a card Another...

Page 30: ...en the scene is filled with only horizontal lines When the scene lacks contrast ª Concerning the focusing area When there is a contrasting object ahead or behind the subject in the focus area the subject may not be focused Move the contrasting object out of the focus area Zoom in out function You can zoom in up to 10k optically Set to Tape Card Recording Mode 1 Wide angle recording zoom out Push t...

Page 31: ...e center of the joystick Quick start This Camcorder will be put into standby in approx 1 7 seconds after the power is turned on Please note in Quick Start Mode approximately half the pause recording power is being consumed Using Quick Start Mode will reduce the battery recording playback time This is only activated in the following cases A tape or a card is inserted while the Tape Recording Mode i...

Page 32: ...nual focusing can be used Recorded scene is seen as if frames were missed MagicPix function You can record dark locations brightly in color 0 Lux MagicPix function You can record completely dark locations with the light of the LCD monitor Set to Tape Recording Mode 1 Press the joystick until the icon 1 appears 2 Move the joystick up to select the MagicPix icon Each upward press switches the modes ...

Page 33: ...f a sharper focus cannot be achieved adjust the focus manually In the following cases the tele macro function is canceled The zoom magnification becomes lower than 10k The OFF ON switch or the mode dial is operated Fade in fade out function Fade in The image and audio gradually appear Fade out The image and audio gradually disappear Set to Tape Recording Mode 1 Press the joystick until the icon 1 ...

Page 34: ...es for wide screen TVs This allows you to record images compatible with wide screen TVs Wide Function Images are recorded with a 16 9 aspect ratio Cinema Function Images are recorded with a black belt appearing along the top and bottom of the screen so that they look like theatre movies Set to Tape Recording Mode 1 Wide Function Set ADVANCE WIDE ON Cinema Function Set ADVANCE CINEMA ON ª To cancel...

Page 35: ...racking it RapidFire Consecutive Photoshot Records still pictures continuously at a certain interval Set to Card Recording Mode 1 Set BASIC PICTURE SIZE 640 2 Set ADVANCE BURST MODE ON 3 Press and hold the PHOTO SHOT button ª To stop RapidFire Consecutive Photoshot midway through Release the PHOTO SHOT button The Camcorder records up to 10 still pictures at intervals of 0 5 seconds If the shutter ...

Page 36: ...playback or playback pause of recorded pictures this mode helps diminish camera shake During normal playback the image movement may not look smooth Avoid recording under fluorescent light mercury light or sodium light because the color and brightness of the playback image may change If you record a subject illuminated with strong light or a highly reflective subject vertical lines of light may app...

Page 37: ...tment ª To set the white balance manually Select in Step 3 Then while viewing a white subject on the entire screen move the joystick up to select the indication ª About flashing of the indication When the manual adjustment mode is selected Flashing indicates that the white balance previously adjusted is stored This setting is stored until the white balance is adjusted again When white balance cann...

Page 38: ...tter speed indication or aperture value indication appears 1 Shutter speed 2 Aperture Iris gain value 3 Move the joystick left or right in order to adjust the shutter speed or aperture ª To restore to automatic adjustment Set the AUTO MANUAL FOCUS switch to AUTO Manual shutter speed adjustment Avoid recording under fluorescent light mercury light or sodium light because the color and brightness of...

Page 39: ... the zoom magnification there are iris values that are not displayed ª Shutter speed range 1 60 to 1 8000 seconds Tape Recording Mode 1 30 to 1 500 seconds Card Recording Mode The shutter speed closer to 1 8000 is faster ª Iris gain value range CLOSE Closed F16 F2 0 OPEN Opened 0dB 18dB Value closer to CLOSE darken the image Value closer to 18dB brighten the image Values with dB are gain values ...

Page 40: ...ON The indication appears In order to cancel the repeat playback mode set REPEAT PLAY OFF or set OFF ON switch to OFF When you set USB FUNCTION WEB CAM and then connect the USB connection cable the repeat playback mode is canceled ª Settings on the audio If you cannot listen to the desired audio when playing back a tape check the settings in SETUP 12bit AUDIO When you record or dub the audio in 12...

Page 41: ...frame playback Press and hold the E or the D button in the playback pause and then the images will continuously be played back frame by frame Variable speed search function The speed of cue review playback can be varied This operation is only available when using the remote control optional Set to Tape Playback Mode and play back a tape 1 Press the VAR SEARCH button on the remote control 2 Press t...

Page 42: ...s for the TV ª To display the on screen information on the TV The information displayed on the LCD monitor or the viewfinder operation icon time code and mode indication etc date and time can be displayed on the TV This operation is only available when using the remote control optional 1 Press the EXT DISPLAY button on the remote control optional Press the button again to erase the OSD information...

Page 43: ... restored Set to Picture Playback Mode 1 Move the joystick left or right to select a file to delete You can select a file in the multi screen display After selecting the file press the joystick and display the operation icon 2 Move the joystick down to select 3 Move the joystick up or down in order to select DELETE 1 FILE and then press it 4 When the confirming message appears select YES and press...

Page 44: ...e joystick to select a file to be locked and then press it Indication 1 appears and the selected file is locked Press the joystick again and the lock will be canceled 2 or more files can be locked in succession ª To complete the settings Press the MENU button Writing the printing data on a card DPOF setting You can write the data of pictures to be printed number of copies and other information DPO...

Page 45: ...ecorder or a VCR Dubbing Pictures recorded by the Camcorder can be stored on a DVD RAM or other such media Refer to the instructions for the recorder Place a recorded cassette in the Camcorder and an unrecorded DVD RAM or cassette in the DVD recorder or VCR 1 Connect the Camcorder and the recorder Connecting with the AV cable Connect the Camcorder and the recorder by using the AV cable 1 If the re...

Page 46: ...again or press the button on the remote control to stop recording Recorder 6 Stop playback Player ª To cancel the standby for recording When the Camcorder is in standby for recording move the joystick down and select the icon Do not plug or unplug the DV cable during dubbing or the dubbing may not be completed properly If a picture bilingual video etc containing main sound and sub sound has been d...

Page 47: ...Recording Mode When you want to preserve the original sound taken during recording set SETUP AUDIO REC 12bit to take pictures When set 16bit the sounds taken during recording are erased after recording with audio dubbing Set BASIC REC SPEED SP to take pictures ª To play back the sound recorded with audio dubbing You can switch between the sound recorded with audio dubbing and the original sound Se...

Page 48: ...ng you cannot select DPOF PRINT When you select DPOF PRINT for printing set the number of prints in DPOF setting When DPOF PRINT is selected print after you determine the paper size 3 Move the joystick left and right to select a desired picture and then press it 4 Select the desired number of prints You can set up to 9 prints 5 Select the setting for date printing If the printer is not capable of ...

Page 49: ...lease consult with your retailer for compatibility Using the Camcorder with a PC An image stored on the DV Cassette can be transferred to your personal computer ª Driver Installation 1 Turn on Computer and start up Windows 2 Insert supplied CD ROM into the CD ROM drive Setup Menu appears 3 Select the driver to be installed from Setup Menu Video Stream Driver 51 If the Camcorder is connected to you...

Page 50: ...er 2 Set the Camcorder to PC Mode 3 Connect the Camcorder to your personal computer with the USB cable 4 Camcorder power is turned on 5 Open My Computer and click Removable Disk For Windows Me 2000 users Click Open folder to view files using Windows Explorer and then OK For Windows XP users 6 Double click a file you want to view You can view images stored on the Memory Card and also save them to y...

Page 51: ... on the same Network LAN Install Windows Messenger Windows XP If you have a version older than 5 0 download the latest version 5 0 5 1 from the Microsoft Home Page The latest version of MSN Messenger can also be downloaded from the Microsoft Home Page http www microsoft com For download and installation instructions please refer to Help on the Home Page If the installed version is not the latest u...

Page 52: ...omputer with the USB connection cable When the Camcorder and personal computer with Windows 2000 are connected via USB cable a message such as the one below is displayed However testing by the manufacturer has confirmed functionality of this Camcorder with Windows 2000 Click Yes and proceed 5 Start Windows Messenger for Windows XP users or MSN Messenger for Windows 2000 users Click start Programs ...

Page 53: ...lect DVC in the Microphone menu Please refer to the HELP file of Windows Messenger to understand its operation During set up if Primary video capture device selection screen is displayed Panasonic DVC Web Camera is selected ª Setting up MSN Messenger When starting MSN Messenger for the first time its setup screen is displayed However the screen is not displayed if MSN Messenger setup has already b...

Page 54: ...ntinue with installation After DirectX 9 0b is installed the computer will restart Do not remove the CD ROM Installation may take a little while 4 Finish installation by following the on screen instructions Click Next and proceed with installation After completing the installation Click Finish 5 Click OK ª Connecting Computer and Camcorder If you wish to capture data from a tape set the Camcorder ...

Page 55: ...ayback Mode 2 Set BASIC or ADVANCE USB FUNCTION DV DATA 3 Connect the Camcorder to the personal computer with USB connection cable When capturing video using the USB connection be sure to use Microsoft s Windows Movie Maker 2 1 You cannot record the video edited by the PC onto the Tape in the Camcorder To disconnect USB cable safely If USB cable is disconnected while the computer is on error dialo...

Page 56: ...red trademarks or trademarks of Apple Computer Inc in the United States and or other countries All other names company names product names etc in these instructions are the trademarks or registered trademarks of their respective corporations Microsoft product screen shot s reprinted with permission from Microsoft Corporation The names of the products you are using may differ from the names given i...

Page 57: ...espective corporations Files recorded on a SD Memory Card It may not be possible to play back the files on this Camcorder recorded on and created by other equipment or vice versa For this reason check the compatibility of the equipment in advance ª About the compatibility of the card files Data files recorded on an SD Memory Card by this Camcorder conform with DCF Design rule for Camera File syste...

Page 58: ...INEMA 34 USB FUNCTION 52 D ZOOM 30 ZOOM MIC 31 DATE TIME 60 INITIAL SET 61 3 SETUP FADE COLOR 33 AUDIO REC 60 REC LAMP 60 DISPLAY 60 REMOTE 25 BEEP SOUND 60 LCD SET 23 EVF SET 23 DEMO MODE 61 AV JACK 60 POWER SAVE 27 4 LANGUAGE 21 ª TAPE PLAYBACK MENU 1 BASIC DATE TIME 60 AV JACK 60 USB FUNCTION 52 2 ADVANCE BLANK SEARCH 28 REC SPEED 26 REC STDBY 46 REC DATA 60 PICT QUALITY 30 REPEAT PLAY 40 3 SET...

Page 59: ...URST MODE 35 SHTR EFFECT 30 DATE TIME 60 INITIAL SET 61 3 SETUP REC LAMP 60 DISPLAY 60 REMOTE 25 BEEP SOUND 60 LCD SET 23 EVF SET 23 POWER SAVE 27 4 LANGUAGE 21 ª PICTURE PLAYBACK MENU 1 BASIC DATE TIME 60 PROTECT 44 2 ADVANCE DPOF SET 44 CARD FORMAT 44 3 SETUP DISPLAY 60 REMOTE 25 LCD SET 23 EVF SET 23 POWER SAVE 27 4 LANGUAGE 21 ...

Page 60: ...beeps are issued as follows 1 Beep When you start recording When you turn on the power 2 Beeps When you pause recording 2 Beeps for 4 times When a cassette with its erasure prevention tab set to SAVE is inserted condensation occurs and at other times Check the sentence displayed on the screen Menus related to playback ª AV JACK This switches among the output settings of the AV headphone terminal O...

Page 61: ...E In the Tape Recording Mode if you set to SETUP DEMO MODE ON without inserting a cassette and a card the Camcorder is automatically set to the demonstration mode for introducing its functions If any button is pressed or operated the demonstration mode is canceled If no operations take place for approx 10 minutes the demonstration mode automatically starts To terminate the demonstration mode inser...

Page 62: ...e mode 36 Auto white balance 37 Indoor mode recording under incandescent lamp 37 Outdoor mode 37 White balance adjustment mode 37 WEB CAMERA mode recording 48 Playback indications Recording underway 1 Playback 40 Pause 40 5 Fast forward Cue playback 40 6 Rewind Review playback 40 D E Slow motion playback 40 1 2 Frame by frame playback 40 2k5 Variable speed search 41 Repeat playback 40 WEB CAMERA m...

Page 63: ...ing audio dubbing or digital dubbing on a tape with the accidental erasure prevention slider placed in the SAVE position CHECK REMOTE MODE An incorrect remote control mode has been selected This is only displayed at the first operation of the remote control after powering on 25 WRONG TAPE FORMAT You are attempting to play back a tape section that has been recorded with a different TV system This c...

Page 64: ...onitor is rotated by 180 towards the lens the brightness of the LCD monitor cannot be adjusted Functions cannot be used simultaneously Some functions in the Camcorder are disabled or cannot be selected due to its specifications The table below shows examples of functions restricted by conditions Functions Conditions which disable the functions Progressive When recording onto a tape and a card simu...

Page 65: ...ly charged Charge it with the AC adaptor 16 Are you using the battery in an extremely cold place The battery is affected by ambient temperature In cold places the operating time of the battery becomes shorter Has the battery worn out The battery has a limited life If the operating time is still too short even after the battery is fully charged depending on the usage the battery has worn out and ca...

Page 66: ... disappears 4 Auto focus function does not work Is manual focus mode selected If auto focus mode is selected focus is automatically adjusted There are some recording subjects and surroundings for which the auto focus does not operate correctly 72 If so use the manual focus mode to adjust the focus 38 Is the MagicPix function set When the MagicPix function is working focusing shifts into the manual...

Page 67: ...ctions of your TV and select the channel that matches the input terminals used for the connection 4 Playback picture is not clear Are the heads of the Camcorder dirty If the heads are dirty playback image cannot be clear Clean the heads by using the head cleaner for digital video optional 69 If the terminal for the AV cable is soiled noises may appear on the screen Wipe the soil off the terminal w...

Page 68: ...ver installed Cautions for Use ª About condensation If you turn the Camcorder on when condensation occurs on the head or the tape condensation Indication 3 yellow or red is displayed on the viewfinder or the LCD monitor and the messages 3DEW DETECT or 3EJECT TAPE only when the tape is inserted appear If so follow the procedure below 3 in yellow Dew is slightly adhering on the head or the tape 3 in...

Page 69: ...strong magnetic fields created by speakers or large motors Electromagnetic wave radiation generated by digital circuits including microprocessor may adversely affect the Camcorder causing the disturbance of images and sounds If the Camcorder is affected by such equipment and does not function properly turn off the Camcorder power and detach the battery or AC adaptor Then connect the battery or AC ...

Page 70: ...e battery If the battery is kept in a high temperature high humidity or oily smoky places the terminals may rust and cause malfunctions To store the battery for a long period of time we recommend you charge it once every year and store it again after you have completely used up the charged capacity Dust and other matter attached to the battery terminals should be removed Do not throw old battery i...

Page 71: ...en to prevent swallowing ª Folder structure of the card The folder structure of the card formatted by the Camcorder will be displayed on the PC as the illustration below Up to 999 pictures can be recorded on 100CDPFP folder etc Files with the DPOF settings can be recorded on MISC folder ª LCD monitor Viewfinder LCD monitor When the LCD monitor gets dirty wipe it with a dry soft cloth In a place wi...

Page 72: ... other colors Since white color is the reference of all colors light the Camcorder can record pictures in a natural hue if it can recognize the reference white color ª Auto focus Auto focus automatically moves the focusing lens forward and backward inside the Camcorder to bring the subject into focus Auto focus has the following characteristics Adjusts so that the vertical lines of a subject are s...

Page 73: ...0 compliant Hi Speed No copyright protection support PictBridge compliant Digital interface DV input output terminal IEEE1394 4 pin Dimensions Approx 71 mm W k73 mm H k123 mm D Approx 2 8 inch W k2 9 inch H k4 9 inch D excluding the projection part Mass Approx 410 g 0 91 lbs without battery and DV cassette Operating temperature 0 oC to 40 oC 32 oF to 104 oF Operating humidity 10 to 80 Card memory ...

Page 74: ...ctures recordable on an SD Memory Card optional PICTURE SIZE 640 1280 1760 PICTURE QUALITY 8 MB 45 95 9 15 4 7 16 MB 100 200 21 35 11 18 32 MB 220 440 47 76 24 40 64 MB 440 880 98 158 52 84 128 MB 880 1760 187 302 100 161 256 MB 1760 3520 390 628 208 335 512 MB 3520 7040 774 1246 414 666 1 GB 7040 14080 1550 2495 831 1334 2 GB 14080 28160 3160 5030 1680 2700 ...

Page 75: ...32BPPA BN SDPC3E Pro High Speed 2 GB SD Memory Card Pro High Speed 1 GB SD Memory Card Pro High Speed 512 MB SD Memory Card Super High Speed 256 MB SD Memory Card High Speed 2 GB SD Memory Card High Speed 1 GB SD Memory Card High Speed 512 MB SD Memory Card High Speed 256 MB SD Memory Card High Speed 128 MB SD Memory Card High Speed 64 MB SD Memory Card High Speed 32 MB SD Memory Card N2QAEC000017...

Page 76: ...R OFFICE 20421 84th Avenue South Kent WA 98032 Ship To Mr Mrs Ms First Last Street Address City State Zip Phone Day Night 4 Shipping information UPS delivery requires complete street address Please photocopy this form when placing an order 3 Method of payment check one Check of Money Order enclosed NO C O D SHIPMENTS VISA MasterCard Make Check or Money Order Payable to PANASONIC ACCESSORIES Please...

Page 77: ...duct needs service Please include your proof of purchase Failure to do so will delay your repair To further speed your repair please provide an explanation of what is wrong with the unit and any symptom it is exhibiting Mail this completed form and your Proof of Purchase along with your unit to Panasonic Services Company 410B Airport Road Elgin IL 60123 9333 Attn Camcorder Repair ...

Page 78: ... TV s or non expanded standard 4 3 pictures on wide screen TV s or onscreen data in a stationary and fixed location The warranty ALSO DOES NOT COVER damages which occurred in shipment or failures which are caused by products not supplied by the warrantor or failures which result from accidents misuse abuse neglect bug infestation mishandling misapplication alteration faulty installation set up adj...

Page 79: ...abriel Industrial Park Carolina Puerto Rico 00985 Phone 787 750 4300 Fax 787 768 2910 For hearing or speech impaired TTY users TTY 1 866 605 1277 Purchase Parts Accessories and Instruction Books online for all Panasonic Products by visiting our Web Site at http www pasc panasonic com or send your request by E mail to npcparts us panasonic com You may also contact us directly at 1 800 332 5368 Phon...

Page 80: ...IS EXPRESS LIMITED WARRANTY IS IN LIEU OF ALL OTHER WARRANTIES EXPRESS OR IMPLIED INCLUDING ANY IMPLIED WARRANTIES OF MERCHANTABILITY AND FITNESS FOR A PARTICULAR PURPOSE IN NO EVENT WILL PANASONIC CANADA INC BE LIABLE FOR ANY SPECIAL INDIRECT OR CONSEQUENTIAL DAMAGES In certain instances some jurisdictions do not allow the exclusion or limitation of incidental or consequential damages or the excl...

Page 81: ...nty USA 78 Low Light Mode 36 ª M MagicPix Function 32 Manual Focus 38 Mode Dial 19 ª P Photoshot 29 PictBridge 48 Portrait Mode 36 ª Q Quick Start 31 ª R RapidFire Consecutive Photoshot 35 Recording Check 28 Recording Speed 26 Remaining Tape Time 62 Remote Control 23 Repeat Playback 40 Request for Service Notice USA Only 77 ª S Scene mode 36 SD Memory Card 57 Self Recording 31 Self timer Recording...

Page 82: ...te 3 Apriete la marca PUSH 1 a fin de cerrar el compartimiento del cassette 4 Sólo cierre la tapa del cassette después de que el respectivo compartimiento esté cabalmente alojado ª Insertar quitar una tarjeta 1 Abra el monitor LCD luego abra la tapa de la ranura de la tarjeta 2 Inserte quite la tarjeta en de la ranura Cuando inserta una tarjeta con su lado etiquetado vuelto 1 hacia Ud la apriete d...

Page 83: ... de grabación de tarjeta 1 Oprima el botón PHOTO SHOT ª Reproducción de la cinta Ajuste al modo de reproducción de cinta 1 Actúe en la palanca de mando 1 Reproducción Pausa 6 Rebobinado Localización regresiva Vuelve para reproducir con el icono 1 5 Avance rápido Localización progresiva Vuelve para reproducir con el icono 1 Parada ª Reproducción de tarjeta Ajuste al modo de reproducción de imagen 1...

Page 84: ...mer Electronics Company Division of Panasonic Corporation of North America One Panasonic Way Secaucus NJ 07094 Panasonic Puerto Rico Inc Ave 65 de Infantería Km 9 5 San Gabriel Industrial Park Carolina Puerto Rico 00985 Panasonic Canada Inc 5770 Ambler Drive Mississauga Ontario L4W 2T3 P C ...

Reviews: