background image

102

13

14

15

16

17

18

19

20

20

21

22

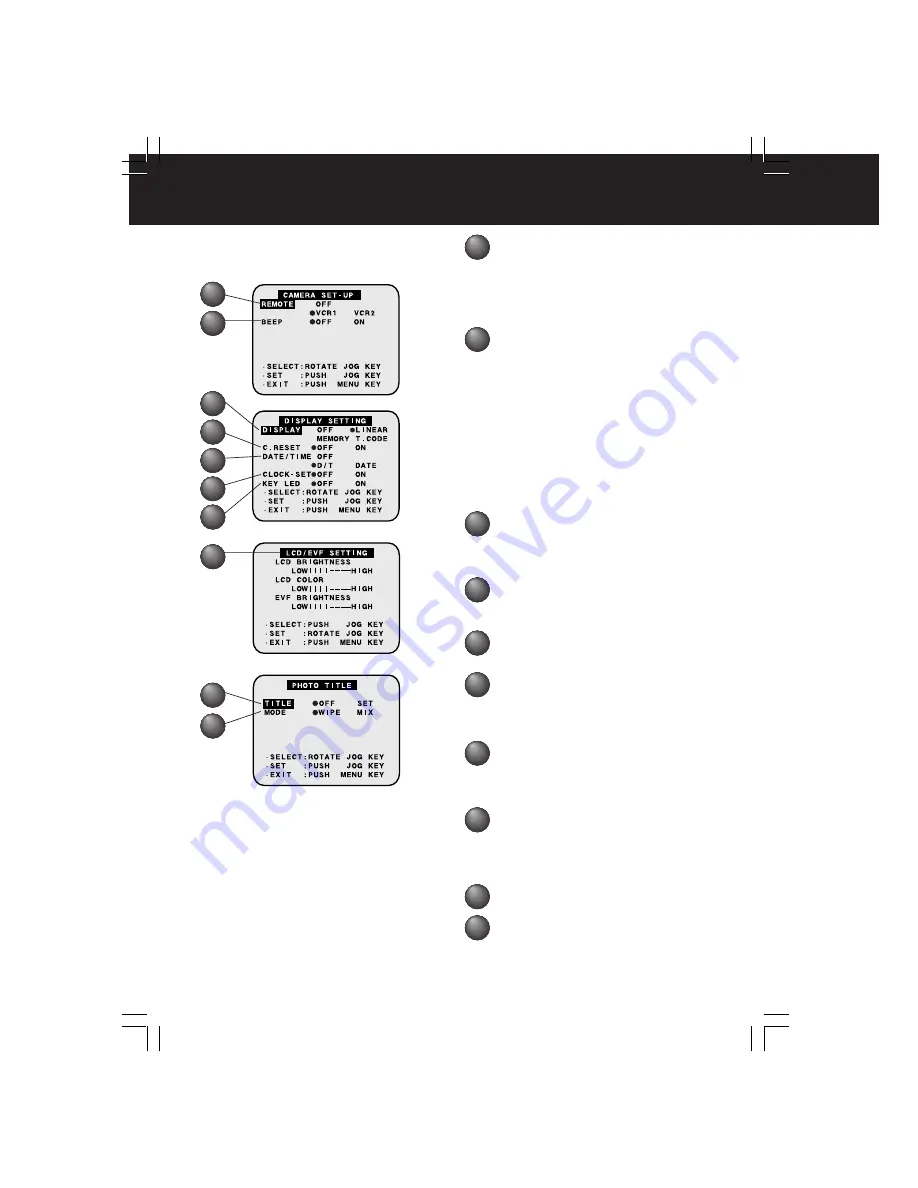
Menu à l’écran

21

13

14

22

REMOTE 

(Télécommande) (Page 10.)

VCR1:

Pour capter les signaux de la
télécommande réglée en mode VCR1.

VCR2:

Pour capter les signaux de la
télécommande réglée en mode VCR2.

OFF:

Pour bloquer la réception des signaux
en provenance de la télécommande.

BEEP 

(Bip)

Activer cette fonction (ON) pour faire
entendre un signal sonore lors du
lancement ou de l’arrêt de
l’enregistrement ou en cas de
condition anormale. Pour ne pas faire
entendre de signal, désactiver la
fonction (OFF).
Un bip est émis:
• Une fois au moment du lancement

d’un enregistrement.

• Deux fois à l’arrêt d’un enregistrement.
• À répétition en cas d’anomalie.

(Pages 98 et 99.)

DISPLAY 

(Paramétrage de l’affichage)

(Page 106.)
Permet de sélectionner le mode
d’affichage du compteur sur l’écran à
cristaux liquides ou sur le viseur.

C.RESET 

(Remise à zéro) (Page 106.)

Lorsque cette fonction est activée
(ON), le compteur est
automatiquement remis à zéro.

DATE/TIME

 (Horodateur) (Page 105.)

Pour l’affichage de la date et de
l’heure.

CLOCK-SET

 (Réglage de l’horloge)

(Page 16.)
Lorsque cette fonction est activée
(ON), il est possible de régler
l’horodateur directement à l’écran.

KEY LED

 (Diodes des touches)

Lorsque cette fonction est activée
(ON), les touches de fonctionnement
sur le dessus du caméscope
s’éclairent en bleu.

LCD/EVF SETTING

 (Réglage de

l’écran/viseur) (Page 19.)
Lorsque cette fonction est activée
(ON), le menu des réglages de
brillance et couleur de l’écran et
de la brillance du viseur est affiché.

TITLE

 (Titrage des photos) (Page 27.)

Le titre de la photo est enregistré.

MODE

 (Mode) (Page 27.)

Pour sélectionner l’un des 2 modes
de titrage des photos.

15

16

17

18

19

DV702-KF.p100-102.p65

02/06/06, 14:09

102

Summary of Contents for PV-DV702-K

Page 1: ...mcorder Operating Instructions Mini R Before attempting to connect operate or adjust this product please read these instructions thoroughly For assistance please call 1 800 561 5505 or visit us at www panasonic ca DV702 K p 1 4 p65 02 06 06 13 54 1 ...

Page 2: ...tenance of this unit has been included Therefore it should be read carefully in order to avoid any problems CAUTION RISK OF ELECTRIC SHOCK DO NOT OPEN CAUTION TO REDUCE THE RISK OF ELECTRIC SHOCK DO NOT REMOVE COVER OR BACK NO USER SERVICEABLE PARTS INSIDE REFER SERVICING TO QUALIFIED SERVICE PERSONNEL The above markings are located on the appliance bottom cover Your Mini Palmcorder is designed to...

Page 3: ...be retained for future reference 3 Heed Warnings All warnings on the unit and in the operating instructions should be adhered to 4 Follow Instructions All operating and maintenance instructions should be followed 5 Cleaning Unplug this video unit from the wall outlet before cleaning Do not use liquid or aerosol cleaners Use a dry cloth for cleaning 6 Attachments Do not use attachments not recommen...

Page 4: ... or other hazards 21 Safety Check Upon completion of any service or repairs to this video unit ask the service technician to perform safety checks to determine that the video unit is in safe operating order USE LOCATION TO AVOID SHOCK HAZARD Your Palmcorder and power supply should not be exposed to rain or moisture Do not connect the power supply or operate your Palmcorder if it gets wet Your Palm...

Page 5: ...en Displays OSD 98 Warranty 100 MENU OSD 101 Electronic Viewfinder LCD Monitor Indications 105 Index of Controls 109 Index Back Cover Special Features Playback Your Recordings 32 Special Effect Features 34 Digital Features 40 Editing Features 44 Card Features 48 PC Connection TransferringYour Images Windows 55 PHOTOVU MPEG4 Movie Messenger System 59 TransferringYour Images i LINK Windows 73 PHOTOV...

Page 6: ...dows 95 98SE Me 2000 XP and Macintosh LSFT0492 Microsoft Windows and Windows Media are registered trademarks of Microsoft in the United States and other countries Macintosh iMac iBook PowerBook Power Macintosh Power Mac and Mac are trademarks or registered trademarks of Apple Computer Inc Intel Pentium is a registered trademark i LINK is a trademark PHOTOVU MPEG4 Movie Messenger System is a regist...

Page 7: ... tab up window side facing out 4 Press PUSH CLOSE to close the Cassette Compartment Cover Note When inserting the cassette make sure it is facing the right direction and then push it in completely EasyCassetteEject Insertion If the Palmcorder is connected to a power source the cassette can be inserted and ejected without turning the Palmcorder on To remove the cassette Slide TAPE EJECT to open the...

Page 8: ...from the front clasp and thread the Strap through the loop in the Lens Cap Cord Reattach the Hand Strap Lens Cap Attaching the Shoulder Strap 2 1 3 Attaching the Lens Cap Strap Thread the Lens Cap Strap through the Strap Attachment Ring as shown Hand Strap 1 Undo the two strap ends from their buckles 2 Thread the strap ends through the Strap Attachment Rings 3 Reinsert the strap ends through their...

Page 9: ... 17 36 Stop Set pp 16 17 32 47 Slow Frame Advance Forward pp 35 36 Slow Frame Advance Backward pp 35 36 Index Search Forward pp 36 37 Index Search Backward pp 36 37 Speaker Volume p 33 1 Hold down LIGHT for more than 0 7 seconds to turn ON or OFF will appear on the screen To brighten the natural colours in a scene Using the Built in Light Caution This light becomes hot during operation Make sure n...

Page 10: ...he desired Palmcorder For VCR 2 Press these buttons at the same time For VCR 1 Press these buttons at the same time Remote Controlling Two Palmcorders Note 1 Set POWER to VCR or CAMERA The POWER Lamp lights red Be sure POWER is fully turned to VCR or CAMERA position 2 Press MENU to display the VCR or CAMERA mode menu screen 3 Rotate JOG KEY to select SET UP in the CAMERA mode menu screen or PLAY M...

Page 11: ...e Compartment Cover Before you begin Charge the Battery p 14 2Set POWER to VCR or CAMERA 1 2 These Palmcorders are equipped with the Easy Cassette Eject System so it is easy to insert or remove tapes even when the Palmcorder is on a tripod p 7 4 Insert a cassette record tab up window side facing out Make sure the record tab is closed p 7 5 Press PUSH CLOSE mark to close the Cassette Compartment Co...

Page 12: ...D OPEN to unlock the LCD monitor Swing it fully open and adjust the angle To Watch Playback in the LCD Liquid Crystal Display When the LCD monitor is fully open the Viewfinder automatically turns OFF 2 Press LCD OPEN to unlock the LCD monitor Swing it fully open and adjust the angle 3 Press REW to rewind the tape 4Press PLAY to start playback 5 Press STOP to stop playback Before you begin Charge t...

Page 13: ...ory Card optional p 93 Capacity 8 MB or higher 8 MB 16 MB 16 MB or higher SD Memory Card write protection switch A write protection switch is located on the SD Memory Card Sliding the switch to the LOCK position prevents writing on or formatting the card Write protection Switch To remove the Memory Card Press here to eject the card About the M CARD Lock Switch Note By sliding M CARD Lock to LOCK y...

Page 14: ... the CHARGE Lamp Charge the Battery within an ambient temperature range of 10 C 50 F and 30 C 86 F If charging is done in extreme low or high temperatures Battery charge time increases CHARGE Lamp flashes when The Battery is being charged but charging is taking longer than normal Charging is not possible Remove the Battery once wait a short time then re attach it for charging Note 1 Insert the Bat...

Page 15: ...h temperatures Batterychargetimeincreases Safety precautions Do not place the Battery near or dispose of in fire Do not directly connect short circuit the positive and negative terminals Never attempt to disassemble or reassemble the Battery To avoid damage to the Battery Do not drop or jar the Battery Use the Battery with specified models only If the Battery is used in extremely high temperatures...

Page 16: ...ns Press JOG KEY repeatedly to move back to an item and correct A built in Battery maintains clock operation If the Palmcorder is not connected to a power source for a few months the built in battery may discharge and CLOCK BATTERY indication appears p 98 EXAMPLE When DATE TIME setting is completed press MENU three times to start the clock and exit 2002 YEAR Push PUSH Rotate PUSH JAN FEB MONTH MON...

Page 17: ...select PROG AE or CINEMA 3 REC MODE CAMERA REC MODE menu is displayed To select REC SPEED AUDIO REC INDEX SHUTTER SELF REC WIND CUT or ZOOM MIC 4 SET UP CAMERA SET UP menu is displayed To select REMOTE or BEEP 5 DISPLAY SETTING DISPLAY SETTING menu is displayed To select DISPLAY C RESET DATE TIME CLOCK SET or KEY LED 6 LCD EVF SETTING LCD EVF SETTING menu is displayed To select LCD BRIGHTNESS LCD ...

Page 18: ...lide TAPE EJECT EVF To conserve power After 5 minutes the Record Pause mode will automatically change to Standby mode To resume recording set POWER to OFF and then ON again When the Palmcorder is aimed at excessively bright objects or bright lights a vertical bar may appear in the picture This is a normal characteristic of the CCD pick up device Try to avoid this whenever possible SimpleRecording ...

Page 19: ...r COLOUR below 3 Start recording Using the LCD monitor will reduce battery operating time Close the LCD monitor completely when not in use Using the LCD Monitor 1LCD OPEN Note 180 90 90 Camera Recording To adjust the LCD EVF BRIGHTNESS or COLOUR 1 Press MENU to display the main menu screen 2 Rotate JOG KEY to select LCD EVF SETTING from the main menu screen Menu OSD pp 102 104 3 Press JOG KEY to d...

Page 20: ...e to make an interesting slide show etc p 44 1Set POWER to CAMERA 2Press PHOTOSHOT in Record Pause mode PHOTO will appear in the EVF or the LCD monitor If SHUTTER on the menu screen is set to ON a sound effect similar to the shutter of a film camera will be heard when PHOTOSHOT is pressed When PHOTOSHOT is pressed the playback image takes approx 7 seconds to process After that the Camera mode scre...

Page 21: ...eFunction 1 Set POWER to CAMERA 2 Press MENU to display the CAMERA mode menu screen 3 Rotate JOG KEY to select REC MODE then press JOG KEY to display the CAMERA REC MODE menu screen 4 Rotate JOG KEY to select ZOOM MIC in the CAMERA REC MODE menu Menu OSD p 101 5 Press JOG KEY to select ON Press MENU twice to exit Z MIC will appear on the screen The Zoom Microphone Function may not work effectively...

Page 22: ... 1While in RECORD mode press STILL and hold for 2 seconds to capture a still picture The captured still picture will be recorded together with sound 2Press STILL once again to release the still picture The camera will resume recording real time pictures Rotate the LCD monitor 180 degrees so it faces the same direction as the lens to record yourself 1 Set POWER to CAMERA 2 Press MENU to display the...

Page 23: ...ide screen TV equipped with S Video picture terminal and Zoom Wide features Backlight 2 3BACK LIGHT The Indicator will not appear in the EVF or LCD monitor when OFF is selected in the DISPLAY menu Note Use when recording a subject that is darker than the surrounding scene in a shadowed area or when the light source is behind your subject 3 4 JOG KEY 5REC PAUSE 1POWER EVF LCD 2MENU 1 Set POWER to C...

Page 24: ...t the SPORTS mode or PORTRAIT mode together with the MagicPix mode in the Digital function camera menu Program AE 3MENU The Auto Exposure feature can be used to make quality recordings in a variety of scene situations Note 1 Set POWER to CAMERA 2 Hold down AUTO MANUAL for more than 0 7 seconds so that the MNL indication appears in the EVF or the LCD monitor 3 Press MENU to display the menu screen ...

Page 25: ...USE Fade In Starting the first scene with fade in is very effective 1 In REC PAUSE mode hold down FADE until the picture fades out 2 Press REC PAUSE to start recording 3 Release FADE and the picture will gradually fade in Fade Out Use to create a soft ending or together with fade in for a soft transition from one scene to the next ADuring recording hold down FADE until the picture fades out BPress...

Page 26: ...en 4 Press JOG KEY to select PinP Press MENU twice to exit this menu PinP will appear in the EVF or the LCD monitor 5 Aim at the scene you wish to place as PinP then press CAMERA STILL to freeze the image 6 Press CAMERA STILL again to place the frozen image as PinP 7 Press REC PAUSE to record a scene with PinP image Press PHOTOSHOT to record a scene with PinP image in PhotoShot mode Press CAMERA S...

Page 27: ...rmed Digital Function turns off 5 Press REC PAUSE to start recording with Photo Title WIPE or MIX screen is displayed at the beginning of the recording Then the Photo Title setting will be cleared automatically You can use PhotoShot images stored on a Memory Card to record a WIPE or MIX effect on a cassette When Photo Title is set to ON the selected image and Title will appear before each recordin...

Page 28: ...hting conditions When the source illumination is a halogen lamp When shooting outdoors on a sunny day When shooting fluorescent light The White Balance setting that was previously set manually For manual White Balance adjustment A Rotate JOG KEY to select B Point the Palmcorder at a white object full screen and hold JOG KEY down until indication stops flashing If indication flashes when the Palmco...

Page 29: ...in the EVF or the LCD monitor 4Press and hold POWER ZOOM T side Telephoto until the lens is at maximum zoom in 5Turn M FOCUS RING until the picture is in focus It may be necessary to back away from the subject to focus the image properly 6Press POWER ZOOM to W or T as desired The subject will remain in focus over the entire zooming range It may be necessary to back away from the subject to focus t...

Page 30: ...tting For proper colour reproduction it is recommended that you use this feature outdoors For indoor High Speed Shutter recording additional halogen or tungsten light should be provided Fluorescent light will degrade the picture quality This feature requires ample light More light is required for the fastest shutter speeds The Auto Focus system may not operate properly in insufficient light when u...

Page 31: ...ds to cancel the setting The value to which dB is attached indicates a gain value If this value is too large the quality of the image deteriorates Depending on ZOOM magnification the iris value may not be displayed correctly If you are using Program AE mode you cannot adjust the iris If the iris is adjusted manually the above modes will be cancelled Note 3 4 JOG KEY 1POWER Iris Setting WIND CUT Yo...

Page 32: ... monitor to play back your recording Note PHONE Jack Before you begin Connect the Palmcorder to a power source pp 14 15 Insert a recorded cassette When a tape recorded in LP mode on another digital video camera is played back on this unit the picture may appear mosaic Using the LCD monitor reduces battery operating time You can place the Palmcorder on a table etc for viewing Rotate the LCD Monitor...

Page 33: ...ct PLAY MODE then press JOG KEY to display the VCR PLAY MODE menu screen 4 Rotate JOG KEY to select B SEARCH in the VCR PLAY MODE menu Menu OSD p 103 5 Press JOG KEY to select ON BLANK will appear on the screen 3 4 5 JOG KEY 1POWER Blank Search You can go directly to a blank portion of tape and start recording exactly where you left off RepeatPlayback Adjusting the Volume 2MENU 1 Rotate VOLUME to ...

Page 34: ...or an instant or mosaic This is normal during this mode Note Note 1Press PAUSE during playback 2Press PLAY or PAUSE to release To protect the tape and video heads your Palmcorder s operating modes will revert as follows STILL STOP after 3 minutes AHold down FAST FORWARD SEARCH during fast forward BHold down REWIND SEARCH during rewind The picture will appear for as long as the button is held down ...

Page 35: ...3 Rotate JOG KEY to adjust the playback speed Rotate JOG KEY clockwise for forward playback Rotate JOG KEY counterclockwise for reverse playback To return to normal playback Press PLAY Playback will continue at normal speed The Variable Speed Search function offers a choice of six playback speeds 1 5X LP mode 1 3X 1X 2X 5X 10X 20X both in forward and reverse directions The review playback at the 1...

Page 36: ...cene Index Search mode the shutter sound effect may not be able to be heard even when SHUTTER is set to ON Photo Index Search may fail to detect a recorded PhotoShot image if the image is 3 seconds or less 1 Press MENU to display the VCR mode menu screen 2 Rotate JOG KEY to select PLAY MODE and press JOG KEY to display the VCR PLAY MODE menu screen 3 Rotate JOG KEY to select INDEX and press JOG KE...

Page 37: ...y Response time from pressing the button and the change in the scene number is quite slow Do not press INDEX SEARCH rapidly and continuously During Reverse Index Search mode playback will not begin when a tape rewinds all the way to the beginning Search for a particular scene by using the electronic index marks placed at the beginning of each recording 1 Press MENU to display the VCR mode menu scr...

Page 38: ...ss PLAY to start playback Press STOP to stop playback Strobe Speeds Strobe Speeds FAST NORM SLOW 9 screen capture time Every 0 3 seconds Every 0 6 seconds Every 1 0 seconds A Multi Image Playback screen cannot be output from the DV terminal or Digital Still Image terminal A Multi screen will have slightly lower image quality Note In Strobe Multi Mode you can select the rate at which a succession o...

Page 39: ...V ON and set it to LINE INPUT or S VIDEO Check your TV operating instructions for further information 3Start playback or begin a recording Make sure the Palmcorder and TV are turned off while connecting Please connect the A V Cable securely A V OUT Remote Control Only You can display the various EVF and LCD indications on your TV by pressing DISPLAY ON TV on the remote control Press again to remov...

Page 40: ...ss JOG KEY to select D ZOOM1 or D ZOOM2 D ZOOM1 from 10X to 25X D ZOOM2 from 10X to 700X OFF Turn off D ZOOM Press MENU twice to exit 5 Press REC PAUSE to start recording and press POWER ZOOM to zoom in or zoom out The magnification level is always displayed in the EVF or the LCD monitor when DISPLAY is set to ON Menu OSD pp 102 104 6 Repeat steps 2 4 to select OFF to cancel this feature Other Dig...

Page 41: ...ing of video or still images onto the Mini DV tape in low lighting pp 43 101 MagicPixImages 1 Set POWER to CAMERA 2 Press MENU to display the menu screen 3 Rotate JOG KEY to select D FUNCTION and then press JOG KEY to display the CAMERA FUNCTION menu screen 4 Rotate JOG KEY to select D FUNCTION and then press JOG KEY repeatedly to select MAGICPIX Press MENU twice to exit 5 To cancel the Digital Fu...

Page 42: ...used in both the Recording and Playback VCR modes CAMERA mode VCR mode Other Digital Functions are turned off automatically when the EIS and Digital Zoom are selected A Set POWER to VCR B Press PLAY to start playback C Press EIS to stabilize the picture D Press EIS again to cancel Be sure that D E I S is turned off when not needed Note When using D E I S in VCR mode the image size is slightly larg...

Page 43: ...horizontally MAGICPIX Not available during playback Colour recording of video or still images onto the Mini DV Tape in low lighting p 41 Only Manual Focus is available WIPE Successive scenes are separated in a way which simulates the drawing of a curtain MIX The current scene is mixed in with the following scene during scene changes PinP PinP Still image is displayed on the Main Picture Digital Ef...

Page 44: ...tion appears in the EVF or the LCD monitor Go to step 4 2PLAY 2PAUSE 3A DUB Before you begin Connect the external Microphone if used Turn on the Palmcorder Insert a pre recorded tape to be dubbed Built in Microphone The AUDIO REC setting in CAMERA MENU mode should be as follows Select 12 bit if you do not want the original sound to be completely replaced during an audio dub If you dub over a tape ...

Page 45: ...MIX in the menu for playback the sound will be stereo regardless of the AUDIO OUT setting If you recorded in LP mode you cannot use the A DUB feature Note You can set an automatic Dubbing stop point DRESET AMENU APress MENU to display the VCR menu screen BRotate JOG KEY to select DISPLAY SETTING and then press JOG KEY to display the DISPLAY SETTING menu CRotate JOG KEY to select DISPLAY and then p...

Page 46: ... tape with record tab in place into the target VCR Recorder 2Press PLAY on the Palmcorder When the tape reaches the point from which you want to start dubbing press PAUSE 3Place the VCR into REC PAUSE mode See VCR manual 4Simultaneously press PAUSE on both units to begin copying 5Press STOP on both units when copying is completed S Video Cable not supplied Audio In Note Turn the TV ON and select i...

Page 47: ... tape at the starting point of the dub 5 Simultaneously press PAUSE on both units to begin dubbing 6 Press STOP on the recording unit and then press STOP on the playing unit to end dubbing When two Palmcorders are used for dubbing it is recommended that the Remote Control VCR1 or VCR2 setting be used to avoid improper operation CAUTION Unauthorized exchanging and or copying of copyrighted recordin...

Page 48: ...erface Cable i LINK is connected Warning M CARD Lock 2MENU Image Resolution and Capacity supplied 8MB Memory Card REC Mode SUPER FINE FINE NORMAL Image Resolution 1600 x 1200 1280 x 960 640 x 480 Capacity Approx 14 images Approx 20 images Approx 70 images The number of images given for each mode applies when all images are taken in same mode You can change recording modes at any time before captur...

Page 49: ... for the Memory Card While Memory Card data is being read do not remove it turn off the power or subject unit to vibrations and or shocks Do not leave the Memory Card in a place with high temperature a place exposed to direct sunlight or a place where electromagnetic waves and static electricity can be generated Electromagnetic waves static electricity malfunction of the Digital Video Palmcorder o...

Page 50: ... to the Multi Playback screen Note If the file number is changed the Palmcorder cannot read the file data This product is compliant with DCF Design rule for Camera File System Images saved on the Memory Card using other Digital Still Cameras that are compliant with DCF can be viewed on this product While PLEASE WAIT is displayed DO NOT turn off the Palmcorder or unplug the AC Adaptor supplied beca...

Page 51: ...1 Slide the M CARD Lock Switch to unlock then set POWER to M CARD PLAY PUSH PLAY KEY is displayed for 10 seconds 2 Press M PLAY to display the Multi playback screen PLEASE WAIT appears on screen 3 Press M DEL to display the DELETE menu then rotate and press JOG KEY to select PAGE DELETE PAGE menu is displayed 4 Rotate and press JOG KEY to select and set the image to be deleted The selected image i...

Page 52: ...P to return to the Card PhotoShot REC Mode screen p 48 You can delete all images from the Memory Card easily with this operation Warning Once deleted images cannot be restored 2M DEL M STOP While deleting images DO NOT turn off the Digital Video Camcorder or unplug the AC Adaptor supplied because this may cause irreversible damage to the Memory Card resulting in reduced image storage capacity Befo...

Page 53: ... complete when NO PICTURE is displayed Press M STOP to return to the Card PhotoShot REC Mode screen p 48 You can easily format your Memory Card using this operation Warning Formatting permanently removes all image data While deleting image DO NOT turn off the Palmcorder or unplug the AC Adaptor supplied because this may cause irreversible damage to the Memory Card resulting in reduced image storag...

Page 54: ...select ON DPOF SETTING menu screen is displayed on the screen 5Rotate and press JOG KEY to select the picture The selected image is underlined in green The cursor moves to D 000 6Rotate and press JOG KEY to set the number of prints The mark is displayed The mark indicates pictures for which 1 or more prints have been set When printing one each of all the pictures select ALL1 if not all the picture...

Page 55: ... and ArcSoft Software Palmcorder USB Device Driver Web Camera SD Drive ArcSoft Software Install ArcSoft Software 2002 PhotoImpression 3 0 Easy to use photo editing program to edit enhance retouch or add special effects to any image Also offers creative solutions for making greeting cards and calendars Panorama Maker 3 0 Easy to use photo stitching program seamlessly combines multiple photos into a...

Page 56: ...t to install Please install the Palmcorder USB Device Driver first and follow the instructions listed under Caution 4 Follow the instructions as they appear on your PC screen Palmcorder USB Device Driver For Movie Messenger For Web Camera For SD Drive Click PHOTOVU MPEG4 Movie Messenger System Click Palmcorder File Converter Click ArcSoft Software Click If a window does not appear automatically cl...

Page 57: ...ttons the image may not be captured properly Use Palmcorder Operation Buttons displayed on the PC screen Transferring Your Images Windows Verifying the driver Windows 98SE Me 2000 XP Note Verify the driver while Palmcorder is connected to the computer Palmcorder USB Device Driver Web Camera CAMERA Mode This screen is an example Windows 2000 1 Click Start Settings and Control Panel 2 Double click o...

Page 58: ...8SE or Me click Add Remove This screen is an example Windows 2000 Palmcorder USB Device Driver SD Drive Palmcorder File Converter M CARD Mode This screen is an example Windows 2000 1 Click Start Settings and Control Panel 2 Double click on System verify USB Storage Device Controller is displayed in Universal Serial Bus controllers of Device Manager If you are using Windows 98SE MATSUSHITA USB Stor...

Page 59: ...are Wizard screen of Windows is displayed The following message is displayed However testing by the manufacturer has confirmed functionality of this Palmcorder with Windows XP 2000 Click Continue Anyway and proceed Follow the instructions as they appear on your PC screen USB Cable supplied Connection forPHOTOVU MPEG4MovieMessengerSystem For Windows XP users Note For extended use the AC Adaptor sho...

Page 60: ...e For extended use the AC Adaptor should be used as a power source Note For extended use the AC Adaptor should be used as a power source Some OS such as Windows 98SE or Me may not show the icon indication that you may safely disconnect in task tray OS may be set not to show Close PHOTOVU MPEG4 Movie Messenger System then disconnect the USB Cable To disconnect USB Cable safely Windows 2000 XP If US...

Page 61: ...PHOTOVU MPEG4 MovieMessenger System 1 00 is opened Refer to Help on program for information about application operations and Error messages While PHOTOVU MPEG4 Movie Messenger System is running do not perform the following operations The PC system may become unstable Change the screen area or colour pallet in the Display Properties window Turn the Palmcorder power switch ON or OFF while connecting...

Page 62: ...d Still images saved on the DV Tape directly to your PC To capture Motion images 3Click on Movie Capture at the start point you wish to capture a Motion image Now capturing a movie is displayed 4Click STOP to end capture Now Searching is displayed The DV Tape is rewound to the point at which the capture was started The Motion image is then transferred to the PC Data transfer is now in progress is ...

Page 63: ...ned please refer to the software Help menu 4Picture 4Movie To view Motion images 4 Click on Movie The first frame of each Motion image will be displayed as a list 5 Double click on the desired Motion image to display the playback screen Click to start Motion image playback You can also playback a motion image by simply pointing at the thumbnail with your mouse Duration Rec Time and size are displa...

Page 64: ...ger System VideoGiftScreen You can use these features using the VideoGift Screen 1 2 3 4 5 6 7 8 9 10 11 12 13 1 2 3 4 5 6 7 8 9 10 11 12 13 14 15 16 17 17 14 15 16 Slider Drag the pointer of the playback start position Movie Mode You can display motion images Open Movie You can open folders containing video files AVI WMV Open Audio You can open folders containing audio files WAV Valid only when t...

Page 65: ...All 5Movie Mode 6Open Movie 6Add Image 5Still Mode 1 Repeat steps 1 4 on page 61 to run the PHOTOVU MPEG4 Movie Messenger System 2 Click VideoGift to display the VideoGift screen The image captured last is displayed in the VideoGift screen If Unable To Locate DLL warning indication is displayed please see page 90 3 Click View Manager to display the View Manager screen 4 Click on Movie to display a...

Page 66: ...ift to display the VideoGift screen The image captured last is displayed in the VideoGift screen If Unable To Locate DLL warning indication is displayed please see page 90 3 Click Settings to display the Compression Settings Mailer Settings screen 4 Click to set the mail software The mail software installed in the computer will be displayed You can select Outlook Express or other software If selec...

Page 67: ... as they appear on your PC screen Before you begin Insert a recorded tape p 11 Make Palmcorder PC connections pp 59 60 Turn your PC on p 59 Set Palmcorder POWER to VCR Attaching captured Motion and Still images to your e mail You can easily transfer and compress your Motion images as attachments to your e mail 1Repeat steps 1 4 on page 61 to run the PHOTOVU MPEG4 Movie Messenger System 2Click Vide...

Page 68: ...hen send the e mail message or click Uploader to upload to the PictureStage Home Page pp 67 71 2 1 2 6Preview 7E Mail 1 7Uploader Slide Show Edit A collection of still images can be edited as slides 1 Repeat steps 1 4 on page 61 to run the PHOTOVU MPEG4 Movie Messenger System 2 Click VideoGift to display the VideoGift screen The image captured last is displayed in the VideoGift screen If Unable To...

Page 69: ...cted Motion or Still image is displayed on the VideoGift screen 4 Press Settings to display the Compression Settings screen 5 Set the Image Size and Quality See Size of Compressed File to the left 6 Click Save to save the compressed image to your PC Click Preview to view the compressed Motion Image Click E mail to send the e mail message Click Uploader to upload to the PictureStage Home Page 6Prev...

Page 70: ...l Mode on the VideoGift screen 6 Select the Motion image from the View Manager screen then drag and drop the image to the VideoGift screen The Select Frame screen is displayed 7 Drag the pointer to select a desired frame 8 Click OK 9 Click Save to save the compressed image to your PC Click Preview to view the compressed Motion Image Click E mail to send the e mail message Click Uploader to upload ...

Page 71: ...on or Still image is displayed on the VideoGift screen If editing the image see Sending a Portion of a Motion Image Setting the Size and Quality of Motion and Still Image Slide Show Edit on pages 68 and 69 4 Click on Uploader on the VideoGift screen The Converting animation screen is displayed When you click the Uploader PictureStage Uploader opens and a temp folder containing WMV compressed files...

Page 72: ...play the View Manager screen and then click for Internet on the View Manager screen to display files that can be uploaded You can select the image from the View Manager screen then drag and drop the image to the PictureStage Image Video Uploader screen You can also drag and drop files from Windows Explorer You can also drag and drop files from temp folder 8Click Upload to PictureStage com on the P...

Page 73: ...are companies allows you to capture and edit video clips using the DV Interface i LINK PC must be equipped with an i LINK terminal During Palmcorder playback do not disconnect the DV Interface Cable i LINK or turn the Palmcorder off as this may cause a PC hang up error For PHOTOVU MPEG4 Movie Messenger System do not use 2 i LINK terminals on your PC at the same time PHOTOVU MPEG4 Movie Messenger S...

Page 74: ...e Motion images 3 Click on Normal 4 Click on Movie Capture at the point you wish to capture a Motion image Click on STOP to end capture The image is transferred to the PC in real time The maximum capture time is approx 3 minutes When capturing data containing changes between 12 bit and 16 bit and or between SP and LP mode a separate file will be made for each mode Please refer to pages 63 72 for o...

Page 75: ...d frames for the video segment you want to capture and save 4Still Capture 4Movie Capture DV 3 3Detail Note 6STOP To capture Still images 3 Click on Normal 4 Click on Still Capture at the point you wish to capture an image Repeat step 4 to continue capturing images Captured Still images are saved to the PC and you can playback the saved images on the View Manager P 63 5 7 5Select PHOTOVU MPEG4 Mov...

Page 76: ...wever testing by the manufacturer has confirmed functionality of this Palmcorder with Windows XP 2000 Click Continue Anyway and proceed Follow the instructions as they appear on your PC screen USB Cable supplied For Windows XP users Connection for Palmcorder USB Device Driver SD Drive Note When connecting for the first time using Windows XP the OS installation CD may be required Follow the instruc...

Page 77: ...urce Palmcorder USB Device Driver SD Drive Note For extended use the AC Adaptor should be used as a power source Some OS such as Windows 98SE may not show the icon indication that you may safely disconnect in task tray OS may be set not to show After the ACCESS display disappears from the EVF or LCD monitor you may disconnect the USB Cable To disconnect USB Cable safely Windows Me 2000 XP If USB C...

Page 78: ...Click Removable Disk You can view images stored on the Memory Card and also save them to your hard disk 1Connect the Palmcorder to your PC using the USB Cable supplied pp 76 77 The Removable Disk screen is displayed PLEASE WAIT CONNECT WITH PC and STORAGE appears in the EVF or the LCD monitor 2Click on Open folder to view files using Windows Explorer and then OK You can view images stored on the M...

Page 79: ...t format for Panasonic Digital Palmcorder To resize the image The size of images captured with the Palmcorder can be increased or decreased to make them suitable for Internet and e mail use To convert format for Panasonic Digital Palmcorder Images can be converted to JPEG format and to file names that can be played back on the Palmcorder When selecting To resize the image 5 Select the size for the...

Page 80: ...s displayed 7Use Help for detailed instructions When selecting To convert format for Panasonic Digital Palmcorder 5Select the file to be converted 6Select the drive to which the converted file is to be saved The Conversion results screen is displayed 7Use Help for detailed instructions DV702 K p 79 80 p65 02 06 06 13 58 80 ...

Page 81: ... with exclusive connection software Windows Messenger is running Select the person to call invite Start Connect the Palmcorder to the PC Connect to the provider with dial up network Connect to provider with exclusive connection software MSN Messenger Service is running Select the person to call invite NetMeeting runs Start ForWindows98SE Me 2000 users For Windows XP users To use the Web Camera fea...

Page 82: ...ontinue Anyway and proceed Follow the instructions as they appear on your PC screen CONNECT WITH PC and WEB CAM are displayed in the EVF and LCD monitor A gray box is also displayed The image within the box can be used with communication Position the Palmcorder so that you are in the picture To confirm if the connection between the Palmcorder and PC is correct please refer to Audio Tuning Wizard o...

Page 83: ...o your PC Windows using the USB Cable supplied CONNECT WITH PC and WEB CAM are displayed in the EVF and LCD monitor A gray box is also displayed The image within the box can be used with communication Position the Palmcorder so that you are in the picture To confirm if the connection between the Palmcorder and PC is correct please refer to Audio Tuning Wizard on page 85 When connecting for the fir...

Page 84: ...r Windows XP only When Windows Messenger is newly installed or when running for the first time the following settings become necessary For more details please read the corresponding Help file Note Once settings are performed they are not required from the second time the software is run Before you begin Be sure you have Internet connection Referring to pages 82 83 connect the Palmcorder and PC Con...

Page 85: ... Tools menu You can set the volume for playback or mic volume etc Also confirm that the Palmcorder and PC are connected correctly 7 Select File Add a Contact to register the person you wish to access in Windows Messenger Please enter the same e mail address that the other person has registered with Windows Messenger After registering the e mail address of the person you wish to access click on Sen...

Page 86: ...the other person is displayed The invited person side A message asking if the person accepts or declines is displayed Click Accept on the screen To ignore the invitation click Decline 10At this point you may proceed with a voice video conversation For other information about Windows Messenger please refer to Help 11When access is finished close Windows Messenger then set Palmcorder POWER to OFF Fi...

Page 87: ... you are using MSN Messenger Service 4 5 or later there is no need to upgrade For MSN Messenger Service and Windows NetMeeting Windows98SE Me 2000 When MSN Messenger Service is newly installed or when run the first time the following settings become necessary For more details please read the respective Help file Note Once settings are performed they are not required from the second time the softwa...

Page 88: ...ou wish to access in MSN Messenger Service Please enter the same e mail address that the other person has registered with MSN Messenger Service After registering the e mail address of the person you wish to access click on Send E Mail and have the person register your e mail address as well You cannot call a person who is not signed on to MSN Messenger Service 8 The person calling inviting side Do...

Page 89: ... finally Image Device for confirmation 11 The invited person side A message asking if the person accepts or declines is displayed Click Accept on the screen To ignore the invitation click Decline 12 The person calling inviting side Incoming Call screen is displayed Click on Accept 13 The invited person side The person calling inviting side The real time live picture displayed in the video camera i...

Page 90: ...left If so please perform the following instructions Download and install Media Player 7 1 or later go to http www microsoft com windows mediaplayer current as of Dec 28 2001 Windows Media com Download is opened Click Download Now on the screen The File Download screen is displayed Then follow the instructions on the screen DV702 K p 87 90 p65 02 06 06 13 58 90 ...

Page 91: ...r other pointing device 210 MB minimum available hard disk space for ArcSoft Software High colour 16 bit or more for ArcSoft Software Even if system requirements are met there is no guarantee that the included software will work on all personal computers Connection 3 2 USB Terminal USB Terminal 1 Turn on your PC 2 Set the Palmcorder POWER to M CARD 3 Connect the Palmcorder to your Macintosh using ...

Page 92: ...the Palmcorder POWER to M CARD 2 Connect the Palmcorder to your Macintosh using the USB Cable supplied p 91 PLEASE WAIT CONNECT WITH PC and STORAGE is displayed on the LCD monitor 3 Double click the Untitled icon You can view images stored on the Memory Card and also save them to your hard disk 4 Follow the instructions as they appear on your Macintosh section screen Note Please do not change file...

Page 93: ...or with AC Cable and DC Cable 800mAH 1 h 30 min Battery Pack 1600mAH 3 h Battery Pack 2800mAH 5 h Battery Pack 5300mAH 9 h Battery Pack DV Interface Cable i LINK 4 pin to 4 pin IR Remote Control 16 MB SD Memory Card Also available in higher capacities SD USB Reader Writer compatible with MultiMediaCard SD PCMCIA Adaptor compatible with MultiMediaCard Car Battery Cord Figure DV702 K P 93 94 p65 02 ...

Page 94: ... KELVIN COLOUR TEMPERATURE Fair weather blue sky Slightly cloudy sky Cloudy or rainy sky Sunlight in clear weather at midday Average sunlight in clearweather Sunlight 2 hours after sunrise and before sunset Sunlight 40 min after sunrise and before sunset Sunlight 30 min after sunrise and before sunset Sunlight 20 min after sunrise and before sunset Amber Filter Range 10 000 8 000 7 000 6 500 6 000...

Page 95: ... mm 0 21 inch Liquid Crystal Electronic Viewfinder LCD Monitor 88 9 mm 3 5 inch Liquid Crystal Display Minimum Illumination Required 10 lx F1 1 8 0 5 footcandles 0 lx MAGICVU 0LUX ON Memory Still image MultiMediaCard SD Memory Card 640 x 480 pixels NORMAL mode 1280 x 960 pixels FINE mode 1600 x 1200 pixels SUPER FINE mode Image Storage supplied Approx 70 images NORMAL mode 8 MB Memory Card Approx ...

Page 96: ...Excessive use of the head cleaning cassette could shorten video head life Use this cassette only when a head clogging symptoms occur Refer servicing to qualified service personnel CloggedVideoHead When you go from function to function PLAY FF REW etc please note that the unit will not accept a new function operation until the previous operation is complete The POWER Button and all function buttons...

Page 97: ...r CAMERA pp 18 32 Check the Dew Indicator p 98 Make sure the Battery is fully charged p 14 Make sure all necessary cables are connected correctly and firmly p 15 Make sure the Lens Cap is removed p 18 Make sure the Power Source is connected pp 14 15 Insert the cassette record tab up window side facing out p 11 Make sure the Power source is connected pp 14 15 Check the Dew Indicator p 98 Make sure ...

Page 98: ...r for 5 seconds When the Palmcorder and remote are not set to the same mode VCR1 or VCR2 CHECK REMOTE MODE REMOTE appears for 5 seconds It also appears when the Palmcorder is first turned on Condition When an AUDIO DUB is attempted on a pre recorded LP tape CANNOT REC LP MODE will appear for 5 seconds If excessive moisture condenses in the unit WARNING will flash DEW DETECTED will appear and the P...

Page 99: ...ady full Memory Card or when setting is DPOF NO SPACE LEFT appears If the Palmcorder is in M CARD mode or Photo Title CAMERA mode and the DV Interface Cable i LINK is connected DISCONNECT DV CABLE appears In this case remove the DV Interface Cable i LINK from the Palmcorder In M CARD mode this display appears if the SD Memory Card Lock Switch is in the Lock position On Screen Displays OSD DV702 K ...

Page 100: ...ercially Dry cell batteries are also excluded from coverage under this warranty This warranty is extended to the original end user purchaser only A purchase receipt or other proof of date of original purchase is required before warranty service is performed THIS EXPRESS LIMITED WARRANTY IS IN LIEU OF ALL OTHER WARRANTIES EXPRESS OR IMPLIED EXCLUDING ANY IMPLIED WARRANTIES OF MERCHANTABILITY OR FIT...

Page 101: ...o ON still pictures taken in the PhotoShot mode are recorded with a visual shutter effect and click sound SELF REC p 22 NORMAL During self recording the picture on the LCD Monitor is the same as it will be when recorded MIRROR During self recording the picture on the LCD Monitor is horizontally reversed WIND CUT p 31 To reduce sound distortion caused by wind hitting the microphone ZOOM MIC p 21 Wh...

Page 102: ... desired type of display and counter indication displayed on the LCD Monitor or in the viewfinder C RESET p 106 Setting to ON resets the counter to zero DATE TIME p 105 The date and time can be set and displayed on the screen CLOCK SET p 16 When set to ON the date and time can be set on the screen KEY LED When set to ON the operation keys on top of the Palmcorder light up in blue LCD EVF SETTING p...

Page 103: ...ls from the Remote Control set to VCR1 VCR2 To receive signals from the Remote Control set to VCR2 OFF To prevent reception of signals from the Remote Control B SEARCH Blank Search p 33 Select ON to go directly to a blank portion of the tape SPEED p 38 In Strobe Multi mode used to select the interval at which a succession of still screens are captured from the playback picture FAST Every 0 3 secon...

Page 104: ...ENU OSD 1 Photo Rec Mode Menu Screen Photo Play Mode Menu Screen REC MODE p 48 To select Photo Rec Mode DISPLAY p 108 Select to OFF to cancel all Displays on the screen DCF NO pp 50 108 Set to OFF to cancel DCF Design rule for Camera File system No on the screen DPOF pp 54 108 When set to ON information of the image to be printed and the number of prints desired DPOF data is written to the Memory ...

Page 105: ...menu Volume Display p 33 The volume bar appears when the volume of the built in speaker is being adjusted AY DVM30EA AY DVM60EA FULL EMPTY R0 30 R0 00 R1 00 R0 00 a b c d e Electronic Viewfinder LCD Monitor Indications CAMERA VCR Mode a b c d e f f g h i h g Date and Time Indication Menu OSD pp 102 104 As shown below the date and time indication changes each time DATE TIME is selected from the Pal...

Page 106: ...e Palmcorder calculates and displays exactly where you are on any tape in terms of hours minutes seconds and frames 30 frames 1 second This display cannot be reset LinearTime Counter Memory Counter Time Code k l IMPORTANT NOTE Display must be set to ON for MF AE W BALANCE or BACK LIGHT indications to be displayed on the EVF or LCD Panel when selected C RESET does not work when DISPLAY is set to OF...

Page 107: ... Indication p 29 White Balance Indication p 28 Shutter Mode Indication p 30 Iris Indication p 31 p r q s t u n o v w Z MIC Indication Menu OSD p 101 This display appears when ZOOM MIC is set to ON Light Indication p 9 This display appears when LIGHT is set to ON WIND CUT Indication Menu OSD p 101 This display appears when WIND CUT is set to ON Progressive Indication Menu OSD p 101 This display app...

Page 108: ...prox 14 images Supplied 8 MB Memory Card REC MODE NORMAL FINE or SUPER FINE mode Image Size NORMAL mode 640 x 480 pixels FINE mode 1280 x 960 pixels SUPER FINE mode 1600 x 1200 pixels Recording Mode POWER is set to PICTURE a b c PHOTO Mode a b c h Directory Image Number DCF NO Design rule for Camera File system Indication Menu OSD p 104 DPOF Indication p 54 Multi Image Playback page number Current...

Page 109: ...T p 13 DC IN Terminal p 15 Shoulder Strap Attachment Ring p 8 M CARD Lock p 13 Hand Strap p 8 Side View External Microphone Jack p 44 Rear View Remote Sensor p 9 Cassette Compartment Cover p 7 DV Input Output i LINK Connector pp 47 73 S VIDEO Output Connector pp 39 46 TAPE EJECT pp 7 11 BATT RELEASE pp 14 15 Built in Twin Capsule 2 Way Microphone System Shoulder Strap Attachment Ring p 8 Index of ...

Page 110: ...p 12 32 M STOP pp 50 53 PLAY pp 12 32 M PLAY pp 50 51 MULTI p 38 FF p 34 BACK LIGHT p 23 PAUSE pp 34 45 47 CAMERA STILL p 26 M DEL pp 51 52 53 Back View Vision Adjustment Control pp 12 18 REC PAUSE pp 12 18 POWER Lamp p 18 MENU pp 16 17 A V Output Connector pp 39 82 PHONE p 32 Tripod Receptacle Underside View FOCUS p 29 AUTO MANUAL pp 28 31 EIS p 42 M FOCUS RING p 29 DV702 K p109 112 p65 02 06 06 ...

Page 111: ...r plug adaptor VJSS0070 in an area which has special AC outlets COUNTER TC pp 9 106 RESET pp 9 45 REWIND SEARCH pp 9 34 MENU pp 9 17 45 VIDEO REC pp 9 47 POWER ZOOM pp 9 21 SPKR VOL pp 9 33 REC PAUSE pp 9 18 PHOTOSHOT pp 9 20 DATE TIME pp 9 105 DISPLAY ON TV pp 9 39 FAST FORWARD SEARCH pp 9 34 REVERSE INDEX SEARCH pp 9 36 37 REVERSE SLOW F ADV pp 9 35 36 STOP pp 9 32 47 SET pp 9 16 17 PAUSE pp 9 3...

Page 112: ... 79 80 Palmcorder USB Device Driver SD Drive 76 78 PhotoTitle 27 PHOTOVU MPEG4 Movie Messenger System 59 72 PHOTOVU MPEG4 Movie Messenger System i LINK 74 75 Picture in Picture PinP 26 Playback Still Images 50 Playback using the LCD Monitor 32 Precautions 4 Program AE 24 Progressive PhotoShot Mode 20 Q Quick Guide 11 12 13 R RapidVisual Search 34 Recording Check 22 Recording Images From aTape 49 R...

Page 113: ...anuel d utilisation Mini Il est recommandé de lire attentivement ce manuel avant d utiliser l appareil Conserver ce manuel Pour de l aide composez le 1 800 561 5505 ou visitez notre site Internet à www panasonic ca DV702 KF p 1 4 p65 02 06 06 14 04 1 ...

Page 114: ... chocs électriques Ne pas ouvrir Attention Afin de prévenir des risques de chocs électriques ne pas retirer les vis Toute réparation devrait être confiée à un personnel qualifié Les informations ci dessus se trouvent sur le dessous de l appareil Votre Mini caméscope est conçu pour faire l enregistrement et la lecture en modes standard SP et longue durée LP Il est recommandé de n utiliser que des c...

Page 115: ...structions Les instructions concernant la sécurité et le fonctionnement de l appareil doivent être lues avant l utilisation 2 Conserver les instructions Le manuel d utilisation devrait être conservé pour consultation ultérieure 3 Tenir compte des avertissements Tous les avertissements figurant sur l appareil et dans le manuel d utilisation doivent être respectés 4 Suivre les instructions Toutes le...

Page 116: ...té Utilisation et emplacement Pour éviter les chocs électriques Le caméscope et son bloc d alimentation ne doivent pas être exposés à la pluie ou à une humidité excessive Ne pas brancher le bloc d alimentation ou faire fonctionner le caméscope s ils sont mouillés Le caméscope a été conçu pour être utilisé à l extérieur dans toutes les conditions météorologiques mais il serait probablement endommag...

Page 117: ...seur électronique Écran à cristaux liquides 105 Index des commandes 109 Index Dernière page Lecture 32 Caractéristiques d effets spéciaux 34 Caractéristiques numériques 40 Caractéristiques d édition 44 Caractéristiques de la carte mémoire 48 Connexion à un PC Transfert de vos images Windows 55 PHOTOVU MPEG4 Movie Messenger 59 Transfert de vos images i LINK Windows 73 PHOTOVU MPEG4 Movie Messenger ...

Page 118: ...intégré pour Macintosh logiciel ArcSoft pour Windows 95 98 Deuxième Édition Me 2000 XP et Macintosh LSFT0492 Microsoft Windows et Windows Media sont des marques déposées de Microsoft aux États Unis et dans d autres pays Macintosh iMac iBook PowerBook Power Macintosh Power Mac et Mac sont des marques de commerces ou des marques déposées de Apple Computer Inc Intel Pentium est une marque déposée i L...

Page 119: ...s 120 minutes Languette de protection 1 Appuyer sur LCD OPEN pour déverrouiller l écran et le faire pivoter 2 Faire glisser le commutateur TAPE EJECT pour ouvrir la porte du logement de la cassette 3 Insérer une cassette languette de protection sur le dessus et fenêtre vers l extérieur 4 Appuyer sur PUSH CLOSE pour refermer le couvercle du logement de la cassette Nota Avant d introduire une casset...

Page 120: ... comme suit Poignée 1 Retirer les deux extrémités de la bandoulière de leur boucle 2 Enfiler les extrémités de la bandoulière aux anneaux de fixation 3 Réinsérer les extrémités de la bandoulière dans leur boucle S assurer que la bandoulière n est pas torsadée 1 Tirer un bout de la bandoulière hors de la boucle 2 Tirer fermement sur la bandoulière à travers la boucle pour l allonger ou la raccourci...

Page 121: ... à CAMERA Fonctions du magnétoscope Mettre l interrupteur à VCR Il est possible d activer les principales fonctions de l appareil à une distance pouvant atteindre 5 m 16 pi à l intérieur Orienter la télécommande vers l avant de l appareil puis appuyer sur les touches de commande correspondant aux fonctions à activer le capteur de signal est situé sous l objectif Télécommande Fonctions pouvant être...

Page 122: ... 2 Appuyer simultanément sur ces touches VCR 1 Appuyer simultanément sur ces touches Commande à distance de deuxcaméscopes Nota 1 Mettre l interrupteur à VCR ou CAMERA Le témoin POWER s allume en rouge S assurer que l interrupteur est à la position VCR ou CAMERA 2 Appuyer sur MENU pour appeler l affichage du menu caméra CAMERA ou magnétoscope VCR 3 Tourner la molette de sélection pour sélectionner...

Page 123: ...ême lors de l utilisation d un trépied Page 7 1 Appuyer sur LCD OPEN pour déverrouiller l écran et le faire pivoter 3 Faire glisser le commutateur TAPE EJECT pour ouvrir la porte du couvercle du logement de la cassette 2 Mettre l interrupteur à la position VCR ou CAMERA 4 Insérer une cassette languette de protection sur le dessus et fenêtre vers l extérieur S assurer que la languette de protection...

Page 124: ... hors marche Écran à cristaux liquides 2 Régler la commande de réglage optique à la vue 4 Appuyer sur la touche d enregistrement pause pour amorcer l enregistrement Appuyer à nouveau sur la touche d enregistrement pause pour interrompre l enregistrement Viseur 1Mettre l interrupteur à la position CAMERA 3 Appuyer sur LCD OPEN pour déverrouiller l écran Le faire pivoter et en ajuster l angle Lectur...

Page 125: ...ue SanDisk Carte mémoire SD vendue séparément Page 93 Capacité 8 Mo ou supérieur 8 Mo 16 Mo 16 Mo ou supérieur 3 Insérer la carte mémoire et la tenir en place jusqu à ce qu un déclic se fasse entendre 4 Refermer le couvercle du logement de la carte mémoire 2 Faire glisser le commutateur DOOR OPEN pour ouvrir le couvercle du logement de la carte mémoire 1 Mettre l interrupteur à la position OFF Ret...

Page 126: ...er le bloc batterie en le glissant vers le bas tout en déplaçant le commutateur BATT RELEASE Touche de dégagement du bloc batterie Recharge du bloc batterie 1 Faire les raccordements tel qu illustré Le témoin POWER s allume S il y a lieu retirer le cordon c c de l adaptateur 2 Fixer le bloc batterie tel qu illustré pour le recharger Le témoin de charge s allume Il s éteint pour indiquer que la rec...

Page 127: ...s pour lesquels il a été conçu Un mécanisme de sécurité empêche le fonctionnement du bloc batterie à des températurestrèsélevées Pour prolonger la vie du bloc batterie Après l utilisation retirer le bloc batterie du caméscope ou de l adaptateur secteur et le ranger dans un endroit frais sombre et sec Sinon le bloc batterie ne pourra plus être rechargé S assurer que les bornes du bloc batterie sont...

Page 128: ...loge CLOCK SET puis appuyer dessus pour l activer Menu à l écran pages 102 et 104 Le menu de réglage de la date et de l heure DATE TIME SETTING s affiche 4Tourner la molette de sélection pour sélectionner l année puis appuyer sur la molette de sélection pour confirmer la sélection et passer au paramètre suivant Régler le mois le jour l heure et les minutes de la même manière Pour effectuer des cor...

Page 129: ...e menu VCR REC MODE s affiche pour la sélection de REC SPEED ou AUDIO DUB 3 PLAY MODE Mode de lecture Le menu VCR PLAY MODE s affiche Il comporte les rubriques INDEX AUDIO REMOTE ou B SEARCH 4 MULTI SETTING Mode de multi Le menu MULTI SETTING s affiche pour la sélection de SPEED 5 DISPLAY SETTING Affichage Le menu DISPLAY SETTING s affiche pour la sélection des paramètres DISPLAY C RESET DATE TIME...

Page 130: ...T Viseur Protection du bloc batterie Après 5 minutes le mode pause à l enregistrement passe automatiquement en mode attente Pour poursuivre l enregistrement couper puis rétablir le contact Lorsque le caméscope est orienté vers des objets excessivement lumineux une barre verticale peut apparaître sur l image Ceci est une caractéristique normale du capteur d image CCD Autant que possible éviter d or...

Page 131: ...écran réduit l autonomie offerte par le bloc batterie Après usage s assurer de bien refermer l écran Utilisation de l écran à cristauxliquides Nota 1 Appuyer sur MENU pour appeler l affichage du menu principal 2 Tourner la molette de sélection pour sélectionner la rubrique des paramètres de l affichage LCD EVF SETTING du menu principal Menu à l écran pages 102 et 104 3 Appuyer sur la molette de sé...

Page 132: ...ndes après quoi l écran du mode caméra s affiche Mode photo numérique Nota 1Interrupteur 1Interrupteur 3 4 Molette de sélection JOG KEY Viseur Écran Viseur Écran 1 Mettre l interrupteur à CAMERA 2 Appuyer sur MENU pour appeler l affichage du menu du mode caméra 3 Tourner la molette de sélection pour sélectionner D FUNCTION puis appuyer sur la molette pour afficher le menu de la caméra 4 Tourner la...

Page 133: ...hage du menu du mode caméra 3 Tourner la molette de sélection pour sélectionner la rubrique des paramètres de l affichage REC MODE puis appuyer sur la molette de sélection pour afficher le menu CAMERA REC MODE 4 Tourner la molette de sélection pour sélectionner ZOOM MIC sur le menu CAMERA REC MODE Menu à l écran page 101 5 Appuyer sur la molette de sélection pour valider la fonction ON Appuyer deu...

Page 134: ...secondes pour capturer une image fixe L image fixe ainsi capturée est enregistrée avec le son 2Pour annuler la fonction d enregistrement d images fixes appuyer à nouveau sur STILL L appareil retourne en mode d enregistrement vidéo avec son Auto enregistrement Faire pivoter l écran sur 180 degrés de manière qu il soit orienté dans la même direction que l objectif pour procéder à un auto enregistrem...

Page 135: ... pour afficher le menu de réglage de la caméra 4 Tourner la molette de sélection pour choisir CINEMA puis appuyer sur la molette pour sélectionner ON Une bande noire apparaît en haut et en bas de l image Appuyer deux fois sur MENU pour quitter le menu L indication CINEMA s affiche à l écran 5 Débuter l enregistrement Viseur Écran 3 4 Molette de sélection JOG KEY 5Enregistrement pause 1Interrupteur...

Page 136: ...ique de l exposition et l obturateur grande vitesse H S S ne peuvent pas être réglés avec le menu Nota Aucun affichage SPORTS PORTRAIT FAIBLE ÉCLAIRAGE PROJECTEUR MER ET NEIGE 2AUTO MANUAL Réglage automatique de l exposition La fonction de réglage automatique de l exposition permet de réaliser des enregistrements de la plus haute qualité dans une diversité de situations de tournage Pourl enregistr...

Page 137: ... d assurer une transition en douceur des images entre les scènes et donne une allure professionnelle aux enregistrements Fondu d entrée Ouvrir une scène sur un fondu d entrée est très efficace 1 En mode enregistrement pause maintenir une pression sur FADE jusqu à ce que l image et le son s évanouissent 2 Appuyer ensuite sur la touche d enregistrement pause pour amorcer l enregistrement 3 Relâcher ...

Page 138: ...ristaux liquides 5 Orienter le caméscope sur la scène voulue pour l image sur image puis appuyer sur CAMERA STILL pour produire un arrêt sur image 6 Appuyer à nouveau sur CAMERA STILL pour superposer l image fixe à l image principale 7 Appuyer sur la touche d enregistrement pause pour enregistrer une scène avec image sur image Appuyer sur PHOTOSHOT pour enregistrer une scène avec image sur image e...

Page 139: ... Appuyer sur la touche d enregistrement pause pour lancer l enregistrement avec le titrage des photos L écran de transition volet WIPE ou de mixage MIX s affiche au début de l enregistrement Le titrage est alors automatiquement effacé Il est possible de transférer sur bande des photos sauvegardées sur une carte mémoire pour les utiliser dans des effets de transition volet WIPE ou de montage MIX Lo...

Page 140: ...bre chromatique optimal pour la plupart des conditions d éclairage Lorsque la source d éclairage est une lampe halogène Lors de prises de vues extérieures au soleil Lors de prises de vues sous un éclairage fluorescent L équilibre du blanc qui a été sélectionné manuellement précédemment Réglage manuel de l équilibre du blanc A Tourner la molette de sélection pour sélectionner B Orienter le caméscop...

Page 141: ...e sa distance focale maximale 5Tourner la molette de mise au point manuelle de manière à obtenir l image la plus précise possible Il pourrait être nécessaire de s éloigner quelque peu du sujet pour effectuer la mise au point 6Appuyer sur le commutateur de focale variable sur l extrémité W ou T selon les besoins La mise au point demeure réglée sur toute la distance focale de l objectif Il sera peut...

Page 142: ... est impossible par le réglage automatique de l exposition et l obturateur grande vitesse Lorsque MagicPix est réglé à ON l obturateur grande vitesse ne peut pas sélectionner la vitesse de l obturateur Nota 2AUTO MANUAL Obturateur grande vitesse Sélectionmanuelle 3 4 Molette de sélection JOG KEY Cette caractéristique permet l enregistrement de scènes à mouvements très rapides tel un match de tenni...

Page 143: ...Appuyer sur AUTO MANUAL pendant plus de 0 7 seconde pour annuler le réglage La valeur affectée du signe dB indique un gain Si cette valeur est trop grande la qualité de l image est diminuée Selon le grossissement du ZOOM la valeur du diaphragme peut ne pas être affichée correctement Si le mode réglage automatique de l exposition est utilisé le diaphragme ne peut pas être réglé Si le diaphragme est...

Page 144: ...pe numérique l image peut apparaître sous forme de mosaïque L utilisation de l écran réduit l autonomie offerte par le bloc batterie Il est possible de placer le caméscope sur une table ou une autre surface aux fins de visionnement Faire pivoter l écran sur 180 degrés et le placer contre le boîtier de l appareil tel qu illustré ci contre 5STOP 4PLAY 3Rebobinage Repérage 2LCD OPEN Brancher des écou...

Page 145: ...r afficher le menu VCR PLAY MODE 4 Tourner la molette de sélection pour sélectionner B SEARCH sur le menu VCR PLAY MODE Menu à l écran page 103 5 Appuyer sur la molette de sélection pour valider la fonction ON L indication BLANK s affiche à l écran 1 Appuyer sur PLAY pendant plus de 5 secondes en mode arrêt Le caméscope amorce la lecture en reprise dès que la bande arrive à sa fin La lettre R s af...

Page 146: ...st normal que l image devienne bleuâtre ou s affiche en mosaïque pendant quelques secondes Nota 1 Pendant la lecture appuyer sur PAUSE 2 Pour poursuivre la lecture appuyer sur PLAY ou PAUSE Afin de protéger la bande et les têtes vidéo le mode de fonctionnement du caméscope est commuté comme suit ARRÊT SUR IMAGE ARRÊT après 3 minutes AMaintenir enfoncée la touche Avance accélérée Repérage pendant l...

Page 147: ... réalisation d effets spéciaux Nota Nota 1 Appuyer sur PLAY pour amorcer la lecture 2 Appuyer sur la molette de sélection pendant environ 1 seconde 3 Tourner la molette de sélection pour régler la vitesse de défilement Tourner la molette de sélection en sens horaire pour la lecture avant Tourner la molette de sélection en sens anti horaire pour la lecture arrière Pour rétablir la vitesse de défile...

Page 148: ...oto est utilisée En mode repérage par index photo séquence l effet de bruit de l obturateur pourrait ne pas être audible même lorsque le paramètre SHUTTER est activé La recherche indexée de photos peut ne pas détecter une photo si la scène est d une durée de 3 secondes ou moins 1 Appuyer sur MENU pour appeler l affichage du menu du mode magnétoscope 2 Tourner la molette de sélection pour sélection...

Page 149: ...t sur la touche INDEX SEARCH Durant le repérage arrière par index la lecture ne sera pas amorcée si la bande est rebobinée jusqu au début Il est possible de repérer une séquence particulière en utilisant des index électroniques inscrits au début de chaque séquence enregistrée 1Appuyer sur MENU pour appeler l affichage du menu magnétoscope VCR 2Tourner la molette de sélection pour sélectionner la r...

Page 150: ...ppuyer sur PLAY pour lancer la lecture Appuyer sur STOP pour interrompre la lecture Cadences de saisie intervalles Réglage FAST NORM SLOW Cadence de saisie succes sion de 9 images Toutes les 0 3 secondes Toutes les 0 6 secondes Toutes les 1 0 secondes Ni la prise DV ni la prise d image fixe numérique ne peut être utilisée pour la sortie d un écran multi image La qualité de l image d un écran multi...

Page 151: ...porter au manuel de l utilisateur du téléviseur 3Amorcer la lecture ou l enregistrement Avant de faire les raccordements s assurer que le contact est coupé tant sur le caméscope que sur le téléviseur S assurer d insérer les fils audio vidéo à fond lors du raccordement au téléviseur Sortie A V Avec télécommande seulement Il est possible de faire afficher à l écran du téléviseur les diverses indicat...

Page 152: ...lette pour sélectionner D ZOOM1 ou D ZOOM2 D ZOOM1 de 10X à 25X D ZOOM2 de 10X à 700X OFF Mise hors circuit de la fonction Appuyer deux fois sur MENU pour quitter le menu 5 Appuyer sur la touche d enregistrement pause pour amorcer l enregistrement puis appuyer sur le commutateur de focale variable pour faire un zoom avant ou arrière Le facteur d agrandissement est toujours affiché dans le viseur o...

Page 153: ...ente en double 6 Répéter les étapes 2 à 4 pour sélectionner OFF et annuler cette caractéristique Zoom numérique suite 2MENU 1Interrupteur 3 4 Molette de sélection JOG KEY 1 Mettre l interrupteur à CAMERA 2 Appuyer sur MENU pour afficher le menu 3 Tourner la molette de sélection pour sélectionner D FUNCTION sur le menu en mode caméra puis appuyer sur la molette pour appeler le menu de fonction camé...

Page 154: ...ure et enregistrement magnétoscope Modecaméra Modemagnétoscope Autres effets et fonctions numériques sont automatiquement désactivés lorsque les fonctions EIS et zoom numérique sont sélectionnées A Mettre l interrupteur à VCR B Appuyer sur PLAY pour amorcer la lecture C Appuyer sur EIS pour stabiliser l image D Appuyer à nouveau sur EIS pour désactiver la fonction de stabilisation S assurer que le...

Page 155: ...unâtre pour lui conférer une apparence vieillotte MONO Monochrome L image apparaît en noir et blanc 2MENU 1Interrupteur 3 4 5 Molette de sélection JOG KEY 1 Mettre l interrupteur à CAMERA ou VCR 2 Appuyer sur MENU pour afficher le menu 3 Tourner la molette de sélection pour sélectionner D FUNCTION sur le menu en mode caméra ou PLAY FUNCTION sur le menu en mode magnétoscope puis appuyer sur la mole...

Page 156: ...stéréo 1 et la nouvelle sera enregistrée sur ST stéréo 2 La piste sonore d origine est remplacée par une nouvelle 1 Mettre l interrupteur à VCR Avec la télécommande il est possible de régler le caméscope pour que le défilement s arrête automatiquement à un endroit donné sur la bande Voir Mémoire arrêt au montage à la page 45 2 Appuyer sur PLAY Appuyer ensuite sur PAUSE pour amorcer le doublage 3 A...

Page 157: ... en stéréo sans égard au réglage de la sortie audio AUDIO OUT Si l enregistrement a été fait en vitesse de défilement longue durée LP il n est pas possibled effectuerundoublage Nota Il est possible de fixer un point d arrêt automatique au montage AUDIO Les sélections suivantes ne sont disponibles que pour des enregistrements audio 12 bits piste sonore en mode SP seulement DRESET AMENU ST 1 ST 2 MI...

Page 158: ...sourced alimentation Raccorder le caméscope à un magnétoscope de la manière illustrée ci contre Établir le contact sur les deux appareils Mettre le sélecteur de signal d entrée dumagnétoscoped enregistrementà la position LINE Mettre l interrupteur du caméscope à VCR Pour utiliser le connecteur S VIDEO brancher le câble c c dans le connecteur d entrée c c DC IN Page 15 Fil VHF vendu séparément Fil ...

Page 159: ... la duplication et qu ils sont commandés à distance par la même télécommande régler l un des caméscopes à VCR1 et l autre à VCR2 afin de prévenir tout problème de fonctionnement Nota 4REC Il est possible d effectuer une duplication numérique à numérique de haute qualité si les deux caméscopes utilisés possèdent l interface d entrée sortie DV i LINK câble d interface DV i LINK vendu séparément Appa...

Page 160: ...ble de changer de mode à n importe quel moment avant de prendre une photo Le nombre de photos pouvant être enregistrées varie selon les scènes Après la saisie d une image le nombre pourrait rester le même ou encore baisser de deux unités Cela est tout à fait normal Pendant l affichage du message PROCESSING ne pas mettre le caméscope hors marche ou débrancher l adaptateur secteur fourni cela pourra...

Page 161: ...le contact ni la soumettre à un choc ou à la vibration Ne pas laisser ou ranger la carte mémoire dans un endroit chaud exposé aux rayons solaires directs à un champ électrique ou électromagnétique L exposition à un champ électromagnétique ou à de l électricité statique ou encore un mauvais fonctionnement du caméscope ou de la carte mémoire elle même peut entraîner une perte des données enregistrée...

Page 162: ...uivante Appuyer sur M STOP pour revenir à l affichage des pages multi image Nota Si le numéro de fichier a été modifié le caméscope ne pourra le lire Cet appareil est conforme aux normes DCF Règle de conception pour le système de fichiers de caméra Toute image enregistrée sur la carte mémoire à l aide d un autre appareil photo numérique conforme aux normes DCF peut être visionnée sur cet appareil ...

Page 163: ...Appuyer sur M PLAY pour afficher l écran multi image Le message PLEASE WAIT s affiche 3 Appuyer sur M DEL pour afficher le menu de suppression puis tourner la molette de sélection tout en la maintenant enfoncée pour sélectionner PAGE Le menu de suppression DELETE PAGE s affiche 4 Tourner et appuyer sur la molette de sélection pour sélectionner l image à supprimer L image sélectionnée est soulignée...

Page 164: ...ication NO PICTURE Aucune image Appuyer sur M STOP pour revenir en mode enregistrement de photos Page 48 Cette opération permet de supprimer d un coup toutes les images sauvegardées sur une carte mémoire Mise en garde Une image supprimée ne peut être récupérée 2M DEL M STOP Au moment de la suppression d une image ne pas mettre le caméscope hors marche ou débrancher l adaptateur secteur fourni cela...

Page 165: ...des images Le message NO PICTURE Aucune photo s affiche une fois la suppression terminée Appuyer sur M STOP pour revenir en mode enregistrement de photos Page 48 La carte mémoire peut être facilement formatée de la façon suivante Mise en garde Le formatage de la carte supprime toutes les données enregistrées Au moment de la suppression d une image ne pas mettre le caméscope hors marche ou débranch...

Page 166: ...ection pour sélectionner l image L image choisie est soulignée en vert Le curseur se déplace à D 000 6 Tourner et appuyer sur la molette de sélection pour régler la quantité d imprimés Le repère s affiche Le repère indique les images pour lesquelles la quantité d imprimés a été réglée à 1 ou plus Pour imprimer 1 copie de toutes les images sélectionner ALL1 s il n est pas nécessaire d imprimer tout...

Page 167: ... SD Logiciel ArcSoft Installer la version 2002 du logiciel ArcSoft PhotoImpression3 0 Programme d édition de photos d utilisation facile pour modifier améliorer retoucher et ajouter des effets spéciaux à toute image Il offre également des solutions créatrices pour la préparation des cartes de souhaits et de calendriers PanoramaMaker3 0 Programme de réunion de photos d utilisation facile pour combi...

Page 168: ...e CD ROM 3 Cliquer sur l icône à installer Installer d abord le pilote de périphérique USB et suivre les instructions sous Mise en garde 4 Suivre les instructions apparaissant sur l écran de votre PC Pilote de périphérique USB Pour Movie Messenger Pour caméra Web Pour lecteur SD Cliquer PHOTOVU MPEG4 Movie Messenger Cliquer Convertisseur de fichier Palmcorder Cliquer Logiciel ArcSoft Cliquer Si un...

Page 169: ...cture d arrêt d avance rapide et de rebobinage Utiliser les commandes logicielles affichées à l écran de l ordinateur Vérificationdupilote Windows98DeuxièmeÉdition Me 2000 XP Nota La vérification du pilote doit se faire alors que le caméscope est raccordé à l ordinateur Pilote de périphérique USB caméra Web Mode caméra L écran est un exemple de Windows 2000 1 Cliquer sur Start Démarrer Settings Pa...

Page 170: ...98 Deuxième Édition ou Me cliquer sur Add Remove Ajouter Supprimer L écran est un exemple de Windows 2000 Pilote de périphérique USB lecteur SD convertisseur de fichiers Palmcorder mode M CARD L écran est un exemple de Windows 2000 1Cliquer sur Start Démarrer Settings Paramètres et Control Panel Panneau de configuration 2Double cliquer sur System Système s assurer que USB Storage Device Controller...

Page 171: ...u à l écran à cristaux liquides L écran Found New Hardware Wizard Assistant de nouveau matériel détecté de Windows s affiche Le message ci dessous s affiche Toutefois les tests effectués par le fabricant confirment que ce caméscope fonctionne avec Windows XP 2000 Cliquer sur Continue Anyway Continuer et poursuivre Suivre les instructions apparaissant sur l écran du PC Pour les utilisateurs de Wind...

Page 172: ...tiliser l adaptateur secteur pour alimenter le caméscope Nota Pour une utilisation prolongée utiliser l adaptateur secteur pour alimenter le caméscope Certains systèmes d exploitation tel que Windows 98 Deuxième Édition ou Me peuvent ne pas afficher l icône de déconnexion dans leur barre de tâches Il se peut que le système ait été paramétré pour désactiver cet affichage Fermer PHOTOVU MPEG4 Movie ...

Page 173: ...m 1 00 puis MovieMessenger 4 PHOTOVU MPEG4 MovieMessenger System 1 00 s ouvre Consulter l Aide en ligne pour des renseignements sur les opérations de l application et les messages d erreur susceptibles de s afficher en cours de route Pendant l exécution de PHOTOVU MPEG4 Movie Messenger ne pas effectuer les opérations suivantes L ordinateur pourrait devenir instable Ne pas modifier la zone écran ou...

Page 174: ...onnées en cours s affiche à l écran de l ordinateur La durée maximale de la saisie est d environ 30 secondes La saisie est automatiquement interrompueaprès30secondes Les images animées ne pourront être saisies si lesdonnéescontiennent Des signaux 12 bits et 16 bits Une commutation de la vitesse de défilement SP et LP Pendant le transfert sur l ordinateur les images animées ne sont pas affichées su...

Page 175: ...se reporter au menu d aide du logiciel 4Picture 4Movie Visualisation d images animées 4 Cliquer sur Movie La première image de chaque séquence animée s affiche sous forme de liste 5 Double cliquer sur l image voulue pour afficher l écran de lecture Cliquer sur pour lancer la lecture des images animées Il est possible de lire une séquence animée en pointant simplement sur l imagette avec la souris ...

Page 176: ...xe pour l ajouter aux images Bouton Slide Edit Pour assembler plusieurs images fixes sous forme de diaporama 1 2 3 4 5 6 7 8 9 10 11 12 13 14 15 16 17 Bande de défilement Glisser le curseur à partir de la position de départ Bouton Movie Mode Permet de visionner les images animées Bouton Open Movie Pour ouvrir des dossiers contenant des fichiers vidéo AVI WMV Bouton Open Audio Pour ouvrir des dossi...

Page 177: ... 6Add Image 5Still Mode 4Cliquer sur Movie pour afficher une liste des images animées à l écran View Manager 5Cliquer sur Movie Mode à l écran VideoGift 6Sélectionner l image animée à l écran View Manager puis la glisser déposer sur l écran VideoGift En cliquant sur Open Movie il est possible d ajouter sur le disque dur du PC les images animées enregistrées Il est possible également de choisir le ...

Page 178: ...uer sur VideoGift pour afficher l écran VideoGift La dernière image prise s affiche à l écran VideoGift Si un Unable To Locate DLL message d avertissement s affiche voir à la page 90 3Cliquer sur Settings pour afficher l écran Compression Settings Mailer Settings 4Cliquer sur pour régler le logiciel de courriel Le logiciel de courriel installé sur l ordinateur s ouvre Il est possible de sélectionn...

Page 179: ...ées et fixes avec un courriel Il est facile de transférer et de compresser des images animées en pièces attachées au courriel 1 Recommencer les étapes 1 à 4 à la page 61 pour exécuter PHOTOVU MPEG4 Movie Messenger 2 Cliquer sur VideoGift pour afficher l écran VideoGift La dernière image prise s affiche à l écran VideoGift Si un Unable To Locate DLL message d avertissement s affiche voir à la page ...

Page 180: ...iel ou cliquer sur Uploader PV DV402 K seulement pour télécharger l image vers la page de démarrage PictureStage Pages 67 et 71 2 1 2 6Preview 7E Mail 1 7Uploader Assemblage de diaporama Un groupe d images fixes peut être assemblé en diaporama 1Recommencer les étapes 1 à 4 à la page 61 pour exécuter PHOTOVU MPEG4 Movie Messenger 2Cliquer sur VideoGift pour afficher l écran VideoGift La dernière im...

Page 181: ...e Voir les étapes 4 à 6 ou 4 à 6 à la page 65 L image animée ou fixe s affiche à l écran VideoGift 4 Appuyer sur Settings pour afficher l écran Compression Settings 5 Régler la taille et la qualité de l image Voir Taille des fichiers compressés ci contre 6 Cliquer sur Save pour enregistrer l image compressée sur le PC Cliquer sur Preview pour visualiser l image animée compressée Cliquer sur E Mail...

Page 182: ...ran VideoGift 6Sélectionner à l écran View Manager l image animée puis la glisser déposer sur l écran VideoGift L écran Select Frame s affiche 7Glisser le pointeur pour sélectionner une image donnée 8Cliquer sur OK 9Cliquer sur Save pour enregistrer l image compressée sur le PC Cliquer sur Preview pour visualiser l image animée compressée Cliquer sur E Mail pour envoyer un courriel Cliquer sur Upl...

Page 183: ...he à l écran VideoGift Pour éditer l image voir Envoi d une portion d une image animée Réglage de la taille et de la qualité des images animées et fixes Assemblage de diaporama aux pages 68 à 69 4 Cliquer sur Uploader à l écran VideoGift L écran Converting animation s affiche Après un déclic sur Uploader l écran PictureStage Uploader s affiche et un dossier temporaire contenant les fichiers WMV co...

Page 184: ...pour afficher l écran View Manager puis cliquer sur for Internet à l écran View Manager pour afficher les fichiers qu il est possible de télécharger Il est possible de sélectionner l image à partir de l écran View Manager puis de la glisser déposer sur l écran PictureStage Image Video Uploader Il est possible de glisser déposer les fichiers à partir de l Explorateur Windows Il est possible égaleme...

Page 185: ... IEEE1394 Pendant la lecture sur le caméscope ne pas déconnecter le câble d interface DV i LINK ou mettre le caméscope hors marche cela pourrait causer une erreur de communication avec l ordinateur Avec PHOTOVU MPEG4 Movie Messenger ne pas utiliser 2 prises i LINK à la fois sur l ordinateur Le logiciel PHOTOVU MPEG4 Movie Messenger i LINK fonctionne sous Windows 98 Deuxième Édition ou une version ...

Page 186: ...réel La durée maximale de la saisie est d environ 3 minutes avec interface i LINK Si les données saisies contiennent des signaux 12 bits et 16 bits et ou une commutation de la vitesse de défilement entre les modes SP et LP un fichier séparé sera créé pour chaque mode Se référer aux pages 63 à 72 pour d autres fonctions Dans le cas où PHOTOVU LINK Movie Messenger ne fonctionnerait pas se reporter à...

Page 187: ...but et de fin du segment vidéo à capturer et à sauvegarder 4Still Capture 4Movie Capture DV 3 3Detail Nota 6STOP Saisie d images fixes 3 Cliquer sur Normal 4 Cliquer sur Still Capture à l endroit où la saisie d images doit s amorcer Recommencer l étape 4 pour poursuivre la saisie d images Les images fixes saisies sont sauvegardées sur l ordinateur et peuvent être visionnées à l écran View Manager ...

Page 188: ...sage ci dessous s affiche Toutefois les tests effectués par le fabricant confirment que ce caméscope fonctionne avec Windows XP 2000 Cliquer sur Continue Anyway Continuer et poursuivre Suivre les instructions apparaissant sur l écran du PC Nota Lors de la première connexion avec Windows XP le CD d installation du système d exploitation peut être demandé par l application Suivre les instructions ap...

Page 189: ...secteur pour alimenter le caméscope Pour les utilisateurs de Windows 2000 Pour les utilisateurs de Windows 98 Deuxième Édition Me Certains systèmes d exploitation tel que Windows 98 Deuxième Édition peuvent ne pas afficher l icône de déconnexion dans leur barre de tâches Il se peut que le système ait été paramétrépourdésactivercetaffichage Débrancher le câble USB lorsque l écran ACCESS n est plus ...

Page 190: ...ue amovible Il est possible de visualiser les images enregistrées sur la carte mémoire et de les enregistrer sur le disque dur 1 Connecter le caméscope à votre PC à l aide du câble USB fourni Pages 76 et 77 L écran Removable Disk s affiche L indication PLEASE WAIT CONNECT WITH PC et STORAGE s affiche dans le viseur ou à l écran à cristaux liquides 2 Cliquer sur Open folder to view files using Wind...

Page 191: ... Digital Palmcorder pour convertir de format pour le caméscope numérique Panasonic Pour reformater l image Le format d images capturées avec le caméscope peut être augmenté ou réduit pour les rendre appropriées à une utilisation Internet ou de courrier électronique Pour convertir de format pour le caméscope numérique Panasonic Les images peuvent être converties en format JPEG et à des noms de fich...

Page 192: ...ns détaillées Lors de la sélection de To convert format for Panasonic Digital Palmcorder pour convertir le format pour le caméscope numérique Panasonic 5 Sélectionner le fichier à convertir 6 Sélectionner le lecteur dans lequel le fichier converti est à sauvegarder L écran Convertion result est affiché 7 Utiliser Help pour des instructions détaillées DV702 KF p 79 80 p65 02 06 06 14 08 80 ...

Page 193: ...ion Windows Messenger démarre Sélectionner la personne à inviter Cliquer sur Start Raccorder le caméscope au PC Ouvrir une connexion sur le réseau à composition du fournisseur de service Utiliser le logiciel de connexion exclusif au fournisseur pour ouvrir la connexion MSN Messenger Service démarre Sélectionner la personne à inviter NetMeeting démarre Cliquer sur Start Utilisateurs de Windows 98 D...

Page 194: ...suivre Suivre les instructions apparaissant sur l écran du PC L écran du viseur ou l écran à cristaux liquides affiche CONNECT WITH PC et WEB CAM L écran affiche également une boîte grise L image dans la boîte peut être utilisée avec la communication Orienter le caméscope de manière à capter l image désirée Pour confirmer que la connexion est correcte entre le caméscope et le PC consulter Audio Tu...

Page 195: ...écran à cristaux liquides affiche CONNECT WITH PC et WEB CAM L écran affiche également une boîte grise L image dans la boîte peut être utilisée avec la communication Orienter le caméscope de manière à capter l image désirée Pour confirmer que la connexion est correcte entre le caméscope et le PC consulter Audio Tuning Wizard Assistant Ajustement des paramètres audio et vidéo à la page 85 Lors de l...

Page 196: ... Consulter les instructions de téléchargement et d installation dans le fichier d aide sur la page de démarrage 4 Lors de la première utilisation de Windows Messenger l écran de configuration s affiche Cliquer sur Click here to sign in Cliquer ici pour ouvrir une session Lire attentivement le contenu et suivre les instructions Préparatifs S assurer d avoir une connexion à l Internet Selon les indi...

Page 197: ...ture ou celui du micro etc S assurer également que le raccordement entre le caméscope et le PC est correct 7 Sélectionner File Fichier Add a Contact Ajouter un contact pour enregistrer la personne pour la communication avec Windows Messenger Utiliser la même adresse de courriel que la personne a utilisé pour s enregistrer sous Windows Messenger Après avoir ajouté l adresse de courriel de la person...

Page 198: ... envoyé Côté personne invitée Un message s affiche demandant d accepter ou de refuser l invitation Cliquer sur Accept Accepter à l écran Pour ignorer l invitation cliquer sur Decline Refuser 10Il est maintenant possible de procéder à une conversation audio vidéo De plus amples renseignements au sujet de Windows Messenger se trouvent dans le fichier d aide 11Lorsque la conversation est terminée fer...

Page 199: ...ick here to sign in Cliquer ici pour ouvrir une session Lire attentivement le contenu et suivre les instructions 5 Taper l adresse de courriel et le mot de passe Il faut avoir une adresse Hotmail Sinon cliquer sur Get one here Obtenez en un ici Lire attentivement le contenu et suivre les instructions Préparatifs S assurer d avoir une connexion à l Internet Selon les indications des pages 82 à 83 r...

Page 200: ...our la communication avec MSN Messenger Service Utiliser la même adresse de courriel que la personne a utilisé pour s enregistrer sous MSN Messenger Service Après avoir ajouté l adresse de courriel de la personne pour la communication cliquer sur Send E Mail Envoyer un courrier électronique pour demander à la personne d enregistrer l adresse de courriel du premier correspondant Il est impossible d...

Page 201: ...lPanel Panneaudeconfiguration System Système Device Manager Gestionnairedepériphériques etImage Device Dispositif image pour confirmer le tout 11 Côté personne invitée Un message s affiche demandant si la personne accepte ou refuse l invitation Cliquer sur Accept Accepter à l écran Pour ignorer l invitation cliquer sur Decline Refuser 12 Personne à l extrémité invitante L écran Appel entrant s aff...

Page 202: ...éant procéder comme suit Télécharger et installer MediaPlayer version 7 1 ou ultérieure Aller à http www microsoft com windows mediaplayer valide au 28 décembre 2001 La fenêtre Windows Media com Download s affiche Cliquer sur Download Now Télécharger à l écran L écran File Download Téléchargement de fichier s affiche Suivre les instructions à l écran DV702 KF p 87 90 p65 02 06 06 14 08 90 ...

Page 203: ...ositif de pointage Minimum de 210 Mo d espace libre sur le disque dur pour le logiciel ArcSoft Haute définition couleur 16 bit ou plus pour le logiciel ArcSoft Même si les exigences de système sont satisfaites il n est pas certain que le logiciel inclus fonctionne sur tous les ordinateurs Raccordement Prise USB Prise USB 1 Mettre le PC sous tension 2 Placer l interrupteur du caméscope sur M CARD 3...

Page 204: ...ire mettre l interrupteur à la position OFF Pages 48 et 49 1 Régler l interrupteur du caméscope à la position M CARD 2 Raccorder le caméscope au Macintosh à l aide du câble USB fourni Page 91 L écran à cristaux liquides affiche PLEASE WAIT CONNECT WITH PC et STORAGE 3 Double cliquer sur l icône Untitled Dossier sans titre Il est possible de visualiser les images stockées sur la carte mémoire et de...

Page 205: ...H 1 h 30 min Bloc batterie 1600mAH 3 h Bloc batterie 2800mAH 5 h Bloc batterie 5300mAH 9 h Câble d interface DV i LINK 4 broches à 4 broches Télécommande infrarouge Carte mémoire SD 16 Mo Également disponible avec capacités supérieures Enregistreur lecteur USB SD compatible avec la carte MultiMédia Adaptateur de carte SD PCMCIA compatible avec la carte MultiMédia Fil pour batterie de voiture Illus...

Page 206: ...uances Réglages du caméscope Gamme du filtrebleu Bleuâtre Blanchâtre Jaunâtre Rougeâtre Éclairage artificiel Conditions d éclairage naturel Extérieur Intérieur Téléviseur couleur Lampe fluorescente jour Lampe éclair de caméra Lumière bleue pour photographie Lampe fluorescente blanc Lampe éclair normale Lampefluorescente blancneutre Lampe au tungstène pour photographie Lampe halogène Lampe à iode L...

Page 207: ... Viseur Viseur électronique à cristaux liquides de 5 3 mm 0 21 po Écran à cristaux liquides Affichage à cristaux liquides de 88 9 mm 3 5 po Éclairement minimal 10 lux F1 1 8 0 5 candéla pied 0 lux MAGICVU 0Lux ON Mémoire Image fixe Carte MultiMédia Carte mémoire SD 640 x 480 pixels Mode NORMAL 1280 x 960 pixels Mode FINE 1600 x 1200 pixels Mode SUPER FINE Stockage des images carte Env 70 images Mo...

Page 208: ...tes N utiliser une cassette de nettoyage seulement quand surviennent des symptômes d encrassement des têtes Têtesvidéoencrassées Lors de la commutation d un mode de fonctionnement à un autre lecture enregistrement rebobinage etc la nouvelle fonction n est activée qu après que la fonction précédente ait été complètement désactivée L interrupteur et toutes les touches de fonction lecture avance accé...

Page 209: ...batterie est complètement rechargé p 14 S assurer que tous les raccordements ont été correctement effectués p 15 Vérifier que le capuchon de l objectif a été enlevé p 18 S assurer que la source d alimentation est raccordée p 14 et 15 Insérer une cassette languette de protection sur le dessus et fenêtre vers l extérieur p 11 S assurer que la source d alimentation est raccordée p 14 et 15 Vérifier s...

Page 210: ... impose le message NEED HEAD CLEANING s affiche pendant 5 secondes Avertissements Lorsqu un doublage audio est tenté sur une bande enregistrée en mode longue durée le message CANNOT REC LP MODE s affiche pendant 5 secondes S il y a formation de condensation dans l appareil l indication WARNING clignote et le message DEW DETECTED s affiche le contact est automatiquement coupé après 15 secondes Dans...

Page 211: ...ors que le caméscope est dans le mode M CARD ou titrages des photos mode caméra Dans un tel cas débrancher le câble de raccordement DV i LINK du caméscope En mode M CARD ce message s affiche lorsque le commutateur de protection contre l écriture sur la carte mémoire SD se trouve à la position LOCK L indication INCOMPATIBLE DATA s affiche si la cassette est d un format autre que NTSC ou que l utili...

Page 212: ...OU CONSÉCUTIF Certaines juridictions ne reconnaissent pas les exclusions ou limitations de dommages indirects ou consécutifs ou les exclusions de garanties implicites Dans de tels cas les limitations stipulées ci dessus peuvent ne pas être applicables RÉPARATION SOUS GARANTIE Pour de l aide sur le fonctionnement de l appareil ou pour toute demande d information veuillez contacter votre détaillant ...

Page 213: ...eur et d un déclic SELF REC Auto enregistrement Page 22 NORMAL Pendant un auto enregistrement l image enregistrée est identique à celle apparaissant sur l écran à cristaux liquides MIRROR Miroir Pendant un auto enregistrement l image est horizontalement inversée sur l écran à cristaux liquides WIND CUT Pare vent Page 31 Sert à amortir les claquements du vent heurtant le microphone ZOOM MIC Zoom mi...

Page 214: ...ode d affichage du compteur sur l écran à cristaux liquides ou sur le viseur C RESET Remise à zéro Page 106 Lorsque cette fonction est activée ON le compteur est automatiquement remis à zéro DATE TIME Horodateur Page 105 Pour l affichage de la date et de l heure CLOCK SET Réglage de l horloge Page 16 Lorsque cette fonction est activée ON il est possible de régler l horodateur directement à l écran...

Page 215: ...doublage audio INDEX Index Pages 36 et 37 Permet la sélection de la fonction de repérage par index désirée PHOTO Recherche d images fixes SCENE Recherche de scènes identifiées par un index AUDIO Audio Page 45 Pour sélectionner le mode de lecture audio après réalisation d une duplication audio en mode 12 bit Mode SP seulement ST1 Seule la piste sonore d origine est entendue ST2 Seule la piste sonor...

Page 216: ...e du viseur est affiché 11 12 13 14 15 Menu à l écran 1 1 2 3 2 3 4 4 5 6 7 5 6 7 Menu de la carte mémoire Menu du mode enregistrement de photos Menu du mode lecture de photos REC MODE Page 48 Pour sélectionner le mode photo DISPLAY Page 108 Sélectionner OFF pour supprimer tous les affichages à l écran DCF NO Pages 50 et 108 Sélectionner OFF pour supprimer le numéro de photo DCF à l écran DPOF Pag...

Page 217: ...nétoscope Affichage du volume Page 33 La barre de volume s affiche lors du réglage du niveau de sortie sur le haut parleur incorporé AY DVM30EA AY DVM60EA Plein Vide R0 30 R0 00 R1 00 R0 00 a b c d e a b c d e f f g h i h g Indication de la date et de l heure Menu à l écran pages 102 et 104 Comme le montre l illustration ci dessous l indication de la date et de l heure est modifiée chaque fois que...

Page 218: ...es de secondes et de cadres 30 cadres 1 seconde Cet affichage ne peut être réglé Remarques importantes L affichage à l écran doit être activé ON afin de permettre l affichage des indications MF mise au point manuelle W BALANCE équilibre du blanc AE réglage automatique de l exposition et BACKLIGHT éclairage en contre jour au viseur ou à l écran à cristaux liquides lors de la sélection de ces foncti...

Page 219: ...sition Page 24 Indication de mise au point manuelle Page 29 Indication de l équilibre du blanc Page 28 Indication du mode de l obturateur Page 30 Indication du diaphragme Page 31 Indication zoom microphone Menu à l écran page 101 Cet affichage confirme l activation du zoom microphone Indication de la lampe Page 9 Cet affichage confirme l activation de la lampe Indication du pare vent Menu à l écra...

Page 220: ... fournie Mode SUPER FINE Environ 14 images sur la carte mémoire de 8 Mo fournie a b Mode REC Mode NORMAL FINE ou SUPER FINE Taille de l image Mode NORMAL 640 x 480 pixels Mode FINE 1280 x 960 pixels Mode SUPER FINE 1600 x 1200 pixels Mode d enregistrement L interrupteur est réglé à PICTURE Numéro de l image directement Indication DCF NO Règle de conception pour le système de fichiers de caméra Men...

Page 221: ...e c c Page 15 Crochets de la bandoulière Page 8 Commutateur de verrouillage M CARD Page 13 Poignée Page 8 Prise de microphone externe Page 44 Capteur du signal de la télécommande Page 9 Porte du couvercle du logement de la cassette Page 7 Connecteur d entrée sortie DV i LINK Pages 47 et 73 Connecteur sortie S vidéo Pages 39 et 46 Commutateur d éjection de la cassette Pages 7 et 11 Commutateur de d...

Page 222: ... Touche d éclairage en contre jour Page 23 Touche de pause Pages 34 45 et 47 Touche d arrêt sur image Page 26 Touche de suppression de carte mémoire Pages 51 52 et 53 Commande de réglage optique Pages 12 et 18 Touche d enregistrement pause Pages 12 et 18 Voyant de mise en contact Page 18 Orifice de montage pour le trépied Touche de focale variable Page 29 Touche de réglage auto manuel Pages 28 à 3...

Page 223: ...e rebobinage repérage Pages 9 et 34 Touche de menu Pages 9 17 et 45 Touche d enregistrement vidéo Pages 9 et 47 Touches de focale variable Pages 9 et 21 Commandes de volume du haut parleur Pages 9 et 33 Touche d enregistrement pause Pages 9 et 18 Touche photo Pages 9 et 20 Touche de réglage de la date heure Pages 9 et 105 Touche d affichage télé Pages 9 et 39 Touche avance accélérée repérage Pages...

Page 224: ...M Mémoire 6 13 93 94 Mémoire arrêt au montage 45 Menu à l écran 101 à 104 Mesures de sécurité 2 Mini cassette vidéo numérique 7 Mise au point 29 Mode CINÉMA 23 Mode photo numérique 20 Mode PhotoShot progressif 20 Mode Stroboscope Multi 38 O Obturateur grande vitesse 30 P Pare vent 31 PHOTOVU MPEG4 Movie Messenger 59 à 72 PHOTOVU MPEG4Movie Messenger i LINK 74 à 75 Pile 10 Pile de l horloge 98 Pilo...

Reviews: