background image

42

For assistance, please call : 1-800-211-PANA(7262) or send e-mail : [email protected]

SELECT :  
SET

: SET

NEXT : D I SPLAY

T I TLE

:

1

DVD

CHAPTER : 12

1 : 12 : 55

SET

: SET

NEXT : D I SPLAY

TRACK

:    1

V I DEO  CD

PBC

: OFF

1 : 35 : 12

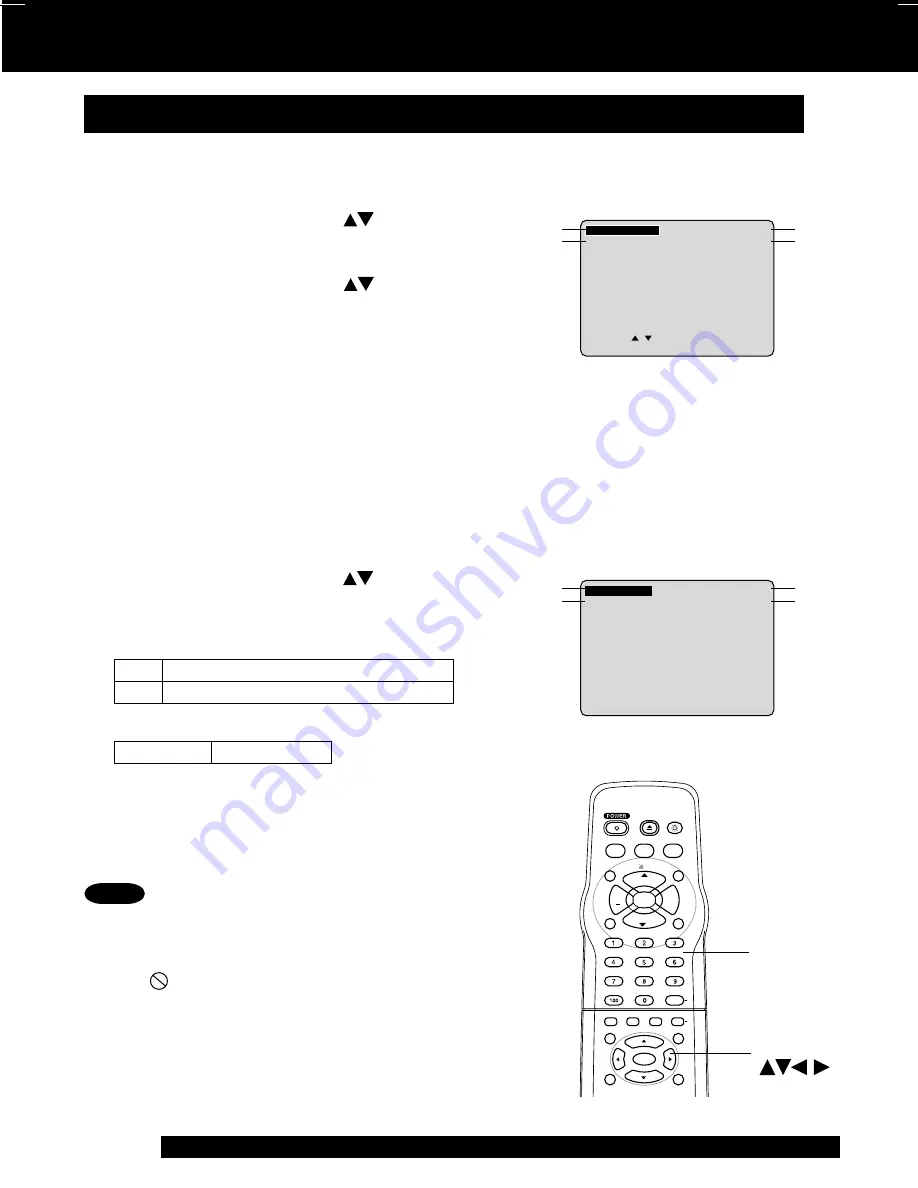
DVD Operation using On-Screen Displays (continued)

Detailed Descriptions of Each On-Screen Display

1. TITLE No.

• Change the No. by 

pressing


*


or the 

NUMBER

keys

, and 

press SET

.

2. Chapter No.

• Change the No. by 

pressing


or the 

NUMBER

keys

, and 

press SET

.

3. Disc currently being played
4. Elapsed playing time

The screen may be changed by selecting the
elapsed time.

• Change the elapsed time by 

pressing NUMBER

keys

, and 

press SET

.

(e.g.) 01 : 23 : 45

 1 

 2 

 3 

 4 

 5

• This function does not work with some discs.

Disc information screen (for DVD)

• Track No. and elapsed playing time are not

displayed during play started from menu of Video
CDs with playback control.

• When 

 appears on the screen while a button is

being operated, it means that the corresponding
operation is prohibited by the unit or the disc.

Disc information screen (for Video CD/ CD)

A. Track No.

• Change the No. by 

pressing


or the 

NUMBER

keys

, and 

press SET

.

B. Playback control ON/OFF

[Video CD with playback control only]

C. Disc currently being played

D. Elapsed playing time

Notes

  OFF

Video CD menu play is cleared.

  ON

Video CD menu play is displayed.

  Video CD             CD

1
2

3

4

A
B

C

D

LIGHT

TITLE

MENU

DISPLAY

ADD/DLT

DSS

CABLE

+

VOL

CH

CH

VOL

10

SUB TITLE

ANGLE

AUDIO

OPEN/CLOSE

CLEAR

ENTER

MU

TE

S

U

R

R

O

U

N

D

TIME

R

R

-T

U

N

E

ACTION

RETURN

D V D

FM/TV

S E T

NUMBER
keys

SELECT


SET

20_27DF62 (P36-43)Disc OP.p65

2002/04/16, 13:43

42

Summary of Contents for PV 20DF62

Page 1: ...roduct model meets the ENERGY STAR guidelines for energy efficiency TV Operation Advanced Operation For Your Information Initial Setup Basic Operation Forassistance pleasecall 1 800 211 PANA 7262 orsende mail consumerproducts panasonic com Please read these instructions carefully before attempting to connect operate or adjust this product Please save this manual Spanish Quick Use Guide is included...

Page 2: ...ng a lightning storm or before leaving unit unused for extended periods of time disconnect all equipment from the power source as well as the antenna and cable system 4 WHEN UNIT IS PLUGGED IN DO NOT OPERATE IF liquid has spilled into unit unit was dropped or otherwise damaged unit emits smoke odours or noises Immediately unplug unit and have it inspected by a service technician to avoid potential...

Page 3: ... this unit is 1 1 This product utilizes both a Cathode Ray Tube CRT and other components that contain lead Disposal of these materials may be regulated in your community due to environmental considerations For disposal or recycling information please contact your local authorities or the Electronics Industries Alliance http www eiae org Safety Precautions Mesures de sécurité Warning To prevent fir...

Page 4: ...R R T U N E ACTION RETURN DVD FM TV S E T Battery replacement caution Do not mix old and new batteries Do not mix alkaline with manganese batteries Loading the Batteries Apparatus Claims of U S Patent Nos 4 631 603 4 577 216 and 4 819 098 licensed for limited viewing uses only This product incorporates copyright protection technology that is protected by method claims of certain U S Patents and ot...

Page 5: ...Box Universal Remote Control Feature 26 27 Special Features 28 29 V Chip Control Feature 30 33 Video Audio Menu 34 Video Audio Adjustment 35 TV Disc Operation 36 40 DVD Operation using On Screen Displays 41 43 MP3 Playback Operation 44 DVD Lock Feature 45 Settings for DVD Operation 46 48 Language Code List 49 DVD For Your Information Before Requesting Service 50 51 Warning and Instruction Displays...

Page 6: ...61 6 lbs PV 20DF62 47 kg 103 4 lbs PV 27DF62 Dimensions 604 W x 523 H x 503 D mm 23 13 16 W x 20 9 16 H x 19 13 16 D PV 20DF62 760 W x 651 H x 503 D mm 29 15 16 W x 25 5 8 H x 19 13 16 D PV 27DF62 Discs played 1 DVD VIDEO disc 5 12 cm single sided single layer 5 12 cm single sided double layer 5 12 cm double sided double layer one layer per side 3 8 cm single sided single layer 3 8 cm single sided...

Page 7: ...uality level as video tape This unit also supports Video CDs with playback control version 2 0 If disc is brought from a cold to a warm environment moisture may form on the disc Wipe away moisture with a soft dry lint free cloth before using disc See above Improper disc storage Discs could be damaged if stored or left in areas exposed to direct sunlight that are humid or dusty near heat i e heater...

Page 8: ...ent subtitle language DISPLAY ENTER Displays the TV status and clock In DVD mode displays disc and unit information In DSS or CABLE mode it may be necessary after channel selection MENU Displays DVD menu RETURN Returns to Menu screen SKIP Skips one chapter or track Goes to next menu screen ZOOM Enlarges specific portions of picture STOP Stops playback SLOW SEARCH Slow motion picture in Still mode ...

Page 9: ...a scene recorded at a different angle is detected Remote Sensor Aim the remote to this point OPEN CLOSE See previous page SKIP See previous page PLAY See previous page Disc Tray Insert a disc to this tray Rear View of the unit AC Power Plug When plugged into an AC outlet the unit consumes 3 5 W of electric power in OFF condition Optical Digital Audio Output Connector Connect to a Dolby Digital dec...

Page 10: ...t on and set it to the Public Broadcasting Service PBS channel in your time zone If you use a DSS receiver it must be turned off Initial Setup Ready to Play Please make all cable or antenna connections before powering on Press POWER on the remote or unit The unit comes on and auto channel andclocksetstarts CH AUTO SET PROCEEDING Settings are made automatically When setup is done this screen appear...

Page 11: ...Time select DST OFF DST Daylight Saving Time Manual Clock Set If AUTO CLOCK SET was incomplete manually set the clock as follows Press ACTION on the Remote to display SET CLOCK Menu screen 1 SET SET SELECT END ACT I ON SET CLOCK DST ON SELECT MONTH Press to select the month and press SET to set In the same manner select and set the date year time and DST 2 Press ACTION twice to start CLOCK and exi...

Page 12: ...nnels Clock Press ACTION to display MAIN MENU 3 PressACTION to exit 1 Press to select CH 2 Press SET 1 Press to select CLOCK 2 Press SET 1 2 For English For Spanish For French MAIN MENU DVD LOCK CH CLOCK TV LANGUAGE END ACT I ON SELECT SET SET 5 3 1 MAIN MENU DVD LOCK CH CLOCK TV LANGUAGE END ACT I ON SELECT SET SET 5 3 1 MENU PRINCIPAL DVD BLOQUEO CANAL RELOJ TV IDIOMA TERMINAR ACT I ON ELEGIR FI...

Page 13: ...d channel Select channel with number keys and press ADD DLT Important If a remote control button does not work when pressed press the FM TV button on the remote and try the button again MAIN MENU DVD LOCK CH CLOCK TV LANGUAGE END ACT I ON SELECT SET SET 5 3 1 LIGHT TITLE MENU DISPLAY ADD DLT PAUSE DSS CABLE SKIP SKIP PLAY STOP SLOW SEARCH VOL CH CH VOL 10 SUB TITLE ANGLE ZOOM AUDIO OPEN CLOSE CLEA...

Page 14: ...efit of Pro Logic from the same DVD movies that provide full 5 1 channel Dolby Digital soundtracks as well as from titles with the Dolby Surround mark For information on Panasonic or Technics Dolby Pro Logic Surround Sound Decoders please contact your local dealer Ready Checklist Turn down the volume then turn this unit as well as other equipment to be connected off before proceeding with connecti...

Page 15: ...coder or dts decoder is used Notes on connecting an Optical digital audio cable optional Firmly connect the cable to the connector IMPORTANT NOTE Caution for optical digital audio output connector When connecting an amplifier with an Optical digital input connector which does not contain the Dolby Digital or dts decoder be sure to select OFF at Dolby Digital and OFF at dts of the Settings for DVD ...

Page 16: ...ve DVD May include multiple camera angles stories etc 2 Video CD with playback control Particular scenes or information can be interactively selected from a menu that appears on the screen Operation using unit buttons Press PLAY Insert disc Press OPEN CLOSE 3 7 4 3 Press STOP 6 Press POWER 1 Example 1 digit number 1 1 2 digit number 12 10 1 2 3 digit number 123 100 1 2 3 Press SKIP or to go to nex...

Page 17: ...Whether pictures are advanced by FRAME or FIELD is selected automatically see page 48 Slow Motion picture DVD Video CD Press SLOW or SLOW in Still mode Press PLAY to release Slow motion speed slow at first is increased with each additional press of the button up to 5 levels Reverse slow motion is not available for video CDs When appears on the screen while a button is being operated it means that ...

Page 18: ...vel Phones Connect an earphone not supplied or headphones not supplied to the Phones Jack Ready Checklist All connections are made Your unit is plugged in PHONES Jack POWER VOL VOL CH Important If a remote control button does not work when pressed press the FM TV button on the remote and try the button again Use CH or number keys to select a channel 2 08 3 Press VOL or VOL to adjust volume 24 LIGH...

Page 19: ...ub language Select SAP audio mode for the sub language Audio Mode for TV Viewing Press AUDIO to select the desired audio mode as describedabove Arrow shows selection Each press of AUDIO will change the audio mode as shown below SAP is selected with first press of AUDIO MTS Broadcast TV Stereo System MONO broadcast Normal monaural sound broadcast Example Press AUDIO Press AUDIO Press AUDIO Equipped...

Page 20: ...ogram listings it will appear in this space Caption Mode OFF Closed Caption Text narration will not be displayed NOTE The closed caption or text signal may be broadcast over C1 C2 or both Also text contents can vary so you may wish to try different settings 5Press ACTION three times to return to the normal screen 2 1 Press to select TV 2 Press SET to display SET UP TV screen 3 1 Press to select CA...

Page 21: ...creen 7Press MUTE to mute the sound and display closed captioning To cancel press MUTE again 3 1 Press to select CAPTION 2 Press SET to display CAPTION screen MAIN MENU DVD LOCK CH CLOCK TV LANGUAGE END ACT I ON SELECT SET SET 5 3 1 4 1 Press to select CAPTION MODE 2 Press SET repeatedly to select OFF NO CAP C1 CAP C2 5 1 Press to select CC ON MUTE 2 Press SET repeatedly to select desired mode Eac...

Page 22: ...eo CD CD mode is selected See FM Radio on pages 24 and 25 for instructions on how to preset FM stations 4 Press to select ALARM ON or OFF When ON is selected an alarm will gradually increase in volume for one minute or until canceled by pressing any button including VOL To Make Corrections use and to move back and correct 5Press TIMER to set ON TIMER ON TIMER SET is displayed ON TIMER Indicator li...

Page 23: ...e the overlay Blue Screen Display When you change channels the channel number will be displayed Channel Display Whenever the selected channel has no broadcast signal with the Weak Signal Display Feature set to OFF see page 28 the screen will turn solid blue Important If a remote control button does not work when pressed press the FM TV button on the remote and try the button again Current Time CH0...

Page 24: ...equency by 200 KHz 2 Press ADD DLT to set the radio station Hold down CH or for a few seconds then release to quickly scan for FM stations in your area To cancel press CH or while in search mode 3 FM Radio Setup FM 1 87 5MHz 12 00PM FM 1 87 7MHz MEMORY PRESS ADD DLT KEY 12 00PM FM 1 87 7MHz MEMORIZED 12 00PM Press FM TV on the remote to display FM radio mode FM Radio is This unit has an FM radio w...

Page 25: ...ACTION MENU is displayed Once stations are set the selected station and current time are displayed when FM Radio mode is entered To remove time press DISPLAY Notes 1 Press to select FM ANTENNA 2 Press SET to select INT INTERNAL or EXT EXTERNAL to determine which one sounds best FM Antenna Setup 1 2 Make sure FM tuning is done correctly see FM Radio Setup PressACTION to display MAIN MENU 1 Press to...

Page 26: ... or CABLE mode depending on which functions you wish to control Find your DSS box or Cable box Brand Code Number from one of the charts on the next page 3Confirm code entry Press POWER to turn selected unit ON or OFF See below for controllable functions in each mode Please repeat the Universal Remote Control Setup after replacing remote control batteries The remote control will not operate all DSS...

Page 27: ... Electronics 44 42 63 29 30 52 04 124 126 Hamlin 41 14 15 28 102 104 103 130 Hitachi 31 Jerrold 01 84 83 34 03 02 04 55 65 66 67 68 120 106 121 122 115 117 118 124 Jasco 30 04 124 Macom 31 Magnavox 26 112 Matsushita 17 16 08 87 109 Movietime 32 39 42 44 126 38 40 Maestro 74 35 NEC 40 19 38 32 NSC 40 19 38 32 Novavision 08 09 25 61 53 87 Next Level 01 84 83 34 03 02 04 55 65 66 67 68 120 106 121 12...

Page 28: ... existent Weak Signal Display Feature 1 2 3 ON Picture is displayed regardless of signal condition and may not always be clearly visible OFF Screen turns solid blue when signal is absent or weak If unit is connected to equipment which has blue back feature selecting ON will have no effect on the other equipment 4 PressACTION to display MAIN MENU 1 Press to select CH 2 Press SET to display SET UPCH...

Page 29: ...G ON DVD VOL ADJUST 2 SURROUND ON SURROUND OFF Important If a remote control button does not work when pressed press the FM TV button on the remote and try the button again 1 2 PressACTION to display MAIN MENU Channel Caption 1 Press to select CH 2 Press SET to display SET UP CHANNEL screen 3 1 Press to selectCHANNEL CAPTION 2 Press SET to display screen 5Press ACTION three times to end setup 4 1 ...

Page 30: ...D ACT I ON CONFIRM 4 DIGIT CODE 1 Press number keys to enter your secret code 2 Enter same code again for confirmation 3 BACK SPACE ENTER 0 9 END ACT I ON LOCK ENTER 4 D I G I T CODE Step 2 not necessary when changing rating or secret code Take care that you are not observed entering the secret code To Make Corrections Press repeatedly to move the cursor Press number keys to make the correction 1 ...

Page 31: ...S DVD LOCK OFF CHANGE SETT I NGS SELECT SET SET END ACT I ON LOCK NEXT PAGE 2 1 Press to select CHANGE SETTINGS 2 Press SET to display screen SELECT SET SET END ACT I ON LOCK NEXT PAGE US MOVIES OFF CHANGE SETT I NGS US TV PROGRAMS OFF CHANGE SETT I NGS DVD LOCK OFF CHANGE SETT I NGS 3 1 Press to select VIEW NR PROGRAMS 2 Press SET to set YES or NO NR Not Rated PROGRAMS Some movies such as old mov...

Page 32: ...nued If LOCK menu is not displayed do Enter Secret Code steps on page 30 2 1 Press to select CHANGE SETTINGS 2 Press SET to display screen NR Not Rated PROGRAMS Some TV shows such as news sports weather bulletins emergency information usually have no ratings 3 1 Press to select VIEW NR PROGRAMS 2 Press SET to set YES or NO Ratings highlighted in Green will be blocked Ratings in white letters will ...

Page 33: ...Chip Control is reactivated when power is turned off or power failure occurs Deactivate V Chip Control Enter your secret code steps 1 4 page 30 Then set US MOVIES and or US TV PROGRAMS to OFF using and SET Ratings set on pages 31 32 is retained and will be in effect when V Chip Control is activated again EnterCode ProcessofV ChipControlFeature Setup Blocking ABC RATING PG 13 ACCESS CODE PROGRAM RA...

Page 34: ... Audio Menu NORMAL AUTO Audio AGC Auto Gain Control The sound level is automatically adjusted to suit the program source see below left MOVIE Sound suited to movies MUSIC Sound suited to music Factory setting SPEECH Sound suited to dialogue Important If a remote control button does not work when pressed press the FM TV button on the remote and try the button again Video Menu NORMAL Factory setting...

Page 35: ...ent BASS Control To adjust the intensity of low frequency sound TREBLE Control To adjust the intensity of high frequency sound BALANCE Control To adjust the L R unit speaker output level The levels set here do not affect other audio equipment when connected to the Audio Output L R Connector Video Audio Adjustment aPress ACTION to display MAIN MENU 1 Press to select TV 2 Press SET to display SET UP...

Page 36: ...utch SVE NOR DAN POR RUS JPN Swedish Norwegian Danish Portuguese Russian Japanese CHI KOR MAL VIE THA Chinese Korean Malay Vietnamese Thai Other Subtitle language No Audio soundtrack language No Change the No by pressing and press SET ReadyChecklist Please read Basic DVD Operation on page 16 You can change the audio soundtrack language selected at the Settings for DVD Operation to a different lang...

Page 37: ...specific portions of a picture and select the zoom ratio using the ZOOM button on the remote during DVD playback Set Zoom size Press ZOOM repeatedly to change display as follows Picture Zoom DVD only You can enlarge the center portion of the image to one of 2 magnifications Closed captioning will not be displayed while Picture Zoom is used To see subtitles set the subtitle feature to ON see page 3...

Page 38: ...ude guides to unique contents audio subtitle languages etc Although contents and operation may vary the following steps show basic steps for using the menu a b Press MENU in Play mode to display DVD menu 1 Press or number key s to select an item 2 Press SET or PLAY to access DVD menu DVD only Pressing MENU again resumes play from the scene when MENU was first pressed 2 1 Press or number Key s to s...

Page 39: ...DISPLAY again to display Unit Information screen f Press SET to set mode DISC REPEAT stops flashing To cancel select REPEAT OFF in step e then press SET SELECT SET SET END DISPLAY PLAY DISC REPEAT PROGRAM PLAY SET SET END DISPLAY Notes 2 1 Press to select DVD 2 Press SET to display screen MAIN MENU DVD LOCK CH CLOCK TV LANGUAGE END ACT I ON SELECT SET SET 5 3 1 3 1 Press to select PLAY MODE 2 Pres...

Page 40: ...begin random play To cancel press STOP during play then press CLEAR 4 MAIN MENU DVD LOCK CH CLOCK TV LANGUAGE END ACT I ON SELECT SET SET 5 3 1 DVD MAIN MENU SELECT SET SET END ACTION PLAY MODE SELECT SET SET END ACTION LIGHT TITLE MENU DISPLAY ADD DLT PAUSE DSS CABLE SKIP SKIP PLAY STOP SLOW SEARCH VOL CH CH VOL 10 SUB TITLE ANGLE ZOOM AUDIO OPEN CLOSE CLEAR ENTER MUTE S U R R O U N D TIMER R T U...

Page 41: ...he setting will be registered immediately without pressing SET When numbers are displayed e g title number the NUMBER keys are also available To return to the normal screen press CLEAR or DISPLAY repeatedly Example of DVD Example of Video CD When DISPLAY is pressed during playback of a Video CD with Playback control the NUMBER keys are not available on the displayed screen In this case press DISPL...

Page 42: ... function does not work with some discs Disc information screen for DVD Track No and elapsed playing time are not displayed during play started from menu of Video CDs with playback control When appears on the screen while a button is being operated it means that the corresponding operation is prohibited by the unit or the disc Disc information screen for Video CD CD A Track No Change the No by pre...

Page 43: ...play normal play Detailed Descriptions of Each On Screen Display a b CHAPTER TITLE REPEAT PLAY DVD TRACK DISC REPEAT PLAY Video CD CD For your reference Important If a remote control button does not work when pressed press the DVD button on the remote and try the button again TITLE chapter chapter chapter CHAPTER REPEAT TITLE REPEAT NORMAL PLAY CURRENT PLAYBACK POSITION track track track TRACK REP...

Page 44: ... track If pressed within first 3 seconds of playback skips to the previous track If over 3 seconds returns to first track SKIP only Only the SKIP or SKIP button can be used for track skip selection during playback Put unit in Stop mode before performing folder file selection see above right Press STOP to stop playing 5 Press OPEN CLOSE to eject the disc The MP3 MENU is closed automatically MP3 pla...

Page 45: ...ite letters will not be blocked Perform DVD Lock setting in TV mode Enter your secret code to display LOCK menu Perform EnterSecretCode stepsonpage30 US MOVIES OFF CHANGE SETT I NGS US TV PROGRAMS OFF CHANGE SETT I NGS DVD LOCK OFF CHANGE SETT I NGS SELECT SET SET END ACT I ON LOCK NEXT PAGE SELECT SET SET END DISPLAY YOUR SELECTION EXCEEDS THE PLAYER S RATING LIMIT DO YOU WANT TO CHANGE THE LIMIT...

Page 46: ...C LANGUAGES See below Any languages offered on the disc can be set If a language not offered is set the original disc language will be selected AUDIO OUTPUT See page 47 You can set the audio output that comes from the digital audio output terminal STILL MODE See page 48 To select FIELD or FRAME to prevent jitter or to make small text or fine patterns clearly visible in a still picture When AUTO is...

Page 47: ...ream Dolby Digital bitstream 1ch 5 1ch is output Factory preset OFF No output dts selections Bitstream dts bitstream is output Factory preset OFF No output DRC Dynamic Range Compression selections OFF Normal audio range is selected Factory preset ON For dynamic sound even at low volume this is useful for late night listening Dolby Digital DVDs only SURROUND selections Surround Sound creates the ef...

Page 48: ...play in letterbox style Letterbox Widescreen video data is played in Letterbox style top and bottom of screen has black margin Set the screen display style for widescreen video material playback Pan Scan Factory preset Letterbox Set to reduce jitter in a displayed still picture or a motion picture DVD MAIN MENU SELECT SET SET END ACTION DISC LANGUAGES AUDIO OUTPUT ST I LL MODE FIELD TV MODE L e t ...

Page 49: ...879 Norwegian 7982 Oriya 8065 Panjabi 8076 Polish 8083 Pashto Pushto 8084 Portuguese 8185 Quechua 8277 Rhaeto Romance 8279 Romanian 8285 Russian 8365 Sanskrit 8368 Sindhi 8372 Serbo Croatian 8373 Singhalese Code Language 8375 Slovak 8376 Slovenian 8377 Samoan 8378 Shona 8379 Somali 8381 Albanian 8382 Serbian 8385 Sundanese 8386 Swedish 8387 Swahili 8465 Tamil 8469 Telugu 8471 Tajik 8472 Thai 8473 ...

Page 50: ...host multiple images TV programs cannot be watched Correction Make sure your antenna system TV or CABLE is correctly set P 10 Completely insert Power Plug into an AC outlet Set POWER button to ON Adjust BRIGHTNESS SHARPNESS and PICTURE controls in the SET UP Video Adjustment P 35 Adjust VOLUME control P 18 Adjust SHARPNESS and PICTURE controls in the SET UP Video Adjustment P 35 Adjust TINT and CO...

Page 51: ...g subtitle language section P 36 to display subtitles Alternative language cannot be selected with discs which do not contain more than one language For some discs alternative language cannot be selected with the AUDIO or SUB TITLE button Try selecting it from the DVD menu if available This function is dependent on software availability Even if disc has multiple angles they may be recorded for spe...

Page 52: ...One 1 Year except CRT CRT Two 2 Years Ten 10 Days Five 5 Days Ninety 90 Days Contact Number 1 800 211 PANA 7262 1 800 211 PANA 7262 1 800 211 PANA 7262 1 888 843 9788 1 800 211 PANA 7262 1 800 211 PANA 7262 1 800 211 PANA 7262 Service Carry In or Mail In Carry In or Mail In Carry In 21 CRT and Smaller In Home or Carry In 22 CRT and Larger In Home or Carry In Carry In or Mail In Carry In or Mail In...

Page 53: ...ishandling misapplication alteration faulty installation set up adjustments misadjustment of consumer controls improper maintenance power line surge lightning damage modification or commercial use such as in a hotel office restaurant or other business rental use of the product service by anyone other than a Factory Servicenter or other Authorized Servicer or damage that is attributable to acts of ...

Page 54: ...ón Inicial CH AUTO SET PROCEEDING PROCEEDING AUTO CLOCK SET CANCEL PRESS STOP KEY PLEASE SET CLOCK BY PRESSING ACTION KEY AUTO CLOCK SET I S I NCOMPLETE 2 6 2002 WED 12 00PM DST ON AUTO CLOCK SET COMPLETED SETTING CH 10 2 Si usa convertidor de cable enciendala y seleccione el Servicio Publico de Canales de Television PBS en su horario de uso o tiempo de su zona Si utiliza receptor DSS este debe de...

Page 55: ...ione la tecla ACTION en el control remoto para visualizar la pantalla del menú RELOJ Presione para seleccionar el mes y SET para ajustar De la misma forma seleccione y ajuste la fecha año hora y DST Hora de Verano Presione dos veces la tecla ACTION para poner el RELOJ en marcha y salir Si el ajuste automático del reloj no se ha completado ajuste el reloj manualmente de la siguiente manera 2 3 AUTO...

Page 56: ...inguna de sus superficies póngalo con el lado donde esté impreso el título hacia arriba alinéelo con las guías y póngalo en su posición apropiada Disco de 3 8 cm Disco de 5 12 cm Iniciar la reproducción Presione PLAY La bandeja del disco se cierra automáticamente Si está usando un DVD interactivo Interactive DVD o un Vídeo CD con contol de reproducción playback control y aparece un menú de títulos...

Page 57: ...C 3 ESP ACTI TIVO VO ELE ELEGI GIR FI FIJAR JAR SET SET Te amo SONIDO 1 ENG 1 ENG Dolby Digital 3 2 1ch Hello ELE ELEGI GI R FI FI JAR JAR SET SET SONIDO 3 ESP 3 ESP Dolby Digital 3 2 1ch ELE ELEGI GIR FI FIJAR JAR SET SET Hola SONIDO 2 ENG VOZ AC VOZ ACTI TIVO VO ELE ELEGI GIR FI FIJAR JAR SET SET Algunos discos con películas por ejemplo vienen con dos o más títulos Si el disco tiene un menú de t...

Page 58: ...es en pantalla Presione DISPLAY en el modo reproducción o parada Cada vez que se presione DISPLAY la visualización en pantalla cambia como se muestra a continuación Selección del ajuste deseado 1 Presione para seleccionar 2 Presione SET para ajustar Para volver a la pantalla normal Presione repetidamente CLEAR o DISPLAY Selected unit information Normal Screen Informaciónseleccionadadeldisco Inform...

Page 59: ...resione SET para seleccionar Repita el paso 5 para seleccionar otra pista La pista seleccionada se añade a la parte derecha Comenzar REPRODUCCION DE PROGRAMAS 1 Presione para seleccionar INICIAR 2 Presione SET La reproducción comienza en la secuencia programada Para cancelar pulsar STOP durante la reproducción y luego presione CLEAR 1 1 2 3 4 2 5 6 DVD MENU PRINCIPAL ELEGIR FIJAR SET TERMINAR ACTI...

Page 60: ...nar CAMPO o CUADRO para prevenir inestabilidad o para permitir ver textos pequeños o patrones finos claramente en el modo de imagen fija 4 3 PREFERENCIA Para seleccionar si el material del vídeo para pantalla ancha será vuelto a reproducir en el estilo Pan Scan o en el estilo Letterbox en la pantalla Seleccione AUDIO Inglés Español Francés Japón Fijación de fábrica inglés Original Se seleccionará ...

Page 61: ...ón sólo se activa con DVDs Dolby Digital Seleccione SURROUND El sonido envolvente crea el efecto de sonido que procede de altavoces que parecen ester en la parte de atrás aún cuando solo se ha conectado a un sistema estéreo de 2 canales INACTIVO No efecto de sonido envolvente Fijación de fábrica ACTIVO Efecto de sonido envolvente Selección de SALIDA DE AUDIO Selección de DETENER RASTREO AUTO Duran...

Page 62: ...ront Panel Indicators 9 Function Display 23 I Important Safeguards and Precautions 2 Information Unit Disc 6 7 Initial Setup 10 Indicators on the Front Panel 9 Input Mode 28 TV L Language 10 12 LIGHT button 8 Location of Controls 8 9 M MTS Broadcast TV Stereo System 19 MUTE button 8 18 N NUMBER keys 8 18 O 100 Key 18 On Screen Displays OSD 23 ON TIMER Indicator 9 22 ON TIMER with Alarm 22 Outdoor ...

Page 63: ...ter Track skip 17 Foward Reverse rapid scene search 17 Frame by Frame picture DVD Video CD 17 K Karaoke DVD Video CD 37 L Language Code List 49 M MENU button 8 38 MP3 Playback Operation 44 Multiple angle viewing DVD 37 O OPEN CLOSE button 8 16 Optical digital audio output connector 9 15 P PAUSE button 8 17 Picture Zoom DVD 37 Play 16 Playback control Video CDs 17 PLAY button 8 16 Program Play Vide...

Page 64: ...Electric Corporation of America One Panasonic Way Secaucus New Jersey 07094 Panasonic Sales Company PSC Division of Matsushita Electric of Puerto Rico Inc Ave 65 de Infantería Km 9 5 San Gabriel Industrial Park Carolina Puerto Rico 00985 Printed in U S A LSQT0581A M0302 0 P ...

Reviews: