background image

E

NGLISH

-61

Other

s

60-E

NGLISH

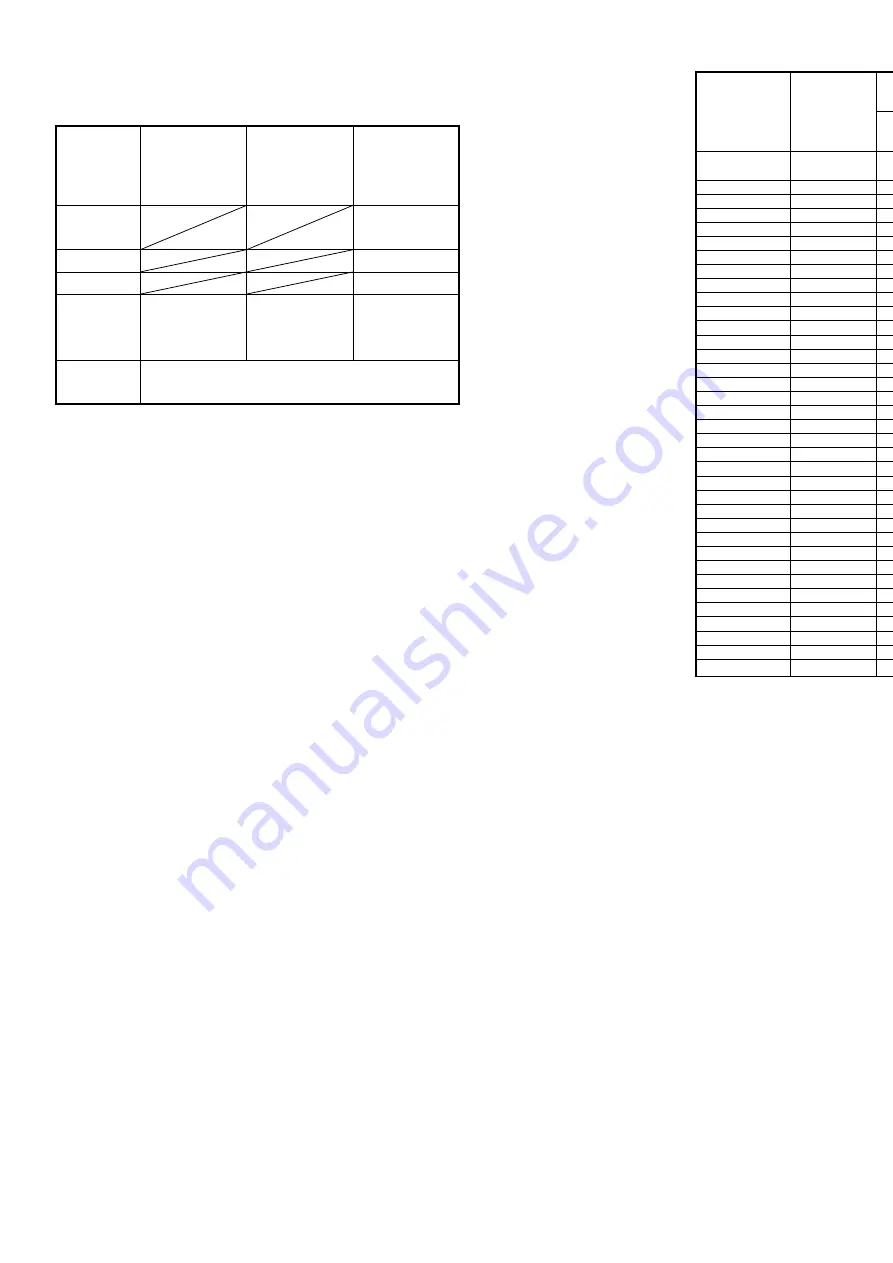
About the automatic setup function

If you press the AUTO SETUP button, the items given in the table below will
be set automatically. The setting details change according to the signal
which is being input. Refer to the table below for details.

VIDEO/S-VIDEO/

NETWORK/SD CARD

YP

B

P

R

Dot Clock

frequency

is 140 MHz

or higher

Signal other

than above

Horizontal/

vertical

position

Dot clock/

clock phase

Automatic

vertical

keystone

correction

Yes

Yes

DVI

Yes

Yes

Yes

Yes

No

NOTE:

B

If the edges of the projected picture are indistinct, or if a dark picture is being
projected, the automatic setup processing may stop automatically before it is
complete. If this happens, project a different picture and then press the AUTO
SETUP button once more, or make the above adjustments manually.

B

If you would like to make further adjustments to the picture, use the menu
commands which are listed on page 30 and subsequent pages.

List of compatible signals

*1 The “i” appearing after the resolution indicates an interlaced signal.
*2 The following symbols are used to indicate picture quality.

AA Maximum picture quality can be obtained.
A

Signals are converted by the image processing circuit before picture
is projected

B

Some loss of data occurs to make projection easier.

*3 Signals with “OK” in the Resizing column can be set using the RESIZING

command in the PICTURE menu. (Refer to page 42.)

*4 Signals that are compatible with the FRAME LOCK function. (page 42.)

DVI signal is compatible only with VGA60, SVGA60, XGA60 and SXGA60.

720 x 480i

15.734

59.940

A

OK

Video/S-Video

720 x 576i

15.625

50.000

A

OK

Video/S-Video

720 x 480i

15.734

59.940

13.500

A

OK

YP

B

P

R

/RGB

720 x 576i

15.625

50.000

13.500

A

OK

YP

B

P

R

/RGB

720 x 483

31.469

59.940

27.000

A

OK

YP

B

P

R

/RGB

1 920 x 1 080i

33.750

60.000

74.250

A

YP

B

P

R

/RGB

1 920 x 1 080i

28.125

50.000

74.250

A

YP

B

P

R

/RGB

1 280 x 720

45.000

60.000

74.250

A

YP

B

P

R

/RGB

640 x 400

31.469

70.086

25.175

A

OK

RGB

640 x 400

37.861

85.081

31.500

A

OK

RGB

640 x 480

31.469

59.940

25.175

A

OK

RGB

640 x 480

35.000

66.667

30.240

A

OK

RGB

640 x 480

37.861

72.809

31.500

A

OK

RGB

640 x 480

37.500

75.000

31.500

A

OK

RGB

640 x 480

43.269

85.008

36.000

A

OK

RGB

800 x 600

35.156

56.250

36.000

A

OK

RGB

800 x 600

37.879

60.317

40.000

A

OK

RGB

800 x 600

48.077

72.188

50.000

A

OK

RGB

800 x 600

46.875

75.000

49.500

A

OK

RGB

800 x 600

53.674

85.061

56.250

A

OK

RGB

832 x 624

49.725

74.550

57.283

A

OK

RGB

1 024 x 768

48.363

60.004

65.000

AA

RGB

1 024 x 768

56.476

70.069

75.000

AA

RGB

1 024 x 768

60.023

75.029

78.750

AA

RGB

1 024 x 768

68.678

84.997

94.500

AA

RGB

1 024 x 768i

35.520

86.952

44.897

AA

RGB

1 152 x 864

63.995

71.184

94.200

A

RGB

1 152 x 864

67.500

74.917

108.000

A

RGB

1 152 x 864

76.705

85.038

121.500

A

RGB

1 152 x 870

68.681

75.062

100.000

A

RGB

1 280 x 960

60.000

60.000

108.000

A

RGB

1 280 x 1 024

63.981

60.020

108.000

A

RGB

1 280 x 1 024

79.977

75.025

135.001

A

RGB

1 280 x 1 024

91.146

85.024

157.500

B

RGB 

1 400 x 1 050

63.981

60.020

108.000

A

RGB

1 600 x 1 200

75.000

60.000

162.000

B

RGB

NTSC/NTSC4.43/

PAL-M/PAL60

PAL/PAL-N/SECAM

525i
625i

525p

HDTV60
HDTV50

750P

VESA70
VESA85

VGA60
VGA65
VGA72
VGA75
VGA85

SVGA55
SVGA60
SVGA70
SVGA75
SVGA85

MAC16

XGA60
XGA70
XGA75
XGA85

XGA85i

MXGA70
MXGA75
MXGA85

MAC21

MSXGA60

SXGA60
SXGA75
SXGA85

UXGA60

Display

resolution

(dots)*

1

Scanning

frequency

H

(kHz)

(Hz)

Dot clock

frequency

(MHz)

Picture

quality*

2

Resizing*

3

Format

Mode

*4

*4

*4

*4
*4

*4
*4

All manuals and user guides at all-guides.com

all-guides.com

Summary of Contents for PT-L780E

Page 1: ... please read the instructions carefully and save this manual for future use LCD Projector Operating Instructions Model No PT L780NTE PT L780E R TQBJ 0110 2 Commercial Use All manuals and user guides at all guides com a l l g u i d e s c o m ...

Page 2: ...el at the operator position is equal or less than 70 dB A according to ISO 7779 WARNING 1 Remove the plug from the mains socket when this unit is not in use for a prolonged period of time 2 To prevent electric shock do not remove cover No user serviceable parts inside Refer servicing to qualified service personnel 3 Do not remove the earthing pin on the power plug This apparatus is equipped with a...

Page 3: ...ing up 26 Projection methods 26 Projector position 26 Projection distances 27 Basic Operation Starting to use 28 Turning on the power 28 Turning off the power 29 On screen menus 30 Menu screens 30 Menu operation guide 33 Returning to the previous screen 33 Returning a setting to the factory default 34 Using the freeze function 34 Using the D ZOOM digital zoom function 35 Adjusting the picture 36 P...

Page 4: ...e to observe this may result in electric shocks Insert the mains plug securely into the mains socket BIf the plug is not inserted correctly electric shocks or overheating could result BDo not use plugs which are damaged or wall outlets which are coming loose from the wall Do not place the projector on top of surfaces which are unstable BIf the projector is placed on top of a surface which is slope...

Page 5: ...not done Ask an Authorised Service Centre to clean inside the projector at least once a year BIf dust is left to build up inside the projector without being cleaned out it can result in fire or problems with operation BIt is a good idea to clean the inside of the projector before the season for humid weather arrives Ask your nearest Authorised Service Centre to clean the projector when required Pl...

Page 6: ...ion such as near a motor or if it is installed inside a vehicle or on board a ship the projector may be subjected to vibration or shocks which can damage the internal parts and cause malfunctions or accidents Accordingly set up the projector in a place which is free from such vibrations and shocks Do not set up the projector near high voltage power lines or near motors The projector may be subject...

Page 7: ...d Location and function of each part Projector control panel page 14 Focus ring pages 29 and 48 Air inlet ports Do not cover these ports Leg adjuster buttons L R page 28 These buttons are used to unlock the front adjustable legs Press to adjust the angle of tilt of the projector Front adjustable legs L R page 28 Lens release button page 49 This button is used when using a projection lens that is s...

Page 8: ...ration of the picture as a result of keystone correction However keystone distortion may not be corrected properly when using a lens sold separately Refer to pa for details on correcting key distortion manually SHUTTER button page 44 This button is used to momentarily turn off the pic and sound However keyst distortion may not be correc properly when using a lens sold separately Refer to pa for de...

Page 9: ...this jack no sound will be output from the built in speakers S VIDEO IN connector pages 24 and 42 This connector is used to input signals from a S VIDEO compatible equipment such as a video deck The connector is S1 signal compatible and it automatically switches between 16 9 and 4 3 aspect ratios in accordance with the type of signal being input AUDIO IN L R for VIDEO S VIDEO jacks page 24 Only on...

Page 10: ...ating indicator illuminates Do not look into the laser emitter of the remote control unit or point the laser beam towards other people otherwise damage to eyes may occur Caution BUse of controls or adjustments or performance of procedures other than those specified herein may result in hazardous radiation exposure BThis remote control unit cannot be repaired N2QAEA000011 POWER RGB VIDEO R CLICK LA...

Page 11: ...t drop the remote control unit BKeep the remote control unit away from liquids BRemove the batteries if not using the remote control unit for long periods BDo not use rechargeable batteries Operating range If the remote control unit is held so that it is facing directly in front of the remote control signal receptors on the front or rear of the projector the operating range is within approximately...

Page 12: ... No sound will come out of the projector s built in speakers while the AUDIO OUT jack is being used BIt may not be possible to connect some types of computer Refer to the list of compatible signals on page 61 BThe pin layout and signal names for the S VIDEO IN connector are shown below Pin No Signal Earth Luminance signal Earth Colour signal Luminance signal Colour signal BThe pin layout and signa...

Page 13: ...DEO VIDEO signals so if you wish to change the audio input source you will need to remove and insert the appropriate plugs BOnly one audio system circuit is available for the RGB AUDIO IN jacks so if you wish to change the audio input source you will need to remove and insert the appropriate plugs BIf an audio system is connected to the AUDIO OUT jack the sound volume balance can be controlled by ...

Page 14: ...mended that yo a place that is tilted at less the projector in places that 35 may cause malfunctio Make sure that enough sp outlet port Screen size 4 3 Diagonal length Height SH W LW 0 0443xSD 0 0254 LT 0 0586xSD 0 0254 LW 0 0407xSD 0 0254 LT 0 0538xSD 0 0254 Setting up Projection methods In way of installing projector any one of the following four projection methods are used Select whichever proj...

Page 15: ...ed before turning on the power Refer to pages 22 27 POWER RGB VIDEO LASER MENU PAGE SETUP AUTO RGB VIDEO AUTO SETUP ON G STANDBY R ENTER MENU POWER SHUTTER INPUT TEMP LAMP RGB INPUT FOCUS ZOOM POWER RGB VIDEO LASER MENU PAGE SETUP AUTO RGB VIDEO AUTO SETUP ON G STANDBY R ENTER MENU POWER SHUTTER INPUT TEMP LAMP RGB INPUT FOCUS ZOOM Remove the lens cover Connect the accessory mains lead Press the M...

Page 16: ...C MENU PICTURE menu page 36 When an RGB DVI signal is being input On screen menus Menu screens The various settings and adjustments for this projector can be carried out by selecting the operations from on screen menus The general arrangement of these menus is shown below NOTE BKeystone distortion of the on screen display will not be corrected PICTURE PICTURE MODE COLOR TEMP COLOR TINT BRIGHT CONT...

Page 17: ... ADJUST ENTER ENTER ESC MENU SD CARD menu page 47 PT L780NTE only The RGB YPbPr item is displayed when an RGB YPBPR signal is being input WEB CONTROL WEB STANDBY and WEB PASSWORD are only displayed for the PT L780NTE Menu operation guid Press the MENU button The menu screen will be displayed Press the I I or H H arrow buttons to select a menu The selected menu screen then be displayed Example POSI...

Page 18: ...e menu screen by pressing the F or G buttons and then press the ENTER button to return all items displayed on the screen to their factory default settings BWhen a menu screen is being displayed POSITION POSITION DOT CLOCK CLOCK PHASE KEYSTONE OSD POSITION RESIZING AUTO SETUP FRAME LOCK STANDARD H 128 V 32 H 0 V 0 32 16 OFF OFF ON ON TOP LEFT SELECT ADJUST ENTER ENTER ESC MENU Using the freeze func...

Page 19: ...ress the I or H buttons to set the selective items For the value adjusting items press the ENTER button to display an individual screen and press the I or H buttons to adjust the setting Adjusting the picture STANDARD DYNAMIC NATURAL PICTURE MODE Select the picture mode that best matches the image source and room conditions The mode best used in dark rooms is NATURAL For rooms having regular light...

Page 20: ...y This is used to adjust the white areas of the picture if they appear colourised Press the I button to make the selected colour lighter Press the H button to make the selected colour stronger Projecting sRGB compatible pictures sRGB is an international colour reproduction standard IEC61966 2 1 established by the International Electrotechnical Commission IEC If you would like the colours in sRGB c...

Page 21: ...al and the angle of tilt of the projector To prevent them from happening you can set AUTO KEYSTONE in the OPTION menu to OFF B The greater the correction of keystone distortion amount the more the picture Picture condition Operation Press the F F button Press the G G button Press the I I button Press the H H button POSITION Moves the picture position Press the I or H buttons to move the picture ho...

Page 22: ...l programme s creator BWhen a VGA60 or 525p RGB signal is being input select the signal in accordance with the input signal RESIZING This should normally be set to ON This setting is only for signals which have lower resolutions than the LCD panels Refer to page 61 for details ON The pixel resolution of the input signal is converted to the same resolution as the LCD panels before being projected F...

Page 23: ... or RGB3 is output when RGB OUT is selected Option settings BACK COLOR This sets the colour which is projected onto the screen whe signal is being input to the pro FRONT REAR This setting should be change accordance with the projector setting up method Set to FRONT when using a normal reflective screen with t projector positioned in front of screen and set to REAR wh using a translucent screen wit...

Page 24: ...ojector IDs to control two or more projectors either simultaneously or separately ALL The projectors can be simultaneously controlled from any remote control unit regardless of their ID settings 1 The projector can be controlled from the remote control unit with its projector ID set to 1 2 The projector can be controlled from the remote control unit with its projector ID set to 2 3 The projector c...

Page 25: ...ordance with the type of projection lens sold separately by pressing the I or H buttons STANDARD For standard projection LONG FOCUS For long distance projection ET LE30 MIDDLE FOCUS For medium distance projection ET LE20 SHORT FOCUS For short distance projection ET LE10 Projection lens By replacing the projection len change the projection distance NOTE BWhen replacing a projection Power indicator ...

Page 26: ...7 62 m 300 4 57 m 15 6 10 m 20 8 1 m 26 6 10 6 m 34 9 ET LE20 for medium Screen size 4 3 Diagonal length Height SH W 1 01 m 40 0 61 m 2 0 81 1 27 m 50 0 76 m 2 6 1 02 1 52 m 60 0 91 m 3 1 22 1 77 m 70 1 07 m 3 6 1 42 2 03 m 80 1 22 m 4 1 63 2 28 m 90 1 37 m 4 6 1 83 2 54 m 100 1 52 m 5 2 03 3 81 m 150 2 29 m 7 6 3 05 5 08 m 200 3 05 m 10 4 06 6 35 m 250 3 81 m 12 6 5 08 7 62 m 300 4 57 m 15 6 10 E...

Page 27: ...9xSD 0 254 0 136 ET LE30 4 0 5 6 1 4 3 LW 0 0809xSD 0 0254 0 104 LT 0 1147xSD 0 0254 0 096 16 9 LW 0 0881xSD 0 0254 0 104 LT 0 1250xSD 0 0254 0 096 Putting the ma rem Slot cover replacement When connecting the projector to a personal computer using an optional projector LAN card replace the slot cover with the accessory projector LAN card slot cover Removing the slot cover Installing the slot cove...

Page 28: ...e 53 for details on removing the cable cover NOTE Do not cover the air inlet ports when using the cable cover as stated above Do not place any heavy objects on the cable cover to prevent it from being removed Do not bend the cables greatly otherwise it will be difficult to attach the cable cover Remove the cable cover when cleaning or replacing the air filter Using the rem Using the remote termina...

Page 29: ...r to the projector is transmitted in the format shown below NOTE BThe projector can not receive the command for 10 seconds after the lamp is switched on Wait 10 seconds before sending the command BIf sending multiple commands check that a response has been received from the projector for one command before sending the next command BWhen a command which does not require parameters is sent the colon...

Page 30: ...een 20 and 80 with no condensation If you set the FAN CONTROL to HIGH page 45 set up the projector in a place where the temperature is between 0 C 32 F and 35 C 95 F and the humidity is between 20 and 80 with no condensation BTurn off the MAIN POWER switch by following the procedure on page 29 and then clean the air filter refer to page 62 Possible cause Remedy The surrounding temperature or the t...

Page 31: ...ing after the 2 The following symbols are AA Maximum picture quali A Signals are converted is projected B Some loss of data occ 3 Signals with OK in the Re command in the PICTURE 4 Signals that are compatible DVI signal is compatible on 720 x 480i 15 720 x 576i 15 720 x 480i 15 720 x 576i 15 720 x 483 31 1 920 x 1 080i 33 1 920 x 1 080i 28 1 280 x 720 45 640 x 400 31 640 x 400 37 640 x 480 31 640 ...

Page 32: ...re using the projector If the projector is used without the air filter cover installed dust and other foreign particles will be drawn into the projector and malfunctions will result BIf the dust cannot be removed by cleaning it is time to replace the air filter Please consult your dealer Furthermore if the lamp unit is being replaced replace the air filter at this time also Air filter Replacing th...

Page 33: ...s been set to HIGH the projector will switch to standby mode after approximately 10 minutes of operation The steps to on the next page should thus be completed within 10 minutes Turn off the MAIN POWER switch according to the procedure given in Turning off the power on page 29 and then disconnect the mains plug from the mains socket and check that the area around the lamp unit has cooled down Use ...

Page 34: ... indicator is illuminated or flashing Refer to page 59 B The lamp unit cover has not been securely installed B The video signal input source may not be connected properly B The input selection setting may not be correct Refer to page 28 B The BRIGHT adjustment setting may be at the minimum possible setting Refer to page 37 B The shutter function may be in use Refer to page 44 B The lens cover may ...

Page 35: ...ow distance 1 6 m 16 0 m 5 2 52 5 Optical axis shift 10 0 fixed Screen aspect ratio 4 3 Installation Front Rear Ceiling Desk Menu selection method Speaker 4 cm x 3 cm oval x 2 Max usable volume output 2 W Connectors DVI D IN connector Single line DVI D 24 pin RGB IN OUT Dual line D SUB HD 15 pin female One line is available for input and output Single line BNCX5 During YPBPR input output Y 1 0 V p...

Page 36: ...ks of International Business Machines Corporation BMacintosh is a registered trademark of Apple Computer Inc BS VGA is a registered trademark of the Video Electronics Standards Association BWindows is a registered trademark of Microsoft Corporation All other trademarks are the property of the various trademark owners Dimensions Units mm inch 25 31 32 290 11 13 32 55 2 5 32 137 5 3 8 406 15 31 32 8...

Reviews: