background image

33

Basic Operation

Notes:

•  The screen size changes if ID-1 is detected. (P. 60)
•  When ASPECT is in ZOOM mode, PIP feature cannot be used. (P. 40)

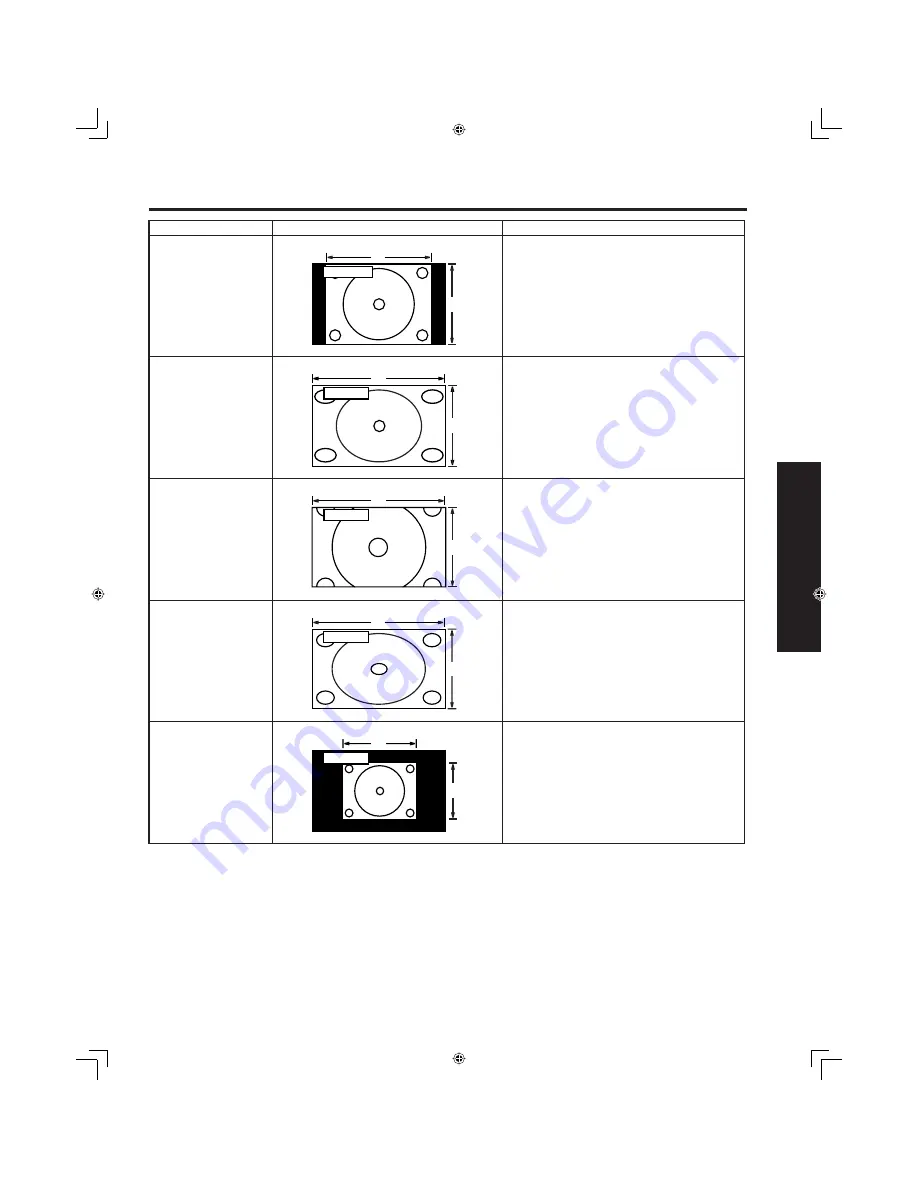
ASPECT Controls

Mode

Picture

Ex pla na tion

NORMAL

NORMAL

3

4

NORMAL will display a 4:3 picture at its 
stand ard 4:3 size.

JUST

JUST

9

16

JUST mode will display a 4:3 picture at 
max i mum size but with aspect correction 
applied to the center of the screen so that 
elongation is only apparent at the left and 
right edges of the screen. The size of the 
picture will depend on the original signal.

ZOOM

ZOOM

16

9

ZOOM mode magni

fi

 es the central section of 

the picture.

FULL

FULL

16

9

FULL will display the picture at its maximum 
size but with sight elongation.

TRUE

647-

!

"

You can reduce the image and adjust it to the 

original image quality. (Except XGA)

Summary of Contents for PT-50LC13K

Page 1: ...ad the instructions completely Please keep this manual for future reference As an ENERGY STAR Participant Panasonic has determined that this product or product model meets the ENERGY STAR guidelines for energy efficiency This operating instruction book is designed for use with models PT 50LC13 K and PT 60LC13 K Illustrations in this manual show the PT 50LC13 K ...

Page 2: ...ctions Openings in the cabinet are provided for ventilation to ensure reliable operation and to protect it from overheating Never block openings by placing the product on a bed sofa or similar surfaces 8 Do not install near any heat source such as radiators heat registers stoves or other apparatus including amplifiers that produces heat Do not install in a built in installation such as a bookcase ...

Page 3: ...ernational Business Machines Corporation Macintosh is a registered trademark of Apple Computer USA VESA and SVGA are trademarks of the Video Electronics Standard Association Even if no special notation has been made of company or product trademarks these trademarks have been fully respected Equipped with TV Noise Reduction for true MTS reproduction TV Noise Reduction is required for good stereo se...

Page 4: ...ojection display To obtain maximum benefit from your set please read these Instructions before making any adjustments and retain them for future reference Retain your purchase receipt also and record the serial number of your set in the space provided on the rear cover of these instructions Dear Panasonic Customer ...

Page 5: ... menu 24 Tuning channels 26 Automatic channel setting 26 Manual channel setting 28 Projection display operation 30 ASPECT Controls 32 Searching for the desired channel Channel search 34 Playing peripheral equipment 35 Mute Freeze SAP 36 Split screen 38 Picture in Picture PIP Screen 40 Adjusting screen position and size 42 Audio Adjustments 44 Picture Adjustments 46 Closed Captions 48 Lock Feature ...

Page 6: ...upply house Before you purchase any cables be sure you know what type of output and input connectors your various components require Also determine the length of cable you ll need Safety Precaution Viewing position Side view Top view To optimize your viewing comfort please follow the viewing guidelines shown in the diagrams below If viewing for an extended period of time sit as far back from the s...

Page 7: ...ry and or damage to the remote control Observe the following precautions 1 Batteries should always be replaced as a pair Always use new batteries when replacing the old set 2 Do not mix battery types example Zinc Carbon with Alkaline 3 Do not attempt to charge short circuit disassemble heat or burn used batteries 4 Battery replacement is necessary when the remote control acts sporadically or stops...

Page 8: ... P 41 SD P 35 PIP MAX P 41 FREEZE P 36 PIP SPLIT CH Down PP 39 41 PIP SPLIT CH Up PP 39 41 CH Search P 34 PIP P 40 SPLIT P 38 PIP MOVE P 41 PIP SPLIT SWAP PP 39 41 DVD Digital Versatile Disc Mode Selection for Remote Control VCR Mode Selection for Remote Control TV Mode Selection for Remote Control Digital TV Mode Selection for Remote Control AUX Mode Selection for Remote Control Receiver Amplifie...

Page 9: ...el down Returns to normal viewing from the MENU screen Previous before item in MENU SAP button Changes the audio mode P 37 Display menu Press the ACTION button to display Menu screen Note This section describes TV mode only For other modes see pages 73 79 2 1 H C C B A L A M R O N O E R E T S P A S O N O M When the Menu screen is displayed PP 24 25 Moves cursor to the left during menu mode Moves c...

Page 10: ...P indicator This indicator lights up when there is an abnormal temperature in the unit P 80 Remote Control Sensor POWER button POWER indicator P 23 Volume up down buttons P 30 Channel up down buttons P 31 Location of Controls A A SD CARD slot PC CARD slot Using your finger slide Slot Cover in direction of arrow to open Slot Cover Model PT 50LC13 K unit shown ...

Page 11: ...blocked This could cause damage Location of Controls Vent SIDE Component signal input 1 4 terminals P 16 AV out terminals P 17 Input 1 2 terminals P 15 RGB Input 1 terminal PP 18 19 Digital Input terminal P 20 Input 3 terminals P 15 RGB Input 2 terminal PP 18 19 Model PT 50LC13 K unit shown ...

Page 12: ...as an option you may need to fashion a cable to suit the component concerned Read the instruction manual for each system component carefully before connecting it If there is a lot of jitter in the video signal input from the video source the picture on the screen may flicker In this case it will be necessary to connect a TBC time base corrector Notes on connections Installation VHF UHF TERMINAL ON...

Page 13: ... box is required for proper reception Check with your local Cable company for its compatibility requirements For reception of cable channels 01 125 connect the cable supplied by your local cable company Antenna Mode must be set to CABLE P 26 Installation Or CABLE BOX TERMINAL ON THE BACK OF THE CABLE BOX In from cable Connect the cable from the antenna or cable system to the VHF UHF terminal on th...

Page 14: ...nel to CH3 or CH4 This does not apply when signal is input from VIDEO INPUT Connecting the Antenna Cable to the RF in Terminal VCR Or Installation Connect the cable from the Output terminal on the back of the Cable Box or antenna cable system to the Antenna input terminal on the back of the VCR VCR Incoming Cable from Antenna or Cable TV System TO VCR In from cable TERMINAL ON THE BACK OF THE CABL...

Page 15: ... 2 3 input terminals Input 3 is located on the side of the unit Select the desired VIDEO input position by pressing the TV VIDEO button P 35 When connecting video cables priority is given to the S Video cable when the S Video input terminal and the video input terminal are connected at the same time Installation S VHS VCR S VIDEO AUDIO VHS VCR VIDEO AUDIO Similar connections are available at the I...

Page 16: ...Component signal output terminal indication will differ according to the output device Y PB PR Please read the operating instructions included with the output device Installation Mode type Signal data Information menu display No of dots H X V Horizontal frequency kHz Vertical frequency Hz DTV Format Signals 480i 664 X 485 15 73 29 97 480 i 480p 720 X 483 31 47 59 94 480 p 720p 1 280 X 720 45 00 60...

Page 17: ...same video recorder as this could cause incorrect operation Even if TV is in Split or PIP mode OUT terminals only output the main picture and sound signals A sub picture including channel search etc will not be output VIDEO OUT terminals will not output Y PB PR RGB DIGITAL IN or SD PC card signals The S Video OUT terminal outputs the same signal that is input from the S Video IN terminal Installat...

Page 18: ...the projection display a vertical scanning frequency of 60 Hz is recommended Do not set the horizontal and vertical scanning frequencies for PC signals which are above or below the specified frequency range Select the desired RGB input position by pressing the PC MENU or TV VIDEO button P 35 Similar connections are available at the RGB IN 1 2 Terminals Pin No Signal name 1 R 2 G 3 B 4 NC 5 NC 6 Gr...

Page 19: ... Connecting a DTV Decoder to RGB IN RGB cable D SUB 15P Audio cable Notes Select the desired RGB input position by pressing the PC MENU or TV VIDEO button P 35 Similar connections are available at the RGB IN 1 2 Terminals M3 stereo mini pin DTV Decoder ...

Page 20: ...TAL IN terminal of this projection display high definition pictures can be displayed on the screen in their digital form This terminal is for use in the future when High bandwidth Digital Content Protection DTV decoders DVD players and D VHS are put on the market DVI cable Notes Select the DIGITAL input position by pressing the TV VIDEO button P 35 The DIGITAL IN terminal can only be used with 108...

Page 21: ...ation is required after the projection display is connected to the PC Mode type Signal data Information menu display No of dots H X V Horizontal frequency kHz Vertical frequency Hz Personal Computer Signals VGA400 70 Hz 640 X 400 31 47 70 08 VGA400 70Hz VGA480 60 Hz 640 X 480 31 47 59 94 VGA 60Hz Macintosh 13 640 X 480 35 00 66 67 MAC 13 VESA400 85 Hz 640 X 400 37 86 85 08 VESA 85Hz VESA480 72 Hz ...

Page 22: ...SS Receiver or VCR Case 1 Case 2 When setup is complete the lowest channel picture appears If setup is incomplete the following screen appears Check connection of Antenna Cable to the RF in Terminal then try Automatic Channel Setting again PP 26 27 Note When the unit is turned on for the first time Automatic Channel Setting is performed Initial Setup Note To cancel AUTO SET in progress press the S...

Page 23: ...e Power Indicator blinks Red for about 1 minute and then turns solid Red Turning the Power ON and OFF Power ON OFF LED ACTION Red Power OFF Standby mode Red blink Power OFF Now cooling Green Power ON Green blink Power ON Preparing to light lamp Power shuts off after a Black Screen is displayed for a few seconds Note If POWER is pressed during the Black Screen display Power is turned back on POWER ...

Page 24: ...Pressing the ACTION button displays the MENU screen Note Depending on the signal being input some items may or may not be adjustable and some functions may or may not be available 1 Flow Chart of Main menu ADJUST SET UP PICTURE AUDIO POSITION SIZE INFORMATION PAGE SELECT END ADJUST SET UP LANGUAGE ENGLISH CHANNEL LOCK CAPTION VIDEO OTHER PAGE SELECT END ...

Page 25: ...ER ON SURROUND OFF BBE OFF SELECT EXIT INPUT SIGNAL NTSC EXIT ADJUST SET UP LANGUAGE ENGLISH CHANNEL LOCK CAPTION VIDEO OTHER PAGE SELECT END SET UP CHANNEL ANTENNA CABLE AUTO SET MANUAL SET CHANNEL CAPTION WEAK SIGNAL DISPLAY OFF SELECT EXIT CAPTION CAPTION MODE OFF CC ON MUTE CAP C1 SELECT EXIT VIDEO VIDEO NR OFF ID 1 OFF 480P COLOR MATRIX SDTV RGB VGA 3D Y C ON 3D IP ON SELECT EXIT LOCK ENTER 4...

Page 26: ... automatically advance until all channels have been scanned Channel numbers with a video signal present will be stored in the channel scan memory Automatic channel setting Continued on the next page Note To cancel AUTO SET in progress press the SWAP button Tuning channels ADJUST SET UP LANGUAGE ENGLISH CHANNEL LOCK CAPTION VIDEO OTHER PAGE SELECT END SET UP CHANNEL ANTENNA CABLE AUTO SET MANUAL SE...

Page 27: ... can be deleted manually using the MANUAL SET feature 4 Case 1 Case 2 When setup is complete the lowest channel picture appears If setup is incomplete the screen at right appears Check connection of Antenna Cable to the RF in Terminal then try Automatic Channel Setting again Press to exit menu 5 Tuning channels NO CH FOUND PLEASE CHECK ANTENNA CABLE CONNECTION THEN PRESS ACTION KEY AGAIN ...

Page 28: ...lect CHANNEL Press to display the CHANNEL Press to select TV or CABLE Press to select ANTENNA 1 2 Manual channel setting Continued on the next page ADJUST SET UP LANGUAGE ENGLISH CHANNEL LOCK CAPTION VIDEO OTHER PAGE SELECT END SET UP CHANNEL ANTENNA CABLE AUTO SET MANUAL SET CHANNEL CAPTION WEAK SIGNAL DISPLAY OFF SELECT EXIT SET UP CHANNEL ANTENNA CABLE AUTO SET MANUAL SET CHANNEL CAPTION WEAK S...

Page 29: ...rom memory Press to exit menu Note Some channels with very weak signals may be locked into memory If desired these channels can be deleted manually using the MANUAL SET feature 5 6 To add channel To delete channel Tuning channels MANUAL SET ENTER CHANNEL 01 CHOOSE A CHANNEL USING CHANNEL UP DOWN DELETE EXIT MANUAL SET ENTER CHANNEL 01 CHOOSE A CHANNEL USING CHANNEL UP DOWN ADD EXIT ...

Page 30: ...annel number and volume level are stored even after the projection display is turned off Power consumption can be reduced if the volume level is lowered Or 0 Note Refer to Using the number keys on the next page Projection display operation CH 02 CH 125 CH 01 or CABLE 125 TV 69 Operation can be done from the projection display Remote Control Sensor POWER button POWER indicator Volume up down button...

Page 31: ... O M Aspect types P 32 Receivable broadcast types P 37 Channel Channel caption P 57 TV status display Press the RECALL button except when the MENU screen is displayed to display current TV status information Projection display operation Projection display Channel up down buttons can also be used to select an outside input as shown right No input mode is displayed for terminals with no equipment co...

Page 32: ... programs for a commercial purpose or for public presentation please note that by using the aspect ratio 16 9 selection function to change the aspect ratio you may be infringing on the rights of the original copyright owner of that program under copyright protection laws If a normal 4 3 picture is projected in wide screen distortion may occur around the edges so that part of the picture may no lon...

Page 33: ...splay a 4 3 picture at maximum size but with aspect correction applied to the center of the screen so that elongation is only apparent at the left and right edges of the screen The size of the picture will depend on the original signal ZOOM ZOOM 16 9 ZOOM mode magnifies the central section of the picture FULL FULL 16 9 FULL will display the picture at its maximum size but with sight elongation TRU...

Page 34: ...he right bottom the next channel is displayed at the left top overwriting the previously displayed channel Notes To end channel search press SEARCH OPEN CLOSE While using the PIP feature Channel search is not available 0 Example Select channel 6 0 Searching for the desired channel Channel search Channel up and down buttons When or button is pressed the next channel up or down is displayed in singl...

Page 35: ...OMPONENT 1 Signal of source connected to COMPONENT VIDEO INPUT 1 is displayed COMPONENT 2 Signal of source connected to COMPONENT VIDEO INPUT 2 is displayed COMPONENT 3 Signal of source connected to COMPONENT VIDEO INPUT 3 is displayed COMPONENT 4 Signal of source connected to COMPONENT VIDEO INPUT 4 is displayed RGB 1 Signal of source connected to RGB IN 1 is displayed RGB 2 Signal of source conn...

Page 36: ...een a frozen still picture and a moving picture each time the FREEZE button on the remote control unit is pressed Press FREEZE button again to resume motion Sound mute Useful when answering the phone or receiving unexpected visitors Freezing pictures E Z E E R F E T U M Note The audio output from AV OUT is not muted Note The video output from AV OUT is not frozen Mute Freeze SAP ...

Page 37: ...udio mode If stereo broadcast is weak and the display flickers select MONO audio mode for possibly better results SAP broadcast Secondary Audio Program sub language Select SAP audio mode for the sub language MONO broadcast Normal monaural sound broadcast Receivable Broadcast Types 2 1 H C O E R E T S P A S O N O M 2 1 H C P A S O N O M O E R E T S 2 1 H C P A S O N O M O E R E T S 2 1 H C P A S O ...

Page 38: ...ge channels and adjust the volume The right and left screens cannot display the same picture at the same time A split screen which includes an RGB DIGITAL IN signal is fixed as SPLIT SCREEN NORMAL Example RGB input is shown right CARD input screen cannot be displayed using the Split Screen function Splitting the screen Press to split The previously selected screen appears on the left Returning to ...

Page 39: ...y change the input Finally press SWAP button again to change the screen back to the right Press to select the desired channel PIP buttons can also be used to select an outside input for the right side of the screen No input mode is displayed for terminals with no equipment connected Note Picture quality may change according to the combination of signals input to the left and right screens Split sc...

Page 40: ...IP screens are processed by individual circuits image quality may vary slightly PIP mode returns to single screen when the projection display is turned off The Main and PIP screens cannot display the same picture at the same time An RGB DIGITAL IN signal and CARD input screen cannot be displayed using the PIP screen function A component signal cannot be displayed on a PIP screen Thus when a compon...

Page 41: ... the screen size for PIP screen You can choose PIP screen size of 3 magnifications Press to large PIP screen size Note PIP buttons can also be used to select an outside input for the PIP screen Initial size 0 Initial position 0 Note The last size chosen is saved and will not be erased even if the power is turned off Note The last position chosen is saved and will not be erased even if the power is...

Page 42: ...ayed at default FULL mode Adjusting screen position and size ADJUST SET UP PICTURE AUDIO POSITION SIZE INFORMATION PAGE SELECT END POSITION H POSITION V POSITION V SIZE NORMAL ADJUST SELECT EXIT POSITION H POSITION V POSITION H WIDTH WIDEN NORMAL ADJUST SELECT EXIT POSITION H POSITION V POSITION NORMAL ADJUST SELECT EXIT RGB input DIGITAL IN H POSITION V POSITION only POSITION H POSITION V POSITIO...

Page 43: ...put Notes This projection display is equipped with various screen modes If a screen mode with a different aspect from the broadcast program is selected image will appear differently Select the proper screen mode with this in mind Be careful when using this projection display for commercial purposes or for public use such as in cafes and hotels Shrinking and enlarging images by using screen mode sw...

Page 44: ...rs Surround sound effect is not available for normal mono broadcasts You can turn off the internal speakers when it is connected to external audio equipment Notes Sound signals are output from the rear AUDIO OUT terminal When volume is adjusted or the mute button is pressed from the remote control a message will be displayed Press to exit menu Audio Adjustments AUDIO AUDIO MENU NORMAL AUDIO ADJUST...

Page 45: ...is set to AUTO or if BBE is ON BASS and TREBLE cannot be adjusted BBE sound technology enhances speech intelligibility and restores the dynamic range of musical passages to provide outstanding natural sound Press to exit menu 4 Note If BBE is ON SURROUND cannot be selected Audio Adjustments AUDIO ADJUST BASS TREBLE BALANCE NORMAL ADJUST SELECT EXIT AUDIO AUDIO MENU NORMAL AUDIO ADJUST SPEAKER ON S...

Page 46: ...P PICTURE AUDIO POSITION SIZE INFORMATION PAGE SELECT END WARM Ideal for movies in low lighting conditions CINEMA See next page Normal color Displays unaltered image During RGB DIGITAL IN input COLOR TEMP changes to NORMAL PICTURE PICTURE MENU DYNAMIC PICTURE ADJUST COLOR TEMP NORMAL SELECT EXIT NORMAL COOL NORMAL DYNAMIC Displays a clear screen with a high contrast of light to dark During RGB DIG...

Page 47: ...or levels are adjusted Except RGB DIGITAL IN Press button Picture intensity becomes weaker as both contrast and color levels are adjusted SHARPNESS Press button The picture quality becomes sharper Except RGB DIGITAL IN Press button The picture quality becomes softer CONTRAST Press button Only the Highlights of the image become brighter adding Contrast RGB DIGITAL IN only Press button The Highlight...

Page 48: ...NU screen and select SET UP Press to select CAPTION Press to display the CAPTION screen Press repeatedly to select CAPTION MODE Press to select CAPTION MODE Press to exit menu 3 This receiver has a built in decoder that provides a visual depiction of the audio portion of a television program in the form of written words across the screen white or colored letters on a black background It allows the...

Page 49: ...press the MUTE button again Note This feature functions when the Closed Caption Mode is in the OFF position The program being viewed must be broadcast with Closed Caption Notes The setting for CC ON MUTE is valid only when the CC MODE is OFF CC MODE set to ON will override CC ON MUTE Closed Caption is not displayed if the input signal is COMPONENT VIDEO INPUT of 480P or more or from RGB DIGITAL IN...

Page 50: ... 3 Press to save 4 digit code Notes Once ratings are set restricted tapes or programs cannot be accessed unless the secret code is entered If you forget your secret code refer to Reset User s Memory Functions on page 56 Changing your secret code You will need your current code Press to clear current code Repeat step 2 to enter new code Press to display LOCK menu for rating screen and go to page 51...

Page 51: ...O Cannot view NR programs YES Can view NR programs ON V Chip Control is activated OFF V Chip Control is deactivated Press to set Note Ratings highlighted in Red will be blocked while those not highlighted black letters will not be blocked Lock Feature LOCK ENTER 4 DIGIT CODE ENTER 0 9 EXIT LOCK 1 2 US MOVIES OFF CHANGE SETTINGS US TV PROGRAMS OFF CHANGE SETTINGS SELECT EXIT LOCK 1 2 US MOVIES OFF ...

Page 52: ...select from standard TV ratings chart 1 or customize to a specific content rating chart 2 ON V Chip Control is activated OFF V Chip Control is deactivated VIEW NR Not Rated PROGRAMS NO Cannot view NR programs YES Can view NR programs Lock Feature VIEW NR PROGRAMS YES TV Y UNLOCKED TV Y7 FV TV G TV PG V S L D TV 14 V S L D TV MA V S L CONTAINS NO RATING SELECT EXIT LOCK 1 2 US MOVIES OFF CHANGE SET...

Page 53: ...GRAMS NO Cannot view E programs YES Can view E programs ON V Chip Control is activated OFF V Chip Control is deactivated Press to set Note Ratings highlighted in Red will be blocked while those not highlighted black letters will not be blocked Note 2 2 is the LOCK Menu for Canada LOCK ENTER 4 DIGIT CODE ENTER 0 9 EXIT LOCK 2 2 CANADIAN ENGLISH OFF CHANGE SETTINGS CANADIAN FRENCH OFF CHANGE SETTING...

Page 54: ... will be blocked while those not highlighted black letters will not be blocked ON V Chip Control is activated OFF V Chip Control is deactivated VIEW E Exempt PROGRAMS NO Cannot view E programs YES Can view E programs Note 2 2 is the LOCK Menu for Canada VIEW E PROGRAMS YES G UNLOCKED 8 ANS 13 ANS 16 ANS 18 ANS EXEMPT SELECT EXIT LOCK 2 2 CANADIAN ENGLISH OFF CHANGE SETTINGS CANADIAN FRENCH OFF CHA...

Page 55: ...nguage or sexual dialogue or situations TV PG PARENTAL GUIDANCE May contain infrequent coarse language limited violence some suggestive sexual dialogue and situations TV 14 PARENTS CAUTIONED May contain sophisticated themes sexual situations strong language and more intense violence TV MA MATURE AUDIENCE May contain mature themes profane language graphic violence and sexual situations FV Fantasy V...

Page 56: ...ff automatically LOCK ENTER 4 DIGIT CODE ENTER 0 9 EXIT When V Chip Control is activated CH08 D E D E E C X E G N I T A R M A R G O R P Y V T G N I T A R E D O C 9 0 R E T N E CH03 CH08 G N I T A R M A R G O R P D E D E E C X E Y V T G N I T A R E D O C 9 0 R E T N E Temporarily deactivate V Chip control Enter your secret code in the blocking message screen V Chip control is reactivated when power...

Page 57: ...cursor to the right Press to select a station Repeat step 3 and 4 until the Caption List is complete 4 Press to set Press to select channel number To remove a registered channel number select the station then press the button CLEAR To make a correction press the button SET UP CHANNEL ANTENNA CABLE AUTO SET MANUAL SET CHANNEL CAPTION WEAK SIGNAL DISPLAY OFF SELECT EXIT ADJUST SET UP LANGUAGE ENGLIS...

Page 58: ...ET UP CHANNEL screen Press to set ON or OFF Press to select WEAK SIGNAL DISPLAY Press to exit menu 3 Note If unit is connected to equipment which has blue back feature selecting ON will have no effect on the other equipment When ON is selected the picture is displayed even when a broadcast signal is weak or non existent SET UP CHANNEL ANTENNA CABLE AUTO SET MANUAL SET CHANNEL CAPTION WEAK SIGNAL D...

Page 59: ...k signal conditions the Video NR circuitry reduces noise in the luminance channel It is important to note that Video NR should remain OFF for maximum picture detail when receiving a strong signal or viewing high quality video Note When an RGB DIGITAL IN signal is input VIDEO NR is set to OFF only ADJUST SET UP LANGUAGE ENGLISH CHANNEL LOCK CAPTION VIDEO OTHER PAGE SELECT END VIDEO VIDEO NR OFF ID ...

Page 60: ... INPUT 1 3 or COMPONENT VIDEO INPUT 1 4 the screen size is automatically changed Press to select VIDEO Press to display the VIDEO screen Press to set ON or OFF Press to select ID 1 Press to exit menu 3 Notes When ID 1 is detected and screen size is changed Aspect mode will be displayed When displaying split screen ID 1 is not detected ADJUST SET UP LANGUAGE ENGLISH CHANNEL LOCK CAPTION VIDEO OTHER...

Page 61: ...is a High Definition system HD Press to select VIDEO Press to display the VIDEO screen Press to select 480P COLOR MATRIX Note 480p COLOR MATRIX does not need to be set when using Hi Definition equipment or 480i output equipment Press to set SDTV or HDTV Press to exit menu 3 ADJUST SET UP LANGUAGE ENGLISH CHANNEL LOCK CAPTION VIDEO OTHER PAGE SELECT END VIDEO VIDEO NR OFF ID 1 OFF 480P COLOR MATRIX...

Page 62: ...t RGB DIGITAL Input Feature ADJUST SET UP LANGUAGE ENGLISH CHANNEL LOCK CAPTION VIDEO OTHER PAGE SELECT END VIDEO VIDEO NR OFF ID 1 OFF 480P COLOR MATRIX SDTV RGB VGA 3D Y C ON 3D IP ON SELECT EXIT When DIGITAL IN signal is input Press to set Press to select DIGITAL IN Or Note Select VGA 480P manually if picture appears unnatural in AUTO When RGB signal is input VGA When RGB DIGITAL IN input signa...

Page 63: ...ect SET UP Press to select VIDEO Press to display the VIDEO screen Press to set ON or OFF Press to select 3D IP Press to exit menu 3 ADJUST SET UP LANGUAGE ENGLISH CHANNEL LOCK CAPTION VIDEO OTHER PAGE SELECT END VIDEO VIDEO NR OFF ID 1 OFF 480P COLOR MATRIX SDTV RGB VGA 3D Y C ON 3D IP ON SELECT EXIT ON Usually set to ON OFF Set to OFF if picture appears unnatural Accurate separation of the pictu...

Page 64: ...ER Press to exit menu 3 ADJUST SET UP LANGUAGE ENGLISH CHANNEL LOCK CAPTION VIDEO OTHER PAGE SELECT END OFF 30min 60min 90min Sleep Timer Feature The projection display can be set to shut itself off at a preselected time Note Pressing RECALL with sleep timer set displays remaining time Minutes remaining is displayed for the last 3 minutes before shutoff OTHER SLEEP TIMER OFF DEMO MODE OFF SELECT E...

Page 65: ...displays follow the instructions below Information Press the ACTION button to display the MENU screen and select ADJUST 1 Press to select INFORMATION Press to display INFORMATION screen You can display the input signal type Display items differ depending on the input signal 2 Press to exit menu ADJUST SET UP LANGUAGE ENGLISH CHANNEL LOCK CAPTION VIDEO OTHER PAGE SELECT END ADJUST SET UP PICTURE AU...

Page 66: ...MO MODE Press to exit menu 3 ADJUST SET UP LANGUAGE ENGLISH CHANNEL LOCK CAPTION VIDEO OTHER PAGE SELECT END Function demonstrations of this unit are displayed in Demo mode ON Demo mode is started OFF Demo mode is canceled Note Demo mode setting remains even when power is turned off To turn off Demo mode select DEMO MODE OFF in the menu screen OTHER SLEEP TIMER OFF DEMO MODE OFF SELECT EXIT ...

Page 67: ...e PC as shown in diagram at below Digital cameras that are compliant with DCF specifications use folders with a specific structure The following diagram shows an example of the folder structure 100_PANA Folder Folder names consist of a 3 digit folder number which is followed by five arbitrary characters Digital camera images are stored within these folders P1000001 JPG DCF File File names consist ...

Page 68: ... files can be displayed This number may be lower if subfolders or files other than JPEG are included in the folder Depending on JPEG file type JPEG will be displayed instead of thumbnail image The media listed in the right column above can be read via the PC Card in the PC Card adaptor Hard disk PC Cards Flash ATA Cards and other recorded media cannot be used Place the selected media onto the PC C...

Page 69: ...area SD PC When both an SD Card and PC Card are inserted the buttons can be used to select a card in the index area MENU Area Operation To select a page directly enter the page number with the Number Keys then press ACTION Press to set Press to select icon MENU PAGE 1 6 SINGLE SLIDE SD PC MENU PAGE 1 6 SINGLE SLIDE SD PC MENU PAGE 1 6 SINGLE SLIDE SD PC RETURN RETURN TO MENU Press RECALL to displa...

Page 70: ...to display next previous page of 9 thumbnail files Press ACTION to display file in full screen size MENU PAGE 1 6 SINGLE SLIDE SD PC Press The next image is displayed Press The previous image is displayed Press Each press rotates image 90 Continued in left column of next page SINGLE VIEW SCREEN Press Press Press Press Press Press Press Press Press ...

Page 71: ...nu When ACTION is pressed while the Information Screen is displayed the Picture Adjust menu p 46 is displayed Rotation angle is maintained Note If a file name exceeds 8 characters a file name different from the original is displayed Pressing RECALL returns to SINGLE VIEW SCREEN FILE P2000006 DATE 07 31 2003 Information Screen PICTURE ADJUST COLOR TINT BRIGHTNESS PICTURE SHARPNESS NORMAL ADJUST SEL...

Page 72: ... b Wait for about 1 minute until the cooling fan stops The lamp cooling fan will continue to operate for about 1 minute after turning off the power Do not unplug the power cord from the outlet until the fan has stopped Avoid interrupting the power line by using circuit breakers or switchable power strips Due to the characteristics and use conditions of individual lamps the lamp may cease to light ...

Page 73: ...your remote is set for this code Then press the Remote Control POWER button to test the component If the procedure was successful the component will turn on Notes Due to changes in infra red commands used by manufacturers some brands have several codes If your unit does not respond to the first code please try the next one If an incorrect number is entered or there is an incomplete entry after 30 ...

Page 74: ...found press the ACTION button to lock it in Notes The step and set mode will start from the current device not the beginning of the library except for the first time The step and set mode works in the reverse direction using the button Infrared Remote Codes for Specific Components Helpful Hint Write down the code numbers for your components in the space provided below This will serve as a handy re...

Page 75: ...HILIPS 323 324 331 CITIZEN 306 PIONEER 323 CRAIG 305 306 329 PROSCAN 300 301 302 323 324 331 333 345 346 CURTIS MATHES 324 345 QUASAR 321 322 323 324 DAEWOO 301 324 343 RADIO SHACK 305 309 324 333 336 340 DBX 310 311 339 RCA 300 301 302 323 324 331 333 345 346 DIMENSIA 345 REALISTIC 305 309 324 336 340 EMERSON 303 319 320 325 326 343 SAMSUNG 302 304 333 FISHER 305 307 308 309 313 SANSUI 320 326 33...

Page 76: ...28 129 130 VIEWSTAR 129 130 PIONEER 101 116 ZENITH 100 117 ZENITH DRAKE SATELLITE 100 Remote Control Quick Reference Guide Operating peripheral equipment Maker List DVD Maker Set Up No Maker Set Up No DENON 100 SABA 101 FERGUSON 101 SAMSUNG 110 JVC 109 SHARP 108 MITSUBISHI 105 SONY 104 NORDMENDE 101 TECHNICS 100 PANASONIC 100 THOMSON 101 PHILIPS 103 TOSHIBA 103 PIONEER 102 YAMAHA 100 RCA 101 ZENIT...

Page 77: ...VR Maker Set Up No Maker Set Up No ADMIRAL 120 OPTIMUS 103 127 130 131 AIWA 125 126 PANASONIC 118 119 121 DENON 134 135 136 PHILIPS 123 FISHER 104 PIONEER 105 107 GARRARD 113 QUASAR 118 119 121 HARMAN KARDON 115 123 RCA 103 105 127 130 131 JENSEN 129 SANSUI 103 111 139 JVC 132 133 SHARP 134 137 KENWOOD 100 108 SONY 122 MAGNAVOX 127 SOUNDESIGN 138 MARANTZ 124 TEAC 111 112 113 MCLNTOSH 116 TECHNICS ...

Page 78: ... Navigation Up Down Next Previous Track Volume Navigation Left Right ACTION TV DTV CBL DBS DVD TV Menu DTV Menu Enter DBS Menu Select DVD DTV DBS DVD Menu Menu On Off Menu On Off PAGE DBS DVD Page Up Down Skip R TUNE TV CBL VCR DBS DTV AUX Cassette Deck Previous Channel Previous STB Channel Deck A B RECALL TV VCR DBS DVD DTV CD Onscreen Display Onscreen Display Time Format 1 2 3 4 5 6 7 8 0 9 TV V...

Page 79: ...lay Play TV VCR AUX Cassette Deck DVD CD RCVR SPLIT function PIP Size Fast Forward Fast Forward Skip Search Fast Forward Skip Search Fast Forward Surround TV VCR AUX Cassette Deck CD DVD Freeze Pause Pause Still TV VCR DVD CD AUX Cassette Deck PIP Swap SPLIT swap Stop Stop Stop Stop TV DTV VCR AUX Cassette Deck DBS Channel Search Info EPG Record Record Record VCR DBS TV VCR switch TV DBS switch TV...

Page 80: ...electing channels on the TV is the TV VIDEO mode for the VCR set to TV Image appears doubled or tripled Is the antenna facing the right direction Is the antenna receiving any signals reflected off of mountains or buildings Images disappear at the top and bottom of the screen When using 16 9 image software there is no picture at the top and bottom of the screen cinema vision size software etc Durin...

Page 81: ... AV INPUT 1 3 VIDEO 1 0 Vp p 75 Ω RCA Pin Jack S VIDEO Y 1 Vp p 75 Ω C 0 286 Vp p 75 Ω Mini DIN 4 pin AUDIO L R 0 5 Vrms RCA Pin Jack x 2 COMPONENT VIDEO INPUT 1 4 Y 1 0 Vp p with sync 75 Ω Pin Jack PB PR 0 35 Vp p 75 Ω Pin Jack x 2 AUDIO L R 0 5 Vrms RCA Pin Jack x 2 DIGITAL IN INPUT DIGITAL IN DVI 1 0 24 pin AUDIO L R 0 5 Vrms RCA Pin Jack Type 2 Card slot SD Card slot SD Card Multi Media Card P...

Page 82: ... careful to follow the instructions that come with the cloth DO NOT bring into contact with insecticide or other volatile substances DO NOT allow the unit to come into contact for extended periods with rubber or vinyl products Remove dirt and soiling by wiping with a light cloth Even if the unit is heavily soiled do not apply cleaner directly to the unit Soak a cloth in a solution of neutral clean...

Page 83: ...ties so the above limitations and exclusions may not be applicable Telephone 905 624 5505 Fax 905 238 2360 Web www panasonic ca Richmond British Columbia Panasonic Canada Inc 12111 Riverside Way Richmond BC V6W 1K8 Tel 604 278 4211 Fax 604 278 5627 Calgary Alberta Panasonic Canada Inc 6835 8th St N E Calgary AB T2E 7H7 Tel 403 295 3955 Fax 403 274 5493 Mississauga Ontario Panasonic Canada Inc 5770...

Page 84: ...GB IN 1 2 terminals 11 Right screen 38 S SAP button 9 SD Card 68 Sound mute 36 SVGA 21 T TEMP indicator 10 TV VIDEO button 9 35 U Using stereo system 17 Using VCR 14 V VESA 21 VGA 21 VHF UHF terminal 11 Volume buttons projection display 10 30 VOL buttons remote control 9 24 X XGA 21 Y Y PB PR 16 Customer Record The serial number of this product can be found on its back cover You should note this s...

Page 85: ...ait aux normes d efficacité énergétique du programme Avant de raccorder régler ou utiliser l appareil il est recommandé de lire attentivement le manuel d utilisation Conservez par ailleurs ce manuel en lieu sûr pour pouvoir le retrouver en cas de besoin Ce manuel d utilisation se rapporte aux modèles PT 50LC13 K et PT 60LC13 K Les illustrations figurant dans ce manuel s appliquent au PT 50LC13 K ...

Page 86: ...aire particulièrement attention à ses extrémités de branchement y compris sa fiche 11 N utiliser que les accessoires ou périphériques recommandés par le fabricant 12 Ne placer l appareil que dans une baie ou sur un support trépied gabarit d installation etc recommandée par le fabricant ou vendu avec l appareil Le chariot sur lequel se trouve l appareil doit être déplacé avec soin Des arrêts brusqu...

Page 87: ... International Business Machines Corporation Macintosh est une marque déposée de Apple Computer USA VESA et SVGA sont des marques de commerce de Video Electronics Standard Association Même s il n y a aucune mention de cette compagnie ou des marques de commerce les marques de commerce ont toutefois été respectées Cet appareil est équipé d un réducteur de bruit télé pour une fidèle reproduction stér...

Page 88: ...ent Pour profiter au mieux de votre acquisition lire attentivement le manuel d utilisation avant d effectuer quelque réglage que ce soit conserver ce manuel pour référence ultérieure Conserver également la facture d achat et noter le numéro de série à l emplacement prévu à cet effet sur la dernière page de ce manuel Cher client Panasonic ...

Page 89: ...initial 22 Établissement coupure du contact 23 Organigramme du menu principal 24 Syntonisation des canaux 26 Réglage automatique des canaux 26 Réglage manuel des canaux 28 Fonctionnement de l écran de projection 30 Commandes du format 32 Recherche du canal désiré recherche de canal 34 Utilisation d appareils périphériques 35 Coupure du son arrêt sur l image seconde voie audio 36 Écran partagé 38 É...

Page 90: ...ant ou un vendeur d appareils électroniques Avant d acheter des câbles s assurer de bien connaître les divers types de connecteurs d entrée et de sortie des appareils Mesurer également les longueurs nécessaires Mesures de sécurité Prendre les mesures appropriées pour empêcher l appareil de basculer Position de visualisation Vue latérale Vue de dessus Pour un confort de visualisation optimal suivre...

Page 91: ...a corrosion des piles ce qui endommagerait la télécommande Observer les précautions suivantes 1 Toujours remplacer les deux piles en même temps De même n utiliser que des piles fraîches pour remplacer les piles usagées 2 Ne pas mélanger des piles de types différents exemple carbone zinc et alcaline 3 Ne pas tenter de recharger court circuiter démonter chauffer ou brûler les piles usagées 4 Il est ...

Page 92: ...ge pause P 36 Sélection de canal ordre croissant Image sur image écran partagé P 39 41 Sélection de canal ordre décroissant Image sur image écran partagé P 39 41 Recherche de canal P 34 Image sur image P 40 Écran partagé P 38 Déplacement de l image sur image P 41 Permutation de l image sur image écran partagé P 39 41 Sélection du mode DVD Digital Versatile Disc pour la télécommande Sélection du mo...

Page 93: ...mal à partir de l écran de menu Rubrique précédente au menu Touche de seconde voie audio SAP Change le mode audio P 37 Affiche le menu Appuyer sur la touche ACTION pour afficher le menu à l écran Nota Cette section décrit le mode TV seulement Voir la description des autres modes aux pages 73 à 79 Lors de l affichage d un menu P 24 25 Déplace le curseur vers la gauche en mode menu Déplace le curseu...

Page 94: ...nce d une température anormale dans l appareil P 80 Capteur de la télécommande Interrupteur POWER Voyant POWER P 23 Pour ouvrir utiliser un doigt pour glisser le couvercle de la fente de carte dans la direction de la flèche Touches du volume P 30 Touches de syntonisation des canaux P 31 Emplacement des commandes Ouvrir A A Fente de carte SD Fente de carte PC Couvercle de la fente de carte Le modèl...

Page 95: ...t endommager l appareil Emplacement des commandes Évent Prises d entrée 1 à 4 des signaux composants P 16 Prises de sortie AV P 17 Prises d entrée 1 et 2 P 15 Prise d entrée RVB 1 P 18 19 Prise d entrée numérique P 20 CÔTÉ Prises d entrée 3 P 15 Prise d entrée RVB 2 P 18 19 Le modèle PT 50LC13 K est illustré ...

Page 96: ... câbles nécessaires au raccordement d un appareil auxiliaire ne sont pas fournis avec l appareil ou sont vendus séparément il peut être nécessaire de fabriquer ou d acheter le câble approprié Lire attentivement le manuel d utilisation de chaque appareil auxiliaire avant de procéder aux raccordements Si le signal vidéo d entrée démontre un sautillement en provenance de la source vidéo l image peut ...

Page 97: ...cessaire pour obtenir la réception appropriée Vérifier les exigences de compatibilité auprès du câblodistributeur local Pour la réception des canaux du câble 01 à 125 brancher le câble fourni par le câblodistributeur local Le mode antenne doit être réglé à CÂBLE P 26 Ou Installation CÂBLOSÉLECTEUR PRISE À L ARRIÈRE DU CÂBLOSÉLECTEUR Fil de câblodistribution Raccorder le câble de l antenne ou de câ...

Page 98: ...pour un signal acheminé à la prise VIDEO INPUT Raccordement de l antenne câble à la prise d entrée RF IN avec magnétoscope Ou Installation Raccorder le câble de la prise de sortie à l arrière du câblosélecteur ou celui de l antenne câblodistribution à la prise d entrée d antenne à l arrière du magnétoscope Câble provenant de l antenne ou du système de câblodistribution Vers le magnétoscope Fil de ...

Page 99: ...s semblables L entrée 3 est située sur le côté de l appareil Sélectionner la position d entrée VIDÉO désirée en appuyant sur la touche TV VIDEO P 35 Lors du raccordement des câbles la priorité est attribuée au câble S Vidéo lorsque les prises d entrée S Vidéo et vidéo sont utilisées en même temps Les prises d entrée 1 2 et 3 offrent des raccordements semblables P 11 Installation Magnétoscope S VHS...

Page 100: ...L identification des prises de sortie des signaux vidéo composant peut différer d un appareil à l autre Y PB PR Consulter les instructions d utilisation de l appareil concerné Installation Lecteur DVD VIDÉO COMPOSANT AUDIO Type de mode Caractéristiques du signal Affichage au menu Points H x V Fréquence horizontale kHz Fréquence verticale Hz Signaux de télévision numérique 480i 664 X 485 15 73 29 9...

Page 101: ...nctionnement incorrect Même en mode écran partagé ou image sur image PIP les prises OUT acheminent uniquement l image et le son de l image principale Une image secondaire incluant la recherche de canal etc n est pas acheminée à la sortie Les prises VIDEO OUT n acheminent pas les signaux de sortie Y PB PR RVB ou numérique ni les signaux des cartes SD ou PC La prise S VIDEO OUT achemine le même sign...

Page 102: ...est recommandé d utiliser une fréquence de balayage verticale de 60 Hz Ne pas régler les fréquences horizontale et verticale de balayage des signaux de l ordinateur au dessus ou au dessous de la gamme recommandée des fréquences de balayage Sélectionner la position d entrée RVB en appuyant sur la touche PC MENU ou TV VIDEO P 35 Les prises d entrée RGB IN 1 et 2 offrent des raccordements semblables ...

Page 103: ...ue à la prise RGB IN Décodeur de télévision numérique Câble audio pour PC Mini fiche stéréo M3 Câble RVB fiche D SUB à 15 contacts Nota Sélectionner la position d entrée RVB en appuyant sur la touche PC MENU ou TV VIDEO P 35 Les prises d entrée RGB IN 1 et 2 offrent des raccordements semblables ...

Page 104: ... 720p ou 480p Pour des informations détaillées se reporter au manuel d instructions du décodeur de télévision numérique Si l image ne s affiche pas parce que le décodeur utilisé n a pas de sortie DIGITAL OUT utiliser l entrée vidéo composant S Vidéo ou l entrée vidéo L image sera alors affichée comme un signal analogique AUDIO Le signal vidéo est acheminé numériquement à l écran de projection afin...

Page 105: ...ordinateur personnel avec prise DIGITAL IN utilisé la reconfiguration sera nécessaire une fois l écran de projection raccordé à l ordinateur Installation Type de mode Caractéristiques du signal Affichage au menu Points H x V Fréquence horizontale kHz Fréquence verticale Hz Signaux de l ordinateur personnel VGA400 70 Hz 640 X 400 31 47 70 08 VGA400 70Hz VGA480 60 Hz 640 X 480 31 47 59 94 VGA 60Hz M...

Page 106: ...le récepteur DSS ou le magnétoscope Cas 1 Cas 2 À la fin du réglage le canal de numéro le plus bas s affiche Si le réglage est incomplet l écran suivant s affiche Vérifier les raccordements de l antenne câble à la prise RF IN puis lancer à nouveau le réglage automatique des canaux P 26 27 Nota Lors de la mise en marche initiale de l appareil le réglage automatique des canaux s effectue Réglage ini...

Page 107: ...l appareil hors contact Nota Lorsque le cordon d alimentation est débranché le ventilateur interne s arrête Le cas échéant la lampe n est pas suffisamment refroidie et il faudra plus de temps lors de la mise en contact ultérieure En contact Hors contact Le voyant POWER tourne au rouge et clignote pendant environ 1 minute puis demeure allumé Établissement coupure du contact Interrupteur POWER Voyan...

Page 108: ...nu suivant Une pression sur la touche ACTION affiche l écran MENU Nota Selon le signal à l entrée certains éléments peuvent ne pas être réglables et certaines fonctions peuvent ne pas être accessibles 1 Organigramme du menu principal RÉGLAGES INITIAUX IMAGE AUDIO POSITION FORMAT INFORMATION PAGE CHOISIR FIN RÉGLAGES INITIAUX LANGUE FRANÇAIS CANAL VERROUILLAGE SOUS TITRES VIDÉO AUTRE PAGE CHOISIR F...

Page 109: ...tes IMAGE MENU IMAGE DYNAMIQUE RÉGLAGES IMAGE TEMP COUL NORMAL CHOISIR SORTIE AUDIO MENU AUDIO NORMAL RÉGLAGES AUDIO HAUT PARLEURS OUI SON AMBIO NON BBE NON CHOISIR SORTIE POSITION POSITION H POSITION V LARGEUR H RÉTRÉCIR NORMAL RÉGLAGE CHOISIR SORTIE SIGNAL D ENTRÉE NTSC SORTIE RÉGLAGES INITIAUX LANGUE FRANÇAIS CANAL VERROUILLAGE SOUS TITRES VIDÉO AUTRE PAGE CHOISIR FIN SOUS TITRES MODE S TITRES ...

Page 110: ...3 La sélection des canaux se fait jusqu à ce que le balayage de tous les canaux soit complété Les numéros des canaux offrant un signal vidéo sont stockés dans la mémoire de balayage des canaux Réglage automatique des canaux Suite à la page suivante Nota Pour annuler le RÉGLAGE AUTO en cours appuyer sur la touche SWAP Syntonisation des canaux RÉGLAGES INITIAUX LANGUE FRANÇAIS CANAL VERROUILLAGE SOU...

Page 111: ...la fonction RÉGLAGE MANUEL 4 Cas 1 Cas 2 À la fin du réglage le canal de numéro le plus bas s affiche Si le réglage est incomplet l écran ci contre s affiche Vérifier les raccordements de l antenne câble à la prise RF IN puis lancer à nouveau le réglage automatique des canaux Appuyer pour quitter le menu 5 Syntonisation des canaux AUCUN CANAL TROUVÉ VÉRIFIER LE RACCORDEMENT DU CÂBLE D ANTENNE PUIS...

Page 112: ... pour afficher l écran RÉGLAGES CANAL Appuyer pour sélectionner TÉLÉ ou CÂBLE Appuyer pour sélectionner ANTENNE 1 2 Réglage manuel des canaux Suite à la page suivante RÉGLAGES INITIAUX LANGUE FRANÇAIS CANAL VERROUILLAGE SOUS TITRES VIDÉO AUTRE PAGE CHOISIR FIN RÉGLAGES CANAL ANTENNE CÂBLE RÉGLAGE AUTO RÉGLAGE MANUEL IDENTIFICATION CANAL AVIS SIGNAL FAIBLE NON CHOISIR SORTIE RÉGLAGES CANAL ANTENNE ...

Page 113: ...moire Appuyer pour quitter le menu Nota Certains canaux au signal très faible peuvent être verrouillés en mémoire Au besoin ces canaux peuvent être effacés manuellement à l aide de la fonction RÉGLAGE MANUEL 5 6 Pour ajouter un canal Pour supprimer un canal Syntonisation des canaux RÉGLAGE MANUEL ENTRER CANAL 01 SÉLECTIONNER LE CANAL AVEC LES TOUCHES SUPPRIMER SORTIE RÉGLAGE MANUEL ENTRER CANAL 01...

Page 114: ...n de projection à partir de la télécommande 1 2 3 4 Nota Le numéro du canal et le réglage du volume sont conservés en mémoire même après la mise hors contact de l appareil La consommation peut être réduite si le niveau de volume est baissé Ou Capteur de la télécommande Interrupteur POWER Voyant POWER Touches du volume Touches de syntonisation des canaux Nota Consulter l utilisation des touches num...

Page 115: ...omme indiqué ci contre Le mode d entrée n est pas affiché pour les prises inutilisées Utilisation des touches de syntonisation des canaux de l appareil pour sélectionner l entrée CA 125 VIDÉO 1 VIDÉO 2 FIGÉE Fonction d avertissement d action invalide Si une action invalide est tentée le repère ci contre s affiche Exemple Une action invalide a été tentée en mode arrêt sur image VIDÉO 3 COMPOSANT 1 ...

Page 116: ...résentation publique il ne faut pas oublier que l utilisation de la fonction de sélection du format 16 9 peut conduire à la violation des droits d auteur du propriétaire de ces émissions Si une image normale de format 4 3 est projetée dans le format grand écran les bords de l image peuvent être déformés ce qui rendrait non visibles ces parties de l image Il est recommandé d utiliser le format 4 3 ...

Page 117: ...RAL 9 16 Le mode INTÉGRAL affiche l image 4 3 à son format maximal mais avec une correction de format au centre d écran de manière que l étirement ne soit apparent que sur les bords gauche et droit de l image Le format de l image dépend du signal d origine ZOOM 16 9 ZOOM Le mode ZOOM agrandit la partie centrale de l image PLEIN ÉCRAN 16 9 PLEIN ÉCRAN Le mode PLEIN ÉCRAN affiche l image à son forma...

Page 118: ...vant est affiché en haut à gauche remplaçant le canal précédemment affiché à cet endroit Nota Pour terminer la recherche de canal appuyer sur SEARCH OPEN CLOSE Lorsque la fonction PIP image sur image est utilisée la recherche de canal est invalidée Ex Sélectionner le canal 6 Exemple 2 Entrée RVB Recherche du canal désiré recherche de canal Touches de syntonisation des canaux Lorsqu une pression es...

Page 119: ...ource raccordée à la prise VIDEO IN 2 VIDÉO 3 L écran affiche le signal de la source raccordée à la prise VIDEO IN 3 COMPOSANT 1 L écran affiche le signal de la source raccordée à la prise COMPONENT VIDEO INPUT1 COMPOSANT 2 L écran affiche le signal de la source raccordée à la prise COMPONENT VIDEO INPUT2 COMPOSANT 3 L écran affiche le signal de la source raccordée à la prise COMPONENT VIDEO INPUT...

Page 120: ...age animée à chaque pression sur la touche FREEZE de la télécommande Appuyer à nouveau sur la touche FREEZE pour reprendre l animation des images Coupure du son S avère pratique lorsqu il faut répondre au téléphone ou recevoir un visiteur inattendu Arrêt sur l image Nota Le signal de sortie audio à la prise AV OUT n est pas coupé Nota Le signal de sortie vidéo à la prise AV OUT n est pas figé Coup...

Page 121: ...sélectionner le mode audio MONO pour obtenir de meilleurs résultats Émission à deuxième voie son Seconde voie audio autre langue Sélectionner le mode audio 2 VOIE pour obtenir l autre langue Émission MONO Émission normale en son monophonique Types d émissions qui peuvent être reçues Appuyer sur la touche SAP pour sélectionner le mode audio désiré en procédant comme suit La flèche confirme la sélec...

Page 122: ...e le canal et de régler le volume Les écrans de gauche et de droite ne peuvent pas afficher simultanément la même image Lorsqu un écran partagé comprend un signal RVB ou numérique le format est réglé à ÉCRAN PARTAGÉ NORMAL Exemple la sortie RVB est montrée à droite Un signal de l entrée carte ne peut être affiché à l écran de gauche ni l écran de droite Partage de l écran Appuyer pour partager l é...

Page 123: ...uite appuyer sur la touche TV VIDEO pour changer l entrée directement Enfin appuyer sur la touche SWAP pour déplacer à nouveau l écran à droite Appuyer pour sélectionner le canal désiré Il est possible également d utiliser les touches PIP et pour sélectionner une entrée de source externe pour l image de l écran de droite Le mode d entrée n est pas affiché pour les prises inutilisées Exemple ÉCRAN ...

Page 124: ...ignaux des écrans principal et image sur image sont traités par des circuits distincts la qualité de l image peut varier L écran image sur image retourne à l écran simple lorsque l écran de projection est mis hors contact Les écrans principal et image sur image ne peuvent pas afficher simultanément la même image Des signaux RVB numérique et de l entrée carte ne peuvent pas être affichés en mode im...

Page 125: ... NORMAL Sélection du format d écran pour un écran image sur image Il est possible de choisir un des 3 formats pour le format de l image sur image Appuyer sur cette touche pour agrandir l écran de l image sur image Nota Il est possible également d utiliser les touches PIP et pour sélectionner une entrée de source externe pour l écran image sur image Format d origine Position d origine Nota Le derni...

Page 126: ...H POSITION V NORMAL RÉGLAGE CHOISIR SORTIE RÉGLAGES INITIAUX IMAGE AUDIO POSITION FORMAT INFORMATION PAGE CHOISIR FIN Appuyer sur la touche ACTION pour afficher le MENU et sélectionner RÉGLAGES Appuyer pour sélectionner POSITION FORMAT Appuyer pour afficher l écran POSITION FORMAT Appuyer pour régler la POSITION FORMAT 2 3 Appuyer pour sélectionner le mode écran 1 Appuyer pour sélectionner le menu...

Page 127: ...sque le format et la position de l image sont modifiés Réglage de la position et du format de l écran Rubrique à régler Touche Détail du réglage Nota Position H Appuyer sur la touche L image se déplace vers la droite Appuyer sur la touche L image se déplace vers la gauche Position V Appuyer sur la touche L image se déplace vers le haut Appuyer sur la touche L image se déplace vers le bas FORMAT H ...

Page 128: ...nsionnel profond est émis par les haut parleurs avant de l appareil seulement L effet ambiophonique n est pas fonctionnel sur les émissions normales monophoniques Il est possible de mettre hors circuit les haut parleurs de l appareil lorsqu il est raccordé à un équipement audio externe Voir à la page suivante Voir à la page suivante Le niveau sonore est réglé automatiquement selon la source du pro...

Page 129: ...GRAVES et AIGUS La technologie du son BBE améliore l intelligibilité de la parole et rétablit la dynamique des passages musicaux pour donner un son exceptionnellement naturel Nota Si BBE est réglé à OUI il est impossible de sélectionner SON AMBIO Régler le niveau désiré en écoutant le signal sonore GRAVES Règle les graves AIGUS Règle les aigus ÉQUILIBRE Règle le volume à gauche et à droite 1 Répét...

Page 130: ...bleue Teinte rouge À la réception d un signal RVB ou numérique le menu de l image passe à NORMAL Voir à la page suivante Nota Il y a peu de changement lorsque le réglage IMAGE est accru avec une image lumineuse ou réduite avec une image sombre Appuyer pour quitter le menu Appuyer sur la touche ACTION pour afficher le MENU et sélectionner RÉGLAGES Appuyer pour sélectionner IMAGE Appuyer pour affich...

Page 131: ...ation est plus rougeâtre BRILLANCE Appuyer sur la touche L image devient plus lumineuse Appuyer sur la touche L image devient plus sombre IMAGE Appuyer sur la touche L intensité de l image devient plus forte alors que le niveau des contrastes et de la couleur est réglé Sauf RVB entrée numérique Appuyer sur la touche L intensité de l image devient plus faible alors que le niveau des contrastes et d...

Page 132: ...la liste des émissions ceux ci s affichent dans cet espace Mode SOUS TITRES NON La narration des sous titres ou du texte n est pas affichée Appuyer sur la touche ACTION pour afficher le MENU et sélectionner INITIAUX Appuyer pour sélectionner SOUS TITRES Appuyer pour afficher l écran SOUS TITRES Appuyer à plusieurs reprises pour sélectionner le MODE S TITRES Appuyer pour sélectionner MODE S TITRES ...

Page 133: ...er S TITRES SOURDINE Appuyer pour quitter le menu 3 S TITRES SOURDINE Valide la fonction de sous titres à l écran lorsqu une pression est exercée sur la touche MUTE de la télécommande Pour désactiver appuyer à nouveau sur la touche MUTE Nota Cette caractéristique fonctionne lorsque le mode SOUS TITRES est à la position NON L émission télédiffusée doit comporter des sous titres Nota Le réglage de S...

Page 134: ... et CANADA QUÉBEC Saisie du code secret Il faut entrer un code à 4 chiffres pour visualiser une émission bloquée ou modifier le réglage de la classification 1 Appuyer pour afficher l écran VERROUILLAGE 2 Appuyer sur les touches numériques pour entrer le code secret 3 Appuyer pour enregistrer le code à 4 chiffres Nota Une fois les classifications réglées les enregistrements ou les émissions bloquée...

Page 135: ...sur les touches numériques pour entrer le code secret Appuyer pour sélectionner FILMS USA Appuyer pour valider Appuyer pour sélectionner MODIFIER RÉGLAGES Appuyer pour afficher l écran de modification des réglages 4 Appuyer pour sélectionner SANS VISA REGARDER Appuyer pour sélectionner OUI ou NON 5 Appuyer pour sélectionner la classification à bloquer P 55 Appuyer pour valider 6 Appuyer pour quitt...

Page 136: ...électionner ÉMISSIONS TÉLÉ USA Appuyer pour valider Appuyer pour sélectionner MODIFIER RÉGLAGES Appuyer pour afficher l écran de modification des réglages 4 Appuyer pour sélectionner SANS VISA REGARDER Appuyer pour sélectionner OUI ou NON Appuyer pour sélectionner la classification à bloquer P 55 Appuyer pour valider 5 Appuyer pour quitter le menu Il est possible de sélectionner selon les classifi...

Page 137: ...ANADA Appuyer pour valider Appuyer pour sélectionner MODIFIER RÉGLAGES Appuyer pour afficher l écran de modification des réglages 4 Appuyer pour sélectionner ÉMISSIONS EXEMPTÉES Appuyer pour sélectionner OUI ou NON 5 Appuyer pour sélectionner la classification à bloquer P 55 Appuyer pour valider 6 Appuyer pour quitter le menu ÉMISSIONS EXEMPTÉES NON Les émissions exemptées sont bloquées OUI Les ém...

Page 138: ...A QUÉBEC Appuyer pour valider Appuyer pour sélectionner MODIFIER RÉGLAGES Appuyer pour afficher l écran de modification des réglages 4 Appuyer pour sélectionner ÉMISSIONS EXEMPTÉES Appuyer pour sélectionner OUI ou NON Appuyer pour sélectionner la classification à bloquer P 55 Appuyer pour valider 5 Appuyer pour quitter le menu OUI La puce antiviolence est activée NON La puce antiviolence est désac...

Page 139: ...ues à connotation sexuelle ou d images suggestives TV PG SURVEILLANCE PARENTALE Cette émission peut comporter certains propos vulgaires d occasionnelles scènes de violence et certaines scènes ou certains propos suggestifs TV 14 JUGEMENT PARENTS Cette émission peut présenter des sujets délicats ou comporter des propos vulgaires des scènes de sexualité ou de violence TV MA AUDITOIRE ADULTE Cette émi...

Page 140: ...e antiviolence activée Désactiver temporairement la puce antiviolence Entrer le code secret à l écran de message de verrouillage La puce antiviolence est réactivée lorsque le contact est coupée ou après une panne de courant S utilise lorsque l écran de projection est déménagé ou si le code secret est perdu Lorsque l écran ci contre s affiche appuyer simultanément sur la touche VOL de l écran de pr...

Page 141: ...t est syntonisé 1 2 Appuyer sur la touche ACTION pour afficher le MENU et sélectionner INITIAUX Appuyer pour sélectionner CANAL Appuyer pour afficher l écran RÉGLAGES CANAL Appuyer pour afficher l écran IDENTIFICATION CANAL Appuyer pour sélectionner IDENTIFICATION CANAL Appuyer pour quitter le menu 5 3 Appuyer pour déplacer le curseur à droite Appuyer pour sélectionner une station Répéter les étap...

Page 142: ...u lorsque le signal est absent ou trop faible L écran est noir quand les fonctions d image sur image ou d écran partagé sont utilisées Appuyer pour sélectionner CANAL Appuyer pour afficher l écran RÉGLAGES CANAL Appuyer pour sélectionner OUI ou NON Appuyer pour sélectionner AVIS SIGNAL FAIBLE Appuyer pour quitter le menu 3 Nota Si l appareil est raccordé à un appareil doté de la caractéristique fo...

Page 143: ...r VIDÉO Appuyer pour afficher l écran VIDÉO Appuyer pour sélectionner OUI ou NON Appuyer pour sélectionner RÉDUCTEUR DE BRUIT Appuyer pour quitter le menu 3 Lorsque le signal vidéo est faible le circuit de réduction de bruit vidéo réduit les parasites sur le signal luminance Il est important de savoir que le réducteur de bruit vidéo doit demeurer à NON pour obtenir le maximum des détails d une ima...

Page 144: ...n n est pas automatiquement changé Commuter à NON en cas de mauvais fonctionnement Si le signal capté contient les spécifications du format d écran à l entrée RF ENTRÉE VIDÉO 1 à 3 ou ENTRÉE VIDÉO COMPOSANT 1 4 le format de l écran est automatiquement changé Appuyer pour sélectionner VIDÉO Appuyer pour afficher l écran VIDÉO Appuyer pour sélectionner OUI ou NON Appuyer pour sélectionner DI 1 Appuy...

Page 145: ...r afficher le MENU et sélectionner INITIAUX DS Lorsque le signal d entrée provient d un système normal de télévision NTSC HD Lorsque le signal d entrée provient d un système à haute définition HD Appuyer pour sélectionner VIDÉO Appuyer pour afficher l écran VIDÉO Appuyer pour sélectionner MATRICE COULEUR 480P Nota Il n est pas nécessaire de valider MATRICE COULEUR 480p lorsque l écran de projectio...

Page 146: ...80P sont automatiquement distingués DIGITAL IN seulement Appuyer pour sélectionner VIDÉO Appuyer pour afficher l écran VIDÉO Appuyer pour sélectionner VGA ou 480P Appuyer pour sélectionner RVB Appuyer pour quitter le menu 3 Règle le signal pour l entrée à la prise RVB ou DIGITAL IN de l écran de projection La plupart des entrées RGB DIGITAL IN sont sélectionnées automatiquement Lorsque le signal d...

Page 147: ...IDÉO RÉDUCTEUR DE BRUIT NON DI 1 NON MATRICE COULEUR 480P DS RVB VGA 3D Y C OUI 3D IP OUI CHOISIR SORTIE RÉGLAGES INITIAUX LANGUE FRANÇAIS CANAL VERROUILLAGE SOUS TITRES VIDÉO AUTRE PAGE CHOISIR FIN VIDÉO RÉDUCTEUR DE BRUIT NON DI 1 NON MATRICE COULEUR 480P DS RVB VGA 3D Y C OUI 3D IP OUI CHOISIR SORTIE Appuyer sur la touche ACTION pour afficher le MENU et sélectionner INITIAUX Appuyer pour sélect...

Page 148: ...he RECALL fait afficher la durée restante La durée restante est affichée pendant les trois dernières minutes avant la coupure du contact RÉGLAGES INITIAUX LANGUE FRANÇAIS CANAL VERROUILLAGE SOUS TITRES VIDÉO AUTRE PAGE CHOISIR FIN AUTRE SOMMEIL NON DÉMONSTRATION NON CHOISIR SORTIE Appuyer sur la touche ACTION pour afficher le MENU et sélectionner INITIAUX Appuyer pour sélectionner AUTRE Appuyer po...

Page 149: ...ur sélectionner LANGUE Appuyer pour quitter le menu 2 Par défaut la langue d utilisation de l appareil est réglée à ANGLAIS Pour sélectionner une des 3 langues d affichage à l écran procéder comme suit Information Appuyer sur la touche ACTION pour afficher le MENU et sélectionner RÉGLAGES 1 Appuyer pour sélectionner INFORMATION Appuyer pour afficher l écran d information Il est possible d afficher...

Page 150: ...ctiver le mode de démonstration sélectionner DÉMONSTRATION NON au menu RÉGLAGES INITIAUX LANGUE FRANÇAIS CANAL VERROUILLAGE SOUS TITRES VIDÉO AUTRE PAGE CHOISIR FIN AUTRE SOMMEIL NON DÉMONSTRATION NON CHOISIR SORTIE 1 2 Appuyer sur la touche ACTION pour afficher le MENU et sélectionner INITIAUX Appuyer pour sélectionner AUTRE Appuyer pour afficher l écran AUTRE Appuyer pour sélectionner OUI ou NON...

Page 151: ...s suivis d un numéro de fichier à 4 chiffres Les fichiers DCF sont des fichiers d images normalement des fichiers JPEG qui ont été pris par un appareil photo numérique Nota Selon la taille de l image certaines parties d une image pourraient ne pas être affichées ou l image pourrait être affichée sur une plus petite grandeur Seules les images JPEG peuvent être affichées sur cet écran de projection ...

Page 152: ...euvent être utilisés Placer le support sélectionné sur la carte PC puis l insérer dans la fente de la carte PC Lorsqu une carte SD et une carte PC sont mises en place en même temps le contenu de la carte SD a préséance et est affiché Si la carte est illisible le message ERREUR DE CARTE s affiche Retirer la carte seulement lorsque l indication ACCÈS n est pas affichée Si un fichier JPEG incompatibl...

Page 153: ...ppuyer pour sélectionner MENU Appuyer pour accéder à la zone d index SD PC Lorsqu une carte mémoire SD et une carte PC ont été insérées en même temps les touches peuvent être utilisées pour sélectionner une carte dans la zone d index Zone MENU RETOUR Retourne au dossier parent précédent RETOUR AU MENU Retour à l écran de la Zone menu Nota Les noms de fichiers et de dossiers ne seront pas affichés ...

Page 154: ...ur ACTION pour afficher le fichier en grandeur plein écran Visualiseur JPEG Carte SD Carte PC Touche L image suivante s affiche Touche L image précédente s affiche Touche Chaque pression fait tourner l image de 90º ÉCRAN DE VISIONNEMENT UNE IMAGE MENU PAGE 1 6 SIMPLE DIAPO SD PC CHOISIR REGELER SORTIE PAGE Suite à la page suivante dans la colonne de gauche Appuyer sur Appuyer sur Appuyer sur Appuy...

Page 155: ...uivre le diaporama Nota L intervalle de 2 5 ou 10 secondes entre l affichage des images ne comprend pas le temps de lecture des données Aussi cet intervalle s allonge t il selon la taille du fichier JPEG Suite de la page 70 Appuyer sur pour sélectionner DIAPO puis appuyer sur ACTION Appuyer sur pour déplacer le curseur sur le fichier désiré dans la zone d index Appuyer sur pour afficher la page su...

Page 156: ...eur Éviter de couper l alimentation par un disjoncteur ou une barre de courant avec interrupteur De par ses caractéristiques et les conditions d utilisation la lampe peut cesser de s allumer avant la fin de la durée de vie prévue Parmi les autres conditions qui peuvent abréger la durée de vie il y a l allumage fréquent l allumage constant pendant plus de 24 heures l allumage multiple le temps entr...

Page 157: ...pour ce code Ensuite appuyer sur la touche POWER de la télécommande pour vérifier le fonctionnement de l appareil correspondant Si la marche à suivre a réussi l appareil se met en marche Nota À cause de changements dans les commandes infrarouge utilisées par les fabricants certaines marques ont plusieurs codes Si l appareil ne répond pas au premier code essayer le code suivant Si un nombre incorre...

Page 158: ...le code trouvé appuyer sur la touche ACTION pour le verrouiller en mémoire Nota Le mode par étape et validation débute avec l appareil actuel pas au début de la bibliothèque sauf la première fois Le mode par étape et validation fonctionne aussi à reculons à l aide de la touche Codes de télécommande infrarouge pour les appareils suivants Conseil pratique Consigner dans les espaces prévus ci dessous...

Page 159: ...1 345 BROKSONIC 320 326 PHILCO 320 323 324 326 331 343 CANON 323 325 PHILIPS 323 324 331 CITIZEN 306 PIONEER 323 CRAIG 305 306 329 PROSCAN 300 301 302 323 324 331 333 345 346 CURTIS MATHES 324 345 QUASAR 321 322 323 324 DAEWOO 301 324 343 RADIO SHACK 305 309 324 333 336 340 DBX 310 311 339 RCA 300 301 302 323 324 331 333 345 346 DIMENSIA 345 REALISTIC 305 309 324 336 340 EMERSON 303 319 320 325 32...

Page 160: ...128 129 130 VIEWSTAR 129 130 PIONEER 101 116 ZENITH 100 117 ZENITH DRAKE SATELLITE 100 Guide de référence rapide pour la télécommande utilisation des périphériques Liste des fabricants DVD Fabricant Numéro de code Fabricant Numéro de code DENON 100 SABA 101 FERGUSON 101 SAMSUNG 110 JVC 109 SHARP 108 MITSUBISHI 105 SONY 104 NORDMENDE 101 TECHNICS 100 PANASONIC 100 THOMSON 101 PHILIPS 103 TOSHIBA 10...

Page 161: ... Sony Tivo 102 102 Liste des fabricants récepteurs Fabricant Numéro de code Fabricant Numéro de code ADMIRAL 120 OPTIMUS 103 127 130 131 AIWA 125 126 PANASONIC 118 119 121 DENON 134 135 136 PHILIPS 123 FISHER 104 PIONEER 105 107 GARRARD 113 QUASAR 118 119 121 HARMAN KARDON 115 123 RCA 103 105 127 130 131 JENSEN 129 SANSUI 103 111 139 JVC 132 133 SHARP 134 137 KENWOOD 100 108 SONY 122 MAGNAVOX 127 ...

Page 162: ...eur DBS DVD Menu télé Menu télé numérique Entrer Menu DBS Sélection DVD Télé numérique Récepteur DBS Menu DVD Menu en hors fonction Menu en hors fonction PAGE Récepteur DBS DVD Page vers le haut bas Saut R TUNE Télé câble magnéto Récepteur DBS Télé numérique AUX magnétophone à cassette Canal précédent Canal STB précédent Platine A B RECALL Télé magnéto Récepteur DBS DVD Télé numérique CD Affichage...

Page 163: ...ge fixe Téléviseur Magnétoscope DVD CD AUX magnétophone à cassette Alterne entre image sur image écran partagé Arrêt Arrêt Arrêt Arrêt Téléviseur Télé numérique Magnétoscope AUX magnétophone à cassette Récepteur DBS Recherche de canal image sur image Information guide électronique des programmes Enregistrement Enregistrement Enregistrement Magnétoscope Récepteur DBS Alterne entre télé magnétoscope...

Page 164: ...areil est en fonction pendant un certain temps Plaques de couleurs ou pas de couleur Avec un magnétoscope et en sélectionnant les canaux sur l écran de projection est ce que le mode TV VIDEO pour le magnétoscope est réglé à TÉLÉ Double ou triple image Est ce que l antenne est correctement orientée Est ce que l antenne reçoit des signaux réfléchis sur des montagnes ou édifices élevés L image dispar...

Page 165: ...IDÉO 1 0 V c à c 75 Ω Fiche RCA S VIDÉO Y 1 V c à c 75 Ω C 0 286 V c à c 75 Ω Minifiche DIN à 4 broches AUDIO G D 0 5 V eff 2 x fiches RCA ENTRÉE COMPOSANT VIDÉO 1 4 Y 1 0 V c à c avec synchro 75 Ω Fiche RCA PB PR 0 35 V c à c 75 Ω 2 x fiches RCA AUDIO G D 0 5 V eff 2 x fiches RCA ENTRÉE NUMÉRIQUE ENTRÉE NUMÉRIQUE DVI 1 0 24 contacts AUDIO G D 0 5 V eff 2 x fiches RCA Fente de carte Fente de carte...

Page 166: ...est utilisé suivre attentivement les directives qui l accompagnent NE PAS exposer l appareil à un insecticide ou d autres substances volatiles NE PAS laisser l appareil entrer en contact prolongé avec des produits en caoutchouc ou en vinyle Retirer la saleté et les détritus à l aide d un chiffon léger Même s il est très souillé ne pas appliquer de nettoyeur directement sur l appareil Humecter un c...

Page 167: ...ssus peuvent ne pas être applicables N de téléphone 905 624 5505 N de télécopieur 905 238 2360 Site Internet www panasonic ca Richmond Colombie Britannique Panasonic Canada Inc 12111 Riverside Way Richmond BC V6W 1K8 Tél 604 278 4211 Téléc 604 278 5627 Calgary Alberta Panasonic Canada Inc 6835 8th St N E Calgary AB T2E 7H7 Tél 403 295 3955 Téléc 403 274 5493 Mississauga Ontario Panasonic Canada In...

Page 168: ...ouche ACTION 9 24 Touche ASPECT 9 32 Touche LIGHT 9 Touche MUTE 8 Touche POWER 8 22 Touche POWER voyant POWER 10 23 30 Touche R TUNE 8 Touche RECALL 9 25 31 Touche SAP 9 Touche TV VIDEO 9 35 Touche Volume écran de projection 10 30 Types d émissions qui peuvent être reçues 37 U Utilisation d un magnétoscope 14 Utilisation d un système stéréo 17 V VESA 21 VGA 21 VHF UHF terminal 11 Voyant LAMP 10 Vo...

Reviews: