background image

57

Special 

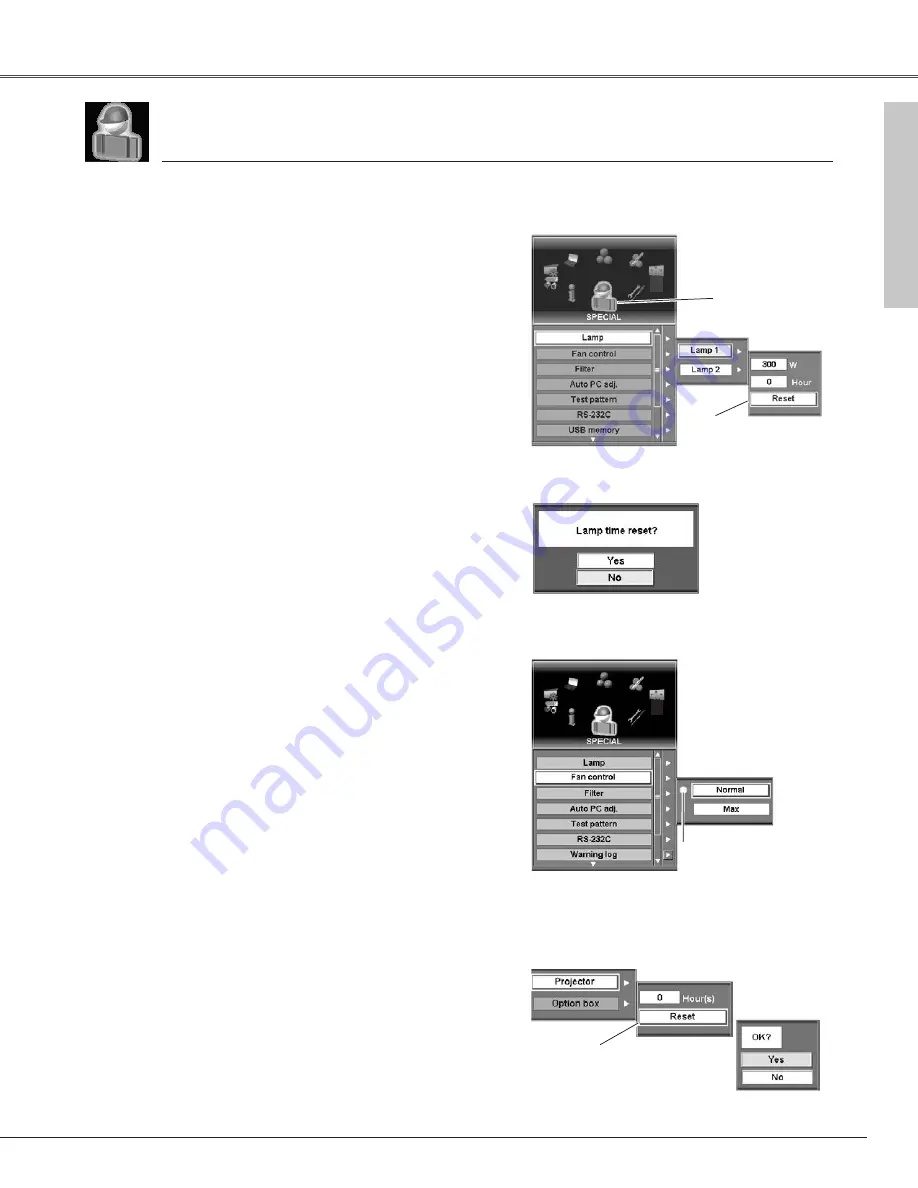
customizes control functions: Lamp, Fan control, Filter, Auto PC adj., Test pattern, RS-
232C, and USB memory and displays Warning log. 

Note:

Be sure to reset the Lamp time only after replacing the lamp.

1

2

Press the MENU button to display On-Screen Menu. Spin
Menu icons with the Point buttons(

e

d

7

, and 

8

) or

Control pad and press the SELECT button when the
SPECIAL icon comes right in front.

Move the yellow frame pointer with the Point buttons (

e

and 

d

) or Control pad to an item which you want to select

and then press the SELECT button. The corresponding dialog
box for the item appears.

Lamp

This feature displays the total time of the lamps being used.
Select  Lamp 1 or Lamp 2 to show each lamp wattage and time.

To reset the Lamp time, move the pointer to “Reset” and then
press the SELECT button. The message “Lamp time reset?” is
displayed. Move the pointer to [Yes] and then press the SELECT
button.  

Move the pointer to Reset
and then press the SELECT
button. The message
“Lamp time reset?” is
displayed. Select [Yes] and
the confirmation box
appears.

Special Menu (Lamp)

Fan control

Fan control

This function provides you the following alternatives for the
cooling fans operation of the projector and the Option box (Smoke
Resist Box ) separately provided. See page 73 for the Option box.

Normal   . . .normal operation 
Max  . . . . . .faster operation than “Normal”  

Select “Normal” for usual operation and “Max” to enhance the
cooling effect.

Filter

This feature displays total time of the filter on the projector and
the Option box (Smoke Resist Box) being used.  

To reset the Filter time, move the pointer to “Reset” and then
press the SELECT button. A confirmation box appears. Move the
pointer to [Yes] and then press the SELECT button. 

Filter

Special

Special

Special icon

Select [Yes]
to activate it.

Note:

Setting of the cooling fans of the projector and the option box cannot be changed
independently. 

Note:

Option box cannot be selected when it is not mounted on the projector. For the
information of the Smoke Resist Box, refer to Optional Parts on page 73 and contact
the sales dealer or the service station.

Select Fan control and this
box appears. Select one of
these settings with the 

Point

buttons (

e

and 

d

) or

Control pad and press the
SELECT button to enable it.

The setting selected.

Move the pointer to Reset and
then press the SELECT button
and the confirmation box
appears.

Select [Yes] to
activate it.

Summary of Contents for PLC-XF60A

Page 1: ...Owner s Manual PLC XF60A PLC EF60A Multimedia Projector MODEL Projection lens is optional...

Page 2: ...go The projector enables you to customize the starting or interval display for your presentation with its image capturing function p 50 My Menu Selection My Menu function allows you to select menu ite...

Page 3: ...nd Focus Adjustment 29 Shutter Function 29 Input Selection 30 Auto PC Adjustment 30 Information 30 Keystone Adjustment 31 Screen Selection 31 Picture Freeze Function 31 P Timer Function 31 D Zoom Func...

Page 4: ...ained If the projector is to be built into a compartment or similarly enclosed the minimum distances must be maintained Do not cover the ventilation slot on the projector Heat build up can reduce the...

Page 5: ...tage points or short out parts that could result in a fire or electric shock Never spill liquid of any kind on the projector Do not install the projector near the ventilation duct of air conditioning...

Page 6: ...use fire hazard by heat Cooling fans are provided to cool down the projector The fan s running speed is chaged according to the temperature inside the projector Air Intake Vent Exhaust Vent Hot air ex...

Page 7: ...THE PROJECTOR OR DAMAGE OF THE OPTICAL COMPONENTS INSIDE THE PROJECTOR Retract the projector s adjustable feet and replace the lens cover to protect the lens surface when moving the projector Disconn...

Page 8: ...ailable from the Parts Department indicated in your User Instructions If the plug supplied is not suitable for your socket outlet it should be cut off and destroyed The end of the flexible cord should...

Page 9: ...i o 0 1 CAUTION Hot air is exhausted from the exhaust vent Do not put heat sensitive objects near this side CAUTION This projector is equipped with cooling fans for protection from overheating Pay att...

Page 10: ...hting during operations Blinks green in the Power Management mode or when the projector is shutdown due to a power failure p 65 67 Indicators r LAMP indicator Lights red when the projector is in the s...

Page 11: ...tton Opens or closes the On Screen Menu p 33 34 o POWER ON OFF button Turns the projector on or off p 27 28 i SHUTTER button Closes and opens up the built in shutter p29 q LENS SHIFT button Activates...

Page 12: ...d Cr Pr from video equipment to these jacks with a video cable BNC type p 24 G B R H V and V Connect RGB output signal from a computer with a computer cable 5 BNC type to these jacks p 22 w ANALOG OUT...

Page 13: ...OUT This terminal outputs signal from SERIAL PORT IN When controling more than two projectors from a computer connect the other projector to this terminal with a serial cross cable commercially avail...

Page 14: ...ns the projector on or off p 27 28 e LENS SHIFT button Activates the LENS SHIFT function p 29 i FOCUS buttons Adjust focus of the image p 29 t WIRED REMOTE JACK Connect the Wired Remote Cable not prov...

Page 15: ...ID buttons at the same time to initialize the Remote Control ID and CH p 16 u P TIMER button Operates P Timer function p 31 MENU CANCEL INFO AUTO PC SCREEN FREEZE P TIMER SOUND REMOTE VOL MUTE CH ID...

Page 16: ...ngs to the remote control do it to the projector as well Refer to Remote Control in Setting menu on page 51 Should you be lost at which CH and ID are currently set initialize the Channel and ID once a...

Page 17: ...lly for one pressing the SELECT button Table1 Remote Control Channel Frequency Table2 Remote Control ID Preparation Caution about Radio Wave The remote control operates in 2 4 GHz band the same freque...

Page 18: ...to strong forces It may damage lens cabinet or mechanical parts This projector is designed to project on a flat surface Projector should be perpendicular to the projection screen Otherwise the project...

Page 19: ...an be adjusted by rotating each foot Adjust the four feet to obtain best position of the projected image and make the projector stable The projection angle is adjustable up to 3 65 degrees upward and...

Page 20: ...ically selects correct input voltage It is designed to work with single phase power systems having a grounded neutral conductor To reduce risk of electrical shock do not plug into any other type of po...

Page 21: ...l Interface Boards When ordering or using the Optional Interface Boards contact your sales dealer and tell the Model no of your desired board p 73 and Option Control No shown in the Information menu p...

Page 22: ...al Cross Cable RS 232C Not supplied with this projector q Monitor Output DIGITAL DVI D q Monitor Input SERIAL PORT IN Note Unplug the power cords of both the projector and external equipment from the...

Page 23: ...used for connection q Video Cable w S Video Cable e DVI D Cable Cables are not supplied with the projector Note Unplug the power cords of both the projector and external equipment from the AC outlet b...

Page 24: ...le e Component Cable Cables are not supplied with the projector Note Unplug the power cords of both the projector and external equipment from the AC outlet before connecting the cables RGB Scart 21 pi...

Page 25: ...the projector or the remote control Remove the wired remote cable from both of the projector and the remote control when using it as wireless Wireless Remote Control Operation Projector Top Control Op...

Page 26: ...31 D Zoom 32 48 Remote CH and ID 16 17 Menu 33 35 Select Point buttons Cancel Pad Pad Pad Pad 26 Basic Operation Basic Operation and Reference Buttons For detail operations other than those on this p...

Page 27: ...on disappears you can operate the projector PJ PIN code Input Dialog Box Enter a PJ PIN code Select a number by using the Point buttons e d 7 and 8 or Control pad and fix the number with the SELECT bu...

Page 28: ...WHILE COOLING FANS ARE RUNNING OR BEFORE POWER INDICATOR LIGHTS RED OTHERWISE IT WILL RESULT IN SHORTENING LAMP LIFE Note The projector cannot be turned on for about 90 seconds after turned off You ca...

Page 29: ...ing menu p 53 The SHUTTER indicator on the projector s top lights blue when the shutter is closed p 10 When the Shutter level is High contrast in the Setting menu the shutter opens up 80 p 53 The proj...

Page 30: ...ed through the projector Press the INFORMATION button on the top control or the INFO button on the remote control to display Information window on the screen To hide the Information window press the I...

Page 31: ...ontrol Refer to the Screen menu on page 47 for details of each screen setting Keystone function is provided to correct image distortions Press the KEYSTONE button on the remote control and correct ver...

Page 32: ...he Control pad D Zoom D Zoom Press the D ZOOM button on the remote control twice and then compress the image size with the SELECT button Note To exit the D Zoom mode try the followings To return to th...

Page 33: ...e data or select the desired setting with your fingertip operation on the Control pad 4 Remote Control Operation Mouse Operation Point to the desired Menu icon and click to display the submenu or clic...

Page 34: ...uide Currently selected menu On Screen Menu Mouse cursor When clicking 77 or 88 on the control bar menu icons rotate fast When clicking 7 or 8 menu icons rotate one by one by every clicking When the d...

Page 35: ...ales picture position sets the projection method Ceiling and Rear and activates keystone and digital zoom functions SETTING sets up operating environment for various features of the projector PC ADJ a...

Page 36: ...HDCP Note HDCP High bandwidth Digital Content Protection is a system for protecting digital entertainment content delivered by DVI Digital Visual Interface from being copied The specification of HDCP...

Page 37: ...Video Input 2 Move a pointer to Input 2 and press the SELECT button Y Pb Cb Pr Cr When the input source is component coming from video equipment connected to the Input 2 Y Pb Cb Pr Cr terminal select...

Page 38: ...p 41 42 There is no signal input from computer Check the connection of your computer and the projector See Troubleshooting on page 68 Note The projector may display one of the following messages User...

Page 39: ...elf to optimize its performance If the projector cannot reproduce proper video image it is necessary to select a specific component video signal format from among 480i 575i 480p 575p 720p 1035i 1080i...

Page 40: ...ment function cannot be operated in Digital Signal input on DVI terminal and 480i 575i 480p 575p 720p HDTV 1035i HDTV 1080i 50 HDTV or 1080i 60 HDTV is selected on the System menu p 39 1 2 Move the ye...

Page 41: ...the number of total dots in one horizontal period Adjust number to match your PC image with the Point buttons e and d or the Control pad Total dots Press the SELECT button to show H Freq and V Freq o...

Page 42: ...justs picture position Position Computer Adjustment To store the adjustment data or clear the stored data move the yellow frame pointer to Mode and then press the SELECT button Store To store the adju...

Page 43: ...Standard Cinema Real and Image 1 10 Press the MENU button to display On Screen Menu Spin Menu icons with the Point buttons 7 and 8 or the Control pad and press the SELECT button when the IMAGE icon c...

Page 44: ...e SELECT button when the IMAGE ADJ icon comes right in front Move the yellow frame pointer with the Point buttons e and d or the Control pad to an item which you want to adjust Press the SELECT button...

Page 45: ...ialog box appears Color management list Clear the check mark with the SELECT button not to apply the adjusted color to the projected image Soften or sharpen the image with the Point buttons e and d or...

Page 46: ...stem and On for Progressive 2 3 Pulldown or Telecine transfer is the process of changing images from film mode to video mode While film runs at 24 frames per second fps NTSC television signals or vide...

Page 47: ...True is displayed on screen pan the image with the Point buttons e d 7 and 8 or the Control pad Digital zoom and mode can be switched by pressing the SELECT button Provides image to fit wide video as...

Page 48: ...er than 1600 x 1200 reset the resolution to the lower before connecting the source to the projector The image data in other than XGA 1024 x 768 for PLC XF60A or SXGA 1400 x 1050 for PLC EF60A is modif...

Page 49: ...en Off Default setting Setting Menu Language changes various settings Language Menu Logo Background Lamp Remote control Display Input search Power management On start Analog out Lens memory Shutter Se...

Page 50: ...enter the PIN code every attempting to change the Logo setting Logo Lock Setting Lock This function prevents an unauthorized person from changing the Logo setting Off the Logo setting can be changed...

Page 51: ...ange and press the SELECT button The PIN code input dialog box will appear Lamp Control Note When neither of the two lamps is lighted the projector will shutdown automatically When either of the two l...

Page 52: ...function starts the count down when the input signal is interrupted and no button is pressed for 30 seconds or more If the input signal is interrupted and no button is pressed for 30 seconds or more...

Page 53: ...by 80 opening up the shutter inside the projector Each setting for the Shutter function can be altered as follows Level Sets up shutter level when closing the mechanical shutter Normal 0 light blocki...

Page 54: ...turns green lighting and the SHUTTER indicator keeps blinking Should the POWER button be pressed in this condition the projection lamp is turned on and the SHUTTER indicator turns off Shutter Manageme...

Page 55: ...e number Enter the correct number Repeat this step to complete entering a four digit number When the four digit number is fixed move to Ent Press the SELECT button so that you can change the following...

Page 56: ...default settings except for those including User logo PJ PIN code Logo PIN code Security setting Lamp time Filter time and PJ time Select Factory default and this box appears Select Yes and the next...

Page 57: ...trol This function provides you the following alternatives for the cooling fans operation of the projector and the Option box Smoke Resist Box separately provided See page 73 for the Option box Normal...

Page 58: ...e and Projector ID to factory default setting Baudrate 19200 Projector ID 001 USB memory This feature allows users to store PC mode and Image adjustment data on the optional USB key connected to the p...

Page 59: ...ut System Signal Screen Language Lamp mode Lamp status Power management Shutter management Smoke resist Option filter time Security and Remote control Information 1 2 Press the MENU button to display...

Page 60: ...e projector returns to normal the WARNING TEMP indicator continues to blink and does not go out until the projector is turned on again Then check the matters below LAMP 1 REPLACE WARNING TEMP WARNING...

Page 61: ...lters become clogged with dust particles it will reduce cooling fans effectiveness and may result in internal heat build up and adversely affect the life of the projector Proper maintenance should be...

Page 62: ...s Unremovable Turn off the projector and disconnect the AC plug Allow the projector to cool for at least 45 minutes Loosen two 2 screws of each lamp with a screwdriver and pull out one lamp and anothe...

Page 63: ...nvironment or conditions in which the projector and lamp are being used IF A LAMP EXPLODES THE FOLLOWING SAFETY PRECAUTIONS SHOULD BE TAKEN If a lamp explodes disconnect the projector s AC plug from t...

Page 64: ...appropriate carrying case to protect it from dust and scratches 3 Softly wipe the projection lens with a cleaning cloth that contains a small amount of non abrasive camera lens cleaner or use lens cle...

Page 65: ...tor detects an abnormal condition and cannot be turned on Unplug the AC power cord and plug it again to turn on the projector If the projector is turned off again disconnect the AC power cord and cont...

Page 66: ...Orange LAMP Red Indicators The air filter is clogged with dust or has been used overtime The air filter has been used overtime Projector Condition Fast Warning Filter Indicator In the Shutter manageme...

Page 67: ...ion lamp is being cooled down The projector cannot be turned on until cooling is completed The lamp cannot light up The lamp has been cooled down enough and the projector is in stand by mode and ready...

Page 68: ...cover is completely closed p 61 Image is out of focus Adjust focus of the projector p 29 Check the projection lens to see if it needs cleaning p 64 Moving the projector from a cool to a warm place may...

Page 69: ...not too far from the projector when using the remote control Maximum operating range is 32 8 10m Make sure the ID and CH of the remote control is conformed to the projector p 16 51 Initialize the remo...

Page 70: ...0 40 SXGA 5 1280 x 1024 62 50 58 60 SXGA 6 1280 x 1024 63 90 60 00 SXGA 7 1280 x 1024 63 34 59 98 SXGA 8 1280 x 1024 63 74 60 01 SXGA 11 1152 x 900 71 69 67 19 SXGA 12 1152 x 900 81 13 76 107 SXGA 13...

Page 71: ...x 768 43 363 60 00 ON SCREEN DISPLAY RESOLUTION H Freq kHz V Freq Hz D SXGA1 1280 x 1024 63 98 60 02 D SXGA2 1280 x 1024 60 276 58 069 When a input signal is digital from DVI terminal refer to chart...

Page 72: ...W Interface Input 1 terminals DVI D Terminal Digital in HDCP Compatible x1 and VGA HDB15 Terminal x 2 Analog In Analog Out Input 2 terminals BNC Type x 5 G VIDEO Y B Cb Pb R Cr Pr H V V Input 3 termin...

Page 73: ...r Optional Parts This cable is used for RGB Scart 21 Pin Video output of video equipment Accessories Owner s Manual CD ROM Quick Reference Guide AC Power Cord Remote Control and Batteries VGA Cable Le...

Page 74: ...RGB Scart RGB PC Digital System 1 RGB AV HDCP System 1 Video Y Pb Cb Pr Cr Y Pb Cb Pr Cr System 3 S Video Input 5 Optional Slot Quit Systems displayed in the System Menu vary depending on an input sig...

Page 75: ...L1 Menu Off Ready Shut down CH 1 4 Remote control Off Projector ID 1 8 1 60 minutes Yes No English German French Italian Spanish Portuguese Dutch Swedish Chinese Korean Japanese Russian Position Simpl...

Page 76: ...Warning log USB memory PC mode Save Delete Load W Reset Hour s Yes No W Reset Hour s Yes No Fan control Max Hour s Reset Hour s Reset Yes No Yes No 001 999 USB memory 1 10 Quit Projector USB memory 1...

Page 77: ...518 23 86 606 Unit inch mm 3 65 Max 9 92 252 7 24 184 5 31 135 Dimensions 1 08 27 5 Appendix 18 11 460 13 58 345 18 27 464 9 15 232 5 9 15 232 5 14 52 369 2 36 60 Screw Holes for Ceiling Mount Screws...

Page 78: ...Composite H V sync Ground Vert sync Ground Vert sync 9 13 10 12 11 14 15 1 9 17 2 10 18 3 11 19 4 12 20 5 13 21 6 14 22 7 15 23 8 16 24 T M D S Data2 No Connect T M D S Data2 No Connect T M D S Data2...

Page 79: ...Logo PIN Code Lock No PIN Code Number Memo Put the appropriate label supplied on in a prominent place of the projector s body while it is locked with a PIN code or USB key While the projector is locke...

Page 80: ...Cover Strap 64 D D Zoom 26 32 48 Dimensions 72 77 Display 52 Dual SDI 73 DVI D 12 78 F Factory default 56 Fan control 57 Faroudja 73 Federal Communication Commission Notice 8 Film 2 46 Filter 57 61 Fi...

Page 81: ...e Control Battery Installation 17 Remote Control Channel and ID 16 REPLACEMENT LAMP 61 63 RESET 13 RS 232C 58 S Scale 47 Scanning Frequency 72 Screen 31 47 Security 54 SERIAL PORT 13 78 Setting 49 Shu...

Page 82: ...Printed in Japan Part No 610 327 9398 1AA6P1P5077 KH6A SANYO Electric Co Ltd...

Reviews: