Panasonic Panafax DX-800 Fax Manual Download Page 107

Sending Documents via Telephone Line

107

Memory Transmission

Bas

ic O

p

er

at

io

n

s

Manual Number Dialing

To dial the telephone number manually, follow the steps below.

NOTE

1. If you need a special access number to get an outside line, dial it first then press 

 to

enter a pause (represented by a "-") before dialing the full number.

Ex: 9 PAUSE 5551234

2. If you are using Pulse dialing and you wish to change to Tone dialing in the middle of dialing,

press 

 (represented by a "/").

The dialing mode will be changed from Pulse to Tone after dialing the digit "/".

Ex: 9 PAUSE * 5551234

3. This feature is called “

Quick Memory Transmission

”. If you wish to store all the document(s)

into memory first before transmitting, change the Fax Parameter No. 82 (QUICK MEMORY
XMT) to “Invalid”. (See page 80)

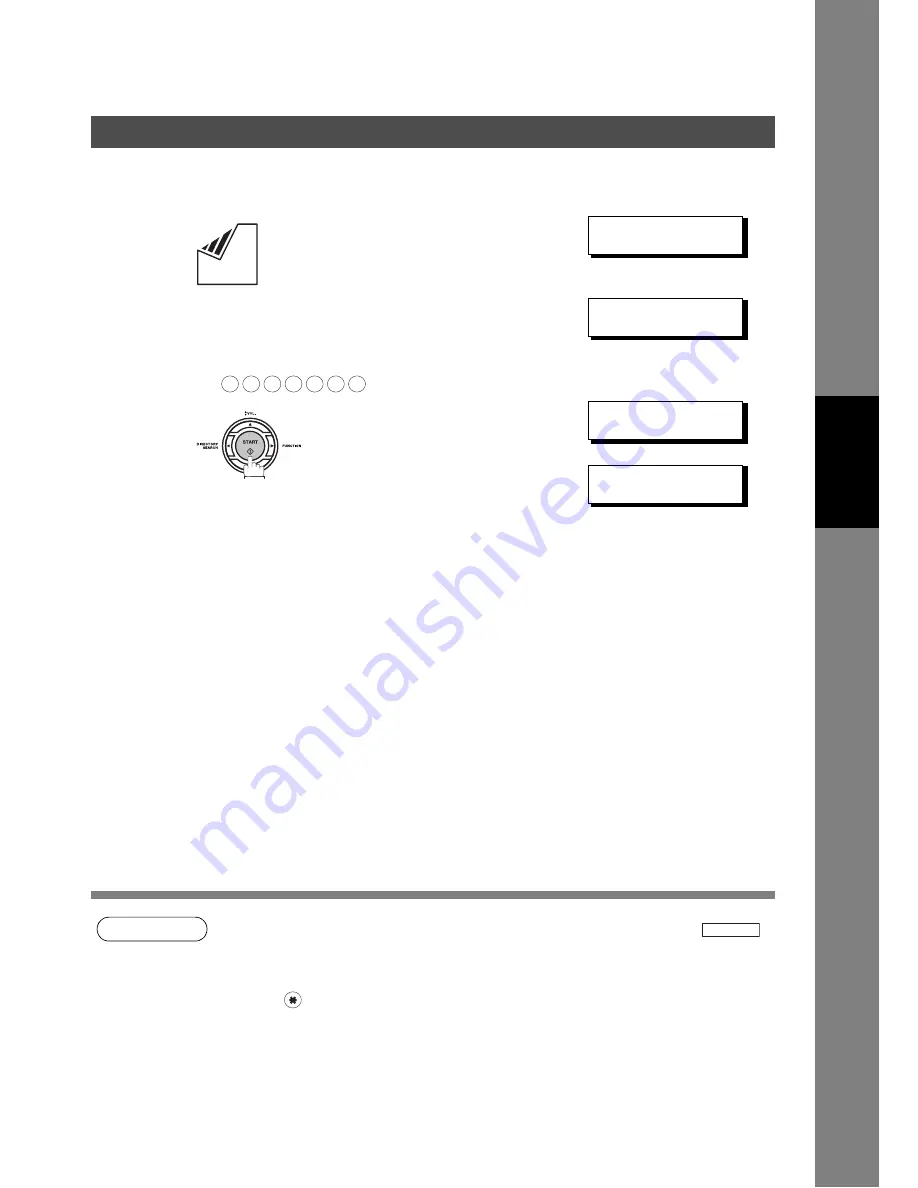
1

 Set document(s) face down.

ENTER STATION(S)

THEN PRESS START 00%

2

Enter a telephone number from the keypad.
(Up to 36 digits)
You can also designate more that one destination.

Ex:

TEL. NO.

5551234

3

The document is stored into memory with a file number.
Then starts dialing the telephone number immediately
after storing the first page. (See Note 3)
The remaining page(s) continue to store into memory.

* STORE *

NO.002

PAGES=001

05%

* DIALING *

NO.002

5551234

5

5

5

1

2

3

4

PAUSE

Summary of Contents for Panafax DX-800

Page 1: ...read these instructions completely and keep these operating instructions for future reference For Internet Fax Getting to Know Your Machine Installing Your Machine Programming Your Machine Basic Oper...

Page 2: ...r the required information and connection to the LAN User Information Company Name Address Dept City State Zip Code Tel No Fax No Internet Parameters See page 49 IP Address Subnet Mask Default Gateway...

Page 3: ...33 Installing the Toner Cartridge 34 Loading the Recording Paper 36 How to Load the Recording Paper 36 Adjusting the Paper Cassette for the Paper Length 38 How to Adjust the Paper Cassette for the Pap...

Page 4: ...ata for Backup 63 To Edit the Retrieved or Backup One Touch ABBR No Data File 65 Using Email to Retrieve the Journal 67 Programming Email Address and Telephone Numbers 68 Programming the Auto Dialer 6...

Page 5: ...Mode Transmission 115 Transmission Reservation 117 Redialing 120 Receiving Documents via LAN 122 General Description 122 Receiving Email from a POP Server 124 Receiving Documents via Telephone Line 12...

Page 6: ...7 Edit File Mode 159 General Description 159 Printing a File List 159 Viewing the Contents of a File List 160 Changing the Start Time or the Station of a File 161 Deleting a File 163 Printing Out a Fi...

Page 7: ...h Other Machines 194 Setting Password Transmission 195 Setting Password Reception 196 Using Password Transmission 197 Using Password Reception 198 Confidential Mailbox 199 General Description 199 Conf...

Page 8: ...5 Email ABBR Programming Errors 228 Clearing a Recording Paper Jam 230 Clearing a Document Jam 231 Cleaning the Document Scanning Area 232 Cleaning the Printer Roller 233 Adjusting the Automatic Docum...

Page 9: ...JURY CAUTION USE OF CONTROLS OR ADJUSTMENTS OR PERFORMANCE OF PROCEDURES OTHER THAN THOSE SPECIFIED HEREIN MAY RESULT IN HAZARDOUS RADIATION EXPOSURE THE POWER CORD ON THIS EQUIPMENT MUST BE USED TO D...

Page 10: ...ecautions should always be followed to reduce the risk of fire electric shock and injury to persons including the following DO NOT USE THIS PRODUCT NEAR WATER FOR EXAMPLE NEAR A BATH TUB WASH BOWL KIT...

Page 11: ...chine Do not install the machine near heating or an air conditioning unit Avoid exposure to direct sunlight Install the machine on a flat surface leave at least 4 inches 10 cm of space between the mac...

Page 12: ...Date Time Time Zone Logo Character ID ID Number Fax Telephone Number IP Address This is a partial list for additional Functions see page 49 2 One Touch Abbreviated Numbers 3 Program Keys 4 Fax Parame...

Page 13: ...g Paper Tray Document Sub Tray ADF Door Control Panel Document Return Tray Set on the upper Recording Paper Cassette Printer Cover Handset Available as an option see page 241 Recording Paper Cassette...

Page 14: ...ter or Darker See page 86 Used to set Standard Fine Super Fine Halftone Fine or Halftone S Fine See page 86 Used to turn the verification stamp On or OFF Lights when the verification stamp is set to O...

Page 15: ...tation for multi station communication Confirm the current communication modes e g Page number ID Dialed Telephone number File number when the unit is ON LINE One Touch Keys 01 28 Used for One Touch D...

Page 16: ...s on the form and ask your network administrator to complete the remaining information on the form The MAC Address of your machine can be found in the Fax Parameter List printout press Your machine ca...

Page 17: ...ption NOTE 1 To function as SMTP mail server your machine s email address must include its unique Host name within your company domain This unique Host name must be registered within your network s DN...

Page 18: ...n be the same as your regular email address If your email address is popuser001 panasonic com your machine s email address can be Internet_Fax panasonic com 2 By default the machine requires the IP Ad...

Page 19: ...R to 1 Invalid Then the machine will prompt you to enter the IP Address of the SMTP and POP Servers 3 If required the MAC Address of your machine can be obtained from the Fax Parameter List printout b...

Page 20: ...60 characters 15 Default Subject The information to be added to the Subject Line for all outgoing emails Up to 40 characters 16 Default Domain Specify the Domain Name up to 50 characters to be added...

Page 21: ...essage Disposition Notification when sending the message itself to a device supporting this notification function Several email applications such as Eudora and Outlook Express support and are able to...

Page 22: ...her record information must be properly registered in the DNS server Further more in common cases only email and web service from the Internet are permitted into the corporate intranet and corporate n...

Page 23: ...cally or manually depending on its setup configuration However if the received email includes a file attachment in a format other than TIFF F such as Word Excel Power Point your machine prints an erro...

Page 24: ...tions email address s and or fax telephone number s 2 If no sub address is specified then your machine tries to match the originating fax machine s Numeric ID TSI with the TSI routing information with...

Page 25: ...his feature was enhanced with an addition of a new Fax Parameter No 164 IFAX XMT HEADER giving you a selection of whether to include the header when sending a document to an address in the same Domain...

Page 26: ...om the CD ROM included with the machine The second part requires you to install and configure the software on your PC to work with your machine See the web site for details about the printer driver in...

Page 27: ...spreadsheet into a TIFF F format file and then transmit this file attached to an email To convert applications into a TIFF F formatted file however requires you to first download the software TIFF Con...

Page 28: ...ust the system Authentication through encryption based techniques are provided as a typical solution The techniques may be associated with the transmission channel such as by using Simple Authenticati...

Page 29: ...t is recommended that you follow up with a telephone call to confirm reception 4 Documents cannot be transmitted correctly if the destination Mail Server does not conform to the MIME protocol Erroneou...

Page 30: ...can download the TIFF F Image Viewer from the following URL addresses http www panasonic co jp mgcs internetfax http www panasonic com internetfax Internet Relayed Transmission To prevent unauthorized...

Page 31: ...31 memo Getting to Know Your Machine...

Page 32: ...r Machine Main Unit and Accessories Unpack the carton and check that you have all the accessories illustrated Machine Toner Cartridge Recording Paper Tray Telephone Line Cable Power Cord Operating Ins...

Page 33: ...ion Handset Available as an Option Recording Paper Tray Hook the projections into the square holes on the machine Final Installed View Handset Cradle Available as an Option Hook the projections into t...

Page 34: ...ge 1 Unpack the Toner Cartridge and rock it back and forth as shown 5 or 6 times to even the toner inside 2 Remove the protective seal Note Pull the seal slowly and straight out 3 Open the Printer Cov...

Page 35: ...Toner Cartridge into the machine Note Lock the Toner Cartridge into place by pressing the handle down and then pushing towards the rear of the machine 5 Close the Printer Cover 6 If you are replacing...

Page 36: ...e results you are looking for For detailed recommended paper specifications See page 240 How to Load the Recording Paper How to Load the Recording Paper 1 Lift up the Paper Cassette slightly and slide...

Page 37: ...n the Paper Width Guide and the right side of the tray If it does not the paper may feed into the printer incorrectly resulting in a paper jam Caution Make sure that the paper is set under the metal P...

Page 38: ...to the appropriate paper length slots A4 or Legal and slide the guide towards the back of the cassette until it locks in place 5 Load the paper into the Paper Cassette Slide the paper width guide to t...

Page 39: ...Swing the Paper Separation Clip downward to latch it in place 2 1 Load the paper into the Paper Cassette Slide the paper width guide to the left until it lightly touches the stack of paper without be...

Page 40: ...ng This apparatus must be properly grounded through an ordinary 3 prong AC outlet Do not break off the earth ground prong to fit a 2 prong outlet Telephone Line Cable Plug one end of the telephone lin...

Page 41: ...e protective tab on the TEL jack LAN Cable 10Base T 100Base TX Cable Insert the plug until a click is heard LAN Cable is not included with the product Purchase a Category 5 Cable compliant with EIA TI...

Page 42: ...ou need to change the dialing method to Tone or Pulse follow the procedure below NOTE 1 For some countries this feature is not available depending on the country s regulation The display may not show...

Page 43: ...he volume of the key touch tone and the volume of the buzzer in the Fax Parameter No 10 KEY BUZZER VOLUME See page 77 Setting the Monitor Volume 1 You will hear the dial tone through the speaker MONIT...

Page 44: ...e first Sunday of April and set the time back from 2 00 AM to 1 00 AM on the last Sunday of October If your state does not use the D S T system change the Fax Parameter No 35 DAYLIGHT TIME to Invalid...

Page 45: ...For details see FCC NOTICE at the end of these Operating Instructions Setting Your LOGO 1 SET MODE 1 8 ENTER NO OR 2 1 USER PARAMETERS PRESS SET TO SELECT 3 repeatedly until display shows LOGO 4 Enter...

Page 46: ...characters of and cannot be used for Character ID Setting Your Character ID 1 SET MODE 1 8 ENTER NO OR 2 1 USER PARAMETERS PRESS SET TO SELECT 3 repeatedly until display shows CHARACTER ID 4 Enter you...

Page 47: ...or U S A country code 81 3 111 2345 81 for Japan country code 2 Your Fax Telephone Number must be set as your ID Number because it is required by the Telephone Consumer Act of 1991 For details see FCC...

Page 48: ...l the display to desired User Parameter in Step 3 press or 2 If the DNS Server is not available change the setting of the Fax Parameter No 161 DNS SERVER to Invalid then enter the IP Address instead 3...

Page 49: ...e assigned to your machine Up to 40 characters 20 POP PASSWORD Password assigned to your machine Up to 10 characters 21 LDAP SERVER NAME The name of the LDAP Server Up to 60 characters 22 LDAP LOG IN...

Page 50: ...Stores data into the Internet Parameters User Parameters The two types of commands that can be entered in the Subject line of your email NOTE 1 To activate this feature change the Fax Parameter No 15...

Page 51: ...ogrammed represent it with and assign a password now Ex set parameters Important Do not use the above command if these fields already contain data the existing information will be deleted and overwrit...

Page 52: ...ion 5 between system to end block Register the following Internet Parameters a Default Domain 50 characters maximum The syntax is domain Default domain name b Manager s Email Address 60 characters max...

Page 53: ...meters i e 123456789 For security always input a Remote Password in the User Parameters If it was not programmed signify with i e get parameters Make sure that the CC Bcc lines and the body of the ema...

Page 54: ...ters in the body of the email Your Machine s Internet Parameters Email Sample 1 To Your email address that was used to retrieve the Internet Parameters From Your machine s email address Subject Your m...

Page 55: ...d in your machine in section 5 between system to end block a Default Domain b Manager s Email Address c Relay XMT Password d Remote Password 6 ldap to end Defines the following Internet Parameters pro...

Page 56: ...be present in the body of the email as unsupported data will be rejected The information following the sign is ignored by your machine 4 Edit a parameter and or add additional Sender Name s or Domain...

Page 57: ...ail address From This field is normally not visible when creating new email message s It is your default email address email application for retrieving the Internet Parameters and for error message no...

Page 58: ...he syntax is manager Manager s Email Address c Relay XMT Password 10 characters maximum The syntax is relay Relay XMT Password Quotation marks enclosing the password is required as shown in the exampl...

Page 59: ...NOTE 1 To activate this feature change the Fax Parameter No 158 PC REMOTE UPDATE to Valid See page 82 Using a PC to Update the Auto Dialer Remotely 1 To Store data type set abbr password where the pa...

Page 60: ...h new data This method will also prevent the Overwrite Warning Message that is sent back from your machine when the current Auto Dialer station is overwritten To erase the entire Auto Dialer data type...

Page 61: ...f the email must be as follows The script sample to program the One Touch ABBR No for the first time is shown in the illustration below First Time Remote Programming of One Touch ABBR No Sample To Pro...

Page 62: ...ields are to remain blank insert a semicolon for each blank field The data string for each station should be defined within a single line a Entry number One Touch ABBR No or Program Keys to be program...

Page 63: ...Sample To Retrieve One Touch ABBR No Data for Backup get abbr password where the password is the Remote Password programmed in your machine s User Parameters i e 123456789 1 To Your machine s email a...

Page 64: ...r Email Sample 1 To Your email address that was used to retrieve the Auto Dialer data From Your machine s email address Subject ONE TOUCH ABBR List 2 begin to end block Defines One Touch Keys Abbrevia...

Page 65: ...ejected The information following the sign is ignored by your machine 4 Edit and or add additional One Touch ABBR No stations 5 When finished use the File Save as command and save the updated file wit...

Page 66: ...acters maximum c Station address email address or telephone number of the station being programmed d Routing subaddress sub address to be used for routing 20 digit maximum e Routing id number TSI to b...

Page 67: ...width font i e Courier in order to align the received journal s contents on the PC A separate email message is sent by your machine an Internet Fax Return Receipt to the Manager s email address progra...

Page 68: ...he steps below Programming the Auto Dialer 1 SET MODE 1 8 ENTER NO OR 2 1 ONE TOUCH 2 ABBR NO 3 ONE TOUCH PRESS ONE TOUCH 4 Ex To change the input mode between ENTER EMAIL ADDRESS and ENTER TEL NO pre...

Page 69: ...arameter 172 DIRECT IFAX XMT set to Valid you are allowed to select the usage of Direct IFAX XMT 7 Enter the station name using character keys up to 15 characters Ex 01 SALES DEPT abc panasonic com or...

Page 70: ...ENTER EMAIL ADDRESS or 022 ENTER TEL NO 5 Enter the email address using character keys up to 60 characters Ex or Enter the telephone number up to 36 digits including pauses and spaces Ex 022 abc panas...

Page 71: ...sing Pulse dialing and you wish to change to Tone dialing in the middle of dialing press represented by a The dialing method will be changed from Pulse to Tone after dialing the digit Ex 9 PAUSE 55512...

Page 72: ...BR dialing number email address Ex ONE TOUCH PRESS ONE TOUCH 3 Enter the station you wish to change Ex 01 SALES DEPT abc panasonic com or 01 SALES DEPT 9 555 1234 4 01 SALES DEPT ENTER EMAIL ADDRESS o...

Page 73: ...ated dialing number email address has been used for a communication reservation the settings cannot be changed or erased until the communication has finished To change or erase the settings cancel the...

Page 74: ...until the communication has finished To change or erase the settings cancel the communication first by Edit File Mode See page 159 1 1 ONE TOUCH 2 ABBR NO 2 Select for One Touch dialing number email...

Page 75: ...ine and place it over the One Touch keys under the Directory Sheet Cover To print a directory sheet follow the steps below Printing Out a Directory Sheet 1 PRINT OUT 1 7 ENTER NO OR 2 Your machine pri...

Page 76: ...return to their preset values Home position Other parameters can only be changed by the procedure described below NOTE 1 To scroll the Fax Parameters in Step 2 or 4 press or 2 To print out a Fax Para...

Page 77: ...07 HEADER PRINT 1 Inside Selecting the printing position of the header Inside Inside TX copy area Outside Outside TX copy area No print Header is not printed 2 Outside 3 No print 008 HEADER FORMAT 1 L...

Page 78: ...in your machine 2 Letter 3 Legal 024 PRINT REDUCTION 1 Fixed Selecting print reduction mode Fixed Reduce received document according to setting of Parameter No 25 Auto Reduce received document accord...

Page 79: ...will advance 1 hour at 2 00 am on the first Sunday in April and fallback 1 hour at 2 00 am on the last Sunday in October 2 Valid 036 RING PATTERN DETECT DRD See Note 2 1 Invalid All ring patterns 2 Va...

Page 80: ...machine performs Fax Forwarding to the specified destination See page 176 2 Valid 056 COVER SHEET 1 Off Setting the home position of the Cover Sheet parameter in the Select Mode See page 172 2 On 058...

Page 81: ...50 IFAX RETURN RECEIPT 1 Invalid Selecting whether to send a return receipt when receiving from another Panasonic Internet Fax 2 Valid 151 EMAIL HEADER FORMAT 1 All Selecting the header information to...

Page 82: ...on on the top edge of each routed pages 2 Valid 164 IFAX XMT HEADER Email only 1 Included Selecting whether to include the header when sending a document to an addressee in the same Domain as specifie...

Page 83: ...Selective Ringing Smart Ring or something similar Check with your local telephone company on the availability of this service in your area 3 Valid can be selected when the SMTP server or the POP serve...

Page 84: ...d or folded Coated e g glossy paper etc Chemically processed e g pressure sensitive paper carbon coated paper etc or made of cloth or metal Document Size Singlesheet 0 0024 0 0060 in 0 06 0 15 mm Mult...

Page 85: ...the document s on the ADF When you set a document on the ADF the display message will change from date and time standby to the following message You can now change basic transmission settings or begin...

Page 86: ...ine is preset to Standard resolution which is suitable for most documents If you want to send it with more detail change the setting to Fine Super Fine or Halftone Press to NOTE 1 To change the preset...

Page 87: ...stamp on the document if it is successfully stored in memory In this case the Verification Stamp is not a confirmation that the document was successfully transmitted If you wish to disable the use of...

Page 88: ...a Communication Journal does not print When you set COMM JOURNAL ON a Communication Journal will print automatically after every communication When you set COMM JOURNAL INC a Communication Journal wi...

Page 89: ...Addressing Auto Dialer LDAP Multiple Station Email Addressing The Memory Transmission mode is automatically selected by your machine if an email address is registered into the chosen One Touch key s...

Page 90: ...TER EMAIL ADDRESS 3a Enter the full email address using the Character keys up to 60 characters Ex If you make a mistake press to erase the character then re enter the correct character abc panasonic c...

Page 91: ...ions including G3 communication have been already reserved 2 If the transmission cannot be completed for any reason the email may be returned undelivered otherwise no reply will be printed One Touch E...

Page 92: ...ncluding G3 communication have been already reserved 2 If the transmission cannot be completed for any reason the email may be returned undelivered otherwise no reply will be printed Abbreviated Email...

Page 93: ...he character then re enter the correct character or ENTER LETTER S PANA 3b Enter the full or part of an email address using the Character keys Ex to search for xyz panasonic com x xyz panasonic com 4...

Page 94: ...mission reservations including G3 communication have been already reserved 2 If the transmission cannot be completed for any reason the email may be returned undelivered otherwise no reply will be pri...

Page 95: ...erver However when the DELIVERY NOTICE ON or when using the DIRECT IFAX XMT modes separate transmission is required for each destination Multi Station Transmission Broadcasting 1 Set document s face d...

Page 96: ...RCV ID Identification PRINTING MEMORY RCV D DOC 2 Set document s face down ENTER STATION S THEN PRESS START 00 3 Dial by any combination of the following methods One Touch Dialing Abbreviated Dialing...

Page 97: ...a message will appear as shown to the right A file number is shown in the upper right hand corner of the display if it is a memory transmission file WAIT TO DIAL NO 001 Email address Manual Redialing...

Page 98: ...iate the Network connection immediately To redial the last email address through the ADF 1 Set document s face down ENTER STATION S THEN PRESS START 00 2 MEMORY XMT ON 1 OFF 2 ON 3 ENTER STATION 00 4...

Page 99: ...ctable Domains 1 Set document s face down ENTER STATION S THEN PRESS START 00 2 To choose Manual Email Addressing mode ENTER EMAIL ADDRESS 3 Enter the User portion of the email address using the Chara...

Page 100: ...appears after pressing in step 7 above Select the sender to be added to the From field on the email and press to start storing the document s The factory default setting for this parameter is on Inva...

Page 101: ...ill connect to the LAN for each station and request a Delivery Notice from each station 2 To change the preset Delivery Notice condition change the setting of Fax Parameter No 173 Internet Fax Deliver...

Page 102: ...l is returned undelivered by the mail server The printout will consist of the undelivered message contents supplied by the mail server and a portion of the first page s image for that particular trans...

Page 103: ...d in the mail server simplifies the process of entering multiple locations and allows you to send to an unlimited number of email addresses with one easy operation Ask your Network System administrato...

Page 104: ...ns You have to retrieve the document immediately You want to take advantage of Dual Operation design Use Direct Transmission if The memory is full You want to send the document immediately Use Voice M...

Page 105: ...to transmit the successfully stored documents or to cancel the transmission Press to cancel or press to transmit MEMORY OVERFLOW INFO CODE 870 See the Specifications on page 238 for the image memory c...

Page 106: ...g display will appear and you can select whether to save the file as an incomplete file for editing and retry or delete the file manually SAVE AS INCOMP FILE 1 YES 2 NO 5 If you would like to print a...

Page 107: ...one after dialing the digit Ex 9 PAUSE 5551234 3 This feature is called Quick Memory Transmission If you wish to store all the document s into memory first before transmitting change the Fax Parameter...

Page 108: ...rameter No 82 QUICK MEMORY XMT to Invalid See page 80 1 Set document s face down ENTER STATION S THEN PRESS START 00 2 Press a One Touch key Ex 01 Station name 5551234 3 The document is stored into me...

Page 109: ...2 QUICK MEMORY XMT to Invalid See page 80 1 Set document s face down ENTER STATION S THEN PRESS START 00 2 ENTER LETTER S 3 Enter the full station name or part of a station name by using the Character...

Page 110: ...ssion is disabled if multiple stations are set 1 Set document s face down ENTER STATION S THEN PRESS START 00 2 Dial by any combination of the following methods One Touch Dialing Abbreviated Dialing M...

Page 111: ...ge to Tone dialing in the middle of dialing press represented by a The dialing mode will be changed from Pulse to Tone after dialing the digit Ex 9 PAUSE 5551234 3 To stop the transmission press The d...

Page 112: ...by pressing a single key To set up the One Touch keys see page 68 1 Set document s face down ENTER STATION S THEN PRESS START 00 2 MEMORY XMT ON 1 OFF 2 ON 3 ENTER STATION 00 4 Press a One Touch key E...

Page 113: ...e number into the built in auto dialer with a 3 digit abbreviated code To program an abbreviated dialing number see page 70 1 Set document s face down ENTER STATION S THEN PRESS START 00 2 MEMORY XMT...

Page 114: ...numbers 1 Set document s face down ENTER STATION S THEN PRESS START 00 2 MEMORY XMT ON 1 OFF 2 ON 3 ENTER STATION 00 4 ENTER LETTER S 5 Enter the full station name or part of a station name by using...

Page 115: ...P 1 YES 2 NO Press to stop the transmission The Communication Journal will not print out regardless of the printout mode setting of the Communication Journal Voice Mode Transmission 1 Set document s f...

Page 116: ...r Ex 9 PAUSE 5551234 2 If you are using Pulse dialing and you wish to change to Tone dialing in the middle of dialing press represented by a The dialing mode will be changed from Pulse to Tone after d...

Page 117: ...N LINE lamp is blinking or printing received documents ON LINE PC MODE ON LINE PRT MODE PRINTING PC DATA ON LINE MEM XMT ID Identification ON LINE RCV ID Identification PRINTING MEMORY RCV D DOC 2 Set...

Page 118: ...Your machine is on line the ON LINE lamp is blinking or printing received documents ON LINE PC MODE ON LINE PRT MODE PRINTING PC DATA ON LINE MEM XMT ID Identification ON LINE RCV ID Identification PR...

Page 119: ...9 Transmission Reservation Basic Operations To cancel the direct transmission reservation 1 Make sure the document is on the ADF DIRECT XMT RESERVED 01 Station name 2 CANCEL XMT RESERVE 1 YES 2 NO 3 a...

Page 120: ...e will redial only one time During that time a message will appear as shown to the right A file number is shown in the upper right hand corner of the display if it is a memory transmission file WAIT T...

Page 121: ...IAL you can press to start redialing immediately To redial the last dialed number through ADF 1 Set document s face down ENTER STATION S THEN PRESS START 00 2 MEMORY XMT ON 1 OFF 2 ON 3 ENTER STATION...

Page 122: ...e email can only be received and printed unattended Internet Fax Received on a PC Figure 1 Outlook Express Inbox Sample The Subject column in the above example shows samples of email messages received...

Page 123: ...e however a handful of Viewers may not support this format You can download the TIFF F Image Viewer into your PC from the following URL addresses http www panasonic co jp mgcs internetfax http www pan...

Page 124: ...eter is set to 1 Invalid the machine will not retrieve it but displays the number of mails on the POP server No 148 DEL POP RCV MAIL Select whether the email is deleted from the POP server after it is...

Page 125: ...u will need to delete mails from the POP server periodically POP servers allocate a certain amount of space per account and if mail is not deleted regularly your mail box will overflow and new incomin...

Page 126: ...ameter No 147 AUTO POP RCV is set to 1 Invalid the machine will query the POP server for new mail at the interval specified by Fax Parameter No 146 If new mail has arrived at POP server the machine wi...

Page 127: ...eive a fax calling signal simply press START to receive manually See page 128 Fax Parameter No 17 set to 1 Tel MAR 12 2002 15 00 RCV MODE TEL 00 You receive both voice and fax calls Fax Tel Auto Switc...

Page 128: ...hone press on the control panel of your fax machine Telephone Mode 1 Change Fax Parameter No 17 RECEIVE MODE to 1 Tel See page 78 1 When your telephone rings lift the handset of the External Telephone...

Page 129: ...r to page 43 Fax Tel Auto Switching Mode 1 Change Fax Parameter No 17 RECEIVE MODE to 3 Fax Tel SW See page 78 If it is a Fax call 1 Your machine will answer the call when a call is received then dist...

Page 130: ...connect most TAMs in the market to your machine and use your existing telephone line very efficiently However some TAMs may not be compatible with this machine Answering Services Voice Mail provided...

Page 131: ...s the OGM Outgoing Message recorded in your TAM to the calling station During the time the TAM is answering the call your fax machine will be monitoring the line to distinguish whether it is a voice o...

Page 132: ...cument on a single page If the received document is extremely long over 39 longer than the recording paper the document will be divided into separate pages and print without reduction 2 Fixed Reductio...

Page 133: ...on top of the next page NOTE 1 If the reduction method is set to the Automatic Reduction mode the document is printed out with no reduction when printing out separate pages If the reduction method is...

Page 134: ...ode whenever one of the above requirements is not met To use this function we recommend installing an Optional Flash Memory Card See page 241 Options and Supplies NOTE 1 If the memory overflows the ma...

Page 135: ...ith Super Fine resolution it will be reduced slightly even if the reduction ratio is set to 100 in order to fit the data on one page 3 You can change the Contrast and Resolution without Standard Resol...

Page 136: ...e last step DEF DIRECT XMT RSV D 01 Station name General Description Deferred Transmission 1 Set document s face down ENTER STATION S THEN PRESS START 00 2 DEFERRED COMM 1 2 ENTER NO OR 3 DEFERRED XMT...

Page 137: ...t time from the keypad Use a 4 digit 24 hour clock Ex 3 30 a m and DEFERRED POLLING PASSWORD 4 Enter a 4 digit polling password Ex and ENTER STATION S THEN PRESS START 5 Dial by any combination of the...

Page 138: ...g request will be refused automatically NOTE 1 Polling might not function with all fax machines We suggest you attempt a trial polling before you actually poll important documents 2 If a password is n...

Page 139: ...e documents even when set to be polled 2 Only 1 polled file can be stored in memory If you need to add document s into the same polled file see page 165 3 If you have set the polling password in Fax P...

Page 140: ...ill change the password temporarily by overwriting it with a new one To Poll Documents from Another Station 1 POLLING NO 1 POLLING 2 POLLED 2 POLLING PASSWORD 1234 3 Enter a 4 digit polling password S...

Page 141: ...O OR 2 PROGRAM P PRESS PROGRAM KEY 3 Ex PROGRAM P1 NAME ENTER NAME 4 Enter the station name up to 15 characters by using the Character keys See page 14 Ex PROG A and ENTER STATION S THEN PRESS START 5...

Page 142: ...Y 5 DEFERRED XMT START TIME 6 Enter the starting time using 4 digits Ex 11 30 p m and ENTER STATION S THEN PRESS START 7 Enter the station by any combination of the following methods One Touch Dialing...

Page 143: ...10 00 p m and DEFERRED POLLING PASSWORD 7 Enter a 4 digit polling password Ex and The polling password appears if it has been previously set ENTER STATION S THEN PRESS START 8 Enter the station by an...

Page 144: ...nter a 4 digit polling password Ex and The polling password appears if it has been previously set ENTER STATION S THEN PRESS START 7 Enter the station by any combination of the following methods One T...

Page 145: ...See page 14 Ex PROG A and P1 PROG A ENTER TEL NO 5a Enter a telephone number up to 36 digits including pauses and spaces Ex P1 PROG A 9 555 1234 5b Enter the email address using character keys up to 6...

Page 146: ...rompt you to enter the POP Password when the Program Key is pressed to retrieve mail Setting the POP Access Key 1 PROGRAM 1 5 ENTER NO OR 2 PROGRAM P PRESS PROGRAM KEY 3 Ex POP USER NAME 4 Enter a POP...

Page 147: ...ram Key enter the POP User Name up to 40 characters POP RCV USER NAME kate 2 If the POP Password is not entered in the Program Key enter the POP Password up to 10 characters and press 3 If the POP ser...

Page 148: ...or group dialing Telephone number and station name for One Touch key To erase the settings in a Program Key Changing or Erasing the Program Key Settings 1 PROGRAM 1 5 ENTER NO OR 2 PROGRAM P PRESS PRO...

Page 149: ...8 ENTER NO OR 2 FAX PARAMETER 1 174 NO 3 145 SENDER SELECTION 1 INVALID 4 145 SENDER SELECTION 2 VALID 5 SENDER SELECTION ENTER NO OR 6 Enter the Sender Selection number Ex 01 to 24 ENTER USER NAME 1...

Page 150: ...OTE 1 Use to copy the default User Name that was programmed in the User Parameters You can add the department name following the default User Name 9 To record another User Name repeat step 6 to 9 To r...

Page 151: ...s for ordinary transmission Sending Document with Sender Selection 1 Set document s face down ENTER STATION S THEN PRESS START 00 2 Enter email address or telephone number 3 SELECT SENDER 00 24 ENTER...

Page 152: ...Contents Printing the Sender Selection List 1 PRINT OUT 1 7 ENTER NO OR 2 PRINTING FAX PARAMETER LIST FAX PARAMETER LIST DATE MAR 12 2002 TIME 15 00 P 02 SENDER SELECTION LIST 1 2 3 NO USER NAME EMAIL...

Page 153: ...THEN PRESS START 00 2 Enter the email addresses by any combination of the following methods One Touch Dialing Abbreviated Dialing Directory Search Dialing press after each email address is entered Man...

Page 154: ...ct is programmed the message is shown as IMAGE from Internet FAX for the subject 5 The document s is stored into memory with a file number Then connects to the LAN and starts sending the email message...

Page 155: ...esponding stations email address s or telephone number s No 154 ROUTING HEADER FORMAT Use this parameter to select the type of email header to be included in the From field of each routed faxes Defaul...

Page 156: ...RIGINATOR or for RELAY STATION 154 ROUTE HEADER FMT 1 ORIGINATOR 154 ROUTE HEADER FMT 2 RELAY STATION 9 155 PRINT ROUTED DOC 1 INC ONLY 10 for INC ONLY or for ALWAYS 155 PRINT ROUTED DOC 1 INC ONLY 15...

Page 157: ...Select for ABBR dialing number email address Ex ONE TOUCH PRESS ONE TOUCH 3 Ex To change the input mode between ENTER EMAIL ADDRESS and ENTER TEL NO press 01 ENTER EMAIL ADDRESS or 01 ENTER TEL NO 4 E...

Page 158: ...entries in the ROUTING TSI field are ignored by the receiving machine 8 Enter the sub address up to 20 characters and press ROUTING SUB ADDRESS 1234567 ROUTING TSI 9 Enter a Numeric ID TSI up to 20 ch...

Page 159: ...List 1 EDIT FILE MODE 1 6 ENTER NO OR 2 1 FILE LIST PRESS SET TO SELECT 3 FILE LIST 1 PRINT 2 VIEW 4 PRINTING FILE LIST FILE LIST DATE MAR 12 2002 TIME 15 00 1 2 3 4 5 6 FILE COMM TYPE CREATED TIME S...

Page 160: ...FILE LIST 1 PRINT 2 VIEW 4 USE THE KEYS TO SCROLL EACH FILE 5 or repeatedly until the display shows a file you want to edit 6 9 1 2 Sample display Type of File XMT Transmission POLL Polling RCV TO MEM...

Page 161: ...that you want to change Ex ENTER FILE NO OR FILE NO 001 4 See Note 2 DEFERRED XMT START TIME 22 30 5 Enter a new start time Ex 6 00 a m If you do not have to change the time skip to step 6 DEFERRED X...

Page 162: ...rred Communication File the following message is shown on the display SET DEFERRED COMM 1 YES 2 NO Press to change the type of the file for deferred communication file 3 If you edit the file that is s...

Page 163: ...ing message is shown on the display DELETE ALL FILES 1 YES 2 NO Press to delete all files Deleting a File 1 EDIT FILE MODE 1 6 ENTER NO OR 2 ENTER FILE NO OR FILE NO 3 Enter the file number or use or...

Page 164: ...it is being sent Printing Out a File 1 EDIT FILE MODE 1 6 ENTER NO OR 2 ENTER FILE NO OR FILE NO 3 Enter the file number or use or to select the file that you want to print Ex ENTER FILE NO OR FILE N...

Page 165: ...r waiting to redial Adding Documents into a File 1 Set document s face down ENTER STATION S THEN PRESS START 05 2 EDIT FILE MODE 1 6 ENTER NO OR 3 Enter the file number or use or to select the file th...

Page 166: ...To confirm or change the entered telephone number for the file see page 159 and 161 2 If you set Fax Parameter No 31 to Valid all incomplete files will remain in the memory To avoid memory overflow pl...

Page 167: ...in order to use the machine again Registering the Access Code does not affect the use of the machine in any other way NOTE 1 To erase the Access Code enter the Access Code and press and follow the pr...

Page 168: ...the Access Code Ex MAR 12 2002 15 00 ACCESS CODE MAR 12 2002 15 00 ACCESS CODE 2 Now you can operate the machine normally MAR 12 2002 15 00 00 Operating Your Machine with the Access Code Restrict Acce...

Page 169: ...g call until there is space available in the memory 2 We recommend that optional flash memory card is installed when this function is used See 238 on Image Memory Capacity General Description Setting...

Page 170: ...step 4 3 Once the RCV TO MEMORY feature is set to On the password cannot be changed Fax Parameter No 37 will not be shown on the LCD display If you wish to change the password set RCV TO MEMORY featur...

Page 171: ...The following illustration shows a typical set up with your machine set to detect Type B double ring ring pattern NOTE 1 Riiing means a long ringing sound and Ring means a short ringing sound General...

Page 172: ...transmission modes 3 The Fax Cover Sheet is not counted in the number of pages column of the journals General Description To use the Fax Cover Sheet 1 Set document s face down ENTER STATION S THEN PRE...

Page 173: ...e To SALES DEPT 3 Message From PANASONIC 201 555 1212 4 02 Page s Following This Cover Page 1 Starting time of communication 2 Recorded name in the One Touch ABBR No or dialed telephone number 3 Your...

Page 174: ...n be set to prompt the user to enter a PIN code before any dialing General Description Selecting the Access Method Prefix or Suffix 1 SET MODE 1 8 ENTER NO OR 2 FAX PARAMETER 1 174 NO 3 39 PIN CODE AC...

Page 175: ...ed Dialing Manual Number Dialing press after each station is entered Up to 70 stations Directory Search Dialing press after each station is entered For details see page 107 to 109 Ex If you want to co...

Page 176: ...like to edit the telephone number 2 If the communication to transfer a received document s fails the received document will print out and then is erased from memory even if the Fax Parameter No 31 IN...

Page 177: ...ature follow the steps below NOTE 1 Your machine sends the Ifax Return Receipt only when receiving from another Panasonic brand Internet Fax It will not confirm email sent from a PC The default settin...

Page 178: ...ption 1 Set document s face down ENTER STATION S THEN PRESS START 00 2 To improve the scanning quality you can temporarily change the Resolution to S FINE and if you are scanning color photographs or...

Page 179: ...LPR software downloaded from the web site first See page 26 NOTE 1 The IP Address Subnet Mask and Default Gateway IP Address TCP IP Gateway Address must be programmed on your machine to use as a Netw...

Page 180: ...to a Relay Station with the telephone number of the End Receiving Station s After the Relay Station completes its transmission to the End Receiving Station your PC or your machine receives a COMM Jour...

Page 181: ...the Relaying Internet Fax to its Manager s Email Address which is programmed in the Relaying Internet Fax machine s User Parameters See page 49 To use the Internet Relayed Transmission just follow the...

Page 182: ...ydney 61 2 111 1234 Singapore Relay Table 3 Sample Parameter and Phone Book Dialing Number Table for London Relaying Station Telephone Number 71 111 1234 Email Address SMTP Ifax london panasonic co uk...

Page 183: ...ess User s Parameter Register the Department Manager s Email Address for supervision and cost control purposes Once registered the machine will send an email notification to this email address for eac...

Page 184: ...One Touch key 01 28 Ex 01 ENTER EMAIL ADDRESS 4 To change the input mode between ENTER EMAIL ADDRESS and ENTER TEL NO press 01 ENTER TEL NO 5 Enter the telephone number up to 36 digits If the Relay a...

Page 185: ...want to assign to this End Receiving Station The Abbreviated number must contain the Relay XMT Password of the Relay Station Ex 01 RELAY ADDRESS 001 10 You can now set an additional One Touch Abbrevia...

Page 186: ...on s using any combination of the following methods One Touch Dialing Abbreviated Dialing Manual Number Dialing up to 70 stations press after each station is entered see Note Directory Search Dialing...

Page 187: ...for the Relay Station One Touch Dialing Abbreviated Dialing Directory Search Dialing For details see pages 90 to 93 Ex 001 LONDON RELAY uk rly london panas RELAY XMT ENTER STATION S 4 Enter only the t...

Page 188: ...r machine starts sending the document s to the Relay email address of the Relay Station with the telephone number for the End Receiving Station Ex End Receiving Station 4681111234 Telephone number see...

Page 189: ...n s Domain Name singapore panasonic co sg Your PC sends the text document s to the Relay email address of the Relay Station with the telephone number of the End Receiving Station After the Relay Stati...

Page 190: ...tion to the Internet FAX you have to convert the file into the format that the Internet FAX is allowed to receive and print as an email using the TIFF file creation function You also have to send that...

Page 191: ...hrough more than one Relay Station you will receive a separate Result Report Printouts and Reports COMM JOURNAL DATE MAR 12 2002 TIME 15 00 1 2 3 MODE RELAYED TRANSMISSION START MAR 12 15 00 END MAR 1...

Page 192: ...ts and Reports Sample Relayed Transmission Notification Email to a Manager Explanation of Contents 1 Email address of the sender s Internet Fax Your machine or PC 2 End Receiving Station s G3 fax tele...

Page 193: ...found your machine will start receiving the document If a match is not found your machine will cancel the reception and an Information Code 406 will be recorded on the Journal NOTE 1 When the Selectiv...

Page 194: ...ou send a document To use Password Reception you must set a 4 digit receiving password in advance The password must be shared with the other compatible Panasonic machine s If the password in your mach...

Page 195: ...r details 2 To change the password press in step 4 Then re enter a new one Setting Password Transmission 1 SET MODE 1 8 ENTER NO OR 2 FAX PARAMETER 1 174 NO 3 43 PASSWORD XMT 4 Enter a 4 digit Transmi...

Page 196: ...e the setting 2 To change the password press in step 4 Then re enter a new one Setting Password Reception 1 SET MODE 1 8 ENTER NO OR 2 FAX PARAMETER 1 174 NO 3 44 PASSWORD RCV 4 Enter a 4 digit Receiv...

Page 197: ...OFF 1 OFF 2 ON 4 for OFF password is not checked or for ON password is checked PASSWD XMT OFF 1 OFF 2 ON or PASSWD XMT ON 1 OFF 2 ON 5 ENTER STATION S THEN PRESS START 00 6 Dial by any combination of...

Page 198: ...r OFF or ON cannot be selected for each reception It is always OFF or ON until you change the setting 7 If your machine s Transmission Password coincides with the other station s Transmission Password...

Page 199: ...to 10 Mailbox files can be stored in memory So you can receive the confidential fax using 10 different confidential codes 3 If the memory overflows the machine will stop receiving and release the lin...

Page 200: ...CONFIDENTIAL XMT CONF CODE 4 Enter a 4 digit Confidential Code Ex CONFIDENTIAL XMT CONF CODE 2233 5 ENTER STATION THEN PRESS START 6 Dial by any one of the following methods One Touch Dialing Abbrevi...

Page 201: ...file will be erased automatically at the center station after being polled Polling a Confidential Document from a Remote Station s Mailbox 1 CONF COMM 1 5 ENTER NO OR 2 CONFIDENTIAL POLL CONF CODE 3...

Page 202: ...e confidential mailbox 2 Up to 10 Mailbox files can be stored in memory So you can receive the confidential fax using 10 different confidential codes 3 If the memory overflows the machine will stop re...

Page 203: ...being polled change the setting of Fax Parameter No 42 CONF POLLED FILE SAVE to Valid Storing a Confidential Document in Your Machine s Mailbox 1 Set document s face down ENTER STATION S THEN PRESS ST...

Page 204: ...ed automatically after being printed out even if the setting of Fax Parameter No 42 CONF POLLED FILE SAVE is changed to Valid Printing Out a Confidential Document from Your Machine s Mailbox 1 CONF CO...

Page 205: ...ts Confidential Code and the other is to delete all confidential files in memory Deleting a Confidential Document Stored in Your Machine s Mailbox To delete a file using Confidential Code 1 CONF COMM...

Page 206: ...I FAX Option and DF 1100 UF 342 344 550 560 585 595 770 788 880 with PC Interface using the Networking version of HydraFax LaserFAX software You can send a document with Sub address information to the...

Page 207: ...Touch or to select ABBR NO Ex ONE TOUCH PRESS ONE TOUCH 3 Ex 01 ENTER TEL NO 4 Enter the telephone number press then enter the Sub address Up to 20 digits Up to 36 digits including telephone number p...

Page 208: ...00 2 Ex 01 Station name 5551234s2762 3 The document is stored into memory and your machine starts to dial the number of the station and sends the document s with Sub addressing information STORE NO 0...

Page 209: ...id See page 77 General Description Transaction Journal 1 PRINT OUT 1 7 ENTER NO OR 2 JOURNAL 1 PRINT 2 VIEW 3a To print a Journal PRINTING JOURNAL 3b To view a Journal JOURNAL VIEW 1 XMT ONLY 2 ALL 4...

Page 210: ...dividual Transmission Journal contains the information on the latest transmission Individual Transmission Journal IND XMT JOURNAL 1 PRINT OUT 1 7 ENTER NO OR 2 6 IND XMT JOURNAL PRESS SET TO PRINT 3 P...

Page 211: ...0 00 21 RCV fax nwfax1 rdmg mgcs MAR 12 20 10 LAN 05 OK 001 155 00 00 19 RCV 215 MAR 12 20 11 C0542B0577000 06 634 000 003 156 00 00 00 XMT 216 MAR 12 20 14 0800420000000 07 408 003 00 02 14 XMT 217 M...

Page 212: ...documents are stored into memory two 3 digit numbers will appear The first 3 digit number represents the number of pages successfully transmitted The second 3 digit number represents the total number...

Page 213: ...NAL Communication Journal COMM JOURNAL COMM JOURNAL DATE MAR 12 2002 TIME 15 00 1 2 3 MODE MEMORY TRANSMISSION START MAR 12 14 50 END MAR 12 15 00 FILE NO 050 4 5 6 7 8 9 10 STN COMM ONE TOUCH STATION...

Page 214: ...red document s was sent R OK indicates that the Relayed XMT or Confidential Communication was successful indicates LAN transmission 3 digit Info Code See page 225 indicates that the communication has...

Page 215: ...t of the telephone numbers you have stored One Touch Abbreviated and Directory Search List 1 PRINT OUT 1 7 ENTER NO OR 2 2 ONE TCH ABBR LIST PRESS SET TO PRINT 3 1 ONE TOUCH ABBR NO 2 DIR SEARCH 4 for...

Page 216: ...dmg mgcs mei co jp 4827 81 03 5251 1234 05 Panafax2 panafax2 rdnn mgcs mei co jp 1773 81 0467 5251 1234 NO OF STATION 05 4 PANASONIC HEAD OFFICE 201 555 1212 ABBR NO LIST DATE MAR 12 2002 TIME 11 11 P...

Page 217: ...jp 4827 81 03 5251 1234 M PAnafax2 005 panafax2 rdnn mgcs mei co jp 1773 81 0467 5251 1234 NO OF STATIONS 005 4 PANASONIC HEAD OFFICE 201 555 1212 1 One Touch number or Abbreviated number nn One Touc...

Page 218: ...MER ABBR NOS P1 TIMER XMT XMT 12 00 001 P2 TIMER POLL POLL 19 00 002 P3 PROG A POLL 001 002 PANASONIC HEAD OFFICE 201 555 1212 1 Program key 2 Program name Up to 15 characters 3 Type of communication...

Page 219: ...NG SETTING 7 001 CONTRAST HOME 1 Normal 2 Lighter 3 Darker 1 1 002 RESOLUTION HOME 1 Standard 2 Fine 3 S Fine 4 Halftone Fine 5 Halftone S Fine 2 1 099 MEMORY SIZE 4MB 6 PANASONIC HEAD OFFICE 201 555...

Page 220: ...to ________________________________ ______________________________________ ________________________________________ ______________________________________ ________________________________________ Atte...

Page 221: ...cument is blank 1 Make sure the document is set face down 2 Check own copy quality If copy is OK your machine has no problem report to the receiving party that they have a problem If copy is NG clean...

Page 222: ...may be running out of toner Replace the Toner Cartridge 34 Faint print You may need to choose a different paper for the best possible print quality 240 Communication No dial tone 1 Check the connecti...

Page 223: ...p at the end of the OGM and before the tape advances to the end of last ICM Your TAM only uses a single cassette tape to give OGM and record ICM Set Fax Parameter No 20 Silent Detection to Invalid And...

Page 224: ...ble In Unattended Fax Mode OUT Mode Fax machine will not start to receive with the telephone answering machine in the auto answer mode Increase the ring count for detection on the telephone answering...

Page 225: ...not installed Install the Toner Cartridge 34 060 Printer Cover is open Close the Printer Cover 061 ADF Door is open Close the ADF Door 400 During initial handshake receiving station did not respond o...

Page 226: ...t and send again 2 Check with the other party 550 Telephone line disconnected Check with the other party 552 553 554 555 Communication error occurred while receiving Check with the other party 580 Sub...

Page 227: ...to obtain the Network Parameters such as IP Address Subnet Mask Default Gateway IP Address etc from the DHCP server 1 Check the LAN Cable connection 2 Contact your Network Administrator and verify whe...

Page 228: ...error Other errors not listed above try again later Error message Possible cause 1 Format Error command block the end command is missing The block termination command end is missing in the command bl...

Page 229: ...te parameter is set to Invalid Set the Remote Dialer Update parameter to Valid 14 Format Error error line The format of the Entry is incorrect incomplete or the data string for each station is not def...

Page 230: ...wrinkled paper and reload the recording paper into the paper cassette To clear the jam Info Code 007 1 1 Open the Printer Cover 2 Remove the Toner Cartridge 3 Remove the jammed paper Note 1 If at all...

Page 231: ...ng 231 Problem Solving If a document becomes jammed in the machine the display will show the Information Code 030 or 031 Clearing a Document Jam To clear the jam 1 1 Open the ADF Door 2 Remove the jam...

Page 232: ...the copy is black or has black lines the document Scanning Area is probably dirty and must be cleaned Cleaning the Document Scanning Area To clean the Scanning Area 1 Open the ADF Door 2 Wipe the Sca...

Page 233: ...y PRINTING CLEANING CHARTS 3 Load the Cleaning Charts into the cassette face down See Note 1 4 1 CLEAN ROLLER 3 PRINT ORDER FORM 5 The Machine will feed out the charts and clean the printer roller CLE...

Page 234: ...you adjust the ADF Adjusting the Automatic Document Feeder ADF To adjust the ADF 1 Slide the Pressure Adjusting Lever to the desired position depending on the condition Position Condition To prevent n...

Page 235: ...hould be replaced or refilled with ink NOTE 1 Please contact your local Panasonic dealer to purchase a new stamp See page 241 Verification Stamp for order number Verification Stamp To remove the stamp...

Page 236: ...the Telephone Line Cable from the telephone jack that was supplied by the telephone company 2 Plug a different regular telephone into the same telephone jack 3 Check for dial tone through the handset...

Page 237: ...0 Sheets Note The document limitation to send multiple pages is as follows Document Size Document Thickness Up to 20 pages Up to 10 1 x 14 3 in 0 0024 0 0048 in 257 x 364 mm Up to 50 pages A4 or Lette...

Page 238: ...One Touch keys and 4 Program keys Each station can register up to 36 digits for each telephone number including pauses and spaces and up to 15 characters for each station name Manual Dialer 70 statio...

Page 239: ...n Approx 19 0 W Reception Approx 470 W Copy Approx 470 W Max Approx 470 W Dimensions 14 6 W x 18 0 D x 9 8 H in 370 x 457 x 250 mm excluding Projections and optional Paper Cassette Weight Approx 20 lb...

Page 240: ...ossible that the paper could meet all of the specifications listed above and still not print well because of the variations in paper manufacturing Therefore we recommend that you test the paper thorou...

Page 241: ...ure Description UE 403176 Handset Kit UE 409070 250 sheets Letter Legal A4 Size Paper Cassette with the Feeder Unit UE 410046 Expansion Flash Memory Card 2 MB UE 410047 Expansion Flash Memory Card 4 M...

Page 242: ...d Installing the Flash Memory Card 1 1 Unplug the Power Cord 2 Open the Printer Cover and remove the Memory Card Cover 2 1 Insert the Flash Memory Card gently into the card slot with the Panasonic log...

Page 243: ...en your telephone number is called In most but not all areas the sum of the REN s of all devices connected to one line should not exceed five 5 0 To be certain of the number of devices you may connect...

Page 244: ...ion into your facsimile machine you should refer to page number 44 and 47 in this Operating Instructions to complete the steps Example of Header Format LOGO ID Number setting NOTE 1 This equipment com...

Page 245: ...cularly important in rural areas Users should not attempt to make such connections themselves but should contact the appropriate electric inspection authority or electrician as appropriate This equipm...

Page 246: ...ment importante dans les r gions rurales L utilisateur ne doit pas tenter de faire ces raccordements lui m me il doit avoir recours un service d inspection des installations lectriques ou un lectricie...

Page 247: ...great distance Coding scheme The data compression method used by machines Your machine utilizes Modified Huffman MH Modified Read MR and Modified Modified Read MMR coding schemes COMM JOURNAL Refers t...

Page 248: ...ion of machines Group dialing The ability to program many telephone numbers into a single station so that many locations can be dialed in sequence utilizing a single keystroke HALFTONE A scanning tech...

Page 249: ...rvice protocol that runs over TCP IP LOGO Your programmed company name or identification up to 25 alphanumeric characters MAC Address Its the hardware address often referred to as MAC Media Access Con...

Page 250: ...s in the correct order Print reduction modes The methods used to determine how an incoming document will be reduced to print onto the paper loaded in your machine Program keys Keys that are defined fo...

Page 251: ...when it runs out of recording paper or toner TAM Interface A capability of your unit to be connected and operate with a Telephone Answering Machine TAM TCP IP Transmission Control Protocol Internet Pr...

Page 252: ...252 ITU T Image No 1 All specifications are based on the ITU T Image No 1 The sample shown below is not to scale...

Page 253: ...Ring Detector DRD 171 DNS SERVER 82 Document Jam 231 Document Size 237 Document Thickness 237 E Edit File Mode 159 Email ABBR Programming Errors 228 Email Address 72 Email Character Set 81 Email Heade...

Page 254: ...t 77 Receiving Documents via LAN 122 Receiving Email from a POP Server 124 Receiving Password 196 Reception Modes 127 Recording Paper Jam 230 Redialing 120 Reduction Ratio 78 Relay Network 181 Relay X...

Page 255: ...255 memo...

Page 256: ...XPRESSED OR IMPLIED TO THE CUSTOMER WITH RESPECT TO THIS PANASONIC MACHINE INCLUDING BUT NOT LIMITED TO ANY IMPLIED WARRANTY OF MERCHANTABILITY OR FITNESS FOR A PARTICULAR PURPOSE PANASONIC DOCUMENT I...

Reviews: