background image

9

Before Using

2

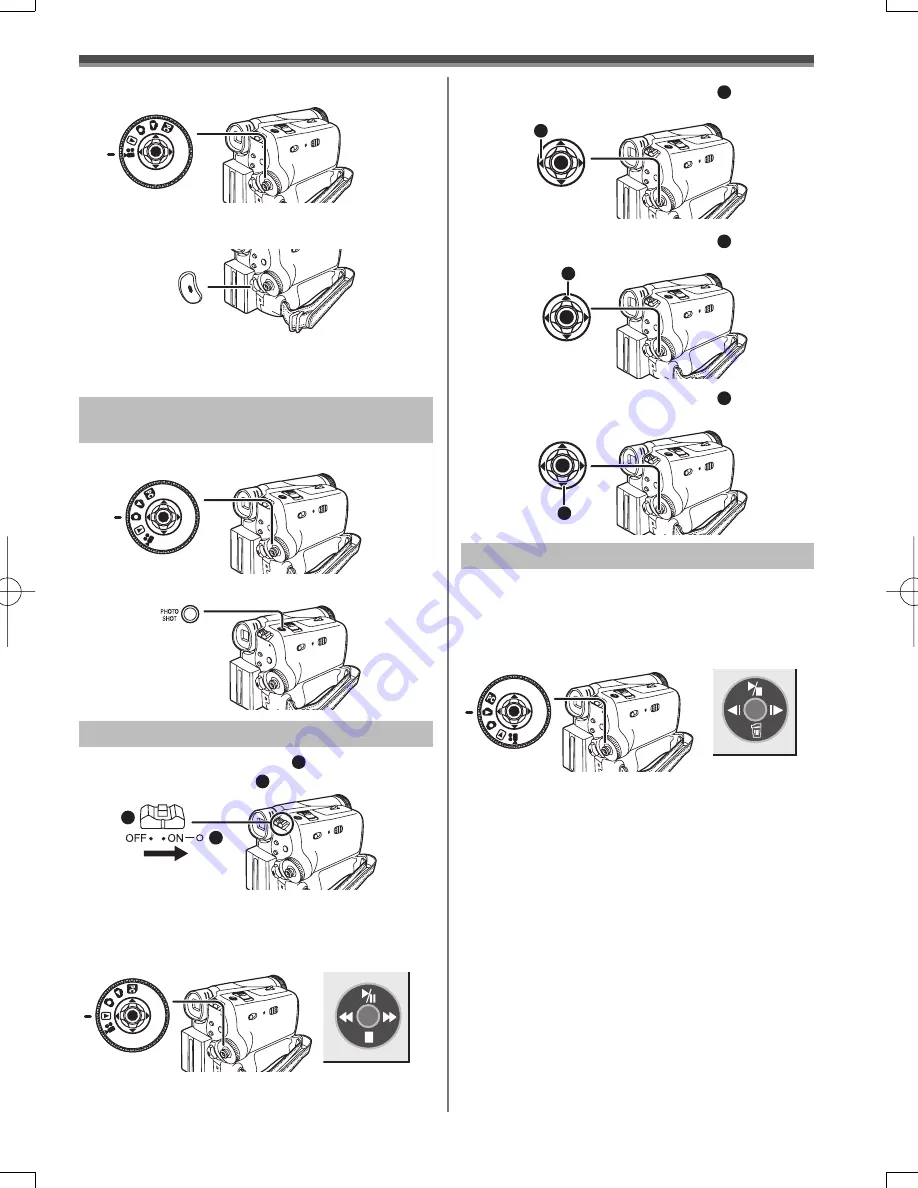
  Set the Mode Dial to Tape Recording Mode.

3

  Press the Recording Start/Stop Button.

• Recording starts.

1

  Set the Mode Dial to Card Recording Mode.

2

  Press the [PHOTO SHOT] Button.

Recording a Still Picture on Card 
(Photoshot)

1

  Set the [OFF/ON] Switch 

1

 to [ON].

•  The [POWER] Lamp 

2

 lights up.

2

  Set the Mode Dial to Tape Playback Mode.

•  The One-Touch Navigation icon is displayed on 

the lower right of the screen.

3

  Move the Joystick Control [

3

 to rewind 

the tape.

4

  Move the Joystick Control [

4

 to start 

playback.

5

  Move the Joystick Control [

5

 to stop 

playback.

Playing Back a Tape

1

  Set the Mode Dial to Picture Playback 

Mode.

•  The One-Touch Navigation icon is displayed on 

the lower right of the screen.

Joystick Control [

] : Starting the Slide Show

Stop the Slide Show

Joystick Control [

] : Erase the pictures

Joystick Control [

] : Playing back the previous 

picture

Joystick Control [

] : Playing back the next picture

2

 Start 

Playback.

Playing Back a Card

4

  Press the Recording Start/Stop Button 

again to pause the recording.

1

2

3

[One-Touch Navigation icon]

4

5

[One-Touch Navigation icon]

Summary of Contents for Palmcorder MultiCam PV-GS32

Page 1: ...igital Video Camcorder Operating Instructions Model No Spanish Quick Use Guide is included Guía para rápida consulta en español está incluida For assistance please call 1 800 211 PANA 7262 or contact us via the web at http www panasonic com contactinfo Refer to page 71 for ArcSoft Software USB Connection Kit Mail In Rebate ...

Page 2: ...is manual as your convenient Camcorder information source This symbol alerts the user that important literature concerning the operation and maintenance of this unit has been included Therefore it should be read carefully in order to avoid any problems The above markings are located on the appliance bottom cover Your Camcorder is designed to record and play back in Standard Play SP mode and Long L...

Page 3: ...dio or television reception which can be determined by turning the equipment off and on the user is encouraged to try to correct the interference by one or more of the following measures Reorient or relocate the receiving antenna Increase the separation between the equipment and receiver Connect the equipment into an outlet on a circuit different from that to which the receiver is connected Consul...

Page 4: ...afety If the provided plug does not fit into your outlet consult an electrician for replacement of the obsolete outlet 10 Protect the power cord from being walked on or pinched particularly at plugs convenience receptacles and the point where they exit from the apparatus 11 Only use attachments accessories specified by the manufacturer 12 Use only with the cart stand tripod bracket or the table sp...

Page 5: ... THE CAMCORDER WITH THE EVF AIMED DIRECTLY AT THE SUN AS THIS MAY CAUSE DAMAGE TO THE INTERNAL PARTS OF THE EVF DO NOT EXPOSE YOUR CAMCORDER TO EXTENDED HIGH TEMPERATURE Such as in direct sunlight inside a closed car next to a heater etc This action could permanently damage the internal parts of your Camcorder AVOID SUDDEN CHANGES IN TEMPERATURE If the unit is suddenly moved from a cold place to a...

Page 6: ...tural Colors White Balance 29 Adjusting White Balance Manually 29 Manual Shutter Speed Adjustment 30 Manual Iris Adjustment F Number 31 Manual Focus Adjustment 31 Before Using Things You Should Know 2 Safety Precautions 2 Precautions 5 Quick Guide 8 Standard Accessories 10 Parts Identification and Handling 10 Power Supply 11 Charging Time and Available Recording Time 12 To Use as a Grip Belt 13 Re...

Page 7: ...ing Camcorder with a PC 39 Using the USB Driver 39 To disconnect USB cable safely 41 Using as a Web Camera 42 If you no longer need software or driver Uninstall 46 Notes 46 Indications 48 Initializing the Modes 49 Warning Alarm Indications 49 Notes and Hints 50 Cautions for Use 54 Before Requesting Service Problems and Solutions 57 Using the RESET button 60 Explanation of Terms 60 Specifications 6...

Page 8: ...assette Holder is opened insert a Cassette 3 Close the Cassette Holder by pressing the PUSH mark 2 4 Only after the Cassette Holder is completely housed close the Cassette Compartment Cover by pressing the mark 3 2 1 Inserting a Card 2 Slide the OPEN Lever 3 to open the Card Slot Cover 4 3 While holding the Memory Card with its cut corner facing right 5 insert it into the Card Slot 6 4 Close the C...

Page 9: ...k Control 3 to rewind the tape 4 Move the Joystick Control 4 to start playback 5 Move the Joystick Control 5 to stop playback Playing Back a Tape 1 Set the Mode Dial to Picture Playback Mode The One Touch Navigation icon is displayed on the lower right of the screen Joystick Control Starting the Slide Show Stop the Slide Show Joystick Control Erase the pictures Joystick Control Playing back the pr...

Page 10: ...corder CGA DU12 1 LCD Monitor Open Knob OPEN p 17 2 LCD Monitor pp 17 57 Due to limitations in LCD production technology there may be some tiny bright or dark spots on the LCD Monitor screen However this is not a malfunction and does not affect the recorded picture 3 Speaker p 32 4 DC Input Jack DC IN p 11 5 Battery Holder 6 Card Slot Cover Open Lever OPEN p 14 7 Card Slot Cover p 14 8 Card Slot p...

Page 11: ...7 29 Recording Start Stop Button p 22 30 Power Lamp POWER p 15 31 Light Button LIGHT p 24 32 Mode Dial p 15 33 Joystick Control pp 15 16 18 34 Shoulder Strap Holders p 13 35 Reset Button RESET pp 49 57 59 60 36 Grip Belt p 13 37 Battery Eject Switch BATTERY RELEASE p 12 38 Tripod Receptacle This is a hole for attaching the Camcorder to optional tripod Please carefully read the Operating Instructio...

Page 12: ...th your hand so it does not fall Charging Time and Available Recording Time A Charging Time Maximum Continuous Recording Time Intermittent Recordable Time B 2 h 25 min indicates 2 hour and 25 minutes Battery CGA DU12 is supplied The times shown in the table are approximate times The numbers indicate the recording time when the Viewfinder is used The numbers in parentheses indicate the recording ti...

Page 13: ...attach the Shoulder Strap before going out to avoid dropping the Camcorder 1 Pull the end of the Shoulder Strap through the Shoulder Strap Holder on the Camcorder 2 Fold the end of the Shoulder Strap run it through the Shoulder Strap Length Adjuster and pull it Pull it out more than 1 inch 2 cm 1 from the Shoulder Strap Length Adjuster so that it cannot slip off Attach the other end of the Shoulde...

Page 14: ...onitor and then slide the OPEN Lever 6 to open the Card Slot Cover 7 2 While holding the Memory Card with its cut corner facing right 1 insert it into the Card Slot 8 1 Inserting a Card 6 7 8 3 Close the Card Slot Cover 7 securely Removing the Card Open the Card Slot Cover and press the center of the Card and then pull it straight out After removing the Card close the Card Slot Cover The Camcorder...

Page 15: ... indicated on the SD Memory Card label corresponds to the total amount of capacity to protect and manage the copyright and the capacity available as conventional memory for a Camcorder personal computer or other equipment 30 Easy to Use Mode Dial You can choose a desired mode by rotating the Mode Dial 1 Rotate the Mode Dial 32 Set your desired mode to 1 32 Tape Recording Mode Use this mode when re...

Page 16: ...tion p 27 Soft Skin Mode p 28 2 3 MagicPix Mode p 27 Recording Check p 22 3 3 Manual Mode White Balance Shutter Speed Iris Focus pp 29 31 Adjust pp 29 31 Adjust pp 29 31 Card Recording Mode When the AUTO MANUAL FOCUS Switch is set to AUTO 1 1 Backlight compensation p 27 Soft Skin Mode p 28 1 1 One Touch Navigation icon OFF Using the Viewfinder LCD Monitor Before using the Viewfinder adjust the fie...

Page 17: ...g yourself the LCD Monitor and the Viewfinder will be simultaneously activated Using the Menu Screen To facilitate the selection of a desired function or setup this Camcorder displays various function setups on Menus 1 Press the MENU Button 28 28 The Menu corresponding to the Mode selected by the Mode Dial 32 is displayed Do not switch the Mode Dial 32 when the Menu is displayed 32 33 When LCD SET...

Page 18: ...u will be retained even when the Camcorder is turned off However if the Battery or AC Adaptor is disconnected before turning off the Camcorder the selected setup may not be retained Menu operation flow is shown in this text by List of Menus The figures of the Menus are for explanation purposes only and they are different from the actual Menus TAPE RECORDING MENU BASIC ADVANCE SETUP LANGUAGE SETUP ...

Page 19: ...celed If no operations take place for approx 10 minutes the demonstration mode automatically starts To terminate the demonstration mode insert a cassette or a card or set to DEMO MODE OFF For normal use set this function to OFF POWER SAVE Power Save Mode p 49 LANGUAGE Language Setup Sub menu p 18 CARD RECORDING MENU BASIC ADVANCE SETUP LANGUAGE SETUP ENTER EXIT BASIC SCENE MODE PICT QUALITY SELF T...

Page 20: ...ontrol or 33 to select the item to be set Then move the Joystick Control or 33 to set the desired value Year will cycle in the order shown below 2000 2001 2089 2000 3 Press the Joystick Control 33 to finish setting the date and time The clock operation starts from 00 second CLOCK SET JAN 01 2005 12AM 00 SETUP SET ENTER EXIT Set to Tape Card Recording Mode 33 32 Internal Lithium Battery Recharge Th...

Page 21: ...but mosaic noise may appear on the playback image or some functions may be disabled Playback on other digital video equipment or on digital video equipment without the LP mode Playback of the image on other digital video equipment recorded in the LP mode Still Advance playback Audio Recording Mode You can select the sound quality of the recorded sound Set to Tape Recording Mode Set SETUP AUDIO REC...

Page 22: ...t to Tape Recording Mode and the recording to a tape is in progress you can also record a still picture on a card by pressing the PHOTO SHOT Button 23 For the number of still pictures to be recorded on a card refer to page 24 When recording pictures onto a card the Recording Start Stop Button is disabled You can select a picture quality for still pictures to be recorded p 23 In order to record hig...

Page 23: ...function The Progressive Photoshot Function may not be activated depending on the function you use p 49 To record still pictures with higher quality we recommend setting to the Card Recording Mode To activate the Progressive Photoshot Function regardless of the function you use When you record onto the tape and the card simultaneously the Progressive Photoshot Function is not activated Progressive...

Page 24: ... RapidFire Consecutive Photoshot The Indication appears The still pictures can be recorded on a Card at regular intervals 1 Set ADVANCE BURST MODE ON Maximum number of still pictures recordable on an SD Memory card optional PICTURE QUALITY High Normal 32 MB 220 440 64 MB 440 880 128 MB 880 1 760 256 MB 1 760 3 520 512 MB 3 520 7 040 1 GB 7 040 14 080 33 28 1 2 3 4 5 6 A M J A N 2 2 0 0 5 23 The nu...

Page 25: ...ever towards T Zoom Magnification Indication is displayed for a few seconds 13 S P 3 h 5 9 m 5 9 s 2 9 f R 2 0 0 4 X W T 1 2 3 4 5 6 A M J A N 2 2 0 0 5 S P 3 h 5 9 m 5 9 s 2 9 f R 2 0 0 1 3 X W T S P 3 h 5 9 m 5 9 s 2 9 f R 2 0 0 2 6 X W T To Take Close up Shots of Small Subjects Macro Close up Function When the zoom magnification is 1 the Camcorder can focus on a subject that is as close as appr...

Page 26: ...lose up shots of subjects located beyond a normal zoom range of 1 to 28 magnification With the Digital Zoom Function you can select a magnification from 50 up to 1000 Set to Tape Recording Mode 1 Set ADVANCE D ZOOM 50 or 1000 S P 3 h 5 9 m 5 9 s 2 9 f R 2 0 0 1 2 3 4 5 6 A M J A N 2 2 0 0 5 33 28 50 Digital zooming to 50 1000 Digital zooming to 1000 13 33 28 S P 3 h 5 9 m 5 9 s 2 9 f R 2 0 0 1 2 3...

Page 27: ...s the Joystick Control 33 twice to display the One Touch Navigation icon on the lower right of the screen 33 3 Move the Joystick Control 33 to select 4 Press the Recording Start Stop Button 29 33 29 The W or B Indication flashes and then is displayed To Cancel Fading Move the Joystick Control to select again Start recording Fade in When you start recording the image audio disappeared completely an...

Page 28: ... Control 33 to select 33 33 S P 3 h 5 9 m 5 9 s 2 9 f R 2 0 0 1 2 3 4 5 6 A M J A N 2 2 0 0 5 1 2 S P 3 h 5 9 m 5 9 s 2 9 f R 2 0 0 Black bars appear at the top and bottom of the screen To Cancel the Cinema Function Set ADVANCE CINEMA OFF For other notes concerning this item see page 52 Cinema Function This function is for recording a cinema like image Set to Tape Recording Mode 1 Set ADVANCE CINE...

Page 29: ...he Indication and the One Touch Navigation icon appears 1 Automatic White Balance Adjustment 2 Indoor Mode recording under incandescent lamp 3 Outdoor Mode 4 The white balance setting that was previously set manually To Resume Automatic Adjustment Move the Joystick Control or 33 until the Indication appears Or set the AUTO MANUAL FOCUS Switch to AUTO 2 Move the Joystick Control 33 until the white ...

Page 30: ...er 2 Blue sky 3 Cloudy sky rain 4 TV screen 5 Sunlight 6 White fluorescent lamp 7 Halogen light bulb 8 Incandescent light bulb 9 Sunrise or sunset 10 Candlelight The White Balance Sensor 14 determines the nature of the light source during recording Do not cover the White Balance Sensor with your hand during recording because White Balance will not function normally About White Balance Sensor 14 24...

Page 31: ...to AUTO For other notes concerning this item see page 53 Manual Focus Adjustment Focus can be adjusted manually for recording in a situation where auto focus may not function well Set to Tape Card Recording Mode 1 Set the AUTO MANUAL FOCUS Switch 24 to MANUAL 2 Slide the AUTO MANUAL FOCUS Switch 24 to FOCUS The MF Indication Manual Focus Mode appears 3 Move the Joystick Control or 33 to adjust the...

Page 32: ... is moved during Playback it turns to Cue Playback A or Review Playback B If the Joystick Control is held continuously it turns to Cue Playback or Review Playback until you release it During Cue Review playback fast moving images may show noise as a mosaic Before and after Cue Review playback the screen may become blue for a moment or images may be distorted 32 13 For other notes concerning this i...

Page 33: ...rd 1 Set the OFF ON Switch 26 to ON The POWER Lamp 30 lights up 2 Set the Mode Dial 32 to Picture Playback Mode The One Touch Navigation icon is displayed on the lower right of the screen 3 Start Playback 1 Folder File Number 2 Picture Size p 48 3 File Number 1 2 3 32 26 30 Joystick Control Starting the Slide Show Stop the Slide Show Joystick Control Erase the pictures Joystick Control Playing bac...

Page 34: ...e the Joystick Control or 33 to select DELETE 1 FILE and press the Joystick Control 33 To Select and Delete All Files To Select and Delete Files DELETE DELETE 1 FILE ALL FILES SETUP ENTER EXIT 1 Move the Joystick Control or 33 to select the file to be deleted The selected file is deleted from the Card If NO is selected the file selection is canceled 4 Move the Joystick Control or 33 to select YES ...

Page 35: ...prints with the printer supporting DPOF 2 or more files can be set in succession 4 Repeat Steps 2 and 3 and press the MENU Button 28 when the setup is completed 1 2 About the DPOF DPOF stands for Digital Print Order Format This enables the printing information to be added to the pictures on the card so that it can be used on a system supporting DPOF Protecting the Files on a Card Lock Setting The ...

Page 36: ...If the SD Memory Card is formatted on a PC it cannot be used on the Camcorder Format the SD Memory Card on the Camcorder in this case The Camcorder supports SD Memory Cards formatted in FAT12 system and FAT16 system based on SD Memory Card Specifications Playing Back on Your TV By connecting your Camcorder with your TV the recorded scenes can be viewed on your TV screen Before connecting them turn...

Page 37: ... 53 One Touch Navigation icon VIDEO IN AUDIO IN 1 Copying onto a DVD Recorder or a VCR Dubbing Pictures recorded by the Camcorder can be stored on a DVD RAM or other such media Refer to the instructions for the recorder Place a recorded cassette in the Camcorder and an unrecorded DVD RAM or cassette in the DVD Recorder or VCR 1 Connect the Camcorder and the Recorder Connecting with the AV Cable Co...

Page 38: ...horized exchanging and or copying of copyrighted recordings may be copyright infringement To Stop Dubbing Move the Joystick Control to select again To Cancel the Standby for Recording When the Camcorder is standby for recording move the Joystick Control and select the Using the DV Cable for Recording Digital Dubbing Player Recorder 2 Insert the Cassette and set to Tape Playback Mode Player 3 Move ...

Page 39: ...ommended Free hard disk space At least 30 MB or more Interface USB 1 1 or more For Windows Me 2000 XP users the USB equipment operates with the driver installed as standard in OS Using the USB Driver Operating environment For Macintosh OS Mac OS X v 10 1 X v 10 3 CPU iMac iBook or Power Book G4 Power Mac G4 or Power Mac G5 RAM 64 MB or more The USB equipment operates with the driver installed as s...

Page 40: ...ing Built in SD Drive 4 Double click the NO_NAME icon You can view images stored on the Memory Card and also save them to your hard disk Please do not change file or folder names on the Personal Computer The images on the Memory Card may not be able to be viewed on the Camcorder 3 Connect the Camcorder to your Macintosh with USB Cable For Macintosh 1 Insert the Memory Card into the Camcorder 2 Set...

Page 41: ...nnect the cable Also with Windows Me the icon will not be displayed when in Tape Recording Mode or Tape Playback Mode CAUTION If you disconnect the USB Cable while the Card Access Lamp is on it may damage the Card data You can safely disconnect the cable 2 Select USB Mass Storage Device and click Stop 3 Verify Matshita DVC USB Device is selected and click OK Removing the USB Cable safely for Macin...

Page 42: ...led OS IBM PC AT compatible personal computer with preinstalled Microsoft Windows XP Home Edition Professional With this version of Windows XP SP2 or later is needed Microsoft Windows 2000 Professional SP4 or later Microsoft Windows Me Millennium Edition Microsoft Windows 98 Second Edition CPU Intel Pentium ll Celeron 450 MHz or higher Celeron 400 MHz or higher including compatible CPU RAM 128 MB ...

Page 43: ...und is displayed Enter C Windows system for Windows 98SE Enter C Windows options CABS for Windows Me If the kstvtune ax file is missing in one of the 2 above mentioned folders insert the OS CD ROM and assign the path 2 The message The file ksclockf ax on Unknown cannot be found is displayed Enter C Windows system If the ksclockf ax file is missing in the above mentioned folder insert the OS CD ROM...

Page 44: ...er on Windows XP When you use other than Windows XP the other parties via the network have to use MSN Messenger on an OS other than Windows XP If the Camcorder is used as a Web Camera the quality of the video to be exchanged will depend on the Internet connection status If the USB Cable is disconnected from the personal computer the Web Camera mode is canceled If the Camcorder is used as a Web Cam...

Page 45: ...d close Windows Messenger then turn off the Camcorder Finally disconnect the USB Cable If the Camcorder is used as Web Camera continuously for two hours the communication is automatically shut OFF In this case restart Windows Messenger and set up the communication again 8 Select DVC in the Microphone menu 5 Click on Audio Tuning Wizard in the Tools menu to confirm that equipment is connected corre...

Page 46: ... data If the Camcorder is used as a Web Camera while virus checking software is running the Camcorder s operation may stop midway through In this case exit the Windows Messenger or MSN Messenger reconnect the Camcorder and restart the Windows Messenger or MSN Messenger Do not delete the folders in the memory card such as picture folder Memory card may not be recognized if folders are deleted When ...

Page 47: ...e recorded in the JPEG format MISC Files in which DPOF Data has been set to the image are in this folder DCIM etc are necessary items in the folder structure They have nothing to do with actual operations In the Card Mode the Camcorder automatically saves file numbers IMGA0001 JPG etc along with the images The file numbers are recorded with each image as consecutive numbers When using software wit...

Page 48: ...Quality p 23 0 Remaining Number of Photoshot pictures When the remaining number of Photoshot pictures reaches 0 the red indication flashes 100 0001 Folder File Display No 00 File Number 1 Number of DPOF Setting p 35 RapidFire Consecutive Photoshot Recording p 24 Lock Setting p 35 LED Video Light is on p 24 Gain up p 24 Web Camera Mode Recording p 43 Web Camera Mode Playback p 43 640 480 Image size...

Page 49: ...he Camcorder or when the Camcorder is in the PC Mode Green While the Card being read Red Using the card that cannot be recognized Warning Alarm Indications If any one of the following indications lights up or flashes please check the Camcorder Confirmatory Indications A cassette with the accidental erasure prevention slider placed in the SAVE position is inserted No cassette is inserted The built ...

Page 50: ...Blank Search Function p 23 to find the position where you want to continue recording If you overwrite record on a previously recorded cassette be sure to find the position where you want to continue recording If a new Cassette is inserted rewind to the beginning of the tape before starting recording When inserting the cassette make sure it faces in the right direction and then push it in until it ...

Page 51: ...he White Balance is adjusted if the scene being recorded has a light source different from the scene last recorded When the MagicPix Function is used however the White Balance of the scene last recorded is retained Since about half the power of normal recording is used in quick start standby using Quick Start reduces the recordable time The zoom magnification may differ from when it is in the Quic...

Page 52: ...nding on the software in used Scene Mode If any of the Scene Modes are selected you cannot adjust the shutter speed p 30 or iris p 31 Using the MagicPix Function cancels any of the Scene Modes Using the Light Function cancels any of the Scene Modes Sports Mode For Playback Pause of recorded pictures this mode helps diminish camera shake During normal playback the image movement may not look smooth...

Page 53: ...und regardless of the AUDIO OUT setting if 12bit AUDIO is set to MIX Playing Back a Card While the data on a card is playing back do not operate the Mode Dial If a blank nothing recorded Card is played the screen becomes white If you attempt to play back file recorded in a different format or file data is defective the whole display becomes bluish and the UNPLAYABLE CARD Indication may appear as a...

Page 54: ...agnetically charged equipment and does not function properly turn off the Camcorder power and detach the Battery or AC Adaptor and then connect the Battery or AC Adaptor again Thereafter turn on the Camcorder power Do not use your Camcorder near radio transmitters or high voltage cables If you record pictures near radio transmitters or high voltage cables recorded images or sounds may be adversely...

Page 55: ... take more time before the condensation indication disappears Watch for Condensation even before the Condensation Indication is displayed The condensation indication may not appear depending on circumstances When condensation occurs on the lens or the Camcorder it also may occur on the head and the tape Do not open the Cassette Compartment Cover When the Lens Is Fogged Set the OFF ON Switch to OFF...

Page 56: ... into the Camera Do not leave the Camcorder in places that expose it to high temperature Battery Extremely high temperatures or low temperatures will shorten the life of the Battery If the Battery is kept in smoky or dusty places the terminals may rust and cause malfunctions Do not allow the Battery terminals to come in contact with metal objects such as necklaces hairpins etc This can result in a...

Page 57: ...ns Power Body The Camcorder power cannot be turned on Is the battery fully charged Use a fully charged battery The battery protection circuit may have operated Attach the battery to the AC adaptor for 5 to 10 seconds If the Camcorder still cannot be used the battery is faulty The Camcorder power is turned off automatically If you set POWER SAVE to 5 MINUTES and do not operate the Camcorder for abo...

Page 58: ... the manual focus mode to adjust the focus p 31 Is the MagicPix function set When the MagicPix function is working focusing shifts into the manual mode Indications A sentence is displayed in red or yellow in the screen center Read the contents and respond to them pp 49 50 The remaining tape time indication disappears The remaining tape time indication may disappear temporarily during Still Advance...

Page 59: ...rmal operation is still not restored detach the power connected and consult the dealer who you purchased the Camcorder from PUSH THE RESET SWITCH is displayed An irregularity in the Camcorder has been automatically detected Remove the cassette or the card for data protection and then press the RESET Button with the protection on the Lens Cap The Camcorder will be activated An irregularity in the C...

Page 60: ... recorded Cassette is inserted the Time Code picks up from the point where the last scene was recorded In this case when the Cassette is inserted the zero display 0h00m00s00f may appear but the Time Code starts from the previous value The Time Code cannot be reset to zero Unless the Time Code is continuously recorded from the beginning of a tape accurate editing may not be possible To ensure that ...

Page 61: ...tput Level Line 316 mV 600 ohm USB Card reader writer function USB 2 0 compliant Full Speed No copyright protection support Digital Interface DV Input Output Jack IEEE1394 4 pin Power Source DC 7 2 7 9 V Power Consumption Recording 4 5 W Power Source AC 110 240 V 50 60 Hz Power Consumption 19 W DC Output DC 7 9 V 1 4 A Camcorder Operation DC 8 4 V 0 65 A Battery Charging Dimensions 61 W 32 H 91 D ...

Page 62: ...A 1B 2 040 mAh Rechargeable Lithium Ion Battery Pack Call For Pricing PV DDC9 DV Interface Cable i LINK 4 pin to 4 pin 55 00 RP SDH01GU1A RP SDH512U1A RP SDH256U1A W RP SD128BU1A W RP SD064BPPA W RP SD032BPPA 1 GB SD Memory Card 512 MB SD Memory Card 256 MB SD Memory Card 128 MB SD Memory Card 64 MB SD Memory Card 32 MB SD Memory Card Call For Pricing BN SDUSB2E USB Reader Writer for SD Memory Car...

Page 63: ...quires complete street address Please photocopy this form when placing an order 2 Items Ordered 1 Camcorder Model Accessory Description Price Each Quantity Total Price Subtotal Your State Local Sales Tax Shipping Handling 6 95 Total Enclosed 3 Method of payment check one Check of Money Order enclosed NO C O D SHIPMENTS VISA MasterCard Discover Credit Card Expiration Date Customer Signature Make Ch...

Page 64: ...ely event this product needs service Please include your proof of purchase Failure to do so will delay your repair To further speed your repair please provide an explanation of what is wrong with the unit and any symptom it is exhibiting Mail this completed form and your Proof of Purchase along with your unit to Panasonic Services Company 1705 N Randall Road Elgin IL 60123 7847 Attn Camcorder Repa...

Page 65: ... Panasonic Sales Company 787 750 4300 or fax 787 768 2910 In Home service if applicable requires clear complete and easy access to the product by the authorized servicer and does not include removal or re installation of an installed product It is possible that certain in home repairs will not be completed in home but will require that the product or parts of the product be removed for shop diagno...

Page 66: ...ized Factory Servicenter Please carefully pack and ship prepaid and insured to the Elgin Centralized Factory Servicenter Customer s in Puerto Rico please ship or carry in to location below Service in Puerto Rico Service in Puerto Rico Panasonic Puerto Rico Inc Panasonic Sales Company Factory Servicenter Ave 65 de Infantería Km 9 5 San Gabriel Industrial Park Carolina Puerto Rico 00985 Phone 787 75...

Page 67: ...ivo puede no causar interferencias perjudiciales y 2 este dispositivo debe aceptar cualquier interferencia recibida incluyendo interferencias que pueden causar un funcionamiento no deseado Nota Este equipo ha sido puesto a prueba y se encontró que cumple con la Parte 15 de las reglas del FCC Estos limites están diseñados para proveer una protección razonable contra interferencias cuando se opera e...

Page 68: ...un cassette 3 Cierre el soporte del cassette presionando la marca PUSH 2 4 Sólo después de que el soporte de cassette esté completamente guardado cierre la cubierta del compartimiento del cassette presionando la marca 3 2 1 Inserción de una tarjeta de memoria 2 Deslice el botón OPEN 3 para abrir la cubierta de la ranura de tarjeta 4 3 Mientras sostiene la tarjeta de memoria con su esquina cortada ...

Page 69: ...oystick 3 para rebobinar el cassette 4 Mueva el joystick 4 para iniciar la reproducción 5 Mueva el joystick 5 para detener la reproducción Reproducción de una cinta 1 Ajuste el selector de modo en modo de reproducción de foto El icono del sistema de navegación de un toque aparece en la parte inferior derecha de la pantalla Joystick Comienzo de una presentación Parada de la presentación Joystick Bo...

Page 70: ...tor 16 57 Limited Warranty 65 Lock Setting 35 Low Light Mode 29 M Macro Close up 25 MagicPix Function 27 Manual Focus 31 Mode Dial 15 O One Touch Navigation icon 15 P Photoshot 23 Picture Size 33 Portrait Mode 29 Q Quick Start 25 R RapidFire Consecutive Photoshot 24 Recording Check 22 Remaining Battery 48 Remaining Tape Time 48 Repeat Playback 53 Request for Service Notice 64 Review Playback 32 S ...

Page 71: ... employees or warehouse facilities groups clubs or organizations will be accepted or acknowledged No P O boxes except military APO FPO Air Army Post Office or Fleet Post Office addresses 6 Limit one ArcSoft Software USB Connection Kit per person address or household may not be combined with any other offer or rebate It is illegal to submit multiple requests for the same individual or family Fraudu...

Page 72: ...Electronics Company Division of Panasonic Corporation of North America One Panasonic Way Secaucus New Jersey 07094 Panasonic Sales Company PSC Division of Panasonic Puerto Rico Inc Ave 65 de Infanteria Km 9 5 San Gabriel Industrial Park Carolina Puerto Rico 00985 ...

Reviews: