background image

23

Recording Mode

To Cancel Blank Search Before Completion

Press the [


] Button.

  Digital Still Picture

When the [STILL] Button 

12

 is pressed, images 

become still pictures. When the button is pressed 
again, the Digital Still Picture Mode is canceled.

• We recommend that you press the [STILL] Button 

fi

 rst at the position where you wish to record the still 

picture so as to enter the Digital Still Picture Mode 
and then press the [PHOTO SHOT] Button.

1  Set the Mode Dial 

36

 to Card Recording 

Mode.

2  Press the [PHOTO SHOT] Button 

33

.

• The [ 

PICTURE

 ] Indication lights up in red.

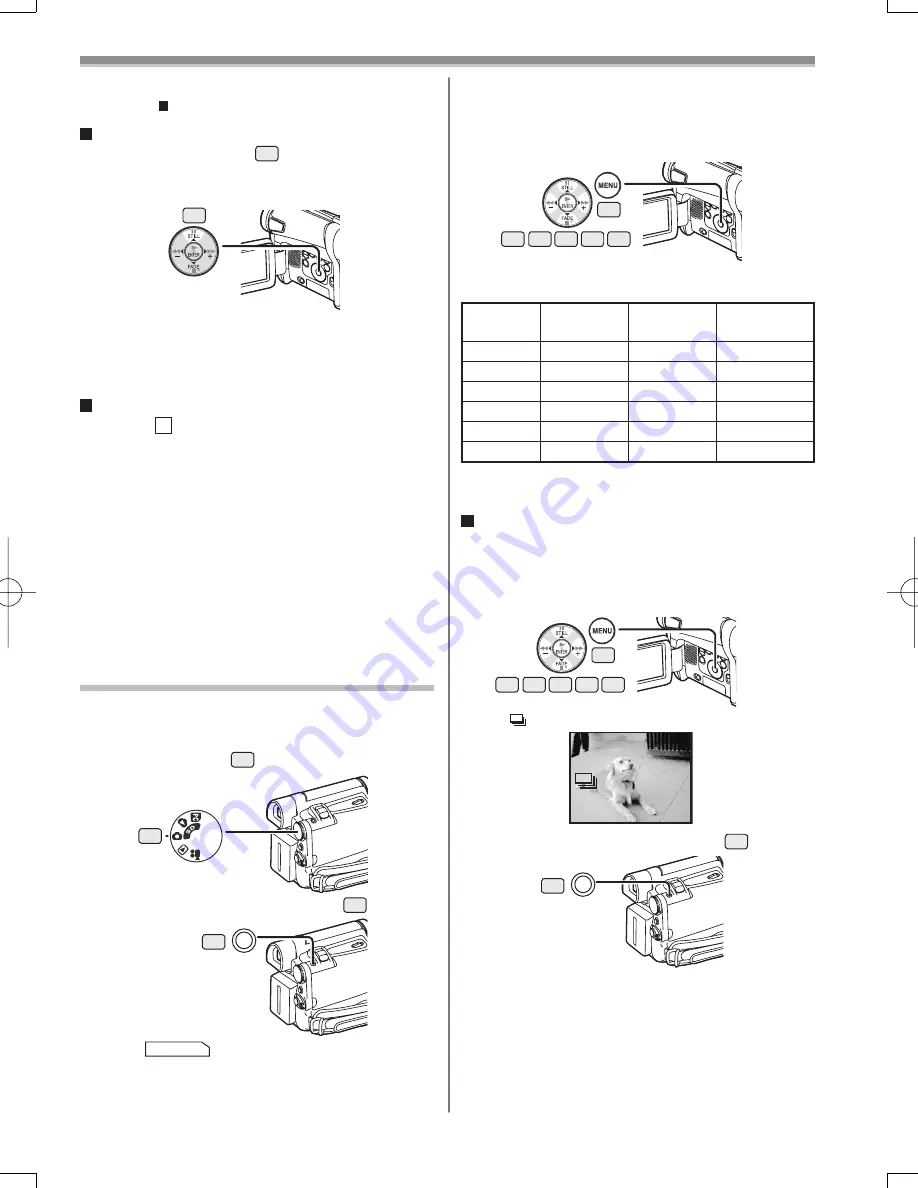
Selecting the quality of Photoshot images

1  Set [CARD RECORDING MENU] >> [CARD] 

>> [PICT QUALITY] >> a desired image 
quality.

12

36

 Recording a Still Picture on a Card 
(Photoshot)

Still pictures can be recorded on the Memory Card 
from the Camcorder.

18

13 14

12

15 16

 Progressive Photoshot

When the [ 

P

 ] Indication is displayed, Progressive 

Photoshot Function works. You can record still pictures 
with higher quality by using this function.
• The Progressive Photoshot Function may not be 

activated depending on the function you use. (p. 55)

• To record still pictures with higher quality, we 

recommend setting to the Card Recording Mode. 
(To activate the Progressive Photoshot Function 
regardless of the function you use)

• When you record onto the tape and the card 

simultaneously, the Progressive Photoshot Function 
is not activated.

33

Maximum number of still pictures recordable 
on an SD Memory card (optional)

PICTURE 

QUALITY

FINE

NORMAL

ECONOMY

16 MB

100

200

400

32 MB

220

440

880

64 MB

440

880

1 760

128 MB

880

1 760

3 520

256 MB

1 760

3 520

7 040

512 MB

3 520

7 040

14 080

• These 

fi

 gures vary depending on the subject being 

photographed.

• When [ON] is selected, the still pictures can be 

recorded in approximately 0.5 second intervals until 
the [PHOTO SHOT] Button is released or 10 pictures 
are recorded.

2  Press the [PHOTO SHOT] Button 

33

.

33

• For other notes concerning this item, see pages 

56-57.

  RapidFire Consecutive Photoshot

The still pictures can be recorded on a Card at regular 
intervals.

1  Set [CARD RECORDING MENU] >> [CARD] 

>> [BURST MODE] >> [ON].

• The [ 

 ] Indication appears.

18

13 14

12

15 16

Summary of Contents for Palmcorder MultiCam PV-GS2

Page 1: ...ions thoroughly LSQT0832 A PV GS2 Digital Video Camcorder Operating Instructions Model No Spanish Quick Use Guide is included Guía para rápida consulta en español está incluida For assistance please call 1 800 211 PANA 7262 or contact us via the web at http www panasonic com contactinfo ...

Page 2: ...s manual as your convenient Camcorder information source This symbol alerts the user that important literature concerning the operation and maintenance of this unit has been included Therefore it should be read carefully in order to avoid any problems The above markings are located on the appliance bottom cover Your Camcorder is designed to record and play back in Standard Play SP mode and Long LP...

Page 3: ...terference by one or more of the following measures Reorient or relocate the receiving antenna Increase the separation between the equipment and receiver Connect the equipment into an outlet on a circuit different from that to which the receiver is connected Consult the dealer or an experienced radio TV technician for help FCC Caution To assure continued compliance follow the attached installation...

Page 4: ... power line surges 1 Read Instructions All the safety and operating instructions should be read before the unit is operated 2 Retain Instructions The safety and operating instructions should be retained for future reference 3 Heed Warnings All warnings on the unit and in the operating instructions should be adhered to 4 Follow Instructions All operating and maintenance instructions should be follo...

Page 5: ...er and power supply should not be exposed to rain or moisture Do not connect the power supply or operate your Camcorder if it gets wet Your Camcorder has been designed for outdoor use however it is not designed to sustain direct exposure to water rain sleet snow sand dust or direct splashing from a pool or even a cup of coffee This action could permanently damage the internal parts of your Camcord...

Page 6: ...eer decompile or disassemble the Software except to the extent either of them is permitted under law or regulation of the country where Licensee resides Matsushita or its distributors or dealers will not be responsible for any defects in the Software or damage to Licensee caused by Licensee s reverse engineering decompiling or disassembly of the Software Article 6 Limitation of Liability The Softw...

Page 7: ... to Play Back 33 Slow Motion Playback Optional Remote Control Only 34 Still Playback Still Advance Playback 34 Index Search Functions Optional Remote Control Only 35 Editing Mode Recording from a Tape onto a Card 41 Recording Pictures from a Card onto a Tape 41 Audio Dubbing Optional Remote Control Only 41 Copying on an S VHS or a VHS Cassette 42 Using the DV Cable for Recording 42 PC Connection W...

Page 8: ...er is not fully opened the cassette cannot be ejected 2 Insert a Cassette 3 Close the Cassette Holder by pressing the PUSH mark 2 4 Close the Cassette Compartment Cover by pressing the mark 3 2 1 Inserting a Cassette Inserting a Card 2 Slide the OPEN Lever 3 to open the Card Slot Cover 4 3 While holding the Memory Card with its cut corner facing right 5 insert it into the Card Slot 6 4 Close the C...

Page 9: ...Lamp 2 lights up 2 Set the Mode Dial to Tape Playback Mode 3 Press the Button to rewind the tape 4 Press the Button to start playback 5 Press the Button to stop playback Playing Back a Tape 1 2 1 Set the Mode Dial to Picture Playback Mode Starting the Slide Show Playing back the next picture Playing back the previous picture Stop the Slide Show Pause the Slide Show 2 Start Playback Playing Back a ...

Page 10: ... Monitor pp 16 17 63 18 19 20 11 10 12 13 14 15 16 17 3 Card Slot Cover Open Lever OPEN p 15 4 Card Slot p 15 5 Card Slot Cover p 15 6 Speaker p 33 7 Recording Check Button p 22 Recording Button REC p 42 8 MagicPix Button MAGICPIX p 26 9 Soft Skin Button SOFT SKIN p 26 10 Backlight Button BACK LIGHT p 26 11 Card Access Lamp p 16 12 Pause Button p 23 Still Button STILL p 23 13 Fast Forward Cue Butt...

Page 11: ...iny bright or dark spots on the Viewfinder screen However this is not a malfunction and does not affect the recorded picture 41 Shoulder Strap Holders p 15 42 Grip Belt p 14 43 Battery Holder 44 Battery Eject Switch BATTERY RELEASE p 14 45 Tripod Receptacle Used for mounting the Camcorder on an optional tripod 41 42 43 44 45 38 Quick Start Recording Button QUICK START p 24 Quick Start Recording La...

Page 12: ...MENU p 17 61 62 63 64 65 66 67 68 69 70 71 The Remote Control Optional Remote Control is not supplied If you would like to order the parts number is LSSQ0411 as a replacement parts Please refer to page 69 Inserting the Button type Battery Before using the Remote Control insert a button type battery 1 While pressing the Lock Button 1 pull out the Battery Holder 2 Insert a button type battery with t...

Page 13: ...atch CHECK REMOTE MODE REMOTE Indication is displayed Setup on the Camcorder Set REMOTE on the INITIAL Sub Menu to the desired Remote Control Mode p 19 Setup on the Remote Control 15 15 15 15 1 2 29 Power Supply Using the AC Adaptor 1 Connect the DC Cable to the Camcorder 2 Connect the DC Cable to the AC Adaptor 3 Connect the AC Cable to the AC Adaptor and the AC Jack Before connecting or disconne...

Page 14: ...hown in the table are for continuous recording at a temperature of 68 F 25 C and humidity of 60 If the Battery is charged at a higher or lower temperature the charging time may be longer The available recording time becomes shorter if you use both of Viewfinder and LCD Monitor simultaneously when rotating the LCD Monitor forward to record yourself or setting EVF ON AUTO to ON 40 44 2 Attach the ch...

Page 15: ...ning the accidental erasure prevention slider 1 on the cassette by sliding it to the SAVE arrow direction prevents recording To enable recording close the accidental erasure prevention slider by sliding it to the REC arrow direction For other notes concerning this item see page 56 1 When you remove the Lens Cap press the knobs firmly Using a Memory Card Optional A Card can be used to record still ...

Page 16: ...splays inside the Viewfinder become clear and easy to read 1 Pull the Viewfinder 2 Adjust by turning the Eyepiece Corrector Knob 32 To Use the Viewfinder at the Same Time as the LCD Monitor Set LCD EVF EVF ON AUTO ON The Viewfinder does not turn off even if the LCD Monitor is opened When you turn the Camcorder off this setting is canceled Using the LCD Monitor With the LCD Monitor open you can als...

Page 17: ... facilitate the selection of a desired function or setup this Camcorder displays various function setups on Menus When operating the menu with the Viewfinder set LCD EVF EVF ON AUTO ON or rotate the LCD Monitor by 180 1 Press the MENU Button 18 18 13 14 12 15 16 2 Press the Button 12 15 to select a desired Sub Menu Press the Button to display the highlighted item 3 Press the Button 13 to display t...

Page 18: ...xplanation purposes only and they are different from the actual Menus TAPE RECORDING MENU Tape Recording Menu 1 Press the Button and select a file The selected file is marked by a frame EFFECT2 Digital Effects 2 p 30 MULTI MODE Multi Picture Mode p 31 TITLE IN Adding a Title p 38 3 CARD Card Setup Sub Menu PICT QUALITY Picture Quality p 23 CREATE TITLE Title Creation pp 37 38 4 RECORDING Recording...

Page 19: ...nstration Mode for introducing its functions If any button is pressed or operated the Demonstration Mode is canceled The Demonstration Mode can be started by setting DEMO MODE to ON and by exiting the Menu To terminate the Demonstration Mode insert a Cassette or set the DEMO MODE to OFF AV JACK AV Jack pp 11 60 REMOTE Remote Control Mode p 13 BEEP SOUND Beep Sound p 56 CLOCK SET Date and Time Sett...

Page 20: ...Time Setting p 20 INITIAL SET Initial Setting Mode p 55 TITLE BY SEL Selecting and Deleting a Title p 39 2 EDITING Editing a File Sub Menu FILE LOCK Setting the Lock p 39 DPOF SET Setting DPOF p 39 CARD FORMAT Formatting a Card p 40 3 DIGITAL Playback Digital Setup Sub Menu TITLE IN Adding a Title p 38 4 DISPLAY Display Setup Sub Menu DISPLAY Display Mode p 55 DATE TIME Date and Time Indication p ...

Page 21: ...e image quality does not decrease with the LP Mode recording mosaic pattern noise may appear on a playback image or some normal functions may be restricted The contents that are recorded in LP Mode are not completely compatible with other equipment Audio dubbing is not possible with LP Mode p 41 Audio Recording Mode The sound quality of the recorded sound can be selected with AUDIO REC on the RECO...

Page 22: ... personal computer with a USB Cable Standby mode is not available Recording on a Tape 1 Set the OFF ON Switch 40 to ON The POWER Lamp 37 lights up 2 Set the Mode Dial 36 to Tape Recording Mode 4 Press the Recording Start Stop Button 39 again to pause the recording The PAUSE Indication is displayed To Check the Recording By pressing the Button 7 briefly in the Recording Pause Mode you can play back...

Page 23: ...y by using this function The Progressive Photoshot Function may not be activated depending on the function you use p 55 To record still pictures with higher quality we recommend setting to the Card Recording Mode To activate the Progressive Photoshot Function regardless of the function you use When you record onto the tape and the card simultaneously the Progressive Photoshot Function is not activ...

Page 24: ...OFF ON Switch 40 to OFF The Quick Start Recording Lamp remains lit 3 Set the OFF ON Switch 40 to ON The Camcorder will be ready for recording in approximately 1 3 seconds For other notes concerning this item see page 57 Self timer Recording When you set the self timer the recording starts automatically after 10 seconds on the Card 1 Set TAPE RECORDING MENU or CARD RECORDING MENU CAMERA SELF TIMER ...

Page 25: ...RECORDING MENU CAMERA D ZOOM 50X or 800X 50X Digital zooming to 50X 800X Digital zooming to 800X 18 13 14 12 15 16 2 Push the W T Lever 24 towards W or towards T to zoom in or out To Cancel the Digital Zoom Function Set TAPE RECORDING MENU CAMERA D ZOOM OFF For other notes concerning this item see page 57 24 Image Stabilizer Function If the Camcorder is shaken while recording the camera shake in t...

Page 26: ...ayed The entire screen becomes brighter To Resume Normal Recording Press the BACK LIGHT Button For other notes concerning this item see page 57 15 39 10 MagicPix Function This function allows you to record color images brightly in a dark place without using the Video Flash 1 Press the MAGICPIX Button 8 To Cancel the MagicPix Function Press the MAGICPIX Button again For other notes concerning this ...

Page 27: ... optimal automatic exposure under specific recording situations 1 Set the AUTO MANUAL FOCUS Switch 17 to MANUAL 2 Set TAPE RECORDING MENU or CARD RECORDING MENU CAMERA PROG AE a desired mode or The Indication of the selected Mode appears For other notes concerning this item see pages 57 58 17 18 13 14 12 15 16 1 2 3 4 5 The MNL Indication appears 1 Sports Mode For recording scenes involving quick ...

Page 28: ...hite Balance Manually White Balance Adjustment recognizes the color of light and adjusts so that white will appear pure white The Camcorder determines the hue of light that comes through the Lens and White Balance Sensor thereby judging the recording condition and selects the closest hue setting This function is called Automatic White Balance Adjustment For light outside the functional Auto White ...

Page 29: ...ed Range of Shutter Speed Adjustment 1 60 1 8000 s in Tape Recording Mode 1 60 1 500 s in Card Recording Mode The standard shutter speed is 1 60 s Selecting a speed closer to 1 8000 causes the shutter speed to be faster To Resume Automatic Adjustment Set the AUTO MANUAL FOCUS Switch to AUTO For other notes concerning this item see page 58 17 13 14 16 Manual Iris Adjustment F Number You can use thi...

Page 30: ...de WIPE 4 Mix Mode MIX 5 Strobe Mode STROBE Records images with a stroboscopic effect 6 Trailing Effect Mode TRAIL Records images with a trailing effect 7 Mosaic Mode MOSAIC Produces a mosaic like image 8 Mirror Mode MIRROR The right half of an image becomes a mirror image of the left half 9 Stretch Mode STRETCH The picture is expanded horizontally 10 Slim Mode SLIM The picture is expanded vertica...

Page 31: ...s the MULTI Button If MANUAL has been selected press the MULTI Button after 9 pictures are displayed To Display the Multi Pictures Again Press the MULTI Button for 1 second or longer To Delete Multi Pictures One by One When pictures were captured in MANUAL When the MULTI Button is pressed for 1 second or longer while the still pictures are displayed the pictures captured last are deleted continuou...

Page 32: ...f the last recorded scene gradually fades out 1 Set TAPE RECORDING MENU DIGITAL EFFECT1 WIPE or MIX The WIPE or MIX Indication appears 2 Press the Recording Start Stop Button 39 to start recording 3 Press the Recording Start Stop Button 39 to pause the recording The last scene is stored in memory The WIPE or MIX Indication changes to WIPE or MIX 4 Press the Recording Start Stop Button 39 to restar...

Page 33: ... the volume The VOLUME indication disappears immediately after adjustment is made To adjust the volume with the Remote Control press the T or W Button to display the VOLUME Indication Press the T Button to increase the volume or press the W Button to decrease the volume The VOLUME indication disappears immediately after adjustment is made The sound volume cannot be adjusted using the Remote Contro...

Page 34: ... Slow Motion Playback proceeds in the forward direction To Resume Normal Playback Press the Button 68 If the Camcorder is left in the Slow Motion Playback Mode for more than 10 minutes the Camcorder switches to the Stop Mode to protect the video heads from excessive wear and tear Still Playback Still Advance Playback This Camcorder is capable of still picture playback and frame advance playback 1 ...

Page 35: ...Camcorder is switched from the Tape Playback Mode to Tape Recording Mode or if the date and time is set before the start of recording the index signal is not recorded Photoshot Index Search 1 Set TAPE PLAYBACK MENU PLAYBACK SEARCH PHOTO 2 Press the Button or Button 54 on the Remote Control With each press of the corresponding button still pictures recorded in Photoshot Mode are searched Scene Inde...

Page 36: ... EFFECT SEL Sub Menu on the TAPE PLAYBACK MENU To suspend Playback Digital Effect Temporarily Press the OFF ON Button 57 to suspend or restart the digital effect When the digital effect is paused temporarily the selected effect s indication flashes The same operating can be done using EFFECT ON Sub Menu on the TAPE PLAYBACK MENU To Cancel the Digital Effect Press the SELECT Button 55 repeatedly on...

Page 37: ...age 59 Slide Show The recorded still pictures in the Card can be played back like a Slide Show 1 Set the Mode Dial 36 to Picture Playback Mode 1 2 3 36 19 1 2 3 13 14 12 15 16 19 36 The selected file is marked with a frame 2 Press the Button 14 The SLIDE Indication is displayed Each of the pictures are played back for several seconds 14 To Pause the Slide Show Press the Button The SLIDE Indication...

Page 38: ...back Mode 12 2 Set CARD CREATE TITLE YES 3 Press the PHOTO SHOT Button 33 4 Select LUMINANCE and press the ENTER Button 14 then press the Button 13 or Button 16 to adjust the title contrast and press the ENTER Button 14 5 Press the Button 13 or Button 16 to adjust the color and press the ENTER Button 14 The dark portion of the image is missing 1 and the colors of the bright portion change in order...

Page 39: ...nd press the MENU Button 18 when the setup is completed Protecting the Files on a Card Lock Setting Precious files recorded on a Card can be locked to prevent accidental erasure Even if files are locked the files will be deleted if the Card is formatted 1 Set PICTURE PLAYBACK MENU EDITING FILE LOCK YES 2 Select the file to be locked and press the ENTER Button 14 The selected file is locked and the...

Page 40: ...uable pictures are stored on your PC before proceeding A Card formatted on other equipment e g PC might be unusable or it might take more time for recording We recommend that you use this equipment to format the Card To Select and Delete All Files 1 Set PICTURE PLAYBACK MENU DELETE ALL FILES YES A verification message appears 2 Select YES and press the ENTER Button 14 All files of Picture Playback...

Page 41: ...s the Button 65 on the Remote Control where you want to add new sound 2 Press the A DUB Button 51 on the Remote Control 3 To start Audio Dubbing press the Button 65 on the Remote Control To Cancel Audio Dubbing Press the Button 65 on the Remote Control The Camcorder is in the Still Playback Mode again To Play Back the Sound Recorded by 12bit Audio Dubbing Set TAPE PLAYBACK MENU PLAYBACK 12bit AUDI...

Page 42: ...a VHS Cassette Dubbing After connecting the Camcorder and the VCR as illustrated start the following procedures 1 AV Cable VIDEO IN AUDIO IN 1 Be sure to press the OSD Button p 11 on the Remote Control Optional prior to copying so that no indications are visible Otherwise the displayed tape counter and function indications are also copied VCR 4 Start recording 5 Press the Pause or Stop Button to s...

Page 43: ...e Our DVC being OHCI compliant should have no problem working with any OHCI compliant Firewire Card video Editing software package Personal Computer must be equipped with an DV Terminal During Camcorder playback do not disconnect the DV Interface Cable or turn the Camcorder off as this may cause a PC hang up error 1394 i LINK Interface must conform to OHCI Open Host Controller Interface Specificat...

Page 44: ...erating environment Despite having the Operating environment indicated it may not be possible to use the program with some types of personal computers A CD ROM drive is requires to install this program OS IBM PC AT compatible personal computer with preinstalled Microsoft Windows XP Home Edition Professional Microsoft Windows 2000 Professional Microsoft Windows Me Millennium Edition Microsoft Windo...

Page 45: ...is installed please restart your computer Reboot the computer to finish installing USB driver Installation continues after the computer reboots if you selected additional software A message indicating a conflict between versions may be displayed during the installation This will not cause a problem Simply click Yes to proceed with the installation Depending on the OS version illustrations and icon...

Page 46: ...Camcorder is in Tape Recording mode or Tape Playback Mode Panasonic DVC USB SERIAL Driver for WinXXXX COM X The numeral designation after Win will differ depending on the OS The numeral after COM will differ depending on the operating environment of your personal computer When the Camcorder is in PC Mode USB Mass Storage Device or Panasonic DV DISK Port Driver Windows Me When the Camcorder is in P...

Page 47: ...Professional Microsoft Windows Me Millennium Edition Microsoft Windows 98 Second Edition CPU Intel Pentium ll Celeron 300 MHz or higher including compatible CPU RAM 32 MB or more 64 MB or more recommended 128 MB or more required for Windows XP Free hard disk space At least 250 MB or more Ports USB Jack To use the Camcorder as a Web Camera the additional minimum requirements must be met Graphic dis...

Page 48: ...order to Personal Computer For Using as a Web Camera WEB is displayed on the LCD Monitor of the Camcorder When the Camcorder and personal computer with Windows 2000 are connected via USB Cable a message such as the one below is displayed However testing by the manufacturer has confirmed functionality of this Camcorder with Windows 2000 Click Yes and proceed If you use Windows 98SE the OS installat...

Page 49: ...up has already been done For more details please read the corresponding Help file 1 Click Click here to sign in 8 Select DVC in the Microphone menu For other information about Windows Messenger please refer to Help When access is finished close Windows Messenger then turn off the Camcorder Finally disconnect the USB Cable If the Camcorder is used as Web Camera continuously for two hours the commun...

Page 50: ...io Device in the Microphone menu 1 5 Click on Audio Tuning Wizard in the Tools menu to confirm that equipment is connected correctly Using the DV STUDIO 3 1E SE Optional Software Operating environment OS IBM PC AT compatible personal computer with preinstalled Microsoft Windows XP Home Edition Professional Microsoft Windows Me Millennium Edition Microsoft Windows 98 Second Edition CPU Intel Pentiu...

Page 51: ...he Camcorder 18 13 14 12 15 16 2 Set CAMERA or PLAYBACK USB FUNCTION DV STUDIO 3 Connect the Camcorder to your personal computer with USB Cable After reading the displayed contents please carry out the installation according to instructions This instruction manual describes only the procedures for installation connection and startup Please read the PDF based instructions for how to use the DV STUD...

Page 52: ...ng software is running the Camcorder s operation may stop midway through In this case exit the Windows Messenger or MSN Messenger reconnect the Camcorder and restart the Windows Messenger or MSN Messenger Do not delete the folders in the memory card such as picture folder Memory card may not be recognized if folders are deleted 1 About the SD Memory Card and MultiMediaCard SD Memory Card Optional ...

Page 53: ...on data such as date are not displayed Depending on the software in use the date and the time may not be displayed correctly About the compatibility of the card files Data files recorded on an SD Memory Card or a MultiMediaCard by this Camcorder conform with DCF Design rule for Camera File system established by JEITA Japan Electronics and Information Technology Industries Association If you attemp...

Page 54: ...rding Mode p 21 MF Manual Focus p 30 Back Light Mode p 26 Sports Mode Program AE p 27 Portrait Mode Program AE p 27 Low Light Mode Program AE p 27 Spotlight Mode Program AE p 27 Surf Snow Mode Program AE p 27 REC Recording p 22 PAUSE Recording Pause p 22 Self Timer Recording p 24 Playback p 33 Still Playback p 34 Fast forward Cue Playback p 33 Rewind Review Playback p 33 Slow Motion Playback p 34 ...

Page 55: ...utter speed When brightness is insufficient When the MagicPix Function is ON When the Portrait is used When using Card Recording Mode When brightness is insufficient When the MagicPix Function is ON Initializing the Modes You can change the Menu settings back to the shipping condition 1 Set INITIAL INITIAL SET YES The initializing takes a little while After the initializing is completed the COMPLE...

Page 56: ...re may be recorded after you release the PHOTO SHOT Button The RapidFire Consecutive Photoshot and Title Function cannot be used simultaneously When the SELF TIMER is set to ON the Camcorder records the maximum number of recordable pictures depending on the BURST MODE setting When using a card formatted by other equipment intervals between recorded pictures may become large NO CARD Card is not ins...

Page 57: ...n of digital zoom increases the quality of image may deteriorate White balance cannot be set in the digital zoom range Image Stabilizer Function The Image Stabilizer Function does not operate in a dimly lit place In this case the EIS Indication flashes Under fluorescent lighting image brightness may change or colors may not look natural After images may appear When a tripod is used it is recommend...

Page 58: ...e of the following operations are carried out stored images will be erased and Wipe and Mix Functions cannot be used Set another Digital Effect item Operate the OFF ON switch or Mode Dial Insert or eject a cassette The Cinema Mode and the Title Creation cannot be used simultaneously Using the Cinema Mode deactivates MULTI and P IN P of EFFECT1 Depending on the software in use the imported Cinema p...

Page 59: ...rd If a blank nothing recorded Card is played the screen becomes white If you attempt to play back a file recorded in a different format or if file data is defective the whole display becomes bluish and the UNPLAYABLE CARD Indication may appear as warning When playing back a picture recorded on other equipment its size and that of this Camcorder may appear differently When playing back a picture r...

Page 60: ...ck Zoom or Playback Title In have been used these effects are not output from the DV terminal Even if you use a device equipped with DV Terminals you may not be able to perform Digital Dubbing in some cases Date or other information to be displayed cannot be displayed if the software of the connected equipment does not support the display function Cautions for Use After Use 1 Take out the Cassette...

Page 61: ... you use your Camcorder on a beach or similar place do not let sand or fine dust get into the Camcorder Sand or dust may damage the Camcorder or Cassette Care should be taken when inserting and removing the Cassette Do not spray insecticides or volatile chemicals onto the Camcorder If the Camcorder is sprayed with such chemicals the camera body may be deformed and the surface finish may peel off D...

Page 62: ...e Cassette in its case Dust direct sunlight ultraviolet rays or humidity may damage the tape Dust contains hard mineral particles and dusty Cassettes damage the heads of the Camcorder and other components Develop a habit of returning the Cassette back to its case Causes of Dirty Heads Large quantity of dust in the air High temperature and high humidity environment Damaged tape Long operating hours...

Page 63: ... the enclosed bag Do not touch the terminals on the back of the Card with your fingers Do not allow dirt dust or water to enter it Keep the Memory Card out of reach of children to prevent swallowing LCD Monitor Viewfinder Lens Hood LCD Monitor In a place with drastic temperature changes condensation may form on the LCD Monitor Wipe it with a soft dry cloth If your Camcorder is extremely cold when ...

Page 64: ...ish to preserve the original sound be sure to select 12bit Mode at the time of recording Battery Battery runs down quickly Is the Battery fully charged Charge it with the AC Adaptor p 13 Are you using the Battery in an extremely cold place In cold places the operating time of the Battery becomes shorter p 62 Has the Battery worn out If the operating time is still too short even after the Battery i...

Page 65: ... in the task tray and follow the instructions on the screen p 46 1 2 Using the RESET button 1 Open the LCD Monitor p 16 2 Undo Grip Belt end 1 and pull Lens Cap Cord 2 downward to loosen Grip Belt 3 Use projection 3 on the Lens Cap to press the RESET Button 4 4 3 Explanation of Terms Digital Video System In a digital video system images and sounds are converted into digital signals and recorded on...

Page 66: ...n dark surroundings Because the light information that comes through the lens decreases considerably the Camcorder cannot focus correctly 4 Recording a subject that is surrounded by objects with glossy surfaces or by highly reflective objects Because the Camcorder focuses on the objects with glossy surfaces or on highly reflective objects the subject may become blurry 5 Recording a fast moving sub...

Page 67: ... Output Level 1 0 Vp p 75 ohm Audio Output Level Line 316 mV 600 ohm USB Card reader writer function USB 2 0 compliant max 12 Mbps No copyright protection support Digital Interface DV Input Output Jack IEEE1394 4 pin Power Source DC 7 2 7 8 V Power Consumption Recording 4 5 W Dimensions Approx 87 H x 69 W x 112 D mm Approx 3 3 8 H x 2 3 4 W x 4 3 8 D inch Weight Approx 0 40 kg 0 88 lbs without Bat...

Page 68: ...0 mAh 9 h Battery Pack 229 95 PV DDC9 DV Interface Cable i LINK 4 pin to 4 pin 55 00 LSSQ0411 IR Remote Control Call For Pricing RP SD64BPPA RP SD32BPPA RP SD16BPPA 64 MB SD Memory Card 32 MB SD Memory Card 16 MB SD Memory Card Call For Pricing BN SDCAPE 1B USB Reader Writer for SD Memory Card compatible with MultiMediaCard 79 95 BN SDABPE 1B SD PCMCIA Adaptor compatible with MultiMediaCard 79 95 ...

Page 69: ...quires complete street address Please photocopy this form when placing an order 2 Items Ordered 1 Camcorder Model Accessory Description Price Each Quantity Total Price Subtotal Your State Local Sales Tax Shipping Handling 6 95 Total Enclosed 3 Method of payment check one Check of Money Order enclosed NO C O D SHIPMENTS VISA MasterCard Discover Credit Card Expiration Date Customer Signature Make Ch...

Page 70: ...ely event this product needs service Please include your proof of purchase Failure to do so will delay your repair To further speed your repair please provide an explanation of what is wrong with the unit and any symptom it is exhibiting Mail this completed form and your Proof of Purchase along with your unit to Panasonic Services Company 1705 N Randall Road Elgin IL 60123 7847 Attn Camcorder Repa...

Page 71: ...Rico call Panasonic Sales Company 787 750 4300 or fax 787 768 2910 In Home service if applicable requires clear complete and easy access to the product by the authorized servicer and does not include removal or re installation of an installed product It is possible that certain in home repairs will not be completed in home but will require that the product or parts of the product be removed for sh...

Page 72: ...ry Servicenter Please carefully pack and ship prepaid and insured to the Elgin Centralized Factory Servicenter Customer s in Puerto Rico please ship or carry in to location below Service in Puerto Rico Service in Puerto Rico Matsushita Electric of Puerto Rico Inc Panasonic Sales Company Factory Servicenter Ave 65 de Infantería Km 9 5 San Gabriel Industrial Park Carolina Puerto Rico 00985 Phone 787...

Page 73: ...ivo puede no causar interferencias perjudiciales y 2 este dispositivo debe aceptar cualquier interferencia recibida incluyendo interferencias que pueden causar un funcionamiento no deseado Nota Este equipo ha sido puesto a prueba y se encontró que cumple con la Parte 15 de las reglas del FCC Estos limites están diseñados para proveer una protección razonable contra interferencias cuando se opera e...

Page 74: ...ompletamente abierta 2 Inserte un cassette 3 Cierre el soporte del cassette presionando la marca PUSH 2 4 Cierre la cubierta del compartimiento del cassette presionando la marca 3 2 1 Inserción de un cassette Inserción de una tarjeta de memoria 2 Deslice la palanca OPEN 3 para abrir la cubierta de la ranura de tarjeta 4 3 Mientras sostiene la tarjeta de memoria con su esquina cortada hacia la dere...

Page 75: ...Ajuste el interruptor OFF ON 1 a ON La lámpara POWER 2 se enciende 2 Gire el dial de modo a Modo de reproducción de cinta 3 Presione el botón para rebobinar la cinta 4 Presione el botón para comenzar la reproducción 5 Presione el botón para parar la reproducción Reproducción de una cinta 1 2 1 Gire el dial de modo a modo de reproducción de foto Comienzo de una presentación Reproducción de la foto ...

Page 76: ...de 27 M Macro Close up 25 MagicPix Function 26 Manual Focus 30 Memory Stop 66 Mirror Mode 30 Mix Mode 32 Mosaic Mode 30 Multi Picture Mode 31 N Negative Mode 30 P Photoshot 23 Picture in Picture Mode 31 Picture Size 37 Playback Digital Effects 36 Playback with Zoom Lever 34 Playback Zoom 35 Portrait Mode 27 Program AE 27 Q Quick Start 24 R RapidFire Consecutive Photoshot 23 Recording Check 22 Reco...

Reviews: